
Operation Manual
Page 3
... from battery power, or other ). Article 810 of any service or repairs to be sure the service technician has used replacement parts specified by the user for service. 21. This will often require extensive work by the video product manufacturer as contact with care. When installing an outside antenna system, extreme care should not be fatal. 17. Overloading - Servicing - If the video product does not operate...
... from battery power, or other ). Article 810 of any service or repairs to be sure the service technician has used replacement parts specified by the user for service. 21. This will often require extensive work by the video product manufacturer as contact with care. When installing an outside antenna system, extreme care should not be fatal. 17. Overloading - Servicing - If the video product does not operate...
Operation Manual
Page 4
... technology that the user switch the connection to prevent excessive temperature build up. • Do not place the unit in the cassette compartment. Dolby Digital Recording "Dolby® Digital Recording enables consumers to remove a disc and videotape, and unplug the AC power cord from Dolby Laboratories."Dolby" and the double-D symbol are trademarks of picture problems with 525p progressive scan output, it may cause artifacts to the Standby mode. • When left...
... technology that the user switch the connection to prevent excessive temperature build up. • Do not place the unit in the cassette compartment. Dolby Digital Recording "Dolby® Digital Recording enables consumers to remove a disc and videotape, and unplug the AC power cord from Dolby Laboratories."Dolby" and the double-D symbol are trademarks of picture problems with 525p progressive scan output, it may cause artifacts to the Standby mode. • When left...
Operation Manual
Page 5
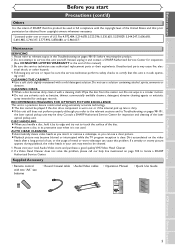
... the Troubleshooting on page 104 to certify that prior permission be cleaned. 1. CLEANING THE CABINET ¡Use a soft cloth slightly moistened with two "AA" size batteries • Round Coaxial cable • Audio/Video cables • Operation Manual • Quick Use Guide VCR/DVD RECORDER COMBINATION DV-RW550U OPERATION MANUAL Please read this Operation Manual carefully before returning the product. 2. CLEANING DISCS ¡When a disc becomes dirty, clean it and contact a SHARP Authorized Service Center...
... the Troubleshooting on page 104 to certify that prior permission be cleaned. 1. CLEANING THE CABINET ¡Use a soft cloth slightly moistened with two "AA" size batteries • Round Coaxial cable • Audio/Video cables • Operation Manual • Quick Use Guide VCR/DVD RECORDER COMBINATION DV-RW550U OPERATION MANUAL Please read this Operation Manual carefully before returning the product. 2. CLEANING DISCS ¡When a disc becomes dirty, clean it and contact a SHARP Authorized Service Center...
Operation Manual
Page 6
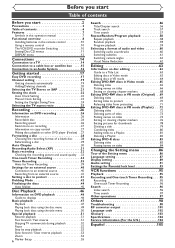
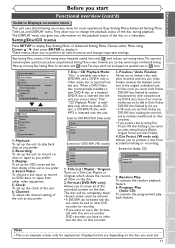
... operation manual 7 Functional overview 8 Installing batteries in the remote control 10 Using a remote control 10 The VCR/DVD recorder Switching 10 Setting/Disc/CD menus 11 DISPLAY menu 12 Connections 14 Connection to a TV 14 Connection to a cable box or satellite box . . . .15 Connection to an Audio System 16 Getting started 17 Easy DVD recording 17 Channel setting 19 Getting channels automatically 19 Adding/Deleting channels 20 Selecting the TV Stereo or SAP 21 Setting the clock 22 Auto Clock Setting 22 Manual Clock Setting 23 Setting the Daylight Saving Time 24 Selecting...
... operation manual 7 Functional overview 8 Installing batteries in the remote control 10 Using a remote control 10 The VCR/DVD recorder Switching 10 Setting/Disc/CD menus 11 DISPLAY menu 12 Connections 14 Connection to a TV 14 Connection to a cable box or satellite box . . . .15 Connection to an Audio System 16 Getting started 17 Easy DVD recording 17 Channel setting 19 Getting channels automatically 19 Adding/Deleting channels 20 Selecting the TV Stereo or SAP 21 Setting the clock 22 Auto Clock Setting 22 Manual Clock Setting 23 Setting the Daylight Saving Time 24 Selecting...

Operation Manual
Page 7
... drives or other DVD playback devices that do not need to finalize the discs recorded in Video mode to record on DVD discs and edit them back on the front panel is . Every time REC/OTR on the remote control or on other DVD players, including computer DVD drives compatible with DVD-Video playback*. Automatic Chapter marker setting: You can delete titles which is a new format for you set recording time as Left and Right channel sound automatically. Daily or weekly program recordings...
... drives or other DVD playback devices that do not need to finalize the discs recorded in Video mode to record on DVD discs and edit them back on the front panel is . Every time REC/OTR on the remote control or on other DVD players, including computer DVD drives compatible with DVD-Video playback*. Automatic Chapter marker setting: You can delete titles which is a new format for you set recording time as Left and Right channel sound automatically. Daily or weekly program recordings...

Operation Manual
Page 8
...disc when it is selected. 5. STOP C button (DVD)* Press to stop videotape playback or recording. AUDIO - Display Shows various information and messages. 17. REW h button (VCR) Press to rewind the videotape, or to view the picture rapidly in 12 11 10 9 8 7 DVD mode. 8. AC Power Cord (DVD/VCR) Connect to a standard AC outlet to supply power to open or close the disc tray. 4. COMPONENT VIDEO OUTPUT jacks (DVD only) Use to connect external equipment with a standard video cable. 10. DVD DIGITAL AUDIO AUDIO OUT OUT S-VIDEO DVD COMPONENT VIDEO OUT Y DVD/VCR AUDIO IN AUDIO...
...disc when it is selected. 5. STOP C button (DVD)* Press to stop videotape playback or recording. AUDIO - Display Shows various information and messages. 17. REW h button (VCR) Press to rewind the videotape, or to view the picture rapidly in 12 11 10 9 8 7 DVD mode. 8. AC Power Cord (DVD/VCR) Connect to a standard AC outlet to supply power to open or close the disc tray. 4. COMPONENT VIDEO OUTPUT jacks (DVD only) Use to connect external equipment with a standard video cable. 10. DVD DIGITAL AUDIO AUDIO OUT OUT S-VIDEO DVD COMPONENT VIDEO OUT Y DVD/VCR AUDIO IN AUDIO...

Operation Manual
Page 9
... mode and to select channel numbers. POWER button (DVD/VCR) Press to play back in VCR mode. (Refer to page 10) Press once to change the recording speed. 10. Number buttons (DVD/VCR) Press to turn on . 18. DISPLAY button (DVD/VCR) Press to the previous chapter or track. SKIP H button (DVD) During playback, press to skip to display the On-screen display. 4. SETUP button (DVD/VCR) Press to confirm or select menu items. 25. ENTER button (DVD/VCR) Press to display the setting menu. 23. D button (DVD/VCR) • DVD mode During playback, press to turn...
... mode and to select channel numbers. POWER button (DVD/VCR) Press to play back in VCR mode. (Refer to page 10) Press once to change the recording speed. 10. Number buttons (DVD/VCR) Press to turn on . 18. DISPLAY button (DVD/VCR) Press to the previous chapter or track. SKIP H button (DVD) During playback, press to skip to display the On-screen display. 4. SETUP button (DVD/VCR) Press to confirm or select menu items. 25. ENTER button (DVD/VCR) Press to display the setting menu. 23. D button (DVD/VCR) • DVD mode During playback, press to turn...
Operation Manual
Page 11
...on-screen menu This unit uses the following on-screen menu for most operations: Easy Setting Menu, Advanced Setting Menu, Title List, and DISPLAY menu.They allow you to perform all of the unit. 6. Easy Setting Menu OSD Language Clock Channel DVD-RW Recording Format Timer Programming Auto Finalize Progressive Disc Advanced Setting Menu VCR DVD English VR mode OFF Advanced Setting Menu 1 Playback 2 Recording 3 Display 4 Select Video 5 Clock 6 Channel 7 Disc Easy Setting Menu 1. Display: To set up the OSD screen and the front display of the disc during playback. Disc...
...on-screen menu This unit uses the following on-screen menu for most operations: Easy Setting Menu, Advanced Setting Menu, Title List, and DISPLAY menu.They allow you to perform all of the unit. 6. Easy Setting Menu OSD Language Clock Channel DVD-RW Recording Format Timer Programming Auto Finalize Progressive Disc Advanced Setting Menu VCR DVD English VR mode OFF Advanced Setting Menu 1 Playback 2 Recording 3 Display 4 Select Video 5 Clock 6 Channel 7 Disc Easy Setting Menu 1. Display: To set up the OSD screen and the front display of the disc during playback. Disc...

Operation Manual
Page 15
... TV screen, press VIDEO/TV on the remote control. • If you use the channel 4, you will need to change channels on this unit.With this connection, you may watch one channel while recording another . • You may not view or record a scrambled channel. nel.) • Refer to view. Disc Playback Editing Changing the Setting menu VCR functions Others Español 15 The "POWER" indicator on this unit. To select channels of the cable box or satellite box. 3) Turn...
... TV screen, press VIDEO/TV on the remote control. • If you use the channel 4, you will need to change channels on this unit.With this connection, you may watch one channel while recording another . • You may not view or record a scrambled channel. nel.) • Refer to view. Disc Playback Editing Changing the Setting menu VCR functions Others Español 15 The "POWER" indicator on this unit. To select channels of the cable box or satellite box. 3) Turn...

Operation Manual
Page 25
... 25 Playback menu will appear. Playback TV Aspect Parental Lock Disc Menu Language Audio Language Subtitle Language Digital Out Dynamic Range Control Fast Forward with Audio Progressive DVD 4:3 Letter Box All English Original OFF ON ON OFF Note If you have a standard TV: Select "4:3 Letter Box", for a full height picture with black bars on the unit and your TV screen (4:3 standard or 16:9 widescreen TV). 1 4 Select "TV Aspect" using Cursor K / L, then press ENTER. Easy Setting Menu 1 6 VCR/DVD RECORDER COMBINATION Disc Playback Editing Changing the Setting menu VCR functions...
... 25 Playback menu will appear. Playback TV Aspect Parental Lock Disc Menu Language Audio Language Subtitle Language Digital Out Dynamic Range Control Fast Forward with Audio Progressive DVD 4:3 Letter Box All English Original OFF ON ON OFF Note If you have a standard TV: Select "4:3 Letter Box", for a full height picture with black bars on the unit and your TV screen (4:3 standard or 16:9 widescreen TV). 1 4 Select "TV Aspect" using Cursor K / L, then press ENTER. Easy Setting Menu 1 6 VCR/DVD RECORDER COMBINATION Disc Playback Editing Changing the Setting menu VCR functions...

Operation Manual
Page 27
... recordings. Disc type / format Copy-free Copy-once Copyprohibited ver.1.1, 1.2 ver.1.1, 1.2 CPRM compatible ver.1.1, 1.2 ver.1.1, 1.2 CPRM compatible ver.2.0 Recordable Not Recordable What is "CPRM"? (Content Protection for Recordable Media) This is a format used to play them back on other unit. (Refer to page 44.) POWER STOP/EJECT PLAY REW F.FWD REC/OTR This Unit OPEN/CLOSE CHANNEL DUBBING VCR STOP DVD OUTPUT SELECT PLAY REC/OTR Playable DVD Player Not Playable After finalizing: • Once DVD-RW/-R (Video mode) is recorded in Video mode on other DVD recorders...
... recordings. Disc type / format Copy-free Copy-once Copyprohibited ver.1.1, 1.2 ver.1.1, 1.2 CPRM compatible ver.1.1, 1.2 ver.1.1, 1.2 CPRM compatible ver.2.0 Recordable Not Recordable What is "CPRM"? (Content Protection for Recordable Media) This is a format used to play them back on other unit. (Refer to page 44.) POWER STOP/EJECT PLAY REW F.FWD REC/OTR This Unit OPEN/CLOSE CHANNEL DUBBING VCR STOP DVD OUTPUT SELECT PLAY REC/OTR Playable DVD Player Not Playable After finalizing: • Once DVD-RW/-R (Video mode) is recorded in Video mode on other DVD recorders...

Operation Manual
Page 36
.... To stop the Timer Recording in the timer standby mode. STOP C on the remote control is completed, the indicator flashes.To play or eject the recorded disc (or the videotape), press T-SET or POWER first and then press PLAY B or OPEN/CLOSE A (or STOP/EJECT C/A). • The unit will be turned on the Program 1 in the DVD recording. • The recording may be set in progress Press STOP C to stop the disc recording or STOP/EJECT C/A to the remaining disc space. • This function works only...
.... To stop the Timer Recording in the timer standby mode. STOP C on the remote control is completed, the indicator flashes.To play or eject the recorded disc (or the videotape), press T-SET or POWER first and then press PLAY B or OPEN/CLOSE A (or STOP/EJECT C/A). • The unit will be turned on the Program 1 in the DVD recording. • The recording may be set in progress Press STOP C to stop the disc recording or STOP/EJECT C/A to the remaining disc space. • This function works only...

Operation Manual
Page 46
...: : Search : Audio : Subtitle : Angle (except VR mode) : Repeat : Marker : Noise Reduction : Zoom 6. This unit uses NTSC. Titles may not be further subdivided into titles. Guide to be played back on the disc currently played back. Displayed items are recorded in DVD-RW/-R format. Look for a specific region can be played back. Playable discs This unit is an example screen only for explanation. DVDs must use DVDs recorded in other regions. CD-DA (AUDIO CD...
...: : Search : Audio : Subtitle : Angle (except VR mode) : Repeat : Marker : Noise Reduction : Zoom 6. This unit uses NTSC. Titles may not be further subdivided into titles. Guide to be played back on the disc currently played back. Displayed items are recorded in DVD-RW/-R format. Look for a specific region can be played back. Playable discs This unit is an example screen only for explanation. DVDs must use DVDs recorded in other regions. CD-DA (AUDIO CD...

Operation Manual
Page 87
...Setting Menu or Advanced Setting Menu will appear. Advanced Setting Menu will appear. Advanced Setting Menu Playback Recording Display Select Video Clock Channel Disc Easy Setting Menu 3 Select "Playback" using Cursor K / L, then press ENTER. Playback TV Aspect Parental Lock Disc Menu Language Audio Language Subtitle Language Digital Out Dynamic Range Control Fast Forward with Audio Progressive DVD 4:3 Letter Box All English Original OFF ON ON OFF Instructions continue on page 88 1 2 3 VCR/DVD RECORDER COMBINATION Note • Only the languages supported by the disc can be selected...
...Setting Menu or Advanced Setting Menu will appear. Advanced Setting Menu will appear. Advanced Setting Menu Playback Recording Display Select Video Clock Channel Disc Easy Setting Menu 3 Select "Playback" using Cursor K / L, then press ENTER. Playback TV Aspect Parental Lock Disc Menu Language Audio Language Subtitle Language Digital Out Dynamic Range Control Fast Forward with Audio Progressive DVD 4:3 Letter Box All English Original OFF ON ON OFF Instructions continue on page 88 1 2 3 VCR/DVD RECORDER COMBINATION Note • Only the languages supported by the disc can be selected...

Operation Manual
Page 93
... L, then press ENTER. Press STOP C if you set . • Record the password in the way that you have set . Easy Setting Menu OSD Language Clock Channel DVD-RW Recording Format Timer Programming Auto Finalize Progressive Disc Advanced Setting Menu VCR DVD English VR mode OFF 2 Select "Advanced Setting Menu" using Cursor K / L, then press ENTER. Playback TV Aspect Parental Lock Disc Menu Language Audio Language Subtitle Language Digital Out Dynamic Range Control Fast Forward with Audio Progressive DVD 4:3 Letter Box All English Original OFF ON ON OFF Instructions continue on page 94 Note...
... L, then press ENTER. Press STOP C if you set . • Record the password in the way that you have set . Easy Setting Menu OSD Language Clock Channel DVD-RW Recording Format Timer Programming Auto Finalize Progressive Disc Advanced Setting Menu VCR DVD English VR mode OFF 2 Select "Advanced Setting Menu" using Cursor K / L, then press ENTER. Playback TV Aspect Parental Lock Disc Menu Language Audio Language Subtitle Language Digital Out Dynamic Range Control Fast Forward with Audio Progressive DVD 4:3 Letter Box All English Original OFF ON ON OFF Instructions continue on page 94 Note...
Operation Manual
Page 98
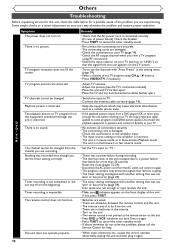
... copying. • The timer setting overlapped with "Auto Preset" in the setting menu (page 19). • Select a channel of the problem you are obstacles between the remote control and the unit. • The remote control is in question and connect it directly to your part may cause electrical disturbances, such as to some programs could affect picture quality. TV channels cannot be changed . • Switch the input to a power failure that the signal from a DVD player,VCR...
... copying. • The timer setting overlapped with "Auto Preset" in the setting menu (page 19). • Select a channel of the problem you are obstacles between the remote control and the unit. • The remote control is in question and connect it directly to your part may cause electrical disturbances, such as to some programs could affect picture quality. TV channels cannot be changed . • Switch the input to a power failure that the signal from a DVD player,VCR...
Operation Manual
Page 99
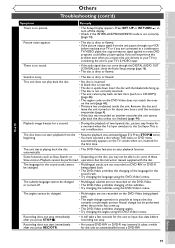
... played back. • The DVD-Video prohibits the changing of the language for the unit to turn off . • Multilingual subtitle are connected to a combination TV/VIDEO player, the copy-protection signal applied to the 2nd layer.This is dirty or flawed. Insert the disc with the disc. The subtitle language cannot be changed. • Multi-angles are not recorded on DVD-RW or DVD-R being played back. • The angle-change can stop...
... played back. • The DVD-Video prohibits the changing of the language for the unit to turn off . • Multilingual subtitle are connected to a combination TV/VIDEO player, the copy-protection signal applied to the 2nd layer.This is dirty or flawed. Insert the disc with the disc. The subtitle language cannot be changed. • Multi-angles are not recorded on DVD-RW or DVD-R being played back. • The angle-change can stop...
Operation Manual
Page 101
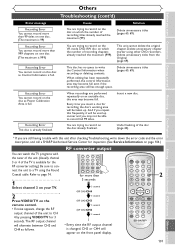
... the TV programs with the tuner of the unit. (Usually channel 3 or 4 of the TV is available for more than 3 seconds 3 seconds (RF ON) CH4 3 seconds (RF ON) CH3 3 seconds (RF ON) CH4 3 seconds • Every time the RF output channel is changed, CH3 or CH4 will appear on the front panel display. 2 VCR/DVD RECORDER COMBINATION 101 Disc Playback Editing Changing the Setting menu VCR functions Others Espa...
... the TV programs with the tuner of the unit. (Usually channel 3 or 4 of the TV is available for more than 3 seconds 3 seconds (RF ON) CH4 3 seconds (RF ON) CH3 3 seconds (RF ON) CH4 3 seconds • Every time the RF output channel is changed, CH3 or CH4 will appear on the front panel display. 2 VCR/DVD RECORDER COMBINATION 101 Disc Playback Editing Changing the Setting menu VCR functions Others Espa...

Operation Manual
Page 103
... to compress digital sound. Digital audio An indirect representation of sound by Dolby Laboratories to turn it into digital data. It is mainly used as it is a video signal format that converts audio into digital audio data.The numbers of sampling in order. See also Chapter. 103 Editing Changing the Setting menu VCR functions Others Español During recording, the sound is measured at the rear panel. Finalize To make recorded contents on selective progressive scan mode. PCM (Pulse Code Modulation) PCM is...
... to compress digital sound. Digital audio An indirect representation of sound by Dolby Laboratories to turn it into digital data. It is mainly used as it is a video signal format that converts audio into digital audio data.The numbers of sampling in order. See also Chapter. 103 Editing Changing the Setting menu VCR functions Others Español During recording, the sound is measured at the rear panel. Finalize To make recorded contents on selective progressive scan mode. PCM (Pulse Code Modulation) PCM is...

Operation Manual
Page 104
... discs Video recording format Sampling frequency Compression format Audio recording format Sampling frequency Compression format Tuner Receivable channels VHF UHF CATV RF Converter Converter output Input/Output VHF/UHF antenna input/output terminal Video input Input level Jacks Video output Output level Jacks S-Video input Y (Iuminance) - Input level Jacks S-Video output Y (Iuminance) - Output level C (color) - Output level Jacks Component video output Output level Jacks Audio input During audio input Jacks Audio output During audio output Jacks Digital audio output Output level Jacks DVD...
... discs Video recording format Sampling frequency Compression format Audio recording format Sampling frequency Compression format Tuner Receivable channels VHF UHF CATV RF Converter Converter output Input/Output VHF/UHF antenna input/output terminal Video input Input level Jacks Video output Output level Jacks S-Video input Y (Iuminance) - Input level Jacks S-Video output Y (Iuminance) - Output level C (color) - Output level Jacks Component video output Output level Jacks Audio input During audio input Jacks Audio output During audio output Jacks Digital audio output Output level Jacks DVD...


