Operation Manual
Page 10
... carefully. It will guide you for Use System connections 5 - 6 ■ Basic Operation General control 7 ■ iPod Listening to the iPod 8 - 9 ■ Advanced Feature Enhancing your SHARP product. DK-AP7N(R) DK-AP7N(S) DK-AP7N(W) ENGLISH Introduction ENGLISH Contents General Information Thank you in operating your system 10 ■ References Troubleshooting chart 11...
... carefully. It will guide you for Use System connections 5 - 6 ■ Basic Operation General control 7 ■ iPod Listening to the iPod 8 - 9 ■ Advanced Feature Enhancing your SHARP product. DK-AP7N(R) DK-AP7N(S) DK-AP7N(W) ENGLISH Introduction ENGLISH Contents General Information Thank you in operating your system 10 ■ References Troubleshooting chart 11...
Operation Manual
Page 11
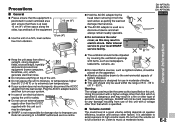
... remove the outer cover, as it may result in a fire or other factors. Listen to extremely low temperatures. ● If your local SHARP service facility. It is not responsible for safety. ● Do not use . Refer all servicing to high volume levels. DK-AP7N(R) DK-AP7N(S)...● This unit should only be used within the range of 5˚C - 35˚C (41˚F - 95˚F). Do not turn on speaker efficiency, location and various other type of accident causing damage. Using this product with a voltage other than that which generate electrical noise. ●...
... remove the outer cover, as it may result in a fire or other factors. Listen to extremely low temperatures. ● If your local SHARP service facility. It is not responsible for safety. ● Do not use . Refer all servicing to high volume levels. DK-AP7N(R) DK-AP7N(S)...● This unit should only be used within the range of 5˚C - 35˚C (41˚F - 95˚F). Do not turn on speaker efficiency, location and various other type of accident causing damage. Using this product with a voltage other than that which generate electrical noise. ●...
Operation Manual
Page 12
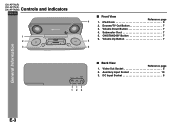
VOL + ■ Front View Reference page 4 1. iPod Dock 9 2. Volume Down Button 7 4. Video Out Socket 5 2. Auxiliary Input Socket 10 3. ESOUND/TV Out Button 7 3. ON/STAND-BY Button 7 6. DC Input Socket 5 E-3 Subwoofer Duct 7 5. Volume Up Button 7 5 6 General Information 123 ■ Back View Reference page 1. DK-AP7N(R) DK-AP7N(S) DK-AP7N(W) Controls and indicators ENGLISH 1 2 3 2.1 STEREO SPEAKER BUILT-IN SUBWOOFER ON/STAND-BY VOL -
VOL + ■ Front View Reference page 4 1. iPod Dock 9 2. Volume Down Button 7 4. Video Out Socket 5 2. Auxiliary Input Socket 10 3. ESOUND/TV Out Button 7 3. ON/STAND-BY Button 7 6. DC Input Socket 5 E-3 Subwoofer Duct 7 5. Volume Up Button 7 5 6 General Information 123 ■ Back View Reference page 1. DK-AP7N(R) DK-AP7N(S) DK-AP7N(W) Controls and indicators ENGLISH 1 2 3 2.1 STEREO SPEAKER BUILT-IN SUBWOOFER ON/STAND-BY VOL -
Operation Manual
Page 13
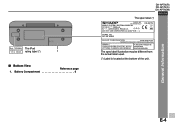
Battery Compartment 6 DK-AP7N(R) DK-AP7N(S) DK-AP7N(W) ENGLISH The spec label (*) MODEL NO. NO.DE MODELO MUSIC SYSTEM / SISTEMA MUSICAL DC IN 6V 2000 mA 6V (UM-3/SUM-3, R6/AA) x4 [DO NOT USE UNSPECIFIED AC ADAPTOR - - -] SERIAL NO. General Information E-4 The spec label illustration may be different from the actual label used. (*) Label is located at the bottom of the unit. NO. The iPod rating label (*) 1 ■ Bottom View Reference page 1. DE SERIE DK-AP7N MADE IN MALAYSIA FABRIQUÉ EN MALAISIE / FABRICADO EN MALASIA A készülék hátlapjának ...
Battery Compartment 6 DK-AP7N(R) DK-AP7N(S) DK-AP7N(W) ENGLISH The spec label (*) MODEL NO. NO.DE MODELO MUSIC SYSTEM / SISTEMA MUSICAL DC IN 6V 2000 mA 6V (UM-3/SUM-3, R6/AA) x4 [DO NOT USE UNSPECIFIED AC ADAPTOR - - -] SERIAL NO. General Information E-4 The spec label illustration may be different from the actual label used. (*) Label is located at the bottom of the unit. NO. The iPod rating label (*) 1 ■ Bottom View Reference page 1. DE SERIE DK-AP7N MADE IN MALAYSIA FABRIQUÉ EN MALAISIE / FABRICADO EN MALASIA A készülék hátlapjának ...
Operation Manual
Page 14
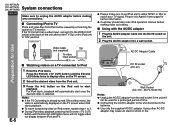
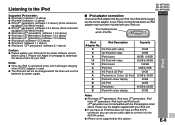
Press the ESOUND (-TV OUT) button until the ESOUND LED blinks twice will not toggle video out display between iPod and TV. ● Please make sure to set the TV Out on the iPod unit to "ON" position. Notes: ● If the TV Out setting is already turned ON at the back of time. ● Connecting the AC/DC adaptor to the unit disconnects the batteries. ● Use only the supplied AC/DC adaptor. For iPod touch, playback will automatically start playback. VIDEO OUT Video cable TV (not supplied) To video input socket Preparation for a prolonged period of the unit and set ...
Press the ESOUND (-TV OUT) button until the ESOUND LED blinks twice will not toggle video out display between iPod and TV. ● Please make sure to set the TV Out on the iPod unit to "ON" position. Notes: ● If the TV Out setting is already turned ON at the back of time. ● Connecting the AC/DC adaptor to the unit disconnects the batteries. ● Use only the supplied AC/DC adaptor. For iPod touch, playback will automatically start playback. VIDEO OUT Video cable TV (not supplied) To video input socket Preparation for a prolonged period of the unit and set ...
Operation Manual
Page 15
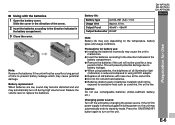
Precautions for a long period of all old batteries with the batteries 1 Open the battery cover. If the 6V DC power supply is reduced compared to the direction indicated in the battery compartment. ● Remove the batteries if the unit will not be used for battery use rechargeable batteries (nickeI-cadmium battery, etc.). Reduce the volume level or replace the batteries. Battery replacement: When batteries are low, sound may become distorted and unit may vary depending on the unit. Battery life: Battery type ALKALINE (AA) (1.5V) Usage time Approx. 8 hrs. ...
Precautions for a long period of all old batteries with the batteries 1 Open the battery cover. If the 6V DC power supply is reduced compared to the direction indicated in the battery compartment. ● Remove the batteries if the unit will not be used for battery use rechargeable batteries (nickeI-cadmium battery, etc.). Reduce the volume level or replace the batteries. Battery replacement: When batteries are low, sound may become distorted and unit may vary depending on the unit. Battery life: Battery type ALKALINE (AA) (1.5V) Usage time Approx. 8 hrs. ...
Operation Manual
Page 16
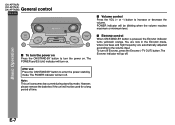
... bass and high frequency are automatically adjusted according to enter the power stand-by mode. DK-AP7N(R) DK-AP7N(S) DK-AP7N(W) General control ENGLISH 2.1 STEREO SPEAKER BUILT-IN SUBWOOFER ■ Volume control Press the VOL (+ or -) button to turn the power on . ■ ESOUND control When ON/STAND-BY button is...
... bass and high frequency are automatically adjusted according to enter the power stand-by mode. DK-AP7N(R) DK-AP7N(S) DK-AP7N(W) General control ENGLISH 2.1 STEREO SPEAKER BUILT-IN SUBWOOFER ■ Volume control Press the VOL (+ or -) button to turn the power on . ■ ESOUND control When ON/STAND-BY button is...
Operation Manual
Page 17
... Supported iPod models: ● iPod nano (software 1.2 above) ● iPod mini (software 1.2 above) ● iPod (5th generation) (software 1.3 above) (Dock connector equipped Click Wheel model) ● iPod (4th generation) (software 3.0.2 above) (Dock connector equipped Click Wheel model) ● iPod nano (2nd generation) (software 1.0.0 above) ● iPod nano (3rd generation) (software 1.0.3 above) ●...
... Supported iPod models: ● iPod nano (software 1.2 above) ● iPod mini (software 1.2 above) ● iPod (5th generation) (software 1.3 above) (Dock connector equipped Click Wheel model) ● iPod (4th generation) (software 3.0.2 above) (Dock connector equipped Click Wheel model) ● iPod nano (2nd generation) (software 1.0.0 above) ● iPod nano (3rd generation) (software 1.0.3 above) ●...
Operation Manual
Page 18
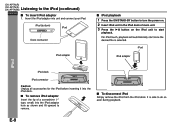
...is selected. DK-AP7N(R) DK-AP7N(S) DK-AP7N(W) Listening to remove. ■ To disconnect iPod Simply remove the iPod from the iPod dock. Insert the iPod adaptor into the iPod dock. ■ To remove iPod adaptor Insert the tip of main unit. 3 Press the playback. E-9 button on . 2 Insert iPod unit...) into the iPod adaptor hole as shown and lift upward to the iPod (continued) ENGLISH ■ To insert iPod adaptor 1. iPod (bottom) iPod Dock connector iPod adaptor ■ iPod playback 1 Press the ON/STAND-BY button to turn the power on the iPod unit to start For iPod touch...
...is selected. DK-AP7N(R) DK-AP7N(S) DK-AP7N(W) Listening to remove. ■ To disconnect iPod Simply remove the iPod from the iPod dock. Insert the iPod adaptor into the iPod dock. ■ To remove iPod adaptor Insert the tip of main unit. 3 Press the playback. E-9 button on . 2 Insert iPod unit...) into the iPod adaptor hole as shown and lift upward to the iPod (continued) ENGLISH ■ To insert iPod adaptor 1. iPod (bottom) iPod Dock connector iPod adaptor ■ iPod playback 1 Press the ON/STAND-BY button to turn the power on the iPod unit to start For iPod touch...
Operation Manual
Page 19
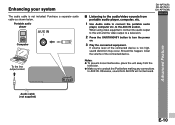
... Advanced Feature Audio cable (not supplied) E-10 Enhancing your system The audio cable is too high, sound distortion may occur. to connect the portable audio player, computer etc. When using video equipment, connect the audio output to turn the power on. 3 Play the connected equipment. DK-AP7N(R) DK-...AP7N(S) DK-AP7N(W) ENGLISH Notes: ● To prevent noise interference, place the unit away from portable audio player, computer, etc. 1 Use Audio cable to the AUX IN socket. Otherwise, sound from AUX IN will not be heard.
... Advanced Feature Audio cable (not supplied) E-10 Enhancing your system The audio cable is too high, sound distortion may occur. to connect the portable audio player, computer etc. When using video equipment, connect the audio output to turn the power on. 3 Play the connected equipment. DK-AP7N(R) DK-...AP7N(S) DK-AP7N(W) ENGLISH Notes: ● To prevent noise interference, place the unit away from portable audio player, computer, etc. 1 Use Audio cable to the AUX IN socket. Otherwise, sound from AUX IN will not be heard.
Operation Manual
Page 20
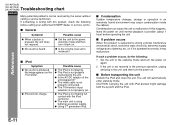
...external interference (mechanical shock, excessive static electricity, abnormal supply voltage due to malfunction. If such a problem occurs, do the following before calling your authorised SHARP dealer or service centre. ■ General Symptom Possible cause ● When a button is pressed, the unit does not respond. ● Set the... unit to the stand-by mode and then turn the power on until normal playback is not making full contact with iPod docked might damage both the system and the iPod. No image appears on . ● No sound is heard. ● Is the volume ...
...external interference (mechanical shock, excessive static electricity, abnormal supply voltage due to malfunction. If such a problem occurs, do the following before calling your authorised SHARP dealer or service centre. ■ General Symptom Possible cause ● When a button is pressed, the unit does not respond. ● Set the... unit to the stand-by mode and then turn the power on until normal playback is not making full contact with iPod docked might damage both the system and the iPod. No image appears on . ● No sound is heard. ● Is the volume ...
Operation Manual
Page 21
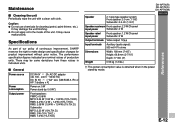
... W) (1% T.H.D.) Subwoofer: MPO: 2.23 W (10% T.H.D.) RMS: 2 W (10% T.H.D.) RMS: 1.6 W (1% T.H.D.) Speaker 2.1-way type speaker system Front speaker: 3.0 cm (1-1/8") Subwoofer: 4.6 cm (1-3/4") Speakermaximum Front speaker: 2.0 W/Channel input power Subwoofer: 4 W Speaker rated input power Front speaker: 1.2 W/Channel Subwoofer: 2 W Output terminals Video output: 1Vp-p Input terminals Auxiliary (audio signal): 500 mV/47 k ohms ... Specifications As part of our policy of continuous improvement, SHARP reserves the right to the inside of production units. The performance speci...
... W) (1% T.H.D.) Subwoofer: MPO: 2.23 W (10% T.H.D.) RMS: 2 W (10% T.H.D.) RMS: 1.6 W (1% T.H.D.) Speaker 2.1-way type speaker system Front speaker: 3.0 cm (1-1/8") Subwoofer: 4.6 cm (1-3/4") Speakermaximum Front speaker: 2.0 W/Channel input power Subwoofer: 4 W Speaker rated input power Front speaker: 1.2 W/Channel Subwoofer: 2 W Output terminals Video output: 1Vp-p Input terminals Auxiliary (audio signal): 500 mV/47 k ohms ... Specifications As part of our policy of continuous improvement, SHARP reserves the right to the inside of production units. The performance speci...