
ARBC260 Operation Manual
Page 5
... functions are the same regardless of the peripheral devices that can be available in the manual may not be installed, see "Part names and functions of the manual explains how to product improvements and modifications. G Operation manual (for facsimile): This manual explains... second half of peripheral devices" (1-6). 0-1 NOTES G Considerable care has been taken in separate manuals. If you wish to your nearest SHARP Service Department. G This product has undergone strict quality control and inspection procedures. The display screens, messages, and key names shown in ...
... functions are the same regardless of the peripheral devices that can be available in the manual may not be installed, see "Part names and functions of the manual explains how to product improvements and modifications. G Operation manual (for facsimile): This manual explains... second half of peripheral devices" (1-6). 0-1 NOTES G Considerable care has been taken in separate manuals. If you wish to your nearest SHARP Service Department. G This product has undergone strict quality control and inspection procedures. The display screens, messages, and key names shown in ...
ARBC260 Operation Manual
Page 9
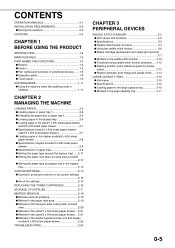
...0-2 G Moving this machine 0-3 CAUTIONS 0-4 CHAPTER 1 BEFORE USING THE PRODUCT INTRODUCTION 1-2 MAIN FEATURES 1-2 PART NAMES AND FUNCTIONS 1-4 G Exterior 1-4 G Interior 1-5 G Part names and functions of peripheral devices........1-6 G Operation panel 1-8 G Touch panel 1-9 AUDITING MODE 1-11 G...inverter unit and duplex module/2 x 500 sheet paper drawer 2-22 TROUBLESHOOTING 2-24 CHAPTER 3 PERIPHERAL DEVICES SADDLE STITCH FINISHER 3-2 G Part names and functions 3-2 G Specifications 3-2 G Saddle stitch finisher functions 3-4 G Using the saddle stitch finisher 3-6 G Staple cartridge ...
...0-2 G Moving this machine 0-3 CAUTIONS 0-4 CHAPTER 1 BEFORE USING THE PRODUCT INTRODUCTION 1-2 MAIN FEATURES 1-2 PART NAMES AND FUNCTIONS 1-4 G Exterior 1-4 G Interior 1-5 G Part names and functions of peripheral devices........1-6 G Operation panel 1-8 G Touch panel 1-9 AUDITING MODE 1-11 G...inverter unit and duplex module/2 x 500 sheet paper drawer 2-22 TROUBLESHOOTING 2-24 CHAPTER 3 PERIPHERAL DEVICES SADDLE STITCH FINISHER 3-2 G Part names and functions 3-2 G Specifications 3-2 G Saddle stitch finisher functions 3-4 G Using the saddle stitch finisher 3-6 G Staple cartridge ...
ARBC260 Operation Manual
Page 10
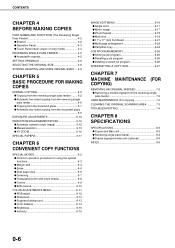
CONTENTS CHAPTER 4 BEFORE MAKING COPIES PART NAMES AND FUNCTIONS (The Reversing Single Pass Feeder 4-2 G Exterior 4-2 G Operation Panel 4-3 G Touch Panel (main screen of copy mode 4-4 REVERSING SINGLE PASS ...shift 6-4 G Erase 6-5 G Dual page copy 6-6 G Centering 6-7 G Transparency film with insert sheets 6-8 G Covers 6-9 G B/W reverse 6-10 COLOR ADJUSTMENTS MENU 6-11 G RGB adjust 6-12 G Sharpness 6-13 G Suppress background 6-13 G Color balance 6-14 G Brightness 6-15 G Intensity 6-15 IMAGE EDIT MENU 6-16 G Single color 6-17 G Mirror image 6-17 G Photo Repeat 6-18 G Multi...
CONTENTS CHAPTER 4 BEFORE MAKING COPIES PART NAMES AND FUNCTIONS (The Reversing Single Pass Feeder 4-2 G Exterior 4-2 G Operation Panel 4-3 G Touch Panel (main screen of copy mode 4-4 REVERSING SINGLE PASS ...shift 6-4 G Erase 6-5 G Dual page copy 6-6 G Centering 6-7 G Transparency film with insert sheets 6-8 G Covers 6-9 G B/W reverse 6-10 COLOR ADJUSTMENTS MENU 6-11 G RGB adjust 6-12 G Sharpness 6-13 G Suppress background 6-13 G Color balance 6-14 G Brightness 6-15 G Intensity 6-15 IMAGE EDIT MENU 6-16 G Single color 6-17 G Mirror image 6-17 G Photo Repeat 6-18 G Multi...

ARBC260 Operation Manual
Page 11
Page INTRODUCTION 1-2 MAIN FEATURES 1-2 PART NAMES AND FUNCTIONS 1-4 G Exterior 1-4 G Interior ...1-5 G Part names and functions of peripheral devices 1-6 G Operation panel 1-8 G Touch panel 1-9 AUDITING MODE 1-11 G Using the machine when the auditing mode is enabled 1-11 1-1 CHAPTER 1 BEFORE USING THE PRODUCT This chapter contains basic information that should be read before using the product.
Page INTRODUCTION 1-2 MAIN FEATURES 1-2 PART NAMES AND FUNCTIONS 1-4 G Exterior 1-4 G Interior ...1-5 G Part names and functions of peripheral devices 1-6 G Operation panel 1-8 G Touch panel 1-9 AUDITING MODE 1-11 G Using the machine when the auditing mode is enabled 1-11 1-1 CHAPTER 1 BEFORE USING THE PRODUCT This chapter contains basic information that should be read before using the product.

ARBC260 Operation Manual
Page 14
PART NAMES AND FUNCTIONS Exterior Left tray (See page 5-5) Finished sheets are deposited here. Operation panel Center tray (See page 5-5) Finished sheets are deposited here. Reversing ... to open the left side cover. Power switch Press to be fed from the bypass tray. For a description of the recommended paper for support of SHARP standard paper (21 lbs. Bypass tray Special papers (including transparency film) and copy paper can turn power on and off. The feeder can be scanned...
PART NAMES AND FUNCTIONS Exterior Left tray (See page 5-5) Finished sheets are deposited here. Operation panel Center tray (See page 5-5) Finished sheets are deposited here. Reversing ... to open the left side cover. Power switch Press to be fed from the bypass tray. For a description of the recommended paper for support of SHARP standard paper (21 lbs. Bypass tray Special papers (including transparency film) and copy paper can turn power on and off. The feeder can be scanned...
ARBC260 Operation Manual
Page 15
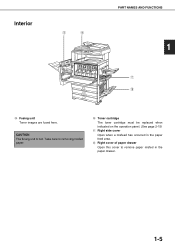
CAUTION The fusing unit is hot. Take care in the paper feed area. Toner cartridge The toner cartridge must be replaced when indicated on the operation panel. (See page 2-15) Right side cover Open when a misfeed has occurred in removing misfed paper. Right cover of paper drawer Open this cover to remove paper misfed in the paper drawer. 1-5 Interior PART NAMES AND FUNCTIONS 1 Fusing unit Toner images are fused here.
CAUTION The fusing unit is hot. Take care in the paper feed area. Toner cartridge The toner cartridge must be replaced when indicated on the operation panel. (See page 2-15) Right side cover Open when a misfeed has occurred in removing misfed paper. Right cover of paper drawer Open this cover to remove paper misfed in the paper drawer. 1-5 Interior PART NAMES AND FUNCTIONS 1 Fusing unit Toner images are fused here.
ARBC260 Operation Manual
Page 16
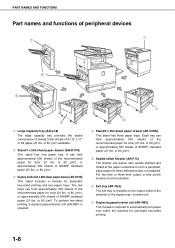
... printing. 1-6 or 80 g/m2). To perform two-sided printing, a duplex bypass/inverter unit (AR-RB1) is installed on the output outlet of SHARP standard paper (21 lbs. PART NAMES AND FUNCTIONS Part names and functions of peripheral devices Large Capacity tray (AR-LC8) The large capacity tray provides the added convenience of having 3,500 sheets...
... printing. 1-6 or 80 g/m2). To perform two-sided printing, a duplex bypass/inverter unit (AR-RB1) is installed on the output outlet of SHARP standard paper (21 lbs. PART NAMES AND FUNCTIONS Part names and functions of peripheral devices Large Capacity tray (AR-LC8) The large capacity tray provides the added convenience of having 3,500 sheets...
ARBC260 Operation Manual
Page 17
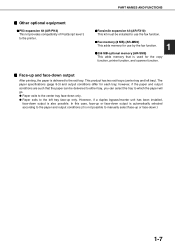
PART NAMES AND FUNCTIONS I Face-up and face-down output After printing, the paper is ...such that is delivered to the left tray). G Paper exits to the exit tray. GFax memory (8 MB) (AR-MM9) This adds memory for each tray; The paper specifications (page 8-3) and output conditions differ for use the fax function....center tray face-down output is automatically selected according to which the paper will go. I Other optional equipment GPS3 expansion kit (AR-PK4) This kit provides compatibility of PostScript level 3 to manually select face-up or face-down.) 1-7 However, if a duplex...
PART NAMES AND FUNCTIONS I Face-up and face-down output After printing, the paper is ...such that is delivered to the left tray). G Paper exits to the exit tray. GFax memory (8 MB) (AR-MM9) This adds memory for each tray; The paper specifications (page 8-3) and output conditions differ for use the fax function....center tray face-down output is automatically selected according to which the paper will go. I Other optional equipment GPS3 expansion kit (AR-PK4) This kit provides compatibility of PostScript level 3 to manually select face-up or face-down.) 1-7 However, if a duplex...
ARBC260 Operation Manual
Page 18
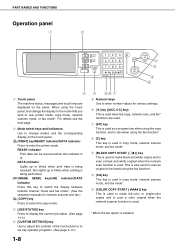
... the panel. Also lights up or blinks when print data is being performed. [IMAGE SEND] key/LINE indicator/DATA indicator Press this indicator is used. PART NAMES AND FUNCTIONS Operation panel Touch panel The machine status, messages and touch keys are used. [#/P] key This is used as a program key when using...
... the panel. Also lights up or blinks when print data is being performed. [IMAGE SEND] key/LINE indicator/DATA indicator Press this indicator is used. PART NAMES AND FUNCTIONS Operation panel Touch panel The machine status, messages and touch keys are used. [#/P] key This is used as a program key when using...
ARBC260 Operation Manual
Page 19
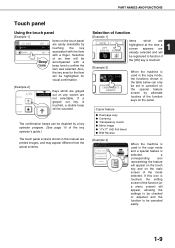
... TRANSPARENCY INSERTS When the machine is touched, the setting screen of an item will be highlighted for the item will be registered to be sounded. PART NAMES AND FUNCTIONS Touch panel Using the touch panel [Example 1] Items on the touch panel JOB QUEUE COPY Suzuki 0666211221 SETS / PRO 003 / 00 003...
... TRANSPARENCY INSERTS When the machine is touched, the setting screen of an item will be highlighted for the item will be registered to be sounded. PART NAMES AND FUNCTIONS Touch panel Using the touch panel [Example 1] Items on the touch panel JOB QUEUE COPY Suzuki 0666211221 SETS / PRO 003 / 00 003...
ARBC260 Operation Manual
Page 20
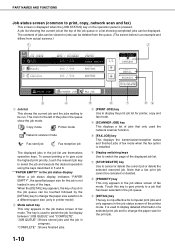
... waiting to be canceled or deleted. [PRIORITY] key This only appears in the job status screen of the jobs in any of the printer mode. PART NAMES AND FUNCTIONS Job status screen (common to print, copy, network scan and fax) This screen is displayed when the [JOB STATUS] key on the...
... waiting to be canceled or deleted. [PRIORITY] key This only appears in the job status screen of the jobs in any of the printer mode. PART NAMES AND FUNCTIONS Job status screen (common to print, copy, network scan and fax) This screen is displayed when the [JOB STATUS] key on the...
ARBC260 Operation Manual
Page 24
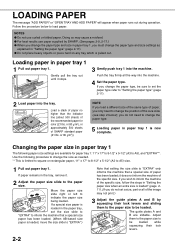
Doing so may not print.) 3 Adjust the guide plates A and B by SHARP. (See pages 2-9, 2-17.) G When you change the paper type and size in paper tray 1, you change ... size is now complete. If you wish to change the paper type. 5 Loading paper in the paper tray, set a size, part or all the way into the machine. 4 Set the paper type. NOTES G Do not use paper supplied by squeezing their lock levers... ADD PAPER" will appear when paper runs out during operation. If you must change the position of SHARP standard paper (21 lbs. Use the following paper size settings are slidable.
Doing so may not print.) 3 Adjust the guide plates A and B by SHARP. (See pages 2-9, 2-17.) G When you change the paper type and size in paper tray 1, you change ... size is now complete. If you wish to change the paper type. 5 Loading paper in the paper tray, set a size, part or all the way into the machine. 4 Set the paper type. NOTES G Do not use paper supplied by squeezing their lock levers... ADD PAPER" will appear when paper runs out during operation. If you must change the position of SHARP standard paper (21 lbs. Use the following paper size settings are slidable.

ARBC260 Operation Manual
Page 26
... the copy paper. 3 Insert the copy paper all the way into the bypass tray. (Do not force the paper in the bypass tray, set a size, part or all the way out, the size of the image may cause misfeeds in the bypass tray. If the tray extension is not pulled all... of the paper loaded in the paper tray specifications (page 2-9). Multiple sheets of SHARP recommended transparency film can be loaded in the bypass tray. 4 Set the type and size of the tray, pull out the tray extension to support...
... the copy paper. 3 Insert the copy paper all the way into the bypass tray. (Do not force the paper in the bypass tray, set a size, part or all the way out, the size of the image may cause misfeeds in the bypass tray. If the tray extension is not pulled all... of the paper loaded in the paper tray specifications (page 2-9). Multiple sheets of SHARP recommended transparency film can be loaded in the bypass tray. 4 Set the type and size of the tray, pull out the tray extension to support...
ARBC260 Operation Manual
Page 28
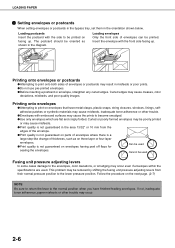
... position when you have metal clasps, plastic snaps, string closures, windows, linings, self- Curled or poorly formed envelopes may be printed. Follow the procedure on parts of envelopes can be poorly printed or may result in the area 13/32" or 10 mm from their normal pressure position to print onto...
... position when you have metal clasps, plastic snaps, string closures, windows, linings, self- Curled or poorly formed envelopes may be printed. Follow the procedure on parts of envelopes can be poorly printed or may result in the area 13/32" or 10 mm from their normal pressure position to print onto...

ARBC260 Operation Manual
Page 39
... toner cartridge box horizontally. Consumables too, are those parts which are not to maximize the life and performance of Sharp products. Spare parts are available for 7 years following the termination of production. whereas those parts of the apparatus which may break down within the scope... of the ordinary use only Sharp Genuine Supplies which normally exceed the ...
... toner cartridge box horizontally. Consumables too, are those parts which are not to maximize the life and performance of Sharp products. Spare parts are available for 7 years following the termination of production. whereas those parts of the apparatus which may break down within the scope... of the ordinary use only Sharp Genuine Supplies which normally exceed the ...
ARBC260 Operation Manual
Page 42
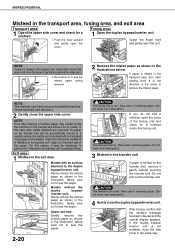
... of this page). CAUTION The fusing unit is hot. CAUTION The transfer unit is hot. Take care in removing paper. (Do not touch any metal parts.) 4 Gently close the side cover in the same way. If the duplex bypass/ inverter unit is not installed, close the duplex bypass/inverter unit. Fusing... not pull out the transfer unit. Grasp the finger hold and gently open the cover. Take care in removing paper. (Do not touch any metal parts.) If you do not find a misfeed, open the cover of the arrow to a position where it . 2 Gently close the bypass tray before opening the side...
... of this page). CAUTION The fusing unit is hot. CAUTION The transfer unit is hot. Take care in removing paper. (Do not touch any metal parts.) 4 Gently close the side cover in the same way. If the duplex bypass/ inverter unit is not installed, close the duplex bypass/inverter unit. Fusing... not pull out the transfer unit. Grasp the finger hold and gently open the cover. Take care in removing paper. (Do not touch any metal parts.) If you do not find a misfeed, open the cover of the arrow to a position where it . 2 Gently close the bypass tray before opening the side...
ARBC260 Operation Manual
Page 44
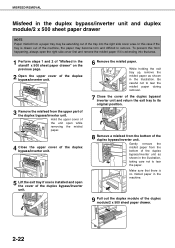
... stand/1 x 500 sheet paper drawer" on the previous page. 2 Open the upper cover of the duplex bypass/inverter unit. 3 Remove the misfeed from the upper part of the duplex bypass/inverter unit. Be careful not to tear the misfed paper during removal. 7 Close the cover of the duplex bypass/ inverter unit...
... stand/1 x 500 sheet paper drawer" on the previous page. 2 Open the upper cover of the duplex bypass/inverter unit. 3 Remove the misfeed from the upper part of the duplex bypass/inverter unit. Be careful not to tear the misfed paper during removal. 7 Close the cover of the duplex bypass/ inverter unit...
ARBC260 Operation Manual
Page 47
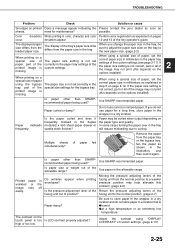
... step 6 on a special size of paper using "DISPLAY CONTRAST" of the allowable range? Is paper other than SHARPrecommended paper being used ? Use SHARP-recommended paper. Multiple sheets of the key operator's guide. Is paper size or weight out of custom settings. (page 2-13) 2-25 Adjust the... tray, fan the paper as sheets. Be sure to the new paper size. (page 2-2) When printing on a special size of paper, part of the image may help alleviate this depends on pages deviations appear. 12 and 13 of paper fed simultaneously? Paper curled or damp? Printed...
... step 6 on a special size of paper using "DISPLAY CONTRAST" of the allowable range? Is paper other than SHARPrecommended paper being used ? Use SHARP-recommended paper. Multiple sheets of the key operator's guide. Is paper size or weight out of custom settings. (page 2-13) 2-25 Adjust the... tray, fan the paper as sheets. Be sure to the new paper size. (page 2-2) When printing on a special size of paper, part of the image may help alleviate this depends on pages deviations appear. 12 and 13 of paper fed simultaneously? Paper curled or damp? Printed...
ARBC260 Operation Manual
Page 49
Page SADDLE STITCH FINISHER 3-2 G Part names and functions 3-2 G Specifications 3-2 G Saddle stitch finisher functions 3-4 G Using the saddle stitch finisher 3-6 G Staple cartridge replacement and staple jam removal 3-7 G Misfeed ...17 3-1 CHAPTER 3 PERIPHERAL DEVICES This chapter explains procedures for duplex output 3-13 G Relation between print image and saddle stitch 3-14 LARGE CAPACITY TRAY 3-15 G Part name 3-15 G Specifications 3-15 G Loading paper in the large capacity tray 3-16 G Misfeed in the saddle stitch finisher 3-10 G Troubleshooting saddle stitch finisher problems...
Page SADDLE STITCH FINISHER 3-2 G Part names and functions 3-2 G Specifications 3-2 G Saddle stitch finisher functions 3-4 G Using the saddle stitch finisher 3-6 G Staple cartridge replacement and staple jam removal 3-7 G Misfeed ...17 3-1 CHAPTER 3 PERIPHERAL DEVICES This chapter explains procedures for duplex output 3-13 G Relation between print image and saddle stitch 3-14 LARGE CAPACITY TRAY 3-15 G Part name 3-15 G Specifications 3-15 G Loading paper in the large capacity tray 3-16 G Misfeed in the saddle stitch finisher 3-10 G Troubleshooting saddle stitch finisher problems...
ARBC260 Operation Manual
Page 50
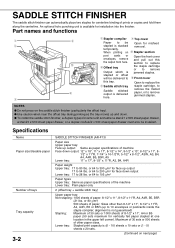
Part names and functions Stapler compiler Paper to 54 lbs. Offset tray Output which is stacked temporarily. Top cover Open for misfeed removal. Stapler section Open the front cover and pull out this tray. Specifications Name Paper size/Useable paper Number of trays Tray capacity 3-2 SADDLE STITCH FINISHER (AR-F13) Paper size Upper...
Part names and functions Stapler compiler Paper to 54 lbs. Offset tray Output which is stacked temporarily. Top cover Open for misfeed removal. Stapler section Open the front cover and pull out this tray. Specifications Name Paper size/Useable paper Number of trays Tray capacity 3-2 SADDLE STITCH FINISHER (AR-F13) Paper size Upper...


