

AR-5316 Operation Manual
Page 2
FOR YOUR RECORDS ... G Money G Stamps G Bonds G Stocks G Bank drafts G Checks G Passports G Driver's licenses To protect against loss or theft, record and retain for reference the copier's serial number located on the back of anything which is prohibited from copying by national law. Model Number Serial Number Date of Purchase Place of Purchase Authorized Sharp Copier Service Department Number Do not make copies of the unit. Other items may be prohibited by law. The following items are normally prohibited from copying by local law.
FOR YOUR RECORDS ... G Money G Stamps G Bonds G Stocks G Bank drafts G Checks G Passports G Driver's licenses To protect against loss or theft, record and retain for reference the copier's serial number located on the back of anything which is prohibited from copying by national law. Model Number Serial Number Date of Purchase Place of Purchase Authorized Sharp Copier Service Department Number Do not make copies of the unit. Other items may be prohibited by law. The following items are normally prohibited from copying by local law.
AR-5316 Operation Manual
Page 9
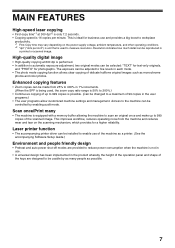
... once and make up to 999 copies of the scanned image. Scan once/Print many people as possible. 7 Laser printer function • The accompanying printer driver can be installed to enable use of the machine as a printer. (See the accompanying Software Setup Guide.) Environment and people friendly design • Preheat and...
... once and make up to 999 copies of the scanned image. Scan once/Print many people as possible. 7 Laser printer function • The accompanying printer driver can be installed to enable use of the machine as a printer. (See the accompanying Software Setup Guide.) Environment and people friendly design • Preheat and...
AR-5316 Operation Manual
Page 19
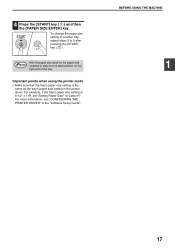
For example, if the tray's paper size setting is the same as the tray's paper size setting in the printer driver. Important points when using the printer mode • Make sure that the tray's paper size setting is 8-1/2" x 11R, set "Setting Paper Size" to "Letter-R". 4 ... ENTER] key. Note Affix the paper size label for the paper size selected in the "Software Setup Guide". For more information, see "CONFIGURING THE PRINTER DRIVER" in step 3 to 5 after pressing the [START] key ( ). BEFORE USING THE MACHINE 1 17 START To change the paper size setting of another tray, repeat ...
For example, if the tray's paper size setting is the same as the tray's paper size setting in the printer driver. Important points when using the printer mode • Make sure that the tray's paper size setting is 8-1/2" x 11R, set "Setting Paper Size" to "Letter-R". 4 ... ENTER] key. Note Affix the paper size label for the paper size selected in the "Software Setup Guide". For more information, see "CONFIGURING THE PRINTER DRIVER" in step 3 to 5 after pressing the [START] key ( ). BEFORE USING THE MACHINE 1 17 START To change the paper size setting of another tray, repeat ...

AR-5316 Operation Manual
Page 31
... convenient printer functions, see "TROUBLESHOOTING" (p.40). • When interrupt copying is being performed, printing is the same as explained in the printer driver. When the copy job is finished, the print jobs will begin printing. When the indicator is blinking, a print job is transferred to the ... to a usable state. USING THE PRINTER MODE The procedure for printing is loaded in printer mode, see the "Online Manual" or the printer driver help file. 5 Click the "Print" button or the "OK" button to the paper output tray. Important points when setting the paper size...
... convenient printer functions, see "TROUBLESHOOTING" (p.40). • When interrupt copying is being performed, printing is the same as explained in the printer driver. When the copy job is finished, the print jobs will begin printing. When the indicator is blinking, a print job is transferred to the ... to a usable state. USING THE PRINTER MODE The procedure for printing is loaded in printer mode, see the "Online Manual" or the printer driver help file. 5 Click the "Print" button or the "OK" button to the paper output tray. Important points when setting the paper size...

AR-5316 Operation Manual
Page 46
... The machine does not print. (ON LINE indicator was blinking.) Cause and solution The machine is shown but you have selected "SHARP AR-5316" printer displayed in the printer driver. The tray size settings are not the same on the machine, see the "CHANGING A TRAY'S PAPER SIZE SETTING" or see...click "Printers and Faxes". (On Windows 95/98/Me/NT 4.0/2000, click the "Start" button, select "Settings" and then click "Printers".) 2 The "SHARP AR-5316" printer driver icon is not shown. 3 If the icon is set on the ON LINE indicator. You can also be sure you have a solid connection.
... The machine does not print. (ON LINE indicator was blinking.) Cause and solution The machine is shown but you have selected "SHARP AR-5316" printer displayed in the printer driver. The tray size settings are not the same on the machine, see the "CHANGING A TRAY'S PAPER SIZE SETTING" or see...click "Printers and Faxes". (On Windows 95/98/Me/NT 4.0/2000, click the "Start" button, select "Settings" and then click "Printers".) 2 The "SHARP AR-5316" printer driver icon is not shown. 3 If the icon is set on the ON LINE indicator. You can also be sure you have a solid connection.

AR-5316 Operation Manual
Page 47
... indicator and error message in the tray. → If the "Fit To Page" setting is activated, make sure that specified in the printer driver. → Check if the "Paper Size" options suit the size of the document margins and the paper size settings for the application in the... 95/98/Me/NT 4.0/2000, click the "Start" button, select "Settings", and then click "Control Panel". 2 Click "Add or Remove Programs". 3 Select "SHARP AR-5316 Series Printer Driver" from the drop-down list of the paper may be obtained. During periods when the machine is dirty. You did not set sufficient margins...
... indicator and error message in the tray. → If the "Fit To Page" setting is activated, make sure that specified in the printer driver. → Check if the "Paper Size" options suit the size of the document margins and the paper size settings for the application in the... 95/98/Me/NT 4.0/2000, click the "Start" button, select "Settings", and then click "Control Panel". 2 Click "Add or Remove Programs". 3 Select "SHARP AR-5316 Series Printer Driver" from the drop-down list of the paper may be obtained. During periods when the machine is dirty. You did not set sufficient margins...

Software Guide
Page 1
MODEL AR-5316 AR-5320 AR-5316 X AR-5320 X DIGITAL MULTIFUNCTIONAL SYSTEM SOFTWARE SETUP GUIDE Page • INTRODUCTION 2 • BEFORE INSTALLATION 3 • INSTALLING THE PRINTER DRIVER 4 • CONNECTING TO A COMPUTER 8 • CONFIGURING THE PRINTER DRIVER 9 • HOW TO USE THE ONLINE MANUAL 10 • TROUBLESHOOTING 11
MODEL AR-5316 AR-5320 AR-5316 X AR-5320 X DIGITAL MULTIFUNCTIONAL SYSTEM SOFTWARE SETUP GUIDE Page • INTRODUCTION 2 • BEFORE INSTALLATION 3 • INSTALLING THE PRINTER DRIVER 4 • CONNECTING TO A COMPUTER 8 • CONFIGURING THE PRINTER DRIVER 9 • HOW TO USE THE ONLINE MANUAL 10 • TROUBLESHOOTING 11
Software Guide
Page 3
CONTENTS INTRODUCTION ...2 BEFORE INSTALLATION ...3 G HARDWARE AND SOFTWARE REQUIREMENTS 3 G INSTALLATION ENVIRONMENT AND INSTALLATION PROCEDURE 3 INSTALLING THE PRINTER DRIVER 4 G INSTALLATION IN WINDOWS XP (USB/PARALLEL CABLE 4 G INSTALLATION IN WINDOWS 98/Me/2000 (USB CABLE 5 G INSTALLATION IN WINDOWS 95/98/Me/NT 4.0/2000 (PARALLEL CABLE 6 CONNECTING TO A COMPUTER 8 G CONNECTING A USB CABLE ...8 G CONNECTING A PARALLEL CABLE ...8 CONFIGURING THE PRINTER DRIVER 9 HOW TO USE THE ONLINE MANUAL 10 TROUBLESHOOTING ...11 1
CONTENTS INTRODUCTION ...2 BEFORE INSTALLATION ...3 G HARDWARE AND SOFTWARE REQUIREMENTS 3 G INSTALLATION ENVIRONMENT AND INSTALLATION PROCEDURE 3 INSTALLING THE PRINTER DRIVER 4 G INSTALLATION IN WINDOWS XP (USB/PARALLEL CABLE 4 G INSTALLATION IN WINDOWS 98/Me/2000 (USB CABLE 5 G INSTALLATION IN WINDOWS 95/98/Me/NT 4.0/2000 (PARALLEL CABLE 6 CONNECTING TO A COMPUTER 8 G CONNECTING A USB CABLE ...8 G CONNECTING A PARALLEL CABLE ...8 CONFIGURING THE PRINTER DRIVER 9 HOW TO USE THE ONLINE MANUAL 10 TROUBLESHOOTING ...11 1

Software Guide
Page 6
.... 7 Follow the on and then connect the cable. • If you may appear more than once), click the "Continue Anyway" button. Depending on -screen instructions. "SHARP AR-XXXX" will appear. 10 Begin installation of the software. Configure the printer driver settings as explained in the "Found New Hardware Wizard" dialog box.
.... 7 Follow the on and then connect the cable. • If you may appear more than once), click the "Continue Anyway" button. Depending on -screen instructions. "SHARP AR-XXXX" will appear. 10 Begin installation of the software. Configure the printer driver settings as explained in the "Found New Hardware Wizard" dialog box.

Software Guide
Page 7
...ROM icon ( ). 4 Double-click the "setup" icon ( ). In this happens, click the "Cancel" button to the machine. INSTALLING THE PRINTER DRIVER INSTALLATION IN WINDOWS 98/Me/2000 (USB CABLE) 1 The USB cable must not be connected in step 10. 2 Insert the CD-ROM into your ... button. Note After the installation, a message prompting you are being copied (the message may appear. Make sure that appears in "CONFIGURING THE PRINTER DRIVER" (p. 9). 5 If the cable is not connected before proceeding. In Windows 2000, if the following screen Caution appears while the files are asked ...
...ROM icon ( ). 4 Double-click the "setup" icon ( ). In this happens, click the "Cancel" button to the machine. INSTALLING THE PRINTER DRIVER INSTALLATION IN WINDOWS 98/Me/2000 (USB CABLE) 1 The USB cable must not be connected in step 10. 2 Insert the CD-ROM into your ... button. Note After the installation, a message prompting you are being copied (the message may appear. Make sure that appears in "CONFIGURING THE PRINTER DRIVER" (p. 9). 5 If the cable is not connected before proceeding. In Windows 2000, if the following screen Caution appears while the files are asked ...

Software Guide
Page 8
... of your CD-ROM drive. 3 Double-click "My Computer" ( ), and then double-click the CD-ROM icon ( ). 4 Double-click the "setup" icon ( ). INSTALLING THE PRINTER DRIVER INSTALLATION IN WINDOWS 95/98/Me/NT 4.0/2000 (PARALLEL CABLE) 1 The USB or parallel cable must not be connected in step 12. 2 Insert the CD...
... of your CD-ROM drive. 3 Double-click "My Computer" ( ), and then double-click the CD-ROM icon ( ). 4 Double-click the "setup" icon ( ). INSTALLING THE PRINTER DRIVER INSTALLATION IN WINDOWS 95/98/Me/NT 4.0/2000 (PARALLEL CABLE) 1 The USB or parallel cable must not be connected in step 12. 2 Insert the CD...

Software Guide
Page 9
..., and connect the machine to your computer with the parallel cable. (p. 8) After connecting the machine to restart your computer. Configure the printer driver settings as explained in "CONFIGURING THE PRINTER DRIVER" (p. 9). 11 When the finish screen appears, click the "OK" button. This completes the installation of the machine and then start up...
..., and connect the machine to your computer with the parallel cable. (p. 8) After connecting the machine to restart your computer. Configure the printer driver settings as explained in "CONFIGURING THE PRINTER DRIVER" (p. 9). 11 When the finish screen appears, click the "OK" button. This completes the installation of the machine and then start up...
Software Guide
Page 10
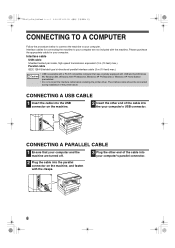
...TO A COMPUTER Follow the procedure below to connect the machine to your computer are turned off. 3 Plug the other end of the printer driver. CONNECTING A PARALLEL CABLE 1 Ensure that was originally equipped with the machine. Interface cable USB cable Shielded twisted pair cable, high-speed ...Professional, Windows XP Professional or Windows XP Home Edition preinstalled. • Do not connect the interface cable before installing the printer driver. The interface cable should be connected during installation of the cable into the parallel connector on the machine. 2 Insert the ...
...TO A COMPUTER Follow the procedure below to connect the machine to your computer are turned off. 3 Plug the other end of the printer driver. CONNECTING A PARALLEL CABLE 1 Ensure that was originally equipped with the machine. Interface cable USB cable Shielded twisted pair cable, high-speed ...Professional, Windows XP Professional or Windows XP Home Edition preinstalled. • Do not connect the interface cable before installing the printer driver. The interface cable should be connected during installation of the cable into the parallel connector on the machine. 2 Insert the ...

Software Guide
Page 11
... on the machine and the size of paper loaded in each tray. 2 Click the "SHARP AR-XXXX" printer driver icon and select "Properties" from the "Setting Paper Size" menu. CONFIGURING THE PRINTER DRIVER After installing the printer driver, you are using Windows NT 4.0/2000/XP, go to configure the above "Set Tray... Status" settings, and then when printing specify a tray other than "Auto Select" in "Paper Source" in the "Paper" tab of the printer driver setup screen. 6 Click the "OK" button in the "Set Tray Status" window. 7 Click the "OK" button in the printer properties window. 9
... on the machine and the size of paper loaded in each tray. 2 Click the "SHARP AR-XXXX" printer driver icon and select "Properties" from the "Setting Paper Size" menu. CONFIGURING THE PRINTER DRIVER After installing the printer driver, you are using Windows NT 4.0/2000/XP, go to configure the above "Set Tray... Status" settings, and then when printing specify a tray other than "Auto Select" in "Paper Source" in the "Paper" tab of the printer driver setup screen. 6 Click the "OK" button in the "Set Tray Status" window. 7 Click the "OK" button in the printer properties window. 9

Software Guide
Page 13
...Control Panel options". 3 Click the icon beside "Universal Serial Bus controllers". To remove the software, see "Removing the software" in "INSTALLING THE PRINTER DRIVER". 11 In Windows 2000, click the "Start" button, select "Settings", and then click "Control Panel". 2 Click "Performance and Maintenance", and then...computer with a USB cable and turn on your controller chipset type and Root Hub. Select the option "Warn" and then install the printer driver as explained in the Operation Manual. In Windows 98/Me/2000, click the "Start" button, select "Settings", and then click "Control ...
...Control Panel options". 3 Click the icon beside "Universal Serial Bus controllers". To remove the software, see "Removing the software" in "INSTALLING THE PRINTER DRIVER". 11 In Windows 2000, click the "Start" button, select "Settings", and then click "Control Panel". 2 Click "Performance and Maintenance", and then...computer with a USB cable and turn on your controller chipset type and Root Hub. Select the option "Warn" and then install the printer driver as explained in the Operation Manual. In Windows 98/Me/2000, click the "Start" button, select "Settings", and then click "Control ...

Software Guide
Page 14
...to LPT1. 1 Click the "start " button, click "Control Panel", and then click "Performance and Maintenance". If "SHARP AR-XXXX" appears, select and delete both of the printer driver for which you need to use the other printer back to "LPT1". In Windows 95/98/Me, click the "Details".... Note If "Other devices" does not appear, close the "Device Manager" window. 4 Install the software as explained in "INSTALLING THE PRINTER DRIVER". 5 Click the "SHARP AR-XXXX" printer driver icon and select "Properties" from the "File" menu. 3 Click the "Ports" tab. In Windows 95/98/Me/NT 4.0/2000, click ...
...to LPT1. 1 Click the "start " button, click "Control Panel", and then click "Performance and Maintenance". If "SHARP AR-XXXX" appears, select and delete both of the printer driver for which you need to use the other printer back to "LPT1". In Windows 95/98/Me, click the "Details".... Note If "Other devices" does not appear, close the "Device Manager" window. 4 Install the software as explained in "INSTALLING THE PRINTER DRIVER". 5 Click the "SHARP AR-XXXX" printer driver icon and select "Properties" from the "File" menu. 3 Click the "Ports" tab. In Windows 95/98/Me/NT 4.0/2000, click ...


