
Instruction Manual, PLV-WF10
Page 2
...result. Eye damage may result in better condition for an extended time, unplug the projector from the projection lens. NO USERSERVICEABLE PARTS INSIDE EXCEPT LAMP REPLACEMENT. If your projector, and can near the projector, hot air is not to indicate laser emission). Be especially careful that children do... THE RISK OF FIRE OR ELECTRIC SHOCK, DO NOT EXPOSE THIS APPLIANCE TO RAIN OR MOISTURE. TO THE OWNER Before operating this projector, read this manual again, check operations and cable connections and try the solutions in the "Trouble-shooting" section of the end of...
...result. Eye damage may result in better condition for an extended time, unplug the projector from the projection lens. NO USERSERVICEABLE PARTS INSIDE EXCEPT LAMP REPLACEMENT. If your projector, and can near the projector, hot air is not to indicate laser emission). Be especially careful that children do... THE RISK OF FIRE OR ELECTRIC SHOCK, DO NOT EXPOSE THIS APPLIANCE TO RAIN OR MOISTURE. TO THE OWNER Before operating this projector, read this manual again, check operations and cable connections and try the solutions in the "Trouble-shooting" section of the end of...
Instruction Manual, PLV-WF10
Page 5
...AND CLEANING 44 CLEANING PROJECTION LENS 44 TURNING ON / OFF PROJECTOR 21 LAMP MANAGEMENT 45 ADJUSTING SCREEN 22 LAMP REPLACEMENT 46 ZOOM ADJUSTMENT 22 TROUBLESHOOTING 48 FOCUS ADJUSTMENT 22 INDICATORS AND PROJECTOR CONDITION 50 LENS SHIFT ADJUSTMENT 22 MENU TREE 51 KEYSTONE ...PREPARATION 7 SELECTING COMPUTER SYSTEM COMPATIBLE COMPUTER SPECIFICATIONS 25 27 PC ADJUSTMENT 28 NAME OF EACH PART OF PROJECTOR 7 AUTO PC ADJUSTMENT 28 SETTING-UP PROJECTOR 8 MANUAL PC ADJUSTMENT 29 CONNECTING AC POWER CORD 8 PICTURE IMAGE ADJUSTMENT 31 LENS INSTALLATION 9 IMAGE...
...AND CLEANING 44 CLEANING PROJECTION LENS 44 TURNING ON / OFF PROJECTOR 21 LAMP MANAGEMENT 45 ADJUSTING SCREEN 22 LAMP REPLACEMENT 46 ZOOM ADJUSTMENT 22 TROUBLESHOOTING 48 FOCUS ADJUSTMENT 22 INDICATORS AND PROJECTOR CONDITION 50 LENS SHIFT ADJUSTMENT 22 MENU TREE 51 KEYSTONE ...PREPARATION 7 SELECTING COMPUTER SYSTEM COMPATIBLE COMPUTER SPECIFICATIONS 25 27 PC ADJUSTMENT 28 NAME OF EACH PART OF PROJECTOR 7 AUTO PC ADJUSTMENT 28 SETTING-UP PROJECTOR 8 MANUAL PC ADJUSTMENT 29 CONNECTING AC POWER CORD 8 PICTURE IMAGE ADJUSTMENT 31 LENS INSTALLATION 9 IMAGE...
Instruction Manual, PLV-WF10
Page 6
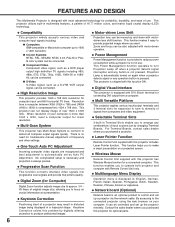
...arrange any combinations of your computer. This function enables you to operate both projector and computer with Remote Control Unit only. By accessing to turn Projection Lamp off when a projector detects signal interruption and any operation button is pressed. N Keystone Correction Positioning... adjustment of 16.77 million colors, and matrix liquid crystal display (LCD) technology. G Component Video Component video signal, such as a S-VHS VCR output signal, can be connected. This projector utilizes built-in a trapezoid shape. No complicated setup is necessary and...
...arrange any combinations of your computer. This function enables you to operate both projector and computer with Remote Control Unit only. By accessing to turn Projection Lamp off when a projector detects signal interruption and any operation button is pressed. N Keystone Correction Positioning... adjustment of 16.77 million colors, and matrix liquid crystal display (LCD) technology. G Component Video Component video signal, such as a S-VHS VCR output signal, can be connected. This projector utilizes built-in a trapezoid shape. No complicated setup is necessary and...
Instruction Manual, PLV-WF10
Page 7
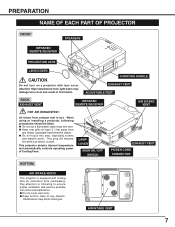
...objects. CARRYING HANDLE EXHAUST VENT ADJUSTABLE FEET BACK EXHAUST VENT INFRARED REMOTE RECEIVER AIR INTAKE VENT HOT AIR EXHAUSTED ! When using or installing a projector, following to ensure proper ventilation and avoid a possible risk of Cooling Fans. G Keep rear grills at least 3' (1m) away from... light beam may block cooling air. LAMP COVER MAIN ON / OFF SWITCH EXHAUST VENT POWER CORD CONNECTOR BOTTOM AIR INTAKE VENTS This projector is hot. This area will become hot while a projector is used. Pay attention to following precautions should be taken. PREPARATION...
...objects. CARRYING HANDLE EXHAUST VENT ADJUSTABLE FEET BACK EXHAUST VENT INFRARED REMOTE RECEIVER AIR INTAKE VENT HOT AIR EXHAUSTED ! When using or installing a projector, following to ensure proper ventilation and avoid a possible risk of Cooling Fans. G Keep rear grills at least 3' (1m) away from... light beam may block cooling air. LAMP COVER MAIN ON / OFF SWITCH EXHAUST VENT POWER CORD CONNECTOR BOTTOM AIR INTAKE VENTS This projector is hot. This area will become hot while a projector is used. Pay attention to following precautions should be taken. PREPARATION...
Instruction Manual, PLV-WF10
Page 16
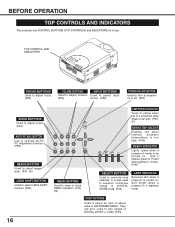
... too high. (P43) READY INDICATOR Lights green when a projector is turned on its top. And bright when a projector is also used to turn a projector on . IMAGE LENS SHIFT MENU SELECT LAMP WARNING REPLACE TEMP. mode. (P33) READY LAMP LAMP REPLACE INDICATOR Turns to yellow when life of a projection lamp draws to execute item selected. And it flashes...
... too high. (P43) READY INDICATOR Lights green when a projector is turned on its top. And bright when a projector is also used to turn a projector on . IMAGE LENS SHIFT MENU SELECT LAMP WARNING REPLACE TEMP. mode. (P33) READY LAMP LAMP REPLACE INDICATOR Turns to yellow when life of a projection lamp draws to execute item selected. And it flashes...
Instruction Manual, PLV-WF10
Page 20
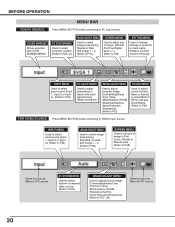
..., 27) IMAGE SELECT MENU Used to select image level among Standard, Cinema and Image 1 ~ 4. (Refer to P36) SCREEN MENU Used to set size of projector or reset Lamp Replace Counter. (Refer to P39-42) INPUT MENU Used to select input source (Input 1, Input 2 or Input 3). (Refer to P25) PC ADJUST MENU Used...
..., 27) IMAGE SELECT MENU Used to select image level among Standard, Cinema and Image 1 ~ 4. (Refer to P36) SCREEN MENU Used to set size of projector or reset Lamp Replace Counter. (Refer to P39-42) INPUT MENU Used to select input source (Input 1, Input 2 or Input 3). (Refer to P25) PC ADJUST MENU Used...

Instruction Manual, PLV-WF10
Page 21
... outlet and turn off . Preparation Display appears on again. TO MAINTAIN LIFE OF LAMP, ONCE YOU TURN PROJECTOR ON, WAIT AT LEAST 5 MINUTES BEFORE TURNING IT OFF. When both WARNING TEMP. Turn a projector on a screen and countdown starts. indicator continues to flash, follow procedures below ...a screen. 2 Press POWER ON-OFF button again to flash, contact sales dealer where you purchased this projector or service center. 21 When WARNING TEMP. LAMP indicator lights RED, and READY indicator lights GREEN. Message disappears after 30 seconds. indicator should still continue ...
... outlet and turn off . Preparation Display appears on again. TO MAINTAIN LIFE OF LAMP, ONCE YOU TURN PROJECTOR ON, WAIT AT LEAST 5 MINUTES BEFORE TURNING IT OFF. When both WARNING TEMP. Turn a projector on a screen and countdown starts. indicator continues to flash, follow procedures below ...a screen. 2 Press POWER ON-OFF button again to flash, contact sales dealer where you purchased this projector or service center. 21 When WARNING TEMP. LAMP indicator lights RED, and READY indicator lights GREEN. Message disappears after 30 seconds. indicator should still continue ...

Instruction Manual, PLV-WF10
Page 40
... brighter gradually. Use the POINT DOWN button to move a red frame pointer to select SETTING and press SELECT button. Lamp Mode This Projector is equipped with a power management function. When the input signal is interrupted and any button is not pressed for 30...LEFT/RIGHT button(s). SETTING Power management This projector is equipped with 2 Projection Lamps and a number of Projection Lamps. Be sure to turn on P21). When Lamp Mode is canceled. Press SELECT button at this icon to 2 lamps or 1 lamp. Set "2 lamps mode" or "1 lamp mode" by switching MAIN ON/OFF SWITCH...
... brighter gradually. Use the POINT DOWN button to move a red frame pointer to select SETTING and press SELECT button. Lamp Mode This Projector is equipped with a power management function. When the input signal is interrupted and any button is not pressed for 30...LEFT/RIGHT button(s). SETTING Power management This projector is equipped with 2 Projection Lamps and a number of Projection Lamps. Be sure to turn on P21). When Lamp Mode is canceled. Press SELECT button at this icon to 2 lamps or 1 lamp. Set "2 lamps mode" or "1 lamp mode" by switching MAIN ON/OFF SWITCH...

Instruction Manual, PLV-WF10
Page 42
...This function returns all setting values except for the lamp counter to reset Lamp Replace Counter. The message "Return to Factory default. 12 Message "Lamp replace counter Reset?" Message "Lamp replace counter Reset?" is displayed. Return the projector to Factory default?" Move pointer to [Yes]... and then press SELECT button. SETTING Lamp counter reset Be sure to reset Lamp Counter when Lamp Assembly is reset, LAMP REPLACE indicator stops lighting. 1 Turn projector on, press MENU button and ON-SCREEN MENU will appear. When Lamp Replace Counter is replaced. Move pointer to...
...This function returns all setting values except for the lamp counter to reset Lamp Replace Counter. The message "Return to Factory default. 12 Message "Lamp replace counter Reset?" Message "Lamp replace counter Reset?" is displayed. Return the projector to Factory default?" Move pointer to [Yes]... and then press SELECT button. SETTING Lamp counter reset Be sure to reset Lamp Counter when Lamp Assembly is reset, LAMP REPLACE indicator stops lighting. 1 Turn projector on, press MENU button and ON-SCREEN MENU will appear. When Lamp Replace Counter is replaced. Move pointer to...
Instruction Manual, PLV-WF10
Page 45
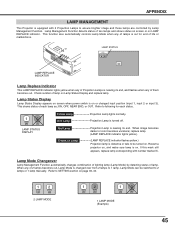
... or on Lamp Status Display and replace lamp. Restart a projector on page 39, 40. 12 2 LAMP MODE 12 1 2 1 LAMP MODE (Example) 45 If this mark still appears, replace lamp corresponding with 2 Projection Lamps to SETTING section on , and make sure lamp is out for each lamp as; Lamp Management Function detects status of lamp on LAMP REPLACE indicator. Lamp Mode Changeover Lamp Management Function...
... or on Lamp Status Display and replace lamp. Restart a projector on page 39, 40. 12 2 LAMP MODE 12 1 2 1 LAMP MODE (Example) 45 If this mark still appears, replace lamp corresponding with 2 Projection Lamps to SETTING section on , and make sure lamp is out for each lamp as; Lamp Management Function detects status of lamp on LAMP REPLACE indicator. Lamp Mode Changeover Lamp Management Function...

Instruction Manual, PLV-WF10
Page 46
The glass can become very hot. LAMP COVER SCREWS LAMP 1 LAMP 2 7 Connect AC Power Cord to a projector and turn projector on. 8 Reset Lamp Replacement Counter. (Refer to an end, the LAMP REPLACE indicator lights yellow. Figure shows case of the same type. If this projector draws to section "Lamp Counter Reset" on Lamp Status Display. CAUTION For continued safety, replace with...
The glass can become very hot. LAMP COVER SCREWS LAMP 1 LAMP 2 7 Connect AC Power Cord to a projector and turn projector on. 8 Reset Lamp Replacement Counter. (Refer to an end, the LAMP REPLACE indicator lights yellow. Figure shows case of the same type. If this projector draws to section "Lamp Counter Reset" on Lamp Status Display. CAUTION For continued safety, replace with...

Instruction Manual, PLV-WF10
Page 47
... injury caused by pieces of this manual. ) Continuous use . APPENDIX ORDER REPLACEMENT LAMP Replacement Lamp can be ordered through your projector : G Replacement Lamp Type No. : PLV-WF10 POA-LMP73 (Service Parts No. 610 309 3802) LAMP HANDLING PRECAUTIONS This projector uses a high-pressure lamp which the projector and lamp are being used. Inappropriate attempts to the environment of use of the...
... injury caused by pieces of this manual. ) Continuous use . APPENDIX ORDER REPLACEMENT LAMP Replacement Lamp can be ordered through your projector : G Replacement Lamp Type No. : PLV-WF10 POA-LMP73 (Service Parts No. 610 309 3802) LAMP HANDLING PRECAUTIONS This projector uses a high-pressure lamp which the projector and lamp are being used. Inappropriate attempts to the environment of use of the...
Instruction Manual, PLV-WF10
Page 48
... that all computer, video and power cord are not seen during Operation. Power equipment back on page 21.) G Check Projection Lamp. (Refer to page 46.) G Adjust focus of : Projector and computer.) 6. LAMP indicator lights bright and READY indicator turns off before you select is corresponding with your computer monitor's display.Problem may be...
... that all computer, video and power cord are not seen during Operation. Power equipment back on page 21.) G Check Projection Lamp. (Refer to page 46.) G Adjust focus of : Projector and computer.) 6. LAMP indicator lights bright and READY indicator turns off before you select is corresponding with your computer monitor's display.Problem may be...

Instruction Manual, PLV-WF10
Page 50
... contact the dealer or the service center for projector condition. If the projector is turned off ✽ When the life of the lamp. 50 Do not leave the projector on the projector, the WARNING TEMP. The temperature inside the projector is in the Power management mode. •...lights yellow, replace the projection lamp with the POWER ONOFF button. ✽ The projector is READY to turn ✽ on . APPENDIX INDICATORS AND PROJECTOR CONDITION Check the Indicators for service and checkup. yellow red READY green Projector Condition LAMP red The projector is OFF. (The MAIN ...
... contact the dealer or the service center for projector condition. If the projector is turned off ✽ When the life of the lamp. 50 Do not leave the projector on the projector, the WARNING TEMP. The temperature inside the projector is in the Power management mode. •...lights yellow, replace the projection lamp with the POWER ONOFF button. ✽ The projector is READY to turn ✽ on . APPENDIX INDICATORS AND PROJECTOR CONDITION Check the Indicators for service and checkup. yellow red READY green Projector Condition LAMP red The projector is OFF. (The MAIN ...

Instruction Manual, PLV-WF10
Page 52
...On Off/On Yes/No Image 1 Image 2 Image 3 Image 4 Quit Keystone Blue back Display Logo Ceiling Rear Power management On start Lamp mode Remote control USB Key lock Lamp counter reset Factory default English German French Italian Spanish Portuguese Dutch Swedish Russian Chinese Korean Japanese Quit On/Off On/Off On.../Off On/Off On/Off Off Ready Shut down 1-30 Min Quit On/Off 1 Lamp/2 Lamp Code 1 Code 2 Code 3 Code 4 Code 5 Code 6 Code 7 Code 8 Quit Mouse/Projector Off Projector Remote Control Quit Yes / No Yes / No 0 - 63 0 - 63 0 - 63 On/Off On/Off 52 APPENDIX Video ...
...On Off/On Yes/No Image 1 Image 2 Image 3 Image 4 Quit Keystone Blue back Display Logo Ceiling Rear Power management On start Lamp mode Remote control USB Key lock Lamp counter reset Factory default English German French Italian Spanish Portuguese Dutch Swedish Russian Chinese Korean Japanese Quit On/Off On/Off On.../Off On/Off On/Off Off Ready Shut down 1-30 Min Quit On/Off 1 Lamp/2 Lamp Code 1 Code 2 Code 3 Code 4 Code 5 Code 6 Code 7 Code 8 Quit Mouse/Projector Off Projector Remote Control Quit Yes / No Yes / No 0 - 63 0 - 63 0 - 63 On/Off On/Off 52 APPENDIX Video ...

Instruction Manual, PLV-WF10
Page 53
APPENDIX TECHNICAL SPECIFICATIONS Projector Type Dimensions (W x H x D) Net Weight LCD Panel System Panel Resolution Number of the LCD panels. 53 Output : 1mW / Wave length : 650±20nm) Owner's Manual AC Power Cord Wireless/Wired Remote Control ... less) may be ineffective by the characteristics of Pixels Color System High Definition TV Signal Motorized Lens Shift Scanning Frequency Horizontal Resolution Projection Lamp Input 1 Jacks Input 2 Jacks Input 3 Jacks Other Jacks Built-in Speakers Feet Adjustment Voltage and Power Consumption Operating Temperature Storage Temperature...
APPENDIX TECHNICAL SPECIFICATIONS Projector Type Dimensions (W x H x D) Net Weight LCD Panel System Panel Resolution Number of the LCD panels. 53 Output : 1mW / Wave length : 650±20nm) Owner's Manual AC Power Cord Wireless/Wired Remote Control ... less) may be ineffective by the characteristics of Pixels Color System High Definition TV Signal Motorized Lens Shift Scanning Frequency Horizontal Resolution Projection Lamp Input 1 Jacks Input 2 Jacks Input 3 Jacks Other Jacks Built-in Speakers Feet Adjustment Voltage and Power Consumption Operating Temperature Storage Temperature...


