
Owners Manual
Page 3
... Product design and specifications are subject to suit their respective owners. Products very often vary between retailers especially with your Camera may be trademarks or registered trademarks of their market requirements, customer demographics, and geographical preferences. Occasionally a retailer will ...this manual are U.S. This is a trademark. „ Other names and products may be different from the actual design of your Camera. „ The manufacturer assumes no liability for any errors or discrepancies in this user manual. EN-2 registered trademarks of Microsoft Corporation...
... Product design and specifications are subject to suit their respective owners. Products very often vary between retailers especially with your Camera may be trademarks or registered trademarks of their market requirements, customer demographics, and geographical preferences. Occasionally a retailer will ...this manual are U.S. This is a trademark. „ Other names and products may be different from the actual design of your Camera. „ The manufacturer assumes no liability for any errors or discrepancies in this user manual. EN-2 registered trademarks of Microsoft Corporation...

Owners Manual
Page 4
... has been damaged, turn the power off and remove the battery. This might cause fire or electric shock. This might cause the Camera to fall or tilt over or result in areas near the shore. If the battery is accidentally swallowed, immediately consult a physician. ...This might cause poisoning. This might cause fire or electric shock. Continued use the Camera while you to fall over , causing damage. Consult the store of purchase. For repair or internal inspection, ask the store of purchase. ...
... has been damaged, turn the power off and remove the battery. This might cause fire or electric shock. This might cause the Camera to fall or tilt over or result in areas near the shore. If the battery is accidentally swallowed, immediately consult a physician. ...This might cause poisoning. This might cause fire or electric shock. Continued use the Camera while you to fall over , causing damage. Consult the store of purchase. For repair or internal inspection, ask the store of purchase. ...

Owners Manual
Page 5
...battery rupturing or leaking. EN-4 Inserting the battery with fresh water. Do not drop it, strike it in fire. This might cause burns. Camera is a precision instrument. Touching a hot battery might cause damage to the person's eyesight. Do not subject the LCD monitor to anyone's eyes.... Do not leave the Camera in places where the temperature may rise significantly, such as inside , resulting in fire and electric shock. Cautions Insert the battery paying careful ...
...battery rupturing or leaking. EN-4 Inserting the battery with fresh water. Do not drop it, strike it in fire. This might cause burns. Camera is a precision instrument. Touching a hot battery might cause damage to the person's eyesight. Do not subject the LCD monitor to anyone's eyes.... Do not leave the Camera in places where the temperature may rise significantly, such as inside , resulting in fire and electric shock. Cautions Insert the battery paying careful ...

Owners Manual
Page 8
FCC information Tested To Comply With FCC Standards FOR HOME OR OFFICE USE Declaration of Conformity Model number: VPC-T1060 Trade Name: SANYO Responsible party: SANYO FISHER COMPANY Address: 21605 Plummer Street Chatsworth, California 91311 Telephone No.: (818) 998-7322 This device complies ... This class B digital apparatus complies with Part 15 of the FCC Rules. EN-7 Operation is subject to questions or problems concerning camera operation in this device must accept any interference received, including interference that may not cause harmful interference, and (2) this manual „...
FCC information Tested To Comply With FCC Standards FOR HOME OR OFFICE USE Declaration of Conformity Model number: VPC-T1060 Trade Name: SANYO Responsible party: SANYO FISHER COMPANY Address: 21605 Plummer Street Chatsworth, California 91311 Telephone No.: (818) 998-7322 This device complies ... This class B digital apparatus complies with Part 15 of the FCC Rules. EN-7 Operation is subject to questions or problems concerning camera operation in this device must accept any interference received, including interference that may not cause harmful interference, and (2) this manual „...

Owners Manual
Page 9
... condition, its performance and lifetime, we recommend that can shorten the battery life and reduce Camera performance. „ When you fully charge the battery and discharge it for a long period of continuous use. SANYO Li-ion Battery, 3.7V, 700mAh - Notes on Battery Usage When you use the battery...when carrying or storing. CAUTION „ Danger of explosion if battery is normal and not a malfunction. „ The Camera may feel warm after a long period of time, remove it from the Camera to maximize its performance may feel warm after a long period of continuous use of the...
... condition, its performance and lifetime, we recommend that can shorten the battery life and reduce Camera performance. „ When you fully charge the battery and discharge it for a long period of continuous use. SANYO Li-ion Battery, 3.7V, 700mAh - Notes on Battery Usage When you use the battery...when carrying or storing. CAUTION „ Danger of explosion if battery is normal and not a malfunction. „ The Camera may feel warm after a long period of time, remove it from the Camera to maximize its performance may feel warm after a long period of continuous use of the...

Owners Manual
Page 10
CONTENTS 10 INTRODUCTION 10 Overview 10 Package Contents 11 GETTING TO KNOW YOUR CAMERA 11 Front View 12 Rear View 13 LCD Monitor Display 15 GETTING STARTED 15 Preparation 16 Charging the Battery 17 Initial Settings 19 CAPTURE MODE ... 32 Capture Menu 35 Video Menu 36 Playback Menu 37 Setup Menu 38 TRANSFERRING FILES TO YOUR COMPUTER 38 Downloading Your Files 39 USING THE CAMERA AS A PC CAMERA 40 EDITING SOFTWARE INSTALLATION 41 SPECIFICATIONS 42 APPENDIX 42 Possible Number of Shots 43 Troubleshooting 44 Connecting to a PictBridge Compatible Printer EN-9
CONTENTS 10 INTRODUCTION 10 Overview 10 Package Contents 11 GETTING TO KNOW YOUR CAMERA 11 Front View 12 Rear View 13 LCD Monitor Display 15 GETTING STARTED 15 Preparation 16 Charging the Battery 17 Initial Settings 19 CAPTURE MODE ... 32 Capture Menu 35 Video Menu 36 Playback Menu 37 Setup Menu 38 TRANSFERRING FILES TO YOUR COMPUTER 38 Downloading Your Files 39 USING THE CAMERA AS A PC CAMERA 40 EDITING SOFTWARE INSTALLATION 41 SPECIFICATIONS 42 APPENDIX 42 Possible Number of Shots 43 Troubleshooting 44 Connecting to a PictBridge Compatible Printer EN-9

Owners Manual
Page 11
... images with this state-of the new digital camera. EN-10 Equipped with a 10.0-megapixel CCD, this camera is fast and easy with a resolution of up to 3648 x 2736 pixels. INTRODUCTION Overview Congratulations on your camera and ensure that you have the following items:... Common Product Components: „ Digital Camera „ Software CD-ROM „ USB cable „ AV cable „ Camera strap „ Camera pouch „ Rechargeable lithium-ion battery „ Battery...
... images with this state-of the new digital camera. EN-10 Equipped with a 10.0-megapixel CCD, this camera is fast and easy with a resolution of up to 3648 x 2736 pixels. INTRODUCTION Overview Congratulations on your camera and ensure that you have the following items:... Common Product Components: „ Digital Camera „ Software CD-ROM „ USB cable „ AV cable „ Camera strap „ Camera pouch „ Rechargeable lithium-ion battery „ Battery...

Owners Manual
Page 16
...". „ To save, edit, or erase data on the side of an SD/SDHC memory card, be sure to format the memory card with this camera before its initial usage. 5. Close the battery/memory card cover and make sure it is locked securely. „ To prevent valuable data from being accidentally... card, you can slide the write protect tab (on an SD/SDHC memory card, you can load an SD/SDHC memory card to expand the camera's memory capacity. „ Be sure to turn off the power when inserting or removing the SD/ SDHC memory card. Open the battery/memory card cover...
...". „ To save, edit, or erase data on the side of an SD/SDHC memory card, be sure to format the memory card with this camera before its initial usage. 5. Close the battery/memory card cover and make sure it is locked securely. „ To prevent valuable data from being accidentally... card, you can slide the write protect tab (on an SD/SDHC memory card, you can load an SD/SDHC memory card to expand the camera's memory capacity. „ Be sure to turn off the power when inserting or removing the SD/ SDHC memory card. Open the battery/memory card cover...

Owners Manual
Page 17
...; The battery may feel warm after it has been charged or immediately after charging is normal and not a malfunction. „ When using the camera in cold areas, keep the camera and battery warm by holding them inside your outer clothes. Insert the battery into a wall outlet. 1 „ The status LED on the...
...; The battery may feel warm after it has been charged or immediately after charging is normal and not a malfunction. „ When using the camera in cold areas, keep the camera and battery warm by holding them inside your outer clothes. Insert the battery into a wall outlet. 1 „ The status LED on the...

Owners Manual
Page 18
... with the e / f buttons and adjust the value for the date and time with the c / d buttons. „ The time is not displayed on after leaving the camera without the battery for the first time. „ The camera is turned on the LCD monitor, follow these steps to set if and when: „ The... camera is turned on for an extended period of time. Select [Setup] with the c / d buttons, and press the button. 5. To exit from the [Setup] menu, press ...
... with the e / f buttons and adjust the value for the date and time with the c / d buttons. „ The time is not displayed on after leaving the camera without the battery for the first time. „ The camera is turned on the LCD monitor, follow these steps to set if and when: „ The... camera is turned on for an extended period of time. Select [Setup] with the c / d buttons, and press the button. 5. To exit from the [Setup] menu, press ...

Owners Manual
Page 20
In both modes, if the camera mode is changed to [ ], the lens barrel will extend forward and it is turned on the subject, and provides a wider...side to turn the power on. „ The status LED lights green and the camera is initiated. „ If the power is ready for shooting. CAPTURE MODE Capturing Images Your camera is not suitable, the frame of the focus area turns red. Press the button ... exposure, and pressing the shutter button down fully captures the images. „ The focus area frame turns green when the camera is in [ P ] or [ ] mode, the lens will retract into the...
In both modes, if the camera mode is changed to [ ], the lens barrel will extend forward and it is turned on the subject, and provides a wider...side to turn the power on. „ The status LED lights green and the camera is initiated. „ If the power is ready for shooting. CAPTURE MODE Capturing Images Your camera is not suitable, the frame of the focus area turns red. Press the button ... exposure, and pressing the shutter button down fully captures the images. „ The focus area frame turns green when the camera is in [ P ] or [ ] mode, the lens will retract into the...

Owners Manual
Page 21
... capturing group shots (if the number of shots taken depends on the flash mode setting. „ If the camera does not detect a smile within 5 seconds, the camera will Shutter:Exit automatically capture the image(s) when it detects two smiles. EN-20 Smile Detection ON 2008 / 01...Shutter:Exit 7. Compose the image, and press the shutter button down fully. button. 6. Taking Images When the Smile Feature Is On With the camera's new "smile detection" function, this function. Press the button. 3. button. Set the button to preview display. Select [Smile Shot] with the...
... capturing group shots (if the number of shots taken depends on the flash mode setting. „ If the camera does not detect a smile within 5 seconds, the camera will Shutter:Exit automatically capture the image(s) when it detects two smiles. EN-20 Smile Detection ON 2008 / 01...Shutter:Exit 7. Compose the image, and press the shutter button down fully. button. 6. Taking Images When the Smile Feature Is On With the camera's new "smile detection" function, this function. Press the button. 3. button. Set the button to preview display. Select [Smile Shot] with the...

Owners Manual
Page 23
... when you want to capture a series of hand shaking when you want to capture an image with the c / d buttons, and press the button. 5. Set the camera mode to automatically capture an image when a smiling face is detected. Select the desired scene mode with infinity focus, hard sharpness and high saturation. Setting...
... when you want to capture a series of hand shaking when you want to capture an image with the c / d buttons, and press the button. 5. Set the camera mode to automatically capture an image when a smiling face is detected. Select the desired scene mode with infinity focus, hard sharpness and high saturation. Setting...

Owners Manual
Page 25
... Its intuitive interface and easy-to [ P ]. 2. To install software: 1. Panorama Mode This mode is designed to make a single photo. Set the camera mode to -use , power and flexibility to allow even novice digital imaging enthusiasts to move beyond traditional photos into a single frame, such as Cool 360...with COOL 360 SE) COOL 360 SE - Follow the same steps to complete the installation. Insert the CD-ROM that came with the camera into your computer to make it together later with software on -screen instructions to capture subsequent images in the sequence. 10. Press the MENU...
... Its intuitive interface and easy-to [ P ]. 2. To install software: 1. Panorama Mode This mode is designed to make a single photo. Set the camera mode to -use , power and flexibility to allow even novice digital imaging enthusiasts to move beyond traditional photos into a single frame, such as Cool 360...with COOL 360 SE) COOL 360 SE - Follow the same steps to complete the installation. Insert the CD-ROM that came with the camera into your computer to make it together later with software on -screen instructions to capture subsequent images in the sequence. 10. Press the MENU...

Owners Manual
Page 27
... the video clip. „ The recording time depends on the screen. 2. Playing Back Video Clips You can also play back the video clip on the camera. Press the [ ] button. „ The last image appears on the storage size and the subject of the f / e buttons during video recording. „ When recording a video...
... the video clip. „ The recording time depends on the screen. 2. Playing Back Video Clips You can also play back the video clip on the camera. Press the [ ] button. „ The last image appears on the storage size and the subject of the f / e buttons during video recording. „ When recording a video...

Owners Manual
Page 31
... want to protect with the c / d buttons, and press the button. „ Protection is applied to the image and the camera returns to the playback mode. „ The protect icon [ ] is executed and the camera returns to the playback mode. Press the [ ] button. 2. Select [Single] or [All] with the c / d buttons, and press the...
... want to protect with the c / d buttons, and press the button. „ Protection is applied to the image and the camera returns to the playback mode. „ The protect icon [ ] is executed and the camera returns to the playback mode. Press the [ ] button. 2. Select [Single] or [All] with the c / d buttons, and press the...

Owners Manual
Page 37
... to Card Allows you have a memory card installed and some files in this manual titled "Protecting Images" (page 30) for playback. To exit from the camera's internal memory to section in this if you to copy your still images automatically in Capture Menu (page 34) for further details. Fix Red Eyes...
... to Card Allows you have a memory card installed and some files in this manual titled "Protecting Images" (page 30) for playback. To exit from the camera's internal memory to section in this if you to copy your still images automatically in Capture Menu (page 34) for further details. Fix Red Eyes...
Owners Manual
Page 38
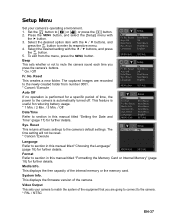
...number 0001. * Cancel / Execute Auto Off If no operation is performed for further details. The captured images are going to connect to the camera. * PAL / NTSC EN-37 Sys. Format Refer to section in this manual titled "Formatting the Memory Card or Internal Memory" (page 18) .... Select the desired setting with the f button. 3. Select the desired option item with the c / d buttons, and press the button to the camera's default settings. This feature is automatically turned off. The time setting will not be reset. * Cancel / Execute Language Refer to section in this manual...
...number 0001. * Cancel / Execute Auto Off If no operation is performed for further details. The captured images are going to connect to the camera. * PAL / NTSC EN-37 Sys. Format Refer to section in this manual titled "Formatting the Memory Card or Internal Memory" (page 18) .... Select the desired setting with the f button. 3. Select the desired option item with the c / d buttons, and press the button to the camera's default settings. This feature is automatically turned off. The time setting will not be reset. * Cancel / Execute Language Refer to section in this manual...

Owners Manual
Page 39
Look for a new "removable disk" icon. „ This "removable disk" is actually the memory (or memory card) in your camera. 4. Typically, the camera will be assigned drive letter "e" or higher. 7. Copy & Paste or Drag-N-Drop image and video files to an available USB port on your ... images and video clips will be inside these folders. 9. Double click on the DCIM folder to open it to the USB terminal on your camera. Turn on the camera. 3. Select [PC] using the c / d buttons and press the button. 5. Mac users: Double-click the "untitled" or "unlabeled" disk drive icon...
Look for a new "removable disk" icon. „ This "removable disk" is actually the memory (or memory card) in your camera. 4. Typically, the camera will be assigned drive letter "e" or higher. 7. Copy & Paste or Drag-N-Drop image and video files to an available USB port on your ... images and video clips will be inside these folders. 9. Double click on the DCIM folder to open it to the USB terminal on your camera. Turn on the camera. 3. Select [PC] using the c / d buttons and press the button. 5. Mac users: Double-click the "untitled" or "unlabeled" disk drive icon...
Owners Manual
Page 40
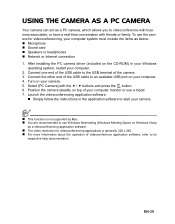
... for videoconferencing, your computer. 4. Launch the videoconferencing application software. „ Simply follow the instructions in your Windows operating system, restart your camera. 5. Connect one end of the USB cable to videoconference with business associates, or have a real-time conversation with the c / d... buttons and press the button. 6. Select [PC Camera] with friends or family. To use Windows Netmeeting (Windows Meeting Space on top of the camera. 3. EN-39 Position the camera steadily on Windows Vista) as below: „ Microphone „ Sound card ...
... for videoconferencing, your computer. 4. Launch the videoconferencing application software. „ Simply follow the instructions in your Windows operating system, restart your camera. 5. Connect one end of the USB cable to videoconference with business associates, or have a real-time conversation with the c / d... buttons and press the button. 6. Select [PC Camera] with friends or family. To use Windows Netmeeting (Windows Meeting Space on top of the camera. 3. EN-39 Position the camera steadily on Windows Vista) as below: „ Microphone „ Sound card ...


