
VPC-503 Owners Manual English
Page 2
...; Macintosh is a trademark of their market requirements, customer demographics, and geographical preferences. Products very often vary between retailers especially with your digital camera may be different from the actual design of your digital camera. „ The manufacturer assumes no liability for the product. „ The product and accessories that different retailers often specify slightly...
...; Macintosh is a trademark of their market requirements, customer demographics, and geographical preferences. Products very often vary between retailers especially with your digital camera may be different from the actual design of your digital camera. „ The manufacturer assumes no liability for the product. „ The product and accessories that different retailers often specify slightly...

VPC-503 Owners Manual English
Page 7
...DPOF 49 Connecting to a PictBridge-Compatible Printer... 51 TRANSFERRING FILES FROM YOUR DIGITAL CAMERA TO COMPUTER 55 Step 1: Install the USB driver 56 Step 2: Connect the digital camera to your computer 57 EDITING SOFTWARE INSTALLATION 59 Installing Photo Explorer 59 Installing ...Photo Express 60 USING THE DIGITAL CAMERA AS A PC CAMERA 61 Step 1: Install the PC camera driver 61 Step 2: Connect the digital camera to your computer 62 Step 3:...
...DPOF 49 Connecting to a PictBridge-Compatible Printer... 51 TRANSFERRING FILES FROM YOUR DIGITAL CAMERA TO COMPUTER 55 Step 1: Install the USB driver 56 Step 2: Connect the digital camera to your computer 57 EDITING SOFTWARE INSTALLATION 59 Installing Photo Explorer 59 Installing ...Photo Express 60 USING THE DIGITAL CAMERA AS A PC CAMERA 61 Step 1: Install the PC camera driver 61 Step 2: Connect the digital camera to your computer 62 Step 3:...
VPC-503 Owners Manual English
Page 9
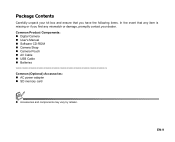
Common Product Components: „ Digital Camera „ User's Manual „ Software CD-ROM „ Camera Strap „ Camera Pouch „ AV Cable „ USB Cable „ Batteries Common (Optional) Accessories: „ AC power adapter „ SD memory card „ Accessories and components may vary by retailer. Package Contents Carefully unpack your kit box and ensure that you have the following items. In the event that any item is missing or if you find any mismatch or damage, promptly contact your dealer. EN-9
Common Product Components: „ Digital Camera „ User's Manual „ Software CD-ROM „ Camera Strap „ Camera Pouch „ AV Cable „ USB Cable „ Batteries Common (Optional) Accessories: „ AC power adapter „ SD memory card „ Accessories and components may vary by retailer. Package Contents Carefully unpack your kit box and ensure that you have the following items. In the event that any item is missing or if you find any mismatch or damage, promptly contact your dealer. EN-9

VPC-503 Owners Manual English
Page 16
.... Make sure that the power of AA alkaline batteries, camera performance may deteriorate. PREPARING THE CAMERA Installing the Batteries You can use 2 AA size batteries (alkaline or Ni-MH rechargeable) to the characteristics of the digital camera is turned off. 2. Make sure the camera is off before inserting or removing the batteries. 1. Close the battery...
.... Make sure that the power of AA alkaline batteries, camera performance may deteriorate. PREPARING THE CAMERA Installing the Batteries You can use 2 AA size batteries (alkaline or Ni-MH rechargeable) to the characteristics of the digital camera is turned off. 2. Make sure the camera is off before inserting or removing the batteries. 1. Close the battery...

VPC-503 Owners Manual English
Page 18
... card cover. 3. Insert an SD memory card in the correct orientation as shown in the digital camera. Inserting and Removing an SD Memory Card (Optional Accessory) The digital camera comes with this digital camera before inserting or removing a memory card. 2. EN-18 Close the battery/SD memory card ...cover. „ To remove the SD memory card, make sure the camera is turned off . Refer to section in...
... card cover. 3. Insert an SD memory card in the correct orientation as shown in the digital camera. Inserting and Removing an SD Memory Card (Optional Accessory) The digital camera comes with this digital camera before inserting or removing a memory card. 2. EN-18 Close the battery/SD memory card ...cover. „ To remove the SD memory card, make sure the camera is turned off . Refer to section in...

VPC-503 Owners Manual English
Page 20
Power switch EN-20 GETTING STARTED Turning the Power On/Off „ Press the power switch until the digital camera turns on. „ To turn the power off, press the power switch again.
Power switch EN-20 GETTING STARTED Turning the Power On/Off „ Press the power switch until the digital camera turns on. „ To turn the power off, press the power switch again.
VPC-503 Owners Manual English
Page 26
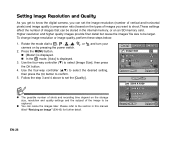
... „ [Mode1] is displayed. „ In the mode, [Auto] is displayed. 3. Use the four-way controller (T) to , , , , , or and turn your camera on by pressing the power switch. 2. Follow the step 3 and 4 above to set the image resolution (number of vertical and horizontal pixels) and image quality (... internal memory, or on an SD memory card. Please refer to confirm. 5. Setting Image Resolution and Quality As you get to know the digital camera, you can set the [Quality]. „ The possible number of shots and recording time depend on the storage size, resolution and quality settings...
... „ [Mode1] is displayed. „ In the mode, [Auto] is displayed. 3. Use the four-way controller (T) to , , , , , or and turn your camera on by pressing the power switch. 2. Follow the step 3 and 4 above to set the image resolution (number of vertical and horizontal pixels) and image quality (... internal memory, or on an SD memory card. Please refer to confirm. 5. Setting Image Resolution and Quality As you get to know the digital camera, you can set the [Quality]. „ The possible number of shots and recording time depend on the storage size, resolution and quality settings...

VPC-503 Owners Manual English
Page 28
...when the subject is too far away for the flash to be reduced by asking the subject (person) to look at the digital camera or get as close to the digital camera as possible. EN-28 You can also change the setting using a desired flash mode to suit your scene and press the .... 1. Using the Flash The flash is designed to function automatically when lighting conditions warrant the use of the surrounding brightness. Flash Mode Auto OK : The camera has four flash modes: Auto, Red-eye, Flash on Flash off . The flash will always fire regardless of flash. Press the four-way controller (W/ ...
...when the subject is too far away for the flash to be reduced by asking the subject (person) to look at the digital camera or get as close to the digital camera as possible. EN-28 You can also change the setting using a desired flash mode to suit your scene and press the .... 1. Using the Flash The flash is designed to function automatically when lighting conditions warrant the use of the surrounding brightness. Flash Mode Auto OK : The camera has four flash modes: Auto, Red-eye, Flash on Flash off . The flash will always fire regardless of flash. Press the four-way controller (W/ ...

VPC-503 Owners Manual English
Page 34
The EV compensation value can manually adjust the exposure determined by the digital camera. Press the power switch to , , , , or . 2. Use this mode when the proper exposure cannot be set the range EV of EV compensation value from -2.0EV ...
The EV compensation value can manually adjust the exposure determined by the digital camera. Press the power switch to , , , , or . 2. Use this mode when the proper exposure cannot be set the range EV of EV compensation value from -2.0EV ...

VPC-503 Owners Manual English
Page 46
... of operation is the same as playing back still images and movie clips on the digital camera. Connect the other end to the AV input socket of the video equipment you are going to connect to the digital camera, then turn off all devices to match the video output system of the TV set... connecting to any device, make sure to select NTSC/PAL system to be played back on a TV or on a TV screen. Turn the TV and digital camera on TV You can only be connected. 1. ADVANCED FEATURES Playing Back Still Images/Movie Clips on . 4.
... of operation is the same as playing back still images and movie clips on the digital camera. Connect the other end to the AV input socket of the video equipment you are going to connect to the digital camera, then turn off all devices to match the video output system of the TV set... connecting to any device, make sure to select NTSC/PAL system to be played back on a TV or on a TV screen. Turn the TV and digital camera on TV You can only be connected. 1. ADVANCED FEATURES Playing Back Still Images/Movie Clips on . 4.

VPC-503 Owners Manual English
Page 55
... video clips with your family or friends via e-mail or post them on the Web. TRANSFERRING FILES FROM YOUR DIGITAL CAMERA TO COMPUTER After using USB cable to establish a USB connection between the camera and your computer, you can use your computer to install the software, you must install the USB driver onto...
... video clips with your family or friends via e-mail or post them on the Web. TRANSFERRING FILES FROM YOUR DIGITAL CAMERA TO COMPUTER After using USB cable to establish a USB connection between the camera and your computer, you can use your computer to install the software, you must install the USB driver onto...

VPC-503 Owners Manual English
Page 56
Follow the on MAC OS 9.0 For Mac OS 9.0 or higher, the computer will automatically recognize the digital camera and load its own USB drivers. After the USB driver has been installed, restart your CD-ROM drive. 2. Insert the enclosed CD-ROM into your ...
Follow the on MAC OS 9.0 For Mac OS 9.0 or higher, the computer will automatically recognize the digital camera and load its own USB drivers. After the USB driver has been installed, restart your CD-ROM drive. 2. Insert the enclosed CD-ROM into your ...

VPC-503 Owners Manual English
Page 57
... select the [Set-up2] menu, then use the four-way controller (T) to and turn your camera on our desktop.) Cancel : MENU Select : PC/AV terminal EN-57 Press the button. 4....PC TV NTSC LCD Brightness Auto Shut Down 3 Min. Connect your camera. Turn off your camera and the computer via the supplied USB cable. 7. Turn your camera on by pressing the power switch. 8. Rotate the mode dial to ...detected in "My Computer", which contains your computer 1. Step 2: Connect the digital camera to select [PC], then press the button. 5. Select : USB Mode PC PictBridge PC CAM. 6.
... select the [Set-up2] menu, then use the four-way controller (T) to and turn your camera on our desktop.) Cancel : MENU Select : PC/AV terminal EN-57 Press the button. 4....PC TV NTSC LCD Brightness Auto Shut Down 3 Min. Connect your camera. Turn off your camera and the computer via the supplied USB cable. 7. Turn your camera on by pressing the power switch. 8. Rotate the mode dial to ...detected in "My Computer", which contains your computer 1. Step 2: Connect the digital camera to select [PC], then press the button. 5. Select : USB Mode PC PictBridge PC CAM. 6.

VPC-503 Owners Manual English
Page 58
...included with the package. Make sure that video playback application has been installed in your hard disk. Step 3: Download images or movie clips When the digital camera is turned on and connected to your computer, it to find more folders. EN-58 Your images are inside these folder(s). You can download (... Open the "removable disk" and double click on your computer. Select the desired still images or video clips and then choose "Copy" from the digital camera to be a disk drive, just like a floppy disk or CD. Open the destination location (folder) and choose "Paste" from the...
...included with the package. Make sure that video playback application has been installed in your hard disk. Step 3: Download images or movie clips When the digital camera is turned on and connected to your computer, it to find more folders. EN-58 Your images are inside these folder(s). You can download (... Open the "removable disk" and double click on your computer. Select the desired still images or video clips and then choose "Copy" from the digital camera to be a disk drive, just like a floppy disk or CD. Open the destination location (folder) and choose "Paste" from the...

VPC-503 Owners Manual English
Page 59
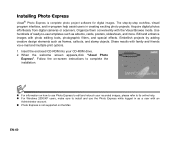
..., click "Ulead Photo Explorer". Acquire photos, video or sound clips from various digital device types and easily browse or add personal descriptions; or distribute the media through the medium of digital media. 1. iPhoto or iPhoto2 is not supported on the Mac. Insert the ...make sure to install and use the Photo Explorer in -one tool for owners of digital cameras, WebCams, DV camcorders, scanners, or anyone who strives to transfer, browse, modify and distribute digital media. EDITING SOFTWARE INSTALLATION Installing Photo Explorer Ulead® Photo Explorer provides a simple and...
..., click "Ulead Photo Explorer". Acquire photos, video or sound clips from various digital device types and easily browse or add personal descriptions; or distribute the media through the medium of digital media. 1. iPhoto or iPhoto2 is not supported on the Mac. Insert the ...make sure to install and use the Photo Explorer in -one tool for owners of digital cameras, WebCams, DV camcorders, scanners, or anyone who strives to transfer, browse, modify and distribute digital media. EDITING SOFTWARE INSTALLATION Installing Photo Explorer Ulead® Photo Explorer provides a simple and...
VPC-503 Owners Manual English
Page 60
... design elements such as frames, callouts, and stamp objects. Organize them conveniently with an Administrator account. „ Photo Express is complete photo project software for digital images. Insert the enclosed CD-ROM into your recorded images, please refer to complete the installation. „ For information on the Mac. Follow the on... instructions to its online help assist users in as albums, cards, posters, slideshows, and more. When the welcome screen appears,click "Ulead Photo Express". Acquire digital photos effortlessly from digital cameras or scanners. EN-60
... design elements such as frames, callouts, and stamp objects. Organize them conveniently with an Administrator account. „ Photo Express is complete photo project software for digital images. Insert the enclosed CD-ROM into your recorded images, please refer to complete the installation. „ For information on the Mac. Follow the on... instructions to its online help assist users in as albums, cards, posters, slideshows, and more. When the welcome screen appears,click "Ulead Photo Express". Acquire digital photos effortlessly from digital cameras or scanners. EN-60
VPC-503 Owners Manual English
Page 61
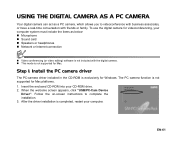
...-screen instructions to videoconference with business associates, or have a real-time conversation with the digital camera. „ This mode is not supported for Mac. USING THE DIGITAL CAMERA AS A PC CAMERA Your digital camera can act as below: „ Microphone „ Sound card „ Speakers or headphones... family. Step 1: Install the PC camera driver The PC-camera driver included in the CD-ROM is completed, restart your CD-ROM drive. 2. After the driver installation is exclusively for Mac platforms. 1. To use the digital camera for videoconferencing, your computer system must ...
...-screen instructions to videoconference with business associates, or have a real-time conversation with the digital camera. „ This mode is not supported for Mac. USING THE DIGITAL CAMERA AS A PC CAMERA Your digital camera can act as below: „ Microphone „ Sound card „ Speakers or headphones... family. Step 1: Install the PC camera driver The PC-camera driver included in the CD-ROM is completed, restart your CD-ROM drive. 2. After the driver installation is exclusively for Mac platforms. 1. To use the digital camera for videoconferencing, your computer system must ...
VPC-503 Owners Manual English
Page 62
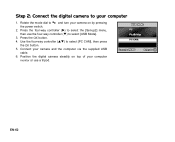
Rotate the mode dial to and turn your camera and the computer via the supplied USB cable. 6. USB Mode PC PictBridge PC CAM. Press the four-way controller (X) to select the [Set-up2] menu, ... controller (ST) to select [PC CAM], then press the button. 5. Connect your camera on top of your computer 1. Cancel : MENU Select : EN-62 Press the button. 4. Position the digital camera steadily on by pressing the power switch. 2. Step 2: Connect the digital camera to your computer monitor or use the four-way controller (T) to select [USB...
Rotate the mode dial to and turn your camera and the computer via the supplied USB cable. 6. USB Mode PC PictBridge PC CAM. Press the four-way controller (X) to select the [Set-up2] menu, ... controller (ST) to select [PC CAM], then press the button. 5. Connect your camera on top of your computer 1. Cancel : MENU Select : EN-62 Press the button. 4. Position the digital camera steadily on by pressing the power switch. 2. Step 2: Connect the digital camera to your computer monitor or use the four-way controller (T) to select [USB...
VPC-503 Owners Manual English
Page 72
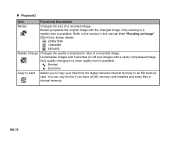
... Change Changes the quality (compression rate) of a recorded image. EN-72 Refer to the section in this if you to copy your files from the digital camera's internal memory to a lower quality level is available. „ Playback2 Item Functional Description Resize Changes the size of a recorded image.
... Change Changes the quality (compression rate) of a recorded image. EN-72 Refer to the section in this if you to copy your files from the digital camera's internal memory to a lower quality level is available. „ Playback2 Item Functional Description Resize Changes the size of a recorded image.

VPC-503 Owners Manual English
Page 76
Sets whether or not to reset the file number when you want to reset the file number, be reset. Set to Default Returns all basic settings to the newly created folder from number 0001. If you take photographs. Version This displays the current firmware version of the camera. „ Set-up3 settings Item Functional Description Reset Number. The captured images are recorded in the internal memory or the SD memory card. The time setting will not be sure that no images are recorded to the digital camera's default settings. EN-76 This creates a new folder.
Sets whether or not to reset the file number when you want to reset the file number, be reset. Set to Default Returns all basic settings to the newly created folder from number 0001. If you take photographs. Version This displays the current firmware version of the camera. „ Set-up3 settings Item Functional Description Reset Number. The captured images are recorded in the internal memory or the SD memory card. The time setting will not be sure that no images are recorded to the digital camera's default settings. EN-76 This creates a new folder.


