
Owners Manual
Page 2
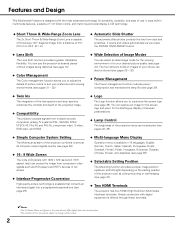
... choice can also be selected (see pages 22, 29). ◆ Simple Computer System Setting The Multi-scan system of the projector conforms to almost all computer output signals quickly (see page 26). ◆ 16 : 9 Wide Screen The wide LCD panels with digital equipment is capable of throwing a 100" diagonal image from dust and...
... choice can also be selected (see pages 22, 29). ◆ Simple Computer System Setting The Multi-scan system of the projector conforms to almost all computer output signals quickly (see page 26). ◆ 16 : 9 Wide Screen The wide LCD panels with digital equipment is capable of throwing a 100" diagonal image from dust and...
Owners Manual
Page 3
...Remote Control 11 Remote Control Operating Range 12 Remote Control Battery Installation 12 Installation 13 Positioning the Projector 13 Adjustable Feet 13 Connecting the AC Power Cord 14 Moving the Lens 15 Connecting to ...Setting 36 Information 41 Input Source Information Display 41 Maintenance and Cleaning 42 Warning Indicator 42 Cleaning the RGB panels 43 Cleaning the Air Filters 45 Cleaning the Projection Lens 46 Cleaning the Projector Cabinet 46 Lamp Replacement 47 Lamp Replacement Counter 48 Appendix 49 Troubleshooting 49 Indicators and Projector...
...Remote Control 11 Remote Control Operating Range 12 Remote Control Battery Installation 12 Installation 13 Positioning the Projector 13 Adjustable Feet 13 Connecting the AC Power Cord 14 Moving the Lens 15 Connecting to ...Setting 36 Information 41 Input Source Information Display 41 Maintenance and Cleaning 42 Warning Indicator 42 Cleaning the RGB panels 43 Cleaning the Air Filters 45 Cleaning the Projection Lens 46 Cleaning the Projector Cabinet 46 Lamp Replacement 47 Lamp Replacement Counter 48 Appendix 49 Troubleshooting 49 Indicators and Projector...
Owners Manual
Page 4
NOTE: This symbol and recycle system are separate collection systems for Protection of Electronic Computer/Data Processing Equipment. Your SANYO product is critical for a long time, the cooling fans can be clogged with dust, and it may cause a breakdown or a disaster. ...the world. Please help us to operate improperly, read this manual thoroughly and operate the projector properly. Otherwise it in good condition for an extended time, unplug the projector from the projection lens. DO NOT SET THE PROJECTOR IN GREASY, WET, OR SMOKY CONDITIONS SUCH AS IN A KITCHEN TO PREVENT A ...
NOTE: This symbol and recycle system are separate collection systems for Protection of Electronic Computer/Data Processing Equipment. Your SANYO product is critical for a long time, the cooling fans can be clogged with dust, and it may cause a breakdown or a disaster. ...the world. Please help us to operate improperly, read this manual thoroughly and operate the projector properly. Otherwise it in good condition for an extended time, unplug the projector from the projection lens. DO NOT SET THE PROJECTOR IN GREASY, WET, OR SMOKY CONDITIONS SUCH AS IN A KITCHEN TO PREVENT A ...
Owners Manual
Page 10
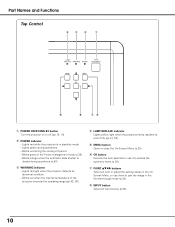
... Menu, or use them to access the submenu items (p.20). Lights red while the projector is closed during operations (p.50). Blinks red during operations. - i INPUT button Select an...50). r LAMP REPLACE indicator Lights yellow light when the projection lamp reaches its end of the projector exceeds the operating range (pp.42, 50). Lights green during the cooling-off (pp.18, ...Part Names and Functions Top Control rew q t y ui q POWER ON/STAND-BY button Turn the projector on or off period. - Blinks orange when the automatic slide shutter is in the Power management mode...
... Menu, or use them to access the submenu items (p.20). Lights red while the projector is closed during operations (p.50). Blinks red during operations. - i INPUT button Select an...50). r LAMP REPLACE indicator Lights yellow light when the projection lamp reaches its end of the projector exceeds the operating range (pp.42, 50). Lights green during the cooling-off (pp.18, ...Part Names and Functions Top Control rew q t y ui q POWER ON/STAND-BY button Turn the projector on or off period. - Blinks orange when the automatic slide shutter is in the Power management mode...
Owners Manual
Page 11
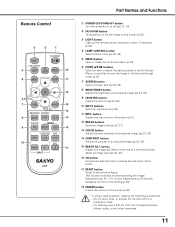
... operation, observe the following precautions: - r LAMP CONTROL button Select a lamp mode (pp.22, 29). y POINT ed7 8 buttons Select an item or adjust the setting values in the On-Screen Menu, or use a soft dry cloth. This function is limited to pan the image in the... OK !6 y u SCREEN IMAGE !5 IMAGE ADJ. !4 BRIGHTNESS CONTRAST i BRIGHT CONT. S-VIDEO PC !1 INPUT CXVT Part Names and Functions q POWER ON/STAND-BY button Turn the projector on the screen (p.23). Menu items one at a time and directly adjust its image level (pp.23, 28). !6 OK button Execute the selected item or...
... operation, observe the following precautions: - r LAMP CONTROL button Select a lamp mode (pp.22, 29). y POINT ed7 8 buttons Select an item or adjust the setting values in the On-Screen Menu, or use a soft dry cloth. This function is limited to pan the image in the... OK !6 y u SCREEN IMAGE !5 IMAGE ADJ. !4 BRIGHTNESS CONTRAST i BRIGHT CONT. S-VIDEO PC !1 INPUT CXVT Part Names and Functions q POWER ON/STAND-BY button Turn the projector on the screen (p.23). Menu items one at a time and directly adjust its image level (pp.23, 28). !6 OK button Execute the selected item or...
Owners Manual
Page 12
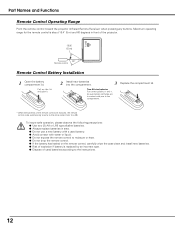
.... Maximum operating range for the remote control is about 16.4' (5 m) and 60 degrees in front of the remote control are in contact with pins in sets. ● Do not use a new battery with a used battery. ● Avoid contact with water or liquid. ● Do not expose the remote control to ...observe the following precautions: ● Use two (2) AA or LR6 type alkaline batteries. ● Always replace batteries in the compartment. * When the batteries of the projector. 16.4' (5 m) 60° Remote control Remote Control Battery Installation 1 Open the battery compartment lid.
.... Maximum operating range for the remote control is about 16.4' (5 m) and 60 degrees in front of the remote control are in contact with pins in sets. ● Do not use a new battery with a used battery. ● Avoid contact with water or liquid. ● Do not expose the remote control to ...observe the following precautions: ● Use two (2) AA or LR6 type alkaline batteries. ● Always replace batteries in the compartment. * When the batteries of the projector. 16.4' (5 m) 60° Remote control Remote Control Battery Installation 1 Open the battery compartment lid.
Owners Manual
Page 16
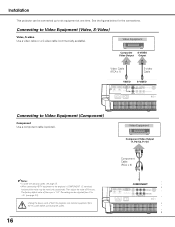
...(Y, Pb/Cb, Pr/Cr) ✔Notes: • To order the optional cables, see page 33). Unplug the power cords of both the projector and external equipment from 0 to +31 (see page 55. • When connecting HDTV equipment to Video Equipment (Component) Component Use a component ...cable (optional). Then adjust the value of Fine sync is "10." The setting can be connected up to Video Equipment (Video, S-Video) Video, S-video Use a video cable or a S-video cable (commercially available). The factory...
...(Y, Pb/Cb, Pr/Cr) ✔Notes: • To order the optional cables, see page 33). Unplug the power cords of both the projector and external equipment from 0 to +31 (see page 55. • When connecting HDTV equipment to Video Equipment (Component) Component Use a component ...cable (optional). Then adjust the value of Fine sync is "10." The setting can be connected up to Video Equipment (Video, S-Video) Video, S-video Use a video cable or a S-video cable (commercially available). The factory...
Owners Manual
Page 19
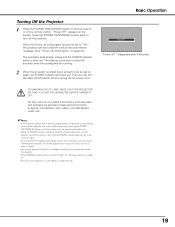
... COOLING FANS ARE RUNNING OR BEFORE POWER INDICATOR STOPS BLINKING. Then you can be turned on page 42. • Do not put the projector in shortening the lamp life. Wait until the POWER indicator becomes red to be turned on the remote control after 4 seconds. disappears after ...use may result in a case before it is set to turn the Main On/Off switch off ?" Basic Operation "Power off the projector. Press the POWER ON/STAND-BY button again to "Off," the projector can turn off ?" Continuous use . • While the POWER indicator is ...
... COOLING FANS ARE RUNNING OR BEFORE POWER INDICATOR STOPS BLINKING. Then you can be turned on page 42. • Do not put the projector in shortening the lamp life. Wait until the POWER indicator becomes red to be turned on the remote control after 4 seconds. disappears after ...use may result in a case before it is set to turn the Main On/Off switch off ?" Basic Operation "Power off the projector. Press the POWER ON/STAND-BY button again to "Off," the projector can turn off ?" Continuous use . • While the POWER indicator is ...
Owners Manual
Page 20
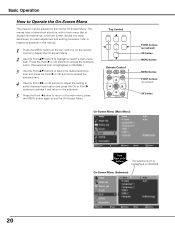
... item and press the Point 8 or OK buttons to access the selected item. 4 Use the Point 7 8 or OK buttons to adjust the setting or switch between each adjustment and setting procedure, refer to the main menu; For each option and press the OK or Point 8 buttons to activate it and return to... selected item is divided into submenus, which are further divided into other submenus. press the MENU button again to Operate the On-Screen Menu The projector can be adjusted or set via the On-Screen Menu.
... item and press the Point 8 or OK buttons to access the selected item. 4 Use the Point 7 8 or OK buttons to adjust the setting or switch between each adjustment and setting procedure, refer to the main menu; For each option and press the OK or Point 8 buttons to activate it and return to... selected item is divided into submenus, which are further divided into other submenus. press the MENU button again to Operate the On-Screen Menu The projector can be adjusted or set via the On-Screen Menu.
Owners Manual
Page 21
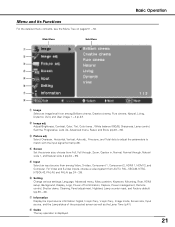
... an image level from among Brilliant cinema, Creative cinema, Pure cinema, Natural, Living, Dynamic, Vivid, and User image 1 - 4 (p.27). w Image adj. e Picture adj. y Setting Change various settings; r Screen Set the screen size; Select Overscan, Horizontal, Vertical, Auto adj., Fine sync, and Total dots to adjust the parameters to match with the input signal...
... an image level from among Brilliant cinema, Creative cinema, Pure cinema, Natural, Living, Dynamic, Vivid, and User image 1 - 4 (p.27). w Image adj. e Picture adj. y Setting Change various settings; r Screen Set the screen size; Select Overscan, Horizontal, Vertical, Auto adj., Fine sync, and Total dots to adjust the parameters to match with the input signal...
Owners Manual
Page 23
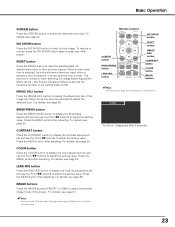
...buttons ✔Note: • See the previous page for the description of the Image adj. RESET button Press the RESET button to adjust the setting value. button Press the IMAGE ADJ. BRIGHTNESS button Press the BRIGHTNESS button to display the Brightness adjustment bar and use the Point 7 8 buttons...the MENU button after adjusting. For details, see page 28. Menu item, it will enter the main menu. All adjustments return to adjust the setting value. when a submenu item is selected, only the selected item is selected, its entire submenu items are reset; This function is limited to...
...buttons ✔Note: • See the previous page for the description of the Image adj. RESET button Press the RESET button to adjust the setting value. button Press the IMAGE ADJ. BRIGHTNESS button Press the BRIGHTNESS button to display the Brightness adjustment bar and use the Point 7 8 buttons...the MENU button after adjusting. For details, see page 28. Menu item, it will enter the main menu. All adjustments return to adjust the setting value. when a submenu item is selected, only the selected item is selected, its entire submenu items are reset; This function is limited to...

Owners Manual
Page 24
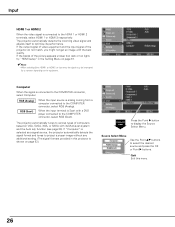
... the input source. S-VIDEO PC INPUT CXVT INPUT buttons ✔Note: • When switching from HDMI1 to HDMI2 or vice versa, the signal may be set on a proper signal form via menu operation (see below) to the HDMI terminal, press H1/H2.
... the input source. S-VIDEO PC INPUT CXVT INPUT buttons ✔Note: • When switching from HDMI1 to HDMI2 or vice versa, the signal may be set on a proper signal form via menu operation (see below) to the HDMI terminal, press H1/H2.
Owners Manual
Page 25
... set item is PAL-M or PAL-N, select the system manually. PAL / SECAM / NTSC / NTSC4.43 / PAL-M / PAL-N If the projector cannot reproduce a proper video image, select a specific broadcast signal format from among PAL, SECAM, NTSC, NTSC 4.43, PAL-M, and PAL-N. Auto The projector ...automatically detects the incoming video system and adjusts itself to optimize its performance. The projector automatically detects the incoming video signal and adjusts itself to optimize its performance. Menu Operation 1...
... set item is PAL-M or PAL-N, select the system manually. PAL / SECAM / NTSC / NTSC4.43 / PAL-M / PAL-N If the projector cannot reproduce a proper video image, select a specific broadcast signal format from among PAL, SECAM, NTSC, NTSC 4.43, PAL-M, and PAL-N. Auto The projector ...automatically detects the incoming video system and adjusts itself to optimize its performance. The projector automatically detects the incoming video signal and adjusts itself to optimize its performance. Menu Operation 1...
Owners Manual
Page 26
.... If the output signal of video equipment and the input signal of computers based on the equipment. The projector automatically tunes to various types of the projector do not match, you might not get an image with its performance. When the input terminal is analog ... button to display the Source Select Menu. Quit Exit this projector is selected as a signal source, the projector automatically detects the signal format and tunes to project a proper image without any additional setting. (The signal formats provided in the Setting Menu on page 37. ✔Note: • When ...
.... If the output signal of video equipment and the input signal of computers based on the equipment. The projector automatically tunes to various types of the projector do not match, you might not get an image with its performance. When the input terminal is analog ... button to display the Source Select Menu. Quit Exit this projector is selected as a signal source, the projector automatically detects the signal format and tunes to project a proper image without any additional setting. (The signal formats provided in the Setting Menu on page 37. ✔Note: • When ...
Owners Manual
Page 28
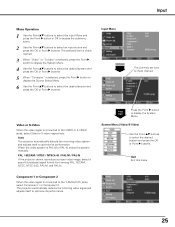
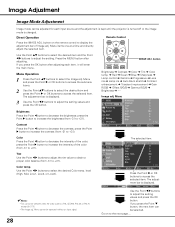
...to select the desired item and the Point 7 8 buttons to select the Image adj. Menu Operation 1 Press the Point ed buttons to adjust the setting. press the Point 8 button to increase the contrast (from -31 to decrease the contrast; Press the Point 8 or OK buttons to +31). ... RESET OK SCREEN IMAGE IMAGE ADJ. COLOR IMAGE ADJ. Press the MENU button after adjusting each input source and the adjustment is kept until the projector is turned off or the image mode is changed. button Brightness ➜ Contrast ➜ Color ➜ Tint ➜ Color temp. ➜ Red ...
...to select the desired item and the Point 7 8 buttons to select the Image adj. Menu Operation 1 Press the Point ed buttons to adjust the setting. press the Point 8 button to increase the contrast (from -31 to decrease the contrast; Press the Point 8 or OK buttons to +31). ... RESET OK SCREEN IMAGE IMAGE ADJ. COLOR IMAGE ADJ. Press the MENU button after adjusting each input source and the adjustment is kept until the projector is turned off or the image mode is changed. button Brightness ➜ Contrast ➜ Color ➜ Tint ➜ Color temp. ➜ Red ...

Owners Manual
Page 30
..., the next item can be selected. Normal open-close speed Open . . . Transient improvement Adjust the sharpness of primary colors User . . . . It can be set to get the desired balance of memory colors List 2 . . . Skin color correction List 3 . . . Disable dynamic gamma correction Auto 1 . . Color list ... 4 steps (Off/L1/L2/L3). Use the Point 7 8 buttons to eight (8) color management data. You can store up to adjust the setting values and press the OK button. Lamp iris Adjust the lamp aperture. High open aperture Close . . . Fully open -close speed Auto 2 ...
..., the next item can be selected. Normal open-close speed Open . . . Transient improvement Adjust the sharpness of primary colors User . . . . It can be set to get the desired balance of memory colors List 2 . . . Skin color correction List 3 . . . Disable dynamic gamma correction Auto 1 . . Color list ... 4 steps (Off/L1/L2/L3). Use the Point 7 8 buttons to eight (8) color management data. You can store up to adjust the setting values and press the OK button. Lamp iris Adjust the lamp aperture. High open aperture Close . . . Fully open -close speed Auto 2 ...
Owners Manual
Page 32
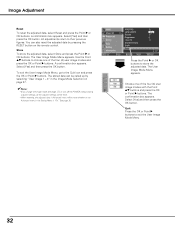
...: • If you change the image mode (see page 27) or turn off the POWER without storing adjusted settings, all the adjusted settings will be reset. • When resetting, the adjusted data in the Setting Menu is "On." A confirmation box appears. The confirmation box appears. Image Adjustment Reset To reset the adjusted data...
...: • If you change the image mode (see page 27) or turn off the POWER without storing adjusted settings, all the adjusted settings will be reset. • When resetting, the adjusted data in the Setting Menu is "On." A confirmation box appears. The confirmation box appears. Image Adjustment Reset To reset the adjusted data...

Owners Manual
Page 33
... (from 0 to access the selected item. Horizontal Use the Point 7 8 buttons to adjust the horizontal picture position (from 0 to adjust the setting values and press the OK button. Press the Point 8 or OK buttons to +100). function cannot be operated with the video input only. &#...for every input. 1 Press the Point ed buttons to +100). Total dots Use the Point 7 8 buttons to adjust the number of this projector. Menu Overscan Use the Point 7 8 buttons to match those signal formats. Picture Adjustment Picture Position and Screen Adjustment Some input source employ special ...
... (from 0 to access the selected item. Horizontal Use the Point 7 8 buttons to adjust the horizontal picture position (from 0 to adjust the setting values and press the OK button. Press the Point 8 or OK buttons to +100). function cannot be operated with the video input only. &#...for every input. 1 Press the Point ed buttons to +100). Total dots Use the Point 7 8 buttons to adjust the number of this projector. Menu Overscan Use the Point 7 8 buttons to match those signal formats. Picture Adjustment Picture Position and Screen Adjustment Some input source employ special ...
Owners Manual
Page 36
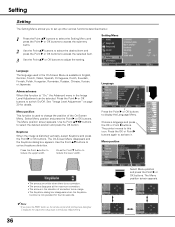
... ed buttons to activate it. Menu position • The arrows are white when there is displayed, the adjustment will go back to the factory default setting. 36 Select Menu position and press the Point 8 or OK buttons. Select Menu position and press the Point 8 or OK buttons. Press the Point e ... function is distorted vertically, select Keystone and press the Point 8 or OK buttons. The On-Screen Menu disappears and the Keystone dialog box appears. Setting Setting The Setting Menu allows you press the RESET button on page 30 for four (4) seconds. ✔Note: • If you to...
... ed buttons to activate it. Menu position • The arrows are white when there is displayed, the adjustment will go back to the factory default setting. 36 Select Menu position and press the Point 8 or OK buttons. Select Menu position and press the Point 8 or OK buttons. Press the Point e ... function is distorted vertically, select Keystone and press the Point 8 or OK buttons. The On-Screen Menu disappears and the Keystone dialog box appears. Setting Setting The Setting Menu allows you press the RESET button on page 30 for four (4) seconds. ✔Note: • If you to...
Owners Manual
Page 37
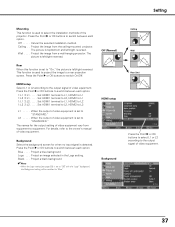
.... HDMI setup Select L1 or L2 according to the output signal of the projector. When the output of video equipment is set to "STANDARD." Project an image selected in the Logo setting. Wall . . . . Set HDMI1 terminal to L2, HDMI2 to L2 L1 . . . . . Set HDMI1 terminal to L2, HDMI2 to L1 1:L1 2:L2 . . ..... Press the Point 8 or OK buttons to switch On/Off. Rear When this function is set to "On," the picture is set to "ENHANCED." Project the image from the ceiling-mounted projector. Press the Point 8 or OK buttons to switch between each option. Press the Point 8 or...
.... HDMI setup Select L1 or L2 according to the output signal of the projector. When the output of video equipment is set to "STANDARD." Project an image selected in the Logo setting. Wall . . . . Set HDMI1 terminal to L2, HDMI2 to L2 L1 . . . . . Set HDMI1 terminal to L2, HDMI2 to L1 1:L1 2:L2 . . ..... Press the Point 8 or OK buttons to switch On/Off. Rear When this function is set to "On," the picture is set to "ENHANCED." Project the image from the ceiling-mounted projector. Press the Point 8 or OK buttons to switch between each option. Press the Point 8 or...


