
Owners Manual
Page 11
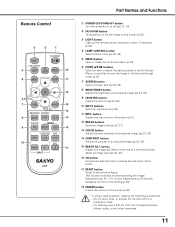
... adjust its image level (pp.23, 28). !6 OK button Execute the selected item or access the sub-menu items (p.20). !7 RESET button Reset to when selecting the Image Adjustment (pp.28 - 31), Picture Adjustment (p.33) and the Keystone function in the On-Screen Menu,...ADJ. S-VIDEO PC !1 INPUT CXVT Part Names and Functions q POWER ON/STAND-BY button Turn the projector on the screen (p.23). Remote Control e w q ON/STAND-BY LIGHT LAMP CONTROL r LAMP NO SHOW FREEZE !8 t MENU RESET !7 OK !6 y u SCREEN IMAGE !5 IMAGE ADJ. !4 BRIGHTNESS CONTRAST i BRIGHT CONT. Do ...
... adjust its image level (pp.23, 28). !6 OK button Execute the selected item or access the sub-menu items (p.20). !7 RESET button Reset to when selecting the Image Adjustment (pp.28 - 31), Picture Adjustment (p.33) and the Keystone function in the On-Screen Menu,...ADJ. S-VIDEO PC !1 INPUT CXVT Part Names and Functions q POWER ON/STAND-BY button Turn the projector on the screen (p.23). Remote Control e w q ON/STAND-BY LIGHT LAMP CONTROL r LAMP NO SHOW FREEZE !8 t MENU RESET !7 OK !6 y u SCREEN IMAGE !5 IMAGE ADJ. !4 BRIGHTNESS CONTRAST i BRIGHT CONT. Do ...
Owners Manual
Page 20
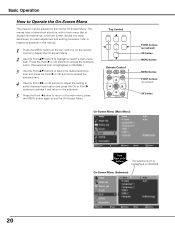
... the submenu. 5 Press the Point 7 button to return to Operate the On-Screen Menu The projector can be adjusted or set via the On-Screen Menu. Top Control Remote Control LAMP NO SHOW FREEZE MENU RESET OK SCREEN IMAGE IMAGE ADJ. press the MENU button again to highlight or select a main menu...
... the submenu. 5 Press the Point 7 button to return to Operate the On-Screen Menu The projector can be adjusted or set via the On-Screen Menu. Top Control Remote Control LAMP NO SHOW FREEZE MENU RESET OK SCREEN IMAGE IMAGE ADJ. press the MENU button again to highlight or select a main menu...
Owners Manual
Page 21
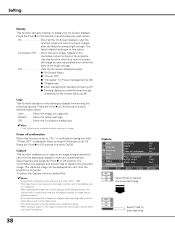
...Display, Logo, Power off confirmation, Capture, Power management, Remote control, Shutter demo, Cleaning, Panel adjustment, Highland, Lamp counter reset, and Factory default (pp.36 - 40). w Image adj. Basic Operation Menu and its Functions For the detailed menu contents...on pages 51 - 52. Adjust Brightness, Contrast, Color, Tint, Color temp., White balance (R/G/B), Sharpness, Lamp control, Gamma, Progressive, Lens iris, Advanced menu, Reset, and Store (pp.28 - 32). t Input Select an input source from among Video, S-video, Component 1, Component 2, HDMI 1, HDMI 2, and Computer. Main...
...Display, Logo, Power off confirmation, Capture, Power management, Remote control, Shutter demo, Cleaning, Panel adjustment, Highland, Lamp counter reset, and Factory default (pp.36 - 40). w Image adj. Basic Operation Menu and its Functions For the detailed menu contents...on pages 51 - 52. Adjust Brightness, Contrast, Color, Tint, Color temp., White balance (R/G/B), Sharpness, Lamp control, Gamma, Progressive, Lens iris, Advanced menu, Reset, and Store (pp.28 - 32). t Input Select an input source from among Video, S-video, Component 1, Component 2, HDMI 1, HDMI 2, and Computer. Main...
Owners Manual
Page 22
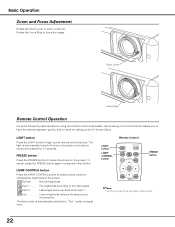
... the Focus Ring to the input signal. Remote Control LIGHT button LAMP CONTROL button ON/STAND-BY LIGHT LAMP CONTROL LAMP NO SHOW FREEZE MENU RESET FREEZE button OK SCREEN IMAGE IMAGE ADJ. ✔Note: • See the next page for the description of other button. Normal brightness. To cancel, press...
... the Focus Ring to the input signal. Remote Control LIGHT button LAMP CONTROL button ON/STAND-BY LIGHT LAMP CONTROL LAMP NO SHOW FREEZE MENU RESET FREEZE button OK SCREEN IMAGE IMAGE ADJ. ✔Note: • See the next page for the description of other button. Normal brightness. To cancel, press...
Owners Manual
Page 23
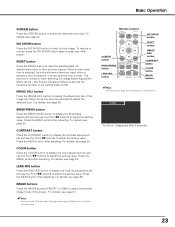
... MENU button after adjusting. Menu item, it will enter the main menu. "No Show" disappears after adjusting. When a main menu item is reset. BRIGHTNESS button Press the BRIGHTNESS button to display the Brightness adjustment bar and use the Point 7 8 buttons to adjust the setting value. CONTRAST ... 7 8 buttons to black out the image. when a submenu item is selected, only the selected item is selected, its entire submenu items are reset; This function is limited to adjust the setting value. To restore to display the adjustment bar of the screen. For details, see page 27 ...
... MENU button after adjusting. Menu item, it will enter the main menu. "No Show" disappears after adjusting. When a main menu item is reset. BRIGHTNESS button Press the BRIGHTNESS button to display the Brightness adjustment bar and use the Point 7 8 buttons to adjust the setting value. CONTRAST ... 7 8 buttons to black out the image. when a submenu item is selected, only the selected item is selected, its entire submenu items are reset; This function is limited to adjust the setting value. To restore to display the adjustment bar of the screen. For details, see page 27 ...
Owners Manual
Page 28
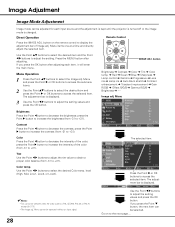
... the selected item. button on to the next page.... Press the MENU button after adjusting each input source and the adjustment is kept until the projector is turned off or the image mode is displayed. Menu and press the Point 8 or OK buttons to access the submenu items. 2 Use the ...the Point 8 button to increase the contrast (from -31 to +31). Color temp. Menu items one at a time and directly adjust the selected item. MENU RESET OK SCREEN IMAGE IMAGE ADJ. The adjustment bar is changed. Tint Use the Point 7 8 buttons to adjust the tint value to obtain a proper color balance...
... the selected item. button on to the next page.... Press the MENU button after adjusting each input source and the adjustment is kept until the projector is turned off or the image mode is displayed. Menu and press the Point 8 or OK buttons to access the submenu items. 2 Use the ...the Point 8 button to increase the contrast (from -31 to +31). Color temp. Menu items one at a time and directly adjust the selected item. MENU RESET OK SCREEN IMAGE IMAGE ADJ. The adjustment bar is changed. Tint Use the Point 7 8 buttons to adjust the tint value to obtain a proper color balance...
Owners Manual
Page 31
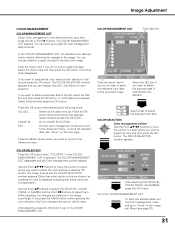
... the image. You can store up to a spot where you press the MENU button while operating the color selection, the Color management pointer will be reset.
... the image. You can store up to a spot where you press the MENU button while operating the color selection, the Color management pointer will be reset.
Owners Manual
Page 32
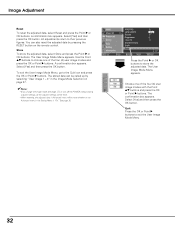
...; If you change the image mode (see page 27) or turn off the POWER without storing adjusted settings, all the adjusted settings will be reset. • When resetting, the adjusted data in Advanced menu will be called up by selecting "User image 1 - 4" in the Setting Menu is "On." The confirmation ...four (4) user image modes and press the OK or Point 8 buttons. Select [Yes] and then press the OK button. Image Adjustment Reset To reset the adjusted data, select Reset and press the Point 8 or OK buttons. All adjustments return to exit the User Image Mode Menu. 32 Store To store the ...
...; If you change the image mode (see page 27) or turn off the POWER without storing adjusted settings, all the adjusted settings will be reset. • When resetting, the adjusted data in Advanced menu will be called up by selecting "User image 1 - 4" in the Setting Menu is "On." The confirmation ...four (4) user image modes and press the OK or Point 8 buttons. Select [Yes] and then press the OK button. Image Adjustment Reset To reset the adjusted data, select Reset and press the Point 8 or OK buttons. All adjustments return to exit the User Image Mode Menu. 32 Store To store the ...
Owners Manual
Page 36
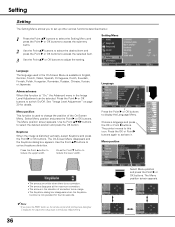
... will go back to activate it. Advanced menu When this icon. The Menu position screen appears. Setting Setting The Setting Menu allows you press the RESET button on page 30 for four (4) seconds. ✔Note: • If you to set up other various functions described below. 1 Press the Point ed buttons...
... will go back to activate it. Advanced menu When this icon. The Menu position screen appears. Setting Setting The Setting Menu allows you press the RESET button on page 30 for four (4) seconds. ✔Note: • If you to set up other various functions described below. 1 Press the Point ed buttons...
Owners Manual
Page 38
...the Keystone function, the adjusted data is set logo. Show the input image instead of presentations. Use this function is automatically reset and the projector captures an image without capturing an image. Select Capture and press the Point 8 or OK buttons. is displayed when turning ... when you cancel the capturing. 38 Capture Select [Yes] to the Capture item. • The Capture function cannot be displayed the next time the projector is in this function when you captured. Use this option. User . . . . . Off Show the Countdown display only. ✔Note: •...
...the Keystone function, the adjusted data is set logo. Show the input image instead of presentations. Use this function is automatically reset and the projector captures an image without capturing an image. Select Capture and press the Point 8 or OK buttons. is displayed when turning ... when you cancel the capturing. 38 Capture Select [Yes] to the Capture item. • The Capture function cannot be displayed the next time the projector is in this function when you captured. Use this option. User . . . . . Off Show the Countdown display only. ✔Note: •...
Owners Manual
Page 40
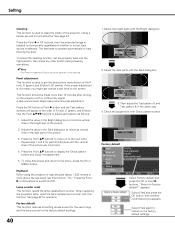
...Use the Point ed7 8 buttons to Factory default?" Highland When using the projector in the same way. 4. "Return to adjust each R,G,B panel until the vertical lines of the R (red), G (green), and B (blue) LCD panels. To cancel the cleaning function, set this screen and return to the...menu, press the OK or MENU button. This function should be operated during cleaning. Lamp counter reset This function resets the lamp replacement counter. When replacing the projection lamp, reset the lamp replacement counter with or without any other button during cleaning operations. ✔Note: •...
...Use the Point ed7 8 buttons to Factory default?" Highland When using the projector in the same way. 4. "Return to adjust each R,G,B panel until the vertical lines of the R (red), G (green), and B (blue) LCD panels. To cancel the cleaning function, set this screen and return to the...menu, press the OK or MENU button. This function should be operated during cleaning. Lamp counter reset This function resets the lamp replacement counter. When replacing the projection lamp, reset the lamp replacement counter with or without any other button during cleaning operations. ✔Note: •...
Owners Manual
Page 47
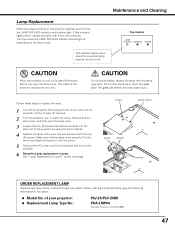
...Lamp Handle Screws ORDER REPLACEMENT LAMP Replacement lamp can be ordered through your projector: ● Replacement Lamp Type No.: PLV-Z5/PLV-Z5BK POA-LMP94 (Service Parts No. 610 323 5998) 47 Lift the lamp out of the projector by using the built in handle. 4 Replace the lamp with the... a projection lamp, give the following information to replace the lamp. 1 Turn off the projector and unplug the AC power cord. CAUTION Allow the projector to the projector and turn on the projector. 6 Reset the Lamp replacement counter. Loosen the screw that secures the lamp cover, and then open the...
...Lamp Handle Screws ORDER REPLACEMENT LAMP Replacement lamp can be ordered through your projector: ● Replacement Lamp Type No.: PLV-Z5/PLV-Z5BK POA-LMP94 (Service Parts No. 610 323 5998) 47 Lift the lamp out of the projector by using the built in handle. 4 Replace the lamp with the... a projection lamp, give the following information to replace the lamp. 1 Turn off the projector and unplug the AC power cord. CAUTION Allow the projector to the projector and turn on the projector. 6 Reset the Lamp replacement counter. Loosen the screw that secures the lamp cover, and then open the...
Owners Manual
Page 48
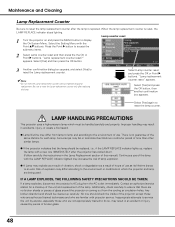
...service station for each lamp. Be sure to reset the Lamp replacement counter only after the lamp is reset, the LAMP REPLACE indicator stops lighting. LAMP HANDLING PRECAUTIONS This projector uses a high-pressure lamp which the projector and lamp are no guarantee of the same ...the lamp replacement counter is replaced. Select [Yes] again to reset the Lamp replacement counter. ✔Note: • Do not reset the Lamp replacement counter without implementing lamp replacement. Select the Setting Menu with projector service. Select [Yes] and press the OK button, then ...
...service station for each lamp. Be sure to reset the Lamp replacement counter only after the lamp is reset, the LAMP REPLACE indicator stops lighting. LAMP HANDLING PRECAUTIONS This projector uses a high-pressure lamp which the projector and lamp are no guarantee of the same ...the lamp replacement counter is replaced. Select [Yes] again to reset the Lamp replacement counter. ✔Note: • Do not reset the Lamp replacement counter without implementing lamp replacement. Select the Setting Menu with projector service. Select [Yes] and press the OK button, then ...

Owners Manual
Page 50
... plug it again to normal, the POWER indicator emits red light and the projector can be turned on the projector. See pages 47 - 48. 50 The projector cannot be turned on until cooling is completed. ✽ The projector is abnormally high. Reset the Lamp replacement counter after replacing the lamp. The temperature inside temperature ✽...
... plug it again to normal, the POWER indicator emits red light and the projector can be turned on the projector. See pages 47 - 48. 50 The projector cannot be turned on until cooling is completed. ✽ The projector is abnormally high. Reset the Lamp replacement counter after replacing the lamp. The temperature inside temperature ✽...

Owners Manual
Page 52
...freq. Lamp Time Image Screen Input Lamp status PAL SECAM NTSC NTSC4.43 PAL-M PAL-N 480i 480p 575i 575p 720p 1080i D-VGA D-480i D-480p D-575i D-575p D-720p D-1080i D-1080p Resolution for PC input - - - Unknown Language Advanced menu Menu Position Keystone Mounting Rear HDMI... setup Background Display Logo Power off confirmation Capture Power management Remote control Shutter demo Cleaning Panel adjustment Highland Lamp counter reset Factory default English...
...freq. Lamp Time Image Screen Input Lamp status PAL SECAM NTSC NTSC4.43 PAL-M PAL-N 480i 480p 575i 575p 720p 1080i D-VGA D-480i D-480p D-575i D-575p D-720p D-1080i D-1080p Resolution for PC input - - - Unknown Language Advanced menu Menu Position Keystone Mounting Rear HDMI... setup Background Display Logo Power off confirmation Capture Power management Remote control Shutter demo Cleaning Panel adjustment Highland Lamp counter reset Factory default English...


