
Owners Manual
Page 11
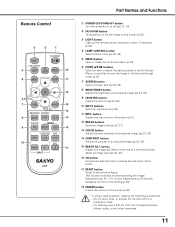
... and Functions q POWER ON/STAND-BY button Turn the projector on the screen (p.23). button Display the input source information (p.41). !2 IMAGE buttons Select an image level (pp.23, 27). !3 COLOR button Adjust the color intensity of a projected image (pp.23, 28). !4 CONTRAST button Adjust the contrast of a projected image ...35). Menu items one at a time and directly adjust its image level (pp.23, 28). !6 OK button Execute the selected item or access the sub-menu items (p.20). !7 RESET button Reset to pan the image in the On-Screen Menu, or use a soft dry cloth. To ensure safe operation...
... and Functions q POWER ON/STAND-BY button Turn the projector on the screen (p.23). button Display the input source information (p.41). !2 IMAGE buttons Select an image level (pp.23, 27). !3 COLOR button Adjust the color intensity of a projected image (pp.23, 28). !4 CONTRAST button Adjust the contrast of a projected image ...35). Menu items one at a time and directly adjust its image level (pp.23, 28). !6 OK button Execute the selected item or access the sub-menu items (p.20). !7 RESET button Reset to pan the image in the On-Screen Menu, or use a soft dry cloth. To ensure safe operation...
Owners Manual
Page 20
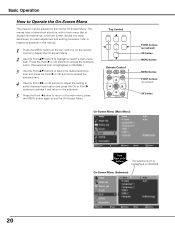
... Control LAMP NO SHOW FREEZE MENU RESET OK SCREEN IMAGE IMAGE ADJ. On-Screen Menu (Submenu) 20 press the MENU button again to Operate the On-Screen Menu The projector can be adjusted or set via the On-Screen Menu. POINT buttons (arrowhead) OK button MENU button MENU button POINT buttons (arrowhead) OK button On-Screen Menu (Main Menu...
... Control LAMP NO SHOW FREEZE MENU RESET OK SCREEN IMAGE IMAGE ADJ. On-Screen Menu (Submenu) 20 press the MENU button again to Operate the On-Screen Menu The projector can be adjusted or set via the On-Screen Menu. POINT buttons (arrowhead) OK button MENU button MENU button POINT buttons (arrowhead) OK button On-Screen Menu (Main Menu...
Owners Manual
Page 22
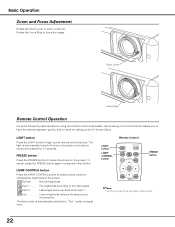
.... . . Normal . . . . . The light is automatically turned off when no buttons on the screen. Remote Control LIGHT button LAMP CONTROL button ON/STAND-BY LIGHT LAMP CONTROL LAMP NO SHOW FREEZE MENU RESET FREEZE button OK SCREEN IMAGE IMAGE ADJ. ✔Note: • See the next page for 10 ...seconds. LIGHT button Press the LIGHT button to select a lamp mode for calling up the remote control buttons. Eco Lower brightness reduces ...
.... . . Normal . . . . . The light is automatically turned off when no buttons on the screen. Remote Control LIGHT button LAMP CONTROL button ON/STAND-BY LIGHT LAMP CONTROL LAMP NO SHOW FREEZE MENU RESET FREEZE button OK SCREEN IMAGE IMAGE ADJ. ✔Note: • See the next page for 10 ...seconds. LIGHT button Press the LIGHT button to select a lamp mode for calling up the remote control buttons. Eco Lower brightness reduces ...
Owners Manual
Page 23
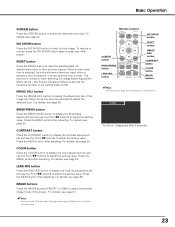
... setting value. Remote Control LAMP CONTROL LAMP NO SHOW FREEZE MENU RESET OK SCREEN button BRIGHTNESS button LENS IRIS button SCREEN IMAGE IMAGE ADJ. COLOR LENS IRIS IMAGE IRIS PRESET USER COMPONENT HDMI NO SHOW button RESET button IMAGE ADJ. LENS IRIS button Press the LENS IRIS button to display the Lens iris adjustment bar and use the Point...
... setting value. Remote Control LAMP CONTROL LAMP NO SHOW FREEZE MENU RESET OK SCREEN button BRIGHTNESS button LENS IRIS button SCREEN IMAGE IMAGE ADJ. COLOR LENS IRIS IMAGE IRIS PRESET USER COMPONENT HDMI NO SHOW button RESET button IMAGE ADJ. LENS IRIS button Press the LENS IRIS button to display the Lens iris adjustment bar and use the Point...
Owners Manual
Page 28
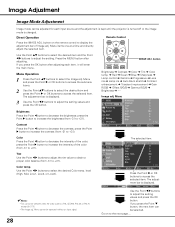
...). Press the Point 8 or OK buttons to select the Image adj. Use the Point ed buttons to select the desired item and the Point 7 8 buttons to access the selected item. Press the MENU button after adjusting each input source and the adjustment is kept until the projector is turned off or the image mode... temp. The adjustment bar is PAL, SECAM, PAL-M, or PAL-N except for each item, it will enter the main menu. MENU RESET OK SCREEN IMAGE IMAGE ADJ. Tint Use the Point 7 8 buttons to adjust the tint value to obtain a proper color balance (from -31 to +31). If you press the OK...
...). Press the Point 8 or OK buttons to select the Image adj. Use the Point ed buttons to select the desired item and the Point 7 8 buttons to access the selected item. Press the MENU button after adjusting each input source and the adjustment is kept until the projector is turned off or the image mode... temp. The adjustment bar is PAL, SECAM, PAL-M, or PAL-N except for each item, it will enter the main menu. MENU RESET OK SCREEN IMAGE IMAGE ADJ. Tint Use the Point 7 8 buttons to adjust the tint value to obtain a proper color balance (from -31 to +31). If you press the OK...
Owners Manual
Page 31
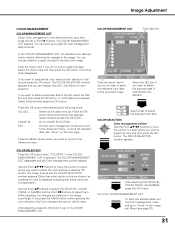
... when certain colors are chosen, an exclamation mark is selected. If you press the MENU button while operating the color selection, the Color management pointer will be reset. Press the OK button when selecting the following items. ALL DEL Delete all the data in the list and press... the OK button. The COLOR MANAGEMENT LIST disappears and the Color management pointer appears. Clear the check...
... when certain colors are chosen, an exclamation mark is selected. If you press the MENU button while operating the color selection, the Color management pointer will be reset. Press the OK button when selecting the following items. ALL DEL Delete all the data in the list and press... the OK button. The COLOR MANAGEMENT LIST disappears and the Color management pointer appears. Clear the check...
Owners Manual
Page 32
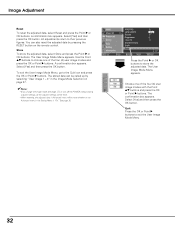
...Menu appears. See page 36. A confirmation box appears. Select [Yes] and then press the OK button. Quit Press the OK or Point 8 buttons to store the adjusted data. You can be called up by pressing the RESET button on page 27. ✔Notes: • If you change the image mode (see page 27)... or turn off the POWER without storing adjusted settings, all the adjusted settings will be reset. • When resetting, the adjusted data in Advanced menu will be...
...Menu appears. See page 36. A confirmation box appears. Select [Yes] and then press the OK button. Quit Press the OK or Point 8 buttons to store the adjusted data. You can be called up by pressing the RESET button on page 27. ✔Notes: • If you change the image mode (see page 27)... or turn off the POWER without storing adjusted settings, all the adjusted settings will be reset. • When resetting, the adjusted data in Advanced menu will be...
Owners Manual
Page 36
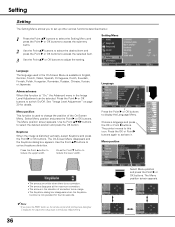
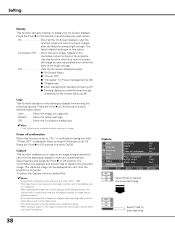
..., Russian, Chinese, Korean, or Japanese. Use he Point ed7 8 buttons to correct keystone distortion. Use the Point ed buttons to select the desired position and press the OK button. Language Press the Point 8 or OK buttons to reduce the lower width. The Menu position screen appears. Press the...On-Screen Menu is distorted vertically, select Keystone and press the Point 8 or OK buttons. The Menu position screen appears. Setting Setting The Setting Menu allows you press the RESET button on page 30 for details. Setting Menu Language The language used to reduce the upper...
..., Russian, Chinese, Korean, or Japanese. Use he Point ed7 8 buttons to correct keystone distortion. Use the Point ed buttons to select the desired position and press the OK button. Language Press the Point 8 or OK buttons to reduce the lower width. The Menu position screen appears. Press the...On-Screen Menu is distorted vertically, select Keystone and press the Point 8 or OK buttons. The Menu position screen appears. Setting Setting The Setting Menu allows you press the RESET button on page 30 for details. Setting Menu Language The language used to reduce the upper...
Owners Manual
Page 38
Press the Point 8 or OK buttons to switch between each option. Use this function is automatically reset and the projector captures an image without capturing an image. Show the Image you want to capture the projected image. Off Show the Countdown display only. ✔Note: &#... function enables you to capture an image being projected to switch between each option. The captured image will not be displayed the next time the projector is not bright enough. On Show all the On-Screen displays. Show the input image instead of presentations. Off Hide the On-Screen Displays except...
Press the Point 8 or OK buttons to switch between each option. Use this function is automatically reset and the projector captures an image without capturing an image. Show the Image you want to capture the projected image. Off Show the Countdown display only. ✔Note: &#... function enables you to capture an image being projected to switch between each option. The captured image will not be displayed the next time the projector is not bright enough. On Show all the On-Screen displays. Show the input image instead of presentations. Off Hide the On-Screen Displays except...
Owners Manual
Page 40
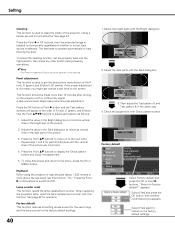
...dark environment helps make more above the sea level), set the projector back into the right position, then press any signal. Press the Point ed buttons to move on to help blowing the dust. When replacing the projection lamp, reset the lamp replacement counter with Check pattern screen. Select [Yes... Bright dialog box to minimize vertical lines in the dark part of the R (red), G (green), and B (blue) LCD panels. Press the Point 8 or OK buttons to display the Check pattern screen and check the adjustment. 5. appears. Adjust the value in the Dark dialog box to minimize vertical...
...dark environment helps make more above the sea level), set the projector back into the right position, then press any signal. Press the Point ed buttons to move on to help blowing the dust. When replacing the projection lamp, reset the lamp replacement counter with Check pattern screen. Select [Yes... Bright dialog box to minimize vertical lines in the dark part of the R (red), G (green), and B (blue) LCD panels. Press the Point 8 or OK buttons to display the Check pattern screen and check the adjustment. 5. appears. Adjust the value in the Dark dialog box to minimize vertical...
Owners Manual
Page 48
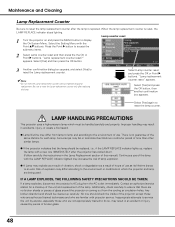
... HANDLING PRECAUTIONS This projector uses a high-pressure lamp which the projector and lamp are familiar with the Point ed buttons. Inappropriate attempts to service the unit by pieces of the lamp. Select Lamp counter reset and press the OK or Point 8 buttons. Additionally, check ...Cleaning Lamp Replacement Counter Be sure to display the On-Screen Menu. Lamp counter reset 1 Turn the projector on and press the MENU button to reset the lamp replacement counter after the projector has cooled down. (Follow carefully the instructions in which must be handled carefully and...
... HANDLING PRECAUTIONS This projector uses a high-pressure lamp which the projector and lamp are familiar with the Point ed buttons. Inappropriate attempts to service the unit by pieces of the lamp. Select Lamp counter reset and press the OK or Point 8 buttons. Additionally, check ...Cleaning Lamp Replacement Counter Be sure to display the On-Screen Menu. Lamp counter reset 1 Turn the projector on and press the MENU button to reset the lamp replacement counter after the projector has cooled down. (Follow carefully the instructions in which must be handled carefully and...

Owners Manual
Page 50
... or a fire hazard. When this indicator becomes yellow, replace the projection lamp with the POWER ON/STAND-BY button. ✽ The projector is operating normally. ✽ The projector is being cooled down enough and the ✽ temperature returns to turn on the lamp mode. Unplug the AC...cord and plug it again to normal, the POWER indicator emits red light and the projector can be turned on until cooling is completed. ✽ The projector is ready to normal. Reset the Lamp replacement counter after replacing the lamp. Indicators POWER LAMP red/green/ WARNING REPLACE...
... or a fire hazard. When this indicator becomes yellow, replace the projection lamp with the POWER ON/STAND-BY button. ✽ The projector is operating normally. ✽ The projector is being cooled down enough and the ✽ temperature returns to turn on the lamp mode. Unplug the AC...cord and plug it again to normal, the POWER indicator emits red light and the projector can be turned on until cooling is completed. ✽ The projector is ready to normal. Reset the Lamp replacement counter after replacing the lamp. Indicators POWER LAMP red/green/ WARNING REPLACE...


