
Owners Manual
Page 2
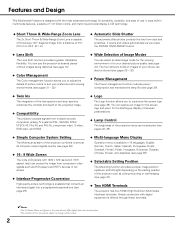
...management function reduces power consumption and maintains the lamp life (see page 39). ◆ Twin Iris The integration of the lens aperture and lamp aperture enhances the contrast and depth of the projected image. ◆ Compatibility The projector accepts signals from multiple sources: computers, analog ..., durability, and ease of use the projector at desired places without notice. 2 You can project the image from dust and scratches. It uses built-in multimedia features, a palette of 1.07 billion colors, and matrix liquid crystal display (LCD) technology. ◆ Short Throw & ...
...management function reduces power consumption and maintains the lamp life (see page 39). ◆ Twin Iris The integration of the lens aperture and lamp aperture enhances the contrast and depth of the projected image. ◆ Compatibility The projector accepts signals from multiple sources: computers, analog ..., durability, and ease of use the projector at desired places without notice. 2 You can project the image from dust and scratches. It uses built-in multimedia features, a palette of 1.07 billion colors, and matrix liquid crystal display (LCD) technology. ◆ Short Throw & ...
Owners Manual
Page 3
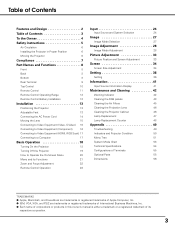
... Terminal 9 Top Control 10 Remote Control 11 Remote Control Operating Range 12 Remote Control Battery Installation 12 Installation 13 Positioning the Projector 13 Adjustable Feet 13 Connecting the AC Power Cord 14 Moving the Lens 15 Connecting to Video Equipment (Video, S-Video) ...43 Cleaning the Air Filters 45 Cleaning the Projection Lens 46 Cleaning the Projector Cabinet 46 Lamp Replacement 47 Lamp Replacement Counter 48 Appendix 49 Troubleshooting 49 Indicators and Projector Condition 50 Menu Tree 51 System Mode Chart 53 Technical Specifications 54 ...
... Terminal 9 Top Control 10 Remote Control 11 Remote Control Operating Range 12 Remote Control Battery Installation 12 Installation 13 Positioning the Projector 13 Adjustable Feet 13 Connecting the AC Power Cord 14 Moving the Lens 15 Connecting to Video Equipment (Video, S-Video) ...43 Cleaning the Air Filters 45 Cleaning the Projection Lens 46 Cleaning the Projector Cabinet 46 Lamp Replacement 47 Lamp Replacement Counter 48 Appendix 49 Troubleshooting 49 Indicators and Projector Condition 50 Menu Tree 51 System Mode Chart 53 Technical Specifications 54 ...
Owners Manual
Page 4
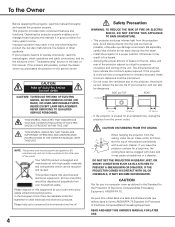
...manual thoroughly and operate the projector properly. DO NOT SET THE PROJECTOR IN GREASY, WET, OR SMOKY CONDITIONS SUCH AS IN A KITCHEN TO PREVENT A BREAKDOWN OR DISASTER. READ AND KEEP THIS OWNER'S MANUAL FOR LATER USE. NO USER-SERVICEABLE PARTS INSIDE EXCEPT LAMP REPLACEMENT. Please dispose of... RISK OF ELECTRIC SHOCK DO NOT OPEN CAUTION: TO REDUCE THE RISK OF ELECTRIC SHOCK, DO NOT REMOVE COVER (OR BACK). Your SANYO product is critical for Protection of the unit. Improper operation may cause a breakdown or a disaster. In the European Union there are applied...
...manual thoroughly and operate the projector properly. DO NOT SET THE PROJECTOR IN GREASY, WET, OR SMOKY CONDITIONS SUCH AS IN A KITCHEN TO PREVENT A BREAKDOWN OR DISASTER. READ AND KEEP THIS OWNER'S MANUAL FOR LATER USE. NO USER-SERVICEABLE PARTS INSIDE EXCEPT LAMP REPLACEMENT. Please dispose of... RISK OF ELECTRIC SHOCK DO NOT OPEN CAUTION: TO REDUCE THE RISK OF ELECTRIC SHOCK, DO NOT REMOVE COVER (OR BACK). Your SANYO product is critical for Protection of the unit. Improper operation may cause a breakdown or a disaster. In the European Union there are applied...
Owners Manual
Page 6
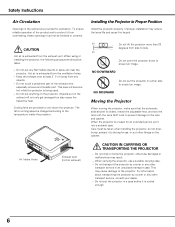
...'s running speed is exhausted from side to side. 20˚ Do not point the projector down the projector. Improper installation may reduce the lamp life and cause fire hazard. 20˚ Do not tilt the projector more than 20 degrees from the ventilation holes. - Do not drop or bump the... projector, otherwise damages or malfunctions may cause damage to protect it to project an image. Cooling ...
...'s running speed is exhausted from side to side. 20˚ Do not point the projector down the projector. Improper installation may reduce the lamp life and cause fire hazard. 20˚ Do not tilt the projector more than 20 degrees from the ventilation holes. - Do not drop or bump the... projector, otherwise damages or malfunctions may cause damage to protect it to project an image. Cooling ...
Owners Manual
Page 8
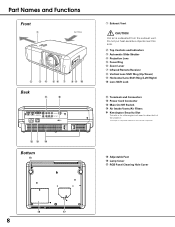
... !4 Air Intake Vents/Air Filters ✽ Kensington Security Slot This slot is for a Kensington lock used to deter theft of ACCO Brands Corporation. !5 Adjustable Feet !6 Lamp Cover !7 RGB Panel Cleaning Hole Cover !6 !7 8 Part Names and Functions Front q Air flow w e r t y u i o !0 Back !1 ✽ S-...COMPONENT 1 HDMI 1 HDMI 2 COMPUTER COMPONENT 2 VIDEO Y Pb/Cb Pr/Cr SERVICEPORT !2 !3 !4 Bottom !5 q Exhaust Vent CAUTION Hot air is a registered trademark of the projector. *Kensington is exhausted from the exhaust vent. Do not put heat-sensitive objects near this side.
... !4 Air Intake Vents/Air Filters ✽ Kensington Security Slot This slot is for a Kensington lock used to deter theft of ACCO Brands Corporation. !5 Adjustable Feet !6 Lamp Cover !7 RGB Panel Cleaning Hole Cover !6 !7 8 Part Names and Functions Front q Air flow w e r t y u i o !0 Back !1 ✽ S-...COMPONENT 1 HDMI 1 HDMI 2 COMPUTER COMPONENT 2 VIDEO Y Pb/Cb Pr/Cr SERVICEPORT !2 !3 !4 Bottom !5 q Exhaust Vent CAUTION Hot air is a registered trademark of the projector. *Kensington is exhausted from the exhaust vent. Do not put heat-sensitive objects near this side.
Owners Manual
Page 10
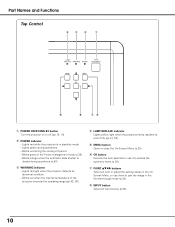
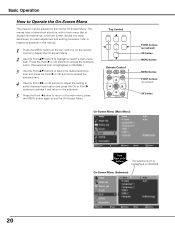
...adjust the setting values in the Normal through mode (p.35). Part Names and Functions Top Control rew q t y ui q POWER ON/STAND-BY button Turn the projector on or off period. - w POWER indicator - y OK button Execute the item selected or use it to pan the image in the OnScreen Menu, or ...use them to access the submenu items (p.20). e WARNING indicator - i INPUT button Select an input source (p.24). 10 r LAMP REPLACE indicator Lights yellow light when the projection lamp reaches its end of the projector exceeds the operating range (pp.42, 50).
...adjust the setting values in the Normal through mode (p.35). Part Names and Functions Top Control rew q t y ui q POWER ON/STAND-BY button Turn the projector on or off period. - w POWER indicator - y OK button Execute the item selected or use it to pan the image in the OnScreen Menu, or ...use them to access the submenu items (p.20). e WARNING indicator - i INPUT button Select an input source (p.24). 10 r LAMP REPLACE indicator Lights yellow light when the projection lamp reaches its end of the projector exceeds the operating range (pp.42, 50).
Owners Manual
Page 11
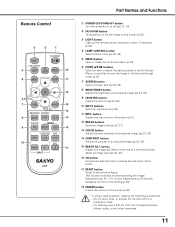
... precautions: - S-VIDEO PC !1 INPUT CXVT Part Names and Functions q POWER ON/STAND-BY button Turn the projector on the screen (p.22). r LAMP CONTROL button Select a lamp mode (pp.22, 29). Remote Control e w q ON/STAND-BY LIGHT LAMP CONTROL r LAMP NO SHOW FREEZE !8 t MENU RESET !7 OK !6 y u SCREEN IMAGE !5 IMAGE ADJ. !4 BRIGHTNESS CONTRAST i BRIGHT CONT. Do not...
... precautions: - S-VIDEO PC !1 INPUT CXVT Part Names and Functions q POWER ON/STAND-BY button Turn the projector on the screen (p.22). r LAMP CONTROL button Select a lamp mode (pp.22, 29). Remote Control e w q ON/STAND-BY LIGHT LAMP CONTROL r LAMP NO SHOW FREEZE !8 t MENU RESET !7 OK !6 y u SCREEN IMAGE !5 IMAGE ADJ. !4 BRIGHTNESS CONTRAST i BRIGHT CONT. Do not...
Owners Manual
Page 19
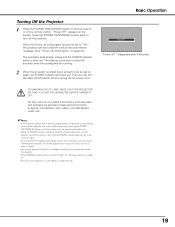
... message. (See "Power off confirmation" on page 42. • Do not put the projector in a case before it is cooled down and the projector cannot be turned on . TO MAINTAIN LIFE OF LAMP, ONCE YOU TURN PROJECTOR ON, WAIT AT LEAST FIVE (5) MINUTES BEFORE TURNING IT OFF. Turn off and unplug the...POWER CORD WHILE COOLING FANS ARE RUNNING OR BEFORE POWER INDICATOR STOPS BLINKING. When the Power off for about an hour in shortening the lamp life. Turning Off the Projector 1 Press the POWER ON/STAND-BY button on the top control or on the screen. OTHERWISE IT WILL RESULT IN SHORTENING...
... message. (See "Power off confirmation" on page 42. • Do not put the projector in a case before it is cooled down and the projector cannot be turned on . TO MAINTAIN LIFE OF LAMP, ONCE YOU TURN PROJECTOR ON, WAIT AT LEAST FIVE (5) MINUTES BEFORE TURNING IT OFF. Turn off and unplug the...POWER CORD WHILE COOLING FANS ARE RUNNING OR BEFORE POWER INDICATOR STOPS BLINKING. When the Power off for about an hour in shortening the lamp life. Turning Off the Projector 1 Press the POWER ON/STAND-BY button on the top control or on the screen. OTHERWISE IT WILL RESULT IN SHORTENING...
Owners Manual
Page 20
... submenus, which are further divided into other submenus. On-Screen Menu (Submenu) 20 press the MENU button again to Operate the On-Screen Menu The projector can be adjusted or set via the On-Screen Menu. Basic Operation How to exit the On-Screen Menu. Press the Point 8 or OK buttons...
... submenus, which are further divided into other submenus. On-Screen Menu (Submenu) 20 press the MENU button again to Operate the On-Screen Menu The projector can be adjusted or set via the On-Screen Menu. Basic Operation How to exit the On-Screen Menu. Press the Point 8 or OK buttons...
Owners Manual
Page 21
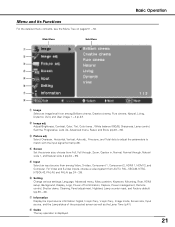
..., Mounting, Rear, HDMI setup, Background, Display, Logo, Power off confirmation, Capture, Power management, Remote control, Shutter demo, Cleaning, Panel adjustment, Highland, Lamp counter reset, and Factory default (pp.36 - 40). choose from AUTO, PAL, SECAM, NTSC, NTSC4.43, PAL-M, and PAL-N (pp.24 - 26...Display the input source information: Signal, H-sync freq., V-sync freq., Image mode, Screen size, Input source, and the Lamp status of the projected screen as well as the Lamp Time (p.41). Basic Operation Menu and its Functions For the detailed menu contents, see the Menu Tree on pages 51 -...
..., Mounting, Rear, HDMI setup, Background, Display, Logo, Power off confirmation, Capture, Power management, Remote control, Shutter demo, Cleaning, Panel adjustment, Highland, Lamp counter reset, and Factory default (pp.36 - 40). choose from AUTO, PAL, SECAM, NTSC, NTSC4.43, PAL-M, and PAL-N (pp.24 - 26...Display the input source information: Signal, H-sync freq., V-sync freq., Image mode, Screen size, Input source, and the Lamp status of the projected screen as well as the Lamp Time (p.41). Basic Operation Menu and its Functions For the detailed menu contents, see the Menu Tree on pages 51 -...
Owners Manual
Page 22
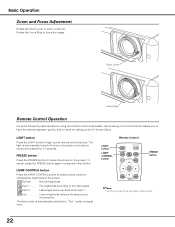
...under no buttons on the screen. Eco Lower brightness reduces the lamp power consumption. FREEZE button Press the FREEZE button to focus the image. Remote Control LIGHT button LAMP CONTROL button ON/STAND-BY LIGHT LAMP CONTROL LAMP NO SHOW FREEZE MENU RESET FREEZE button OK SCREEN IMAGE IMAGE ...screen. Normal brightness. Less bright and lower-sound than Auto 1. The light is automatically turned off when no signal input. The lamp mode is advisable. Basic Operation Zoom and Focus Adjustment Rotate the Zoom Lever to the input signal. Zoom Lever Focus Ring Remote ...
...under no buttons on the screen. Eco Lower brightness reduces the lamp power consumption. FREEZE button Press the FREEZE button to focus the image. Remote Control LIGHT button LAMP CONTROL button ON/STAND-BY LIGHT LAMP CONTROL LAMP NO SHOW FREEZE MENU RESET FREEZE button OK SCREEN IMAGE IMAGE ...screen. Normal brightness. Less bright and lower-sound than Auto 1. The light is automatically turned off when no signal input. The lamp mode is advisable. Basic Operation Zoom and Focus Adjustment Rotate the Zoom Lever to the input signal. Zoom Lever Focus Ring Remote ...
Owners Manual
Page 23
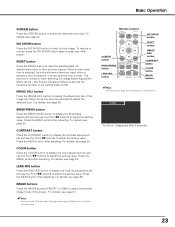
.... 23 "No Show" disappears after adjusting. Menu items one at a time and directly adjust the selected item. For details, see page 28. Remote Control LAMP CONTROL LAMP NO SHOW FREEZE MENU RESET OK SCREEN button BRIGHTNESS button LENS IRIS button SCREEN IMAGE IMAGE ADJ. button CONTRAST button COLOR button IMAGE buttons ✔...
.... 23 "No Show" disappears after adjusting. Menu items one at a time and directly adjust the selected item. For details, see page 28. Remote Control LAMP CONTROL LAMP NO SHOW FREEZE MENU RESET OK SCREEN button BRIGHTNESS button LENS IRIS button SCREEN IMAGE IMAGE ADJ. button CONTRAST button COLOR button IMAGE buttons ✔...
Owners Manual
Page 28
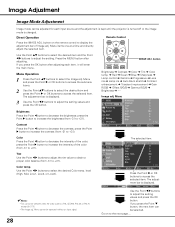
...buttons to access the selected item. Press the MENU button after adjusting each input source and the adjustment is kept until the projector is turned off or the image mode is PAL, SECAM, PAL-M, or PAL-N except for each item, it will enter ... ➜ Color ➜ Tint ➜ Color temp. ➜ Red ➜ Green ➜ Blue ➜ Sharpness ➜ Lamp control ➜ Gamma ➜ Progressive ➜ Lens iris ➜ Lamp iris ➜ Auto black stretch➜ Contrast enhancement ➜ Transient improvement ➜ Gain R/G/B ➜ Offset R/G/B ➜ Gamma ...
...buttons to access the selected item. Press the MENU button after adjusting each input source and the adjustment is kept until the projector is turned off or the image mode is PAL, SECAM, PAL-M, or PAL-N except for each item, it will enter ... ➜ Color ➜ Tint ➜ Color temp. ➜ Red ➜ Green ➜ Blue ➜ Sharpness ➜ Lamp control ➜ Gamma ➜ Progressive ➜ Lens iris ➜ Lamp iris ➜ Auto black stretch➜ Contrast enhancement ➜ Transient improvement ➜ Gain R/G/B ➜ Offset R/G/B ➜ Gamma ...
Owners Manual
Page 29
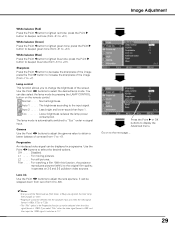
.... Less bright and lower-sound than Auto 1. Progressive An interlaced video signal can also select the lamp mode by pressing the LAMP CONTROL button on 3-2 and 2-2 pulldown video sources. Film . . . . For watching a film... the Point 8 button to deepen blue tone (from -31 to +31). With this function, the projector reproduces pictures faithful to lighten green tone; level changes to lighten red tone; Image Adjustment White balance (...input and when the video signal format is 480p, 575p, or 720p. • The "Film" option in progressive. press the Point 8 button to deepen red tone (from...
.... Less bright and lower-sound than Auto 1. Progressive An interlaced video signal can also select the lamp mode by pressing the LAMP CONTROL button on 3-2 and 2-2 pulldown video sources. Film . . . . For watching a film... the Point 8 button to deepen blue tone (from -31 to +31). With this function, the projector reproduces pictures faithful to lighten green tone; level changes to lighten red tone; Image Adjustment White balance (...input and when the video signal format is 480p, 575p, or 720p. • The "Film" option in progressive. press the Point 8 button to deepen red tone (from...

Owners Manual
Page 30
.... You can be displayed unless the Color management function is executed. • If no user image mode is stored, the factory default value is displayed. Lamp iris Adjust the...
.... You can be displayed unless the Color management function is executed. • If no user image mode is stored, the factory default value is displayed. Lamp iris Adjust the...
Owners Manual
Page 38
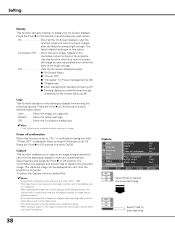
...instead of presentations. Show the Image you want to capture the projected image. Default . . . Show the factory-set to project images after the lamp becomes bright enough. Power off ?" ● "No signal" for the starting to the Capture item. • The Capture function cannot be ... an image without capturing an image. Menu will be captured up display from a computer can be displayed the next time the projector is turned on the projector. Press the Point 8 or OK buttons to stop capturing. To cancel the Capture function, select [No]. ✔Notes: • A ...
...instead of presentations. Show the Image you want to capture the projected image. Default . . . Show the factory-set to project images after the lamp becomes bright enough. Power off ?" ● "No signal" for the starting to the Capture item. • The Capture function cannot be ... an image without capturing an image. Menu will be captured up display from a computer can be displayed the next time the projector is turned on the projector. Press the Point 8 or OK buttons to stop capturing. To cancel the Capture function, select [No]. ✔Notes: • A ...
Owners Manual
Page 39
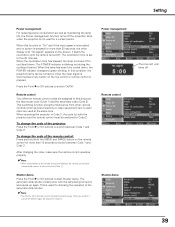
... to Code 2. When this condition, the projection lamp can be operated continuously. Setting Power management For reducing power consumption as well as maintaining the lamp life, the Power management function turns off the projection lamp when the projector is not used for more than 30 seconds, the... timer display with the lamp being turned on the top control or remote control is ...
... to Code 2. When this condition, the projection lamp can be operated continuously. Setting Power management For reducing power consumption as well as maintaining the lamp life, the Power management function turns off the projection lamp when the projector is not used for more than 30 seconds, the... timer display with the lamp being turned on the top control or remote control is ...
Owners Manual
Page 40
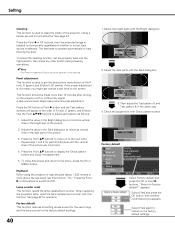
...the next color. Use the Point ed7 8 buttons to move on the projector with or without any other button during cleaning. Adjust the value in the dark part of the R (red), G (green), and B (blue) LCD panels. To close this screen and return to switch On/Off. Press ...Test pattern G and Test pattern B in the order of the projector. Press the OK button or Point 8 button and the Test pattern screens will appear in the same way. 4. When replacing the projection lamp, reset the lamp replacement counter with Check pattern screen. Check the adjustment with this function...
...the next color. Use the Point ed7 8 buttons to move on the projector with or without any other button during cleaning. Adjust the value in the dark part of the R (red), G (green), and B (blue) LCD panels. To close this screen and return to switch On/Off. Press ...Test pattern G and Test pattern B in the order of the projector. Press the OK button or Point 8 button and the Test pattern screens will appear in the same way. 4. When replacing the projection lamp, reset the lamp replacement counter with Check pattern screen. Check the adjustment with this function...
Owners Manual
Page 41
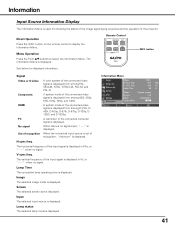
...used for displayed information. The Information Menu is displayed. Remote Control COMPONENT HDMI VIDEO C1/C2 H1/H2 INFO. A system mode of the projector. When there is displayed from among PAL, SECAM, NTSC, NTSC4.43, PAL-M, and PAL-N. V-sync freq. Input The selected input .... H-sync freq. The horizontal frequency of the connected computer signal is displayed from among 480i, 480p, 575i, 575p, 720p, and 1080i. Lamp Time The cumulative lamp operating time is displayed. button on the remote control to select the Information Menu. A resolution of the input signal is...
...used for displayed information. The Information Menu is displayed. Remote Control COMPONENT HDMI VIDEO C1/C2 H1/H2 INFO. A system mode of the projector. When there is displayed from among PAL, SECAM, NTSC, NTSC4.43, PAL-M, and PAL-N. V-sync freq. Input The selected input .... H-sync freq. The horizontal frequency of the connected computer signal is displayed from among 480i, 480p, 575i, 575p, 720p, and 1080i. Lamp Time The cumulative lamp operating time is displayed. button on the remote control to select the Information Menu. A resolution of the input signal is...
Owners Manual
Page 47
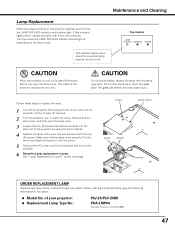
... least 45 minutes before you open the lamp cover. 3 Loosen the two (2) screws that the lamp is depending on the projector. 6 Reset the Lamp replacement counter. Do not drop the lamp or touch the glass bulb! The inside of the projector can be ordered through your projector: ● Replacement Lamp Type No.: PLV-Z5/PLV-Z5BK POA-LMP94 (Service Parts No...
... least 45 minutes before you open the lamp cover. 3 Loosen the two (2) screws that the lamp is depending on the projector. 6 Reset the Lamp replacement counter. Do not drop the lamp or touch the glass bulb! The inside of the projector can be ordered through your projector: ● Replacement Lamp Type No.: PLV-Z5/PLV-Z5BK POA-LMP94 (Service Parts No...


