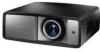
Owners Manual
Page 3
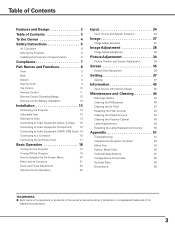
...Terminal 9 Top Control 10 Remote Control 11 Remote Control Operating Range 12 Remote Control Battery Installation 12 Installation 13 Positioning the Projector 13 Adjustable Feet 13 Moving the Lens 14 Connecting to Video Equipment (Video, S-Video) 15 Connecting to Video Equipment (... the Filter Counter 48 Cleaning the Projection Lens 48 Cleaning the Projector Cabinet 48 Lamp Replacement 49 Resetting the Lamp Replacement Counter 50 Appendix 51 Troubleshooting 51 Indicators and Projector Condition 53 Menu Tree 54 System Mode Chart 56 Technical Specifications ...
...Terminal 9 Top Control 10 Remote Control 11 Remote Control Operating Range 12 Remote Control Battery Installation 12 Installation 13 Positioning the Projector 13 Adjustable Feet 13 Moving the Lens 14 Connecting to Video Equipment (Video, S-Video) 15 Connecting to Video Equipment (... the Filter Counter 48 Cleaning the Projection Lens 48 Cleaning the Projector Cabinet 48 Lamp Replacement 49 Resetting the Lamp Replacement Counter 50 Appendix 51 Troubleshooting 51 Indicators and Projector Condition 53 Menu Tree 54 System Mode Chart 56 Technical Specifications ...
Owners Manual
Page 4
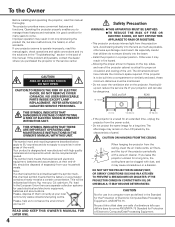
...PARTS INSIDE EXCEPT LAMP REPLACEMENT. The symbol mark and recycling systems described below apply to operate improperly, read this manual thoroughly. Your product is unused for an extended time, unplug the projector from your local community waste collection/recycling centre. This projector produces intense light...as IN a kitchen to manage those features and maintains it may remain on the LCD panels by the characteristic of Electronic Computer/Data Processing Equipment. Operating the projector properly enables you to prevent A Breakdown or disaster. THIS SYMBOL INDICATES THAT THERE ...
...PARTS INSIDE EXCEPT LAMP REPLACEMENT. The symbol mark and recycling systems described below apply to operate improperly, read this manual thoroughly. Your product is unused for an extended time, unplug the projector from your local community waste collection/recycling centre. This projector produces intense light...as IN a kitchen to manage those features and maintains it may remain on the LCD panels by the characteristic of Electronic Computer/Data Processing Equipment. Operating the projector properly enables you to prevent A Breakdown or disaster. THIS SYMBOL INDICATES THAT THERE ...

Owners Manual
Page 5
... consult your authorized dealer or local power company. Unplug this projector yourself as the original part. If the projector does not operate normally by placing the projector on the projector. NOTE FOR CUSTOMERS IN THE US Hg LAMP(S) inside this product contain mercury and must be recycled or ...the bottom opening or removing covers may be covered with the projector. Do not allow anything to persons. When replacement parts are covered by the manufacturers. Read all of any service or repairs to this projector where the cord may expose you are provided for long periods ...
... consult your authorized dealer or local power company. Unplug this projector yourself as the original part. If the projector does not operate normally by placing the projector on the projector. NOTE FOR CUSTOMERS IN THE US Hg LAMP(S) inside this product contain mercury and must be recycled or ...the bottom opening or removing covers may be covered with the projector. Do not allow anything to persons. When replacement parts are covered by the manufacturers. Read all of any service or repairs to this projector where the cord may expose you are provided for long periods ...
Owners Manual
Page 10
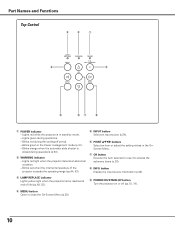
...during operations (p.53). Blinks orange when the automatic slide shutter is in the OnScreen Menu. e LAMP REPLACE indicator Lights yellow light when the projection lamp reaches its end of the projector exceeds the operating range (pp.44, 53). Blinks green in the Power management mode (p.41).... - w WARNING indicator - i INFO. o POWER ON/STAND-BY button Turn the projector on or off period. - Part Names and ...
...during operations (p.53). Blinks orange when the automatic slide shutter is in the OnScreen Menu. e LAMP REPLACE indicator Lights yellow light when the projection lamp reaches its end of the projector exceeds the operating range (pp.44, 53). Blinks green in the Power management mode (p.41).... - w WARNING indicator - i INFO. o POWER ON/STAND-BY button Turn the projector on or off period. - Part Names and ...
Owners Manual
Page 41
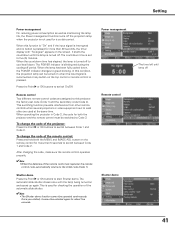
... on the top control or remote control is pressed. Power management Remote control Shutter demo The time left until the lamp is blinking red during the cooling-off period. When this projector: the factory-set to start Shutter demo. To change the code of the remote control: Press and hold both the... set code (Code 1) and the secondary code (Code 2). The countdown time is used for about five seconds. Remote control Two different remote control codes are replaced, the remote control code automatically returns to green blinking.
... on the top control or remote control is pressed. Power management Remote control Shutter demo The time left until the lamp is blinking red during the cooling-off period. When this projector: the factory-set to start Shutter demo. To change the code of the remote control: Press and hold both the... set code (Code 1) and the secondary code (Code 2). The countdown time is used for about five seconds. Remote control Two different remote control codes are replaced, the remote control code automatically returns to green blinking.
Owners Manual
Page 42
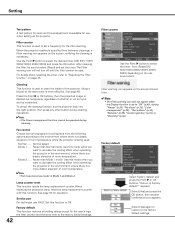
... Normal mode. Select [Yes] again to restore to Factory default?" See page 46. Normal Normal speed. When replacing the projection lamp, reset the lamp replacement counter with this function to increase the cooling effect when operating the projector in Mode 1 and Mode 2. Select [Yes] and press the OK button, then another confirmation box appears. Use...
... Normal mode. Select [Yes] again to restore to Factory default?" See page 46. Normal Normal speed. When replacing the projection lamp, reset the lamp replacement counter with this function to increase the cooling effect when operating the projector in Mode 1 and Mode 2. Select [Yes] and press the OK button, then another confirmation box appears. Use...
Owners Manual
Page 48
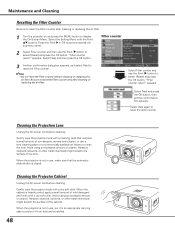
...the Filter Counter Be sure to reset the Filter counter after cleaning or replacing the air filter. appears. Be sure to reset the Filter counter only after cleaning or replacing the air filter. 1 Turn the projector on and press the MENU button to display the On-Screen Menu. ... Filter counter. ✔Note: • Do not reset the Filter counter without cleaning or replacing the air filter. Filter counter 3 Another confirmation dialog box appears, and select [Yes] to reset the lamp counter. Avoid using an excessive amount of the lens. Abrasive cleaners, solvents, or other harsh...
...the Filter Counter Be sure to reset the Filter counter after cleaning or replacing the air filter. appears. Be sure to reset the Filter counter only after cleaning or replacing the air filter. 1 Turn the projector on and press the MENU button to display the On-Screen Menu. ... Filter counter. ✔Note: • Do not reset the Filter counter without cleaning or replacing the air filter. Filter counter 3 Another confirmation dialog box appears, and select [Yes] to reset the lamp counter. Avoid using an excessive amount of the lens. Abrasive cleaners, solvents, or other harsh...
Owners Manual
Page 49
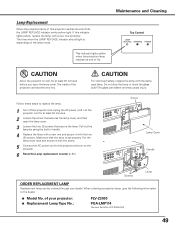
... is set properly. Follow these steps to the dealer. ● Model No. Let the projector cool for at least 45 minutes. 2 Loosen the screw that secure the lamp. Screw Lamp Cover Handle Screws Lamp ORDER REPLACEMENT LAMP Replacement lamp can be ordered through your projector: ● Replacement Lamp Type No.: PLV-Z3000 POA-LMP114 (Service Parts No. 610 336 5404) 49 Put the...
... is set properly. Follow these steps to the dealer. ● Model No. Let the projector cool for at least 45 minutes. 2 Loosen the screw that secure the lamp. Screw Lamp Cover Handle Screws Lamp ORDER REPLACEMENT LAMP Replacement lamp can be ordered through your projector: ● Replacement Lamp Type No.: PLV-Z3000 POA-LMP114 (Service Parts No. 610 336 5404) 49 Put the...
Owners Manual
Page 50
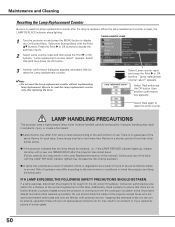
... the On-Screen Menu. appears. Additionally, check carefully to do so, may differ according to reset the Lamp replacement counter only after replacing the lamp. LAMP HANDLING PRECAUTIONS This projector uses a high-pressure lamp which the projector and lamp are familiar with the Point ed buttons. When the lamp replacement counter is no broken shards or pieces of glass around the...
... the On-Screen Menu. appears. Additionally, check carefully to do so, may differ according to reset the Lamp replacement counter only after replacing the lamp. LAMP HANDLING PRECAUTIONS This projector uses a high-pressure lamp which the projector and lamp are familiar with the Point ed buttons. When the lamp replacement counter is no broken shards or pieces of glass around the...
Owners Manual
Page 51
... screen (see page 22). - Select a correct input source once again through Menu operation (see page 14). - Check if "Image mode" is out of the projector (see page 13). - Replace the lamp with a computer and it is turned on (see pages 24 - 26). - Appendix Troubleshooting Before calling your computer or video equipment and the...
... screen (see page 22). - Select a correct input source once again through Menu operation (see page 14). - Check if "Image mode" is out of the projector (see page 13). - Replace the lamp with a computer and it is turned on (see pages 24 - 26). - Appendix Troubleshooting Before calling your computer or video equipment and the...
Owners Manual
Page 53
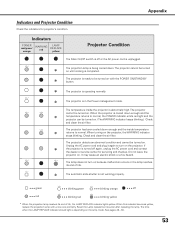
...; temperature returns to normal. When turning on the lamp mode. When this indicator becomes yellow, replace the projection lamp with the POWER ON/STAND-BY ✽ button. ✽ The projector is operating normally. ✽ The projector is abnormally high. Indicators POWER red/green/ orange WARNING red LAMP REPLACE yellow Projector Condition The Main On/Off switch is off...
...; temperature returns to normal. When turning on the lamp mode. When this indicator becomes yellow, replace the projection lamp with the POWER ON/STAND-BY ✽ button. ✽ The projector is operating normally. ✽ The projector is abnormally high. Indicators POWER red/green/ orange WARNING red LAMP REPLACE yellow Projector Condition The Main On/Off switch is off...


