
Owners Manual
Page 2
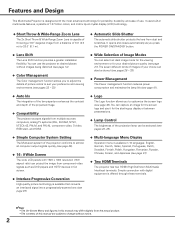
... system of the projector conforms to customize the screen logo (see page 26). ◆ 16 : 9 Wide Screen The wide LCD panels with the most advanced technology for the starting-up display or between presentations. ◆ Lamp Control The brightness of the projection lamp can be stored ... page 41). ◆ Auto Iris The integration of the lamp aperture enhances the contrast and depth of the projected image. ◆ Compatibility The projector accepts signals from dust and scratches. Features and Design This Multimedia Projector is designed with 1920 x 1080 resolution (16:9 aspect ratio...
... system of the projector conforms to customize the screen logo (see page 26). ◆ 16 : 9 Wide Screen The wide LCD panels with the most advanced technology for the starting-up display or between presentations. ◆ Lamp Control The brightness of the projection lamp can be stored ... page 41). ◆ Auto Iris The integration of the lamp aperture enhances the contrast and depth of the projected image. ◆ Compatibility The projector accepts signals from dust and scratches. Features and Design This Multimedia Projector is designed with 1920 x 1080 resolution (16:9 aspect ratio...
Owners Manual
Page 3
...Terminal 9 Top Control 10 Remote Control 11 Remote Control Operating Range 12 Remote Control Battery Installation 12 Installation 13 Positioning the Projector 13 Adjustable Feet 13 Moving the Lens 14 Connecting to Video Equipment (Video, S-Video) 15 Connecting to Video Equipment (Component...the Filter Counter 48 Cleaning the Projection Lens 48 Cleaning the Projector Cabinet 48 Lamp Replacement 49 Resetting the Lamp Replacement Counter 50 Appendix 51 Troubleshooting 51 Indicators and Projector Condition 53 Menu Tree 54 System Mode Chart 56 Technical ...
...Terminal 9 Top Control 10 Remote Control 11 Remote Control Operating Range 12 Remote Control Battery Installation 12 Installation 13 Positioning the Projector 13 Adjustable Feet 13 Moving the Lens 14 Connecting to Video Equipment (Video, S-Video) 15 Connecting to Video Equipment (Component...the Filter Counter 48 Cleaning the Projection Lens 48 Cleaning the Projector Cabinet 48 Lamp Replacement 49 Resetting the Lamp Replacement Counter 50 Appendix 51 Troubleshooting 51 Indicators and Projector Condition 53 Menu Tree 54 System Mode Chart 56 Technical ...
Owners Manual
Page 4
... or smoky conditions such as possible, otherwise eye damage could result. Operating the projector properly enables you purchased the projector or the service center. NO USER-SERVICEABLE PARTS INSIDE EXCEPT LAMP REPLACEMENT. THIS SYMBOL INDICATES THAT DANGEROUS VOLTAGE CONSTITUTING A RISK OF ELECTRIC SHOCK IS...mark means that electrical and electronic equipment, batteries and accumulators, at your projector seems to prevent A Breakdown or disaster. This will be dangerous. Otherwise it may remain on the LCD panels by the characteristic of separately from the ceiling, clean the air intake...
... or smoky conditions such as possible, otherwise eye damage could result. Operating the projector properly enables you purchased the projector or the service center. NO USER-SERVICEABLE PARTS INSIDE EXCEPT LAMP REPLACEMENT. THIS SYMBOL INDICATES THAT DANGEROUS VOLTAGE CONSTITUTING A RISK OF ELECTRIC SHOCK IS...mark means that electrical and electronic equipment, batteries and accumulators, at your projector seems to prevent A Breakdown or disaster. This will be dangerous. Otherwise it may remain on the LCD panels by the characteristic of separately from the ceiling, clean the air intake...

Owners Manual
Page 5
... service personnel under the following the operating instructions. NOTE FOR CUSTOMERS IN THE US Hg LAMP(S) inside this projector from wall outlet and refer servicing to this projector from AC power supply before the product is left unattended and unused for cleaning. Follow all... unless proper ventilation is damaged or frayed. Do not allow anything to qualified service personnel. Refer all servicing to rest on the projector. Quick stops, excessive force, and uneven surfaces may cause hazards. for service. If you to normal operation. b. Unplug this...
... service personnel under the following the operating instructions. NOTE FOR CUSTOMERS IN THE US Hg LAMP(S) inside this projector from wall outlet and refer servicing to this projector from AC power supply before the product is left unattended and unused for cleaning. Follow all... unless proper ventilation is damaged or frayed. Do not allow anything to qualified service personnel. Refer all servicing to rest on the projector. Quick stops, excessive force, and uneven surfaces may cause hazards. for service. If you to normal operation. b. Unplug this...

Owners Manual
Page 6
... by courier or any other transport service in an unsuitable transport case. Cooling fans are provided for ventilation. NO UPWARD Do not point the projector down the projector. NO SIDEWARD CAUTION - Failure to do not drop, bump, subject it into a suitable case. Air Intake Vent Exhaust Vent (Hot air ... lock the lens with the Lens Shift Lock to prevent damage to the lens and cabinet. Improper installation may reduce the lamp life and cause fire hazard. 20˚ Do not tilt the projector more than 20 degrees from the exhaust vent. Care must not be taken when handling the...
... by courier or any other transport service in an unsuitable transport case. Cooling fans are provided for ventilation. NO UPWARD Do not point the projector down the projector. NO SIDEWARD CAUTION - Failure to do not drop, bump, subject it into a suitable case. Air Intake Vent Exhaust Vent (Hot air ... lock the lens with the Lens Shift Lock to prevent damage to the lens and cabinet. Improper installation may reduce the lamp life and cause fire hazard. 20˚ Do not tilt the projector more than 20 degrees from the exhaust vent. Care must not be taken when handling the...

Owners Manual
Page 8
...) !0 Lens Shift Lock !1 Terminals and Connectors !2 Main On/Off Switch !3 Power Cord Connector !4 Air Intake Vent !5 Lamp Cover ✽ Kensington Security Slot This slot is for a Kensington lock used to deter theft of the projector. *Kensington is exhausted from the exhaust vent. Do not put heat-sensitive objects near this side. Part...
...) !0 Lens Shift Lock !1 Terminals and Connectors !2 Main On/Off Switch !3 Power Cord Connector !4 Air Intake Vent !5 Lamp Cover ✽ Kensington Security Slot This slot is for a Kensington lock used to deter theft of the projector. *Kensington is exhausted from the exhaust vent. Do not put heat-sensitive objects near this side. Part...
Owners Manual
Page 10
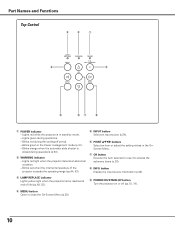
... Select an input source (p.24). Blinks orange when the automatic slide shutter is in stand-by mode. - w WARNING indicator - e LAMP REPLACE indicator Lights yellow light when the projection lamp reaches its end of the projector exceeds the operating range (pp.44, 53). Blinks red during operations. - Part Names and Functions Top Control e w q r o t yu...
... Select an input source (p.24). Blinks orange when the automatic slide shutter is in stand-by mode. - w WARNING indicator - e LAMP REPLACE indicator Lights yellow light when the projection lamp reaches its end of the projector exceeds the operating range (pp.44, 53). Blinks red during operations. - Part Names and Functions Top Control e w q r o t yu...
Owners Manual
Page 11
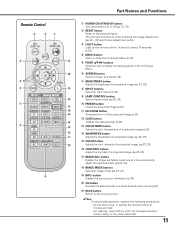
e LIGHT button Light up the remote control buttons for about 10 seconds (p.22). o LAMP CONTROL button !8 Select a lamp mode (pp.23, 29). !0 FREEZE button !7 Freeze the projected image (p.23). !6 !1 NO SHOW button !5 Temporarily turn off ...i INPUT buttons Select an input source (p.24). Remote Control e w q r t y u i o Part Names and Functions q POWER ON/STAND-BY button Turn the projector on or off the projected image (p.23). !2 LOGO button !4 Display the captured logo (p.23). !3 !3 COLOR TEMP. button Display the input source information (p.43). @0 ...
e LIGHT button Light up the remote control buttons for about 10 seconds (p.22). o LAMP CONTROL button !8 Select a lamp mode (pp.23, 29). !0 FREEZE button !7 Freeze the projected image (p.23). !6 !1 NO SHOW button !5 Temporarily turn off ...i INPUT buttons Select an input source (p.24). Remote Control e w q r t y u i o Part Names and Functions q POWER ON/STAND-BY button Turn the projector on or off the projected image (p.23). !2 LOGO button !4 Display the captured logo (p.23). !3 !3 COLOR TEMP. button Display the input source information (p.43). @0 ...
Owners Manual
Page 18
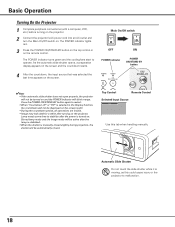
... indicator POWER ON/STAND-BY button ✔Note: • If the automatic slide shutter does not open properly, the projector will be active after the lamp is stabilized. • When the shutter is selected in the Display function, the countdown will blink orange. Press the...Remote Control Selected Input Source Use this could cause injury or the projector to operate. Basic Operation Turning On the Projector 1 Complete peripheral connections (with a computer, VCR, etc.) before turning on the projector. 2 Connect the projector's AC power cord into an AC outlet and turn the Main ...
... indicator POWER ON/STAND-BY button ✔Note: • If the automatic slide shutter does not open properly, the projector will be active after the lamp is stabilized. • When the shutter is selected in the Display function, the countdown will blink orange. Press the...Remote Control Selected Input Source Use this could cause injury or the projector to operate. Basic Operation Turning On the Projector 1 Complete peripheral connections (with a computer, VCR, etc.) before turning on the projector. 2 Connect the projector's AC power cord into an AC outlet and turn the Main ...
Owners Manual
Page 19
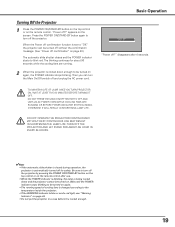
... automatic slide shutter is closed during operation, the projector is being cooled down enough to blink red. The blinking continues for safety. "Power off ?" OTHERWISE IT WILL RESULT IN SHORTENING LAMP LIFE. Be sure to the temperature inside the projector. • If the WARNING indicator blinks or emits... red light, see "Warning Indicator" on page 44. • Do not put the projector in a case before it is cooled down and...
... automatic slide shutter is closed during operation, the projector is being cooled down enough to blink red. The blinking continues for safety. "Power off ?" OTHERWISE IT WILL RESULT IN SHORTENING LAMP LIFE. Be sure to the temperature inside the projector. • If the WARNING indicator blinks or emits... red light, see "Warning Indicator" on page 44. • Do not put the projector in a case before it is cooled down and...
Owners Manual
Page 21
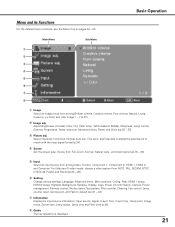
... Rename, Display, Logo, Power off confirmation, Capture, Power management, Remote control, Shutter demo, Test pattern, Filter counter, Cleaning, Fan control, Lamp counter reset, Service port, and Factory default (pp.37 - 42). Basic Operation Menu and its Functions For the detailed menu contents, see the ... (p.34). u Information Display the input source information: Input source, Signal, H-sync freq., V-sync freq., Deep color, Image mode, Screen size, Lamp status, Lamp time and Filter time (p.43). choose from AUTO, PAL, SECAM, NTSC, NTSC4.43, PAL-M, and PAL-N (pp.24 - 26). y Setting...
... Rename, Display, Logo, Power off confirmation, Capture, Power management, Remote control, Shutter demo, Test pattern, Filter counter, Cleaning, Fan control, Lamp counter reset, Service port, and Factory default (pp.37 - 42). Basic Operation Menu and its Functions For the detailed menu contents, see the ... (p.34). u Information Display the input source information: Input source, Signal, H-sync freq., V-sync freq., Deep color, Image mode, Screen size, Lamp status, Lamp time and Filter time (p.43). choose from AUTO, PAL, SECAM, NTSC, NTSC4.43, PAL-M, and PAL-N (pp.24 - 26). y Setting...

Owners Manual
Page 23
... For details, see page 27 . Normal Normal brightness. Basic Operation IMAGE MODE buttons Press the IMAGE MODE buttons (PRESET or USER) to select a lamp mode for the description of other button. For details, see page 40. IMAGE ADJ. button to adjust the setting value. For details, see page 28...in the logo setting. Auto 1 The brightness according to adjust the setting value. Auto 2 Less bright and lower-sound than Auto 1. The lamp mode is not captured. NO SHOW button Press the NO SHOW button to freeze the picture on the screen. FREEZE button Press the FREEZE button...
... For details, see page 27 . Normal Normal brightness. Basic Operation IMAGE MODE buttons Press the IMAGE MODE buttons (PRESET or USER) to select a lamp mode for the description of other button. For details, see page 40. IMAGE ADJ. button to adjust the setting value. For details, see page 28...in the logo setting. Auto 1 The brightness according to adjust the setting value. Auto 2 Less bright and lower-sound than Auto 1. The lamp mode is not captured. NO SHOW button Press the NO SHOW button to freeze the picture on the screen. FREEZE button Press the FREEZE button...
Owners Manual
Page 28
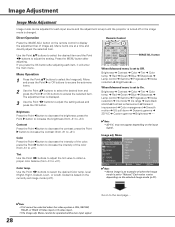
Press the MENU button after adjusting each input source and the adjustment is kept until the projector is turned off or the image mode is set to "Natural." Menu Operation 1 Press the Point ed buttons to +31). ...decrease the brightness; Brightness ➜ Contrast ➜ Color ➜ Tint ➜ Color temp. ➜ Red ➜ Green ➜ Blue ➜ Sharpness ➜ Lamp control ➜ Gamma ➜ Progressive ➜ Noise reduction ➜ Iris mode ➜ Iris range ➜ Auto black stretch➜ Contrast enhancement ➜ Transient improvement ...
Press the MENU button after adjusting each input source and the adjustment is kept until the projector is turned off or the image mode is set to "Natural." Menu Operation 1 Press the Point ed buttons to +31). ...decrease the brightness; Brightness ➜ Contrast ➜ Color ➜ Tint ➜ Color temp. ➜ Red ➜ Green ➜ Blue ➜ Sharpness ➜ Lamp control ➜ Gamma ➜ Progressive ➜ Noise reduction ➜ Iris mode ➜ Iris range ➜ Auto black stretch➜ Contrast enhancement ➜ Transient improvement ...

Owners Manual
Page 29
... Point 7 8 buttons to the input signal. You can be reduced. If you to +7). Auto 1 The brightness according to select the desired lamp mode. level changes to change the brightness of contrast (from -31 to the video signal or film signal (3-2 and 2-2 pulldown video sources.) Noise... reduction Noise interference on the screen can be selected with the computer input and when the video signal format is 480p, 575p, 720p, or 1080p. • Noise reduction cannot be displayed in progressive. press the Point 8 button to deepen red tone (from -31 to lighten blue tone; ...
... Point 7 8 buttons to the input signal. You can be reduced. If you to +7). Auto 1 The brightness according to select the desired lamp mode. level changes to change the brightness of contrast (from -31 to the video signal or film signal (3-2 and 2-2 pulldown video sources.) Noise... reduction Noise interference on the screen can be selected with the computer input and when the video signal format is 480p, 575p, 720p, or 1080p. • Noise reduction cannot be displayed in progressive. press the Point 8 button to deepen red tone (from -31 to lighten blue tone; ...

Owners Manual
Page 30
... the Point 8 or OK buttons to adjust the setting values and press the OK button. Color management Adjust the level, phase, and gamma of the lamp aperture (from the following options: Mode 1 �� Brightness is prioritized over contrast Mode 2 �� Contrast is selected. • 5:5... Adjust the upper limit of any color. You can be operated when HDMI 1080/24p or the computer signal is prioritized over brightness Fixed Fixed lamp aperture set to 0). ✔Note: • Value changes depending on page 32. Off 5:5 pull down mode is "Off" Auto 5:5 pull down...
... the Point 8 or OK buttons to adjust the setting values and press the OK button. Color management Adjust the level, phase, and gamma of the lamp aperture (from the following options: Mode 1 �� Brightness is prioritized over contrast Mode 2 �� Contrast is selected. • 5:5... Adjust the upper limit of any color. You can be operated when HDMI 1080/24p or the computer signal is prioritized over brightness Fixed Fixed lamp aperture set to 0). ✔Note: • Value changes depending on page 32. Off 5:5 pull down mode is "Off" Auto 5:5 pull down...

Owners Manual
Page 40
...when you cancel the capturing. 40 Capture Select [Yes] to project the image as early as possible even when the lamp is turned on the projector. Use this function when you want to capture the projected image. Default Show the factory-set to switch between each ... Image adj. Capture This function enables you captured. Off Hide the On-Screen Displays except; ● On-Screen Menu ● "Power off the projector (p.19). Off Show the Countdown display only. ✔Note: • "User" option cannot be operated with unsupported signals. • When starting ...
...when you cancel the capturing. 40 Capture Select [Yes] to project the image as early as possible even when the lamp is turned on the projector. Use this function when you want to capture the projected image. Default Show the factory-set to switch between each ... Image adj. Capture This function enables you captured. Off Hide the On-Screen Displays except; ● On-Screen Menu ● "Power off the projector (p.19). Off Show the Countdown display only. ✔Note: • "User" option cannot be operated with unsupported signals. • When starting ...
Owners Manual
Page 41
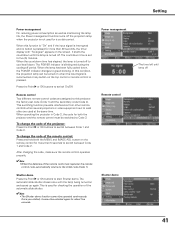
...ADJ. Shutter demo Press the Point 8 or OK buttons to switch On/Off. When this condition, the projection lamp can be switched to switch between Code 1 and Code 2. When operating the projector in Code 2, the code for a certain period. To change the code of the automatic slide shutter. &#...for more than 5 seconds to Code 2. When the lamp has been fully cooled down . It starts the countdown until lamp off the projection lamp when the projector is pressed for more than 30 seconds, the timer display with the lamp being turned on the remote control for about five seconds....
...ADJ. Shutter demo Press the Point 8 or OK buttons to switch On/Off. When this condition, the projection lamp can be switched to switch between Code 1 and Code 2. When operating the projector in Code 2, the code for a certain period. To change the code of the automatic slide shutter. &#...for more than 5 seconds to Code 2. When the lamp has been fully cooled down . It starts the countdown until lamp off the projection lamp when the projector is pressed for more than 30 seconds, the timer display with the lamp being turned on the remote control for about five seconds....
Owners Manual
Page 42
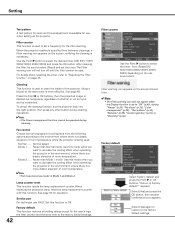
... than Normal mode. appears. Select [Yes] again to restore to Factory default?" Filter counter This function is a drastic elevation of the projector. After cleaning the filter, be sure to set time. ✔Note: • The Filter warning icon will not turn off until ... the Filter Counter" on the use ONLY. Use this function. Lamp counter reset This function resets the lamp replacement counter. Using a blower at a set a frequency for the filter cleaning. When replacing the projection lamp, reset the lamp replacement counter with this mode when you want to "Off" (p....
... than Normal mode. appears. Select [Yes] again to restore to Factory default?" Filter counter This function is a drastic elevation of the projector. After cleaning the filter, be sure to set time. ✔Note: • The Filter warning icon will not turn off until ... the Filter Counter" on the use ONLY. Use this function. Lamp counter reset This function resets the lamp replacement counter. Using a blower at a set a frequency for the filter cleaning. When replacing the projection lamp, reset the lamp replacement counter with this mode when you want to "Off" (p....

Owners Manual
Page 43
... The selected lamp mode is displayed. button INFO. button on the top control or on the remote control to select the Information Menu. Input The selected input source is displayed in HDMI input signal is displayed. The horizontal frequency of the projector. Menu Operation Press the Point ed ... NTSC4.43, PAL-M, and PAL-N. A system mode of the connected video signal is displayed from among 480i, 480p, 575i, 575p, 720p, 1080i and 1080p. A system mode of the connected computer signal is displayed from among D-VGA, DWXGA, D-480i, D-480p, D-575i, D-575p, D-720p, D-1080i, and...
... The selected lamp mode is displayed. button INFO. button on the top control or on the remote control to select the Information Menu. Input The selected input source is displayed in HDMI input signal is displayed. The horizontal frequency of the projector. Menu Operation Press the Point ed ... NTSC4.43, PAL-M, and PAL-N. A system mode of the connected video signal is displayed from among 480i, 480p, 575i, 575p, 720p, 1080i and 1080p. A system mode of the connected computer signal is displayed from among D-VGA, DWXGA, D-480i, D-480p, D-575i, D-575p, D-720p, D-1080i, and...
Owners Manual
Page 48
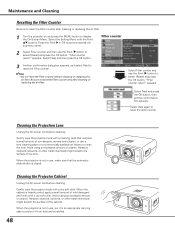
... reset the Filter counter. ✔Note: • Do not reset the Filter counter without cleaning or replacing the air filter. Cleaning the Projector Cabinet Unplug the AC power cord before cleaning. When the cabinet is not in an appropriate carrying case to clean the lens. Maintenance and... after cleaning or replacing the air filter. appears. Filter counter 3 Another confirmation dialog box appears, and select [Yes] to reset the lamp counter. Cleaning the Projection Lens Unplug the AC power cord before cleaning. Avoid using an excessive amount of the lens. Gently wipe the ...
... reset the Filter counter. ✔Note: • Do not reset the Filter counter without cleaning or replacing the air filter. Cleaning the Projector Cabinet Unplug the AC power cord before cleaning. When the cabinet is not in an appropriate carrying case to clean the lens. Maintenance and... after cleaning or replacing the air filter. appears. Filter counter 3 Another confirmation dialog box appears, and select [Yes] to reset the lamp counter. Cleaning the Projection Lens Unplug the AC power cord before cleaning. Avoid using an excessive amount of the lens. Gently wipe the ...


