
Owners Manual
Page 2
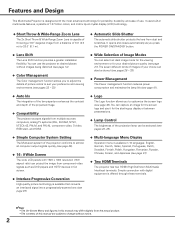
...picture colors to suit your preference and viewing environments (see page 41). ◆ Auto Iris The integration of the lamp aperture enhances the contrast and depth of the projector conforms to 20.0' (6.1 m). ◆ Automatic Slide Shutter The automatic slide shutter protects the lens from multiple sources...projection lamp can project the image from component video signals such as you to customize the screen logo (see page 26). ◆ 16 : 9 Wide Screen The wide LCD panels with digital equipment is capable of throwing a 100" diagonal image from a distance of use the projector at...
...picture colors to suit your preference and viewing environments (see page 41). ◆ Auto Iris The integration of the lamp aperture enhances the contrast and depth of the projector conforms to 20.0' (6.1 m). ◆ Automatic Slide Shutter The automatic slide shutter protects the lens from multiple sources...projection lamp can project the image from component video signals such as you to customize the screen logo (see page 26). ◆ 16 : 9 Wide Screen The wide LCD panels with digital equipment is capable of throwing a 100" diagonal image from a distance of use the projector at...
Owners Manual
Page 3
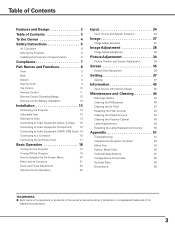
...Terminal 9 Top Control 10 Remote Control 11 Remote Control Operating Range 12 Remote Control Battery Installation 12 Installation 13 Positioning the Projector 13 Adjustable Feet 13 Moving the Lens 14 Connecting to Video Equipment (Video, S-Video) 15 Connecting to Video Equipment (Component...the Filter Counter 48 Cleaning the Projection Lens 48 Cleaning the Projector Cabinet 48 Lamp Replacement 49 Resetting the Lamp Replacement Counter 50 Appendix 51 Troubleshooting 51 Indicators and Projector Condition 53 Menu Tree 54 System Mode Chart 56 Technical ...
...Terminal 9 Top Control 10 Remote Control 11 Remote Control Operating Range 12 Remote Control Battery Installation 12 Installation 13 Positioning the Projector 13 Adjustable Feet 13 Moving the Lens 14 Connecting to Video Equipment (Video, S-Video) 15 Connecting to Video Equipment (Component...the Filter Counter 48 Cleaning the Projection Lens 48 Cleaning the Projector Cabinet 48 Lamp Replacement 49 Resetting the Lamp Replacement Counter 50 Appendix 51 Troubleshooting 51 Indicators and Projector Condition 53 Menu Tree 54 System Mode Chart 56 Technical ...
Owners Manual
Page 4
NO USER-SERVICEABLE PARTS INSIDE EXCEPT LAMP REPLACEMENT. THIS SYMBOL INDICATES THAT THERE ARE IMPORTANT OPERATING AND MAINTENANCE INSTRUCTIONS IN THE OWNER'S MANUAL WITH THIS UNIT. The symbol mark means that electrical ... that the battery or accumulator contains a heavy metal at your household waste. Operating the projector properly enables you to come. Please, dispose of panel. Install the projector in other accidents. Do not cover the ventilation slot on the LCD panels by the characteristic of them correctly at a certain concentration. SIDE and TOP REAR...
NO USER-SERVICEABLE PARTS INSIDE EXCEPT LAMP REPLACEMENT. THIS SYMBOL INDICATES THAT THERE ARE IMPORTANT OPERATING AND MAINTENANCE INSTRUCTIONS IN THE OWNER'S MANUAL WITH THIS UNIT. The symbol mark means that electrical ... that the battery or accumulator contains a heavy metal at your household waste. Operating the projector properly enables you to come. Please, dispose of panel. Install the projector in other accidents. Do not cover the ventilation slot on the LCD panels by the characteristic of them correctly at a certain concentration. SIDE and TOP REAR...

Owners Manual
Page 5
... expose you are covered by the operating instructions as a bookcase unless proper ventilation is provided. If you to normal operation. d. If the projector has been dropped or the cabinet has been damaged. Read all warnings and instructions marked on the marking label. Do not use a mounting ... parts that could result in a wet basement, near or over a radiator or heat register. NOTE FOR CUSTOMERS IN THE US Hg LAMP(S) inside this projector from the type of time, unplug it is operated. Unplug this product contain mercury and must be recycled or disposed of according to...
... expose you are covered by the operating instructions as a bookcase unless proper ventilation is provided. If you to normal operation. d. If the projector has been dropped or the cabinet has been damaged. Read all warnings and instructions marked on the marking label. Do not use a mounting ... parts that could result in a wet basement, near or over a radiator or heat register. NOTE FOR CUSTOMERS IN THE US Hg LAMP(S) inside this projector from the type of time, unplug it is operated. Unplug this product contain mercury and must be recycled or disposed of according to...

Owners Manual
Page 6
..., put other things on this projector. Cooling fans are provided for this projector does not cover any other transport service, consult your dealer. Improper installation may reduce the lamp life and cause fire hazard. 20˚ Do not tilt the projector more than 20 degrees from the... ventilation holes. - NO SIDEWARD CAUTION - When the projector is being used . - For details, consult your dealer. ...
..., put other things on this projector. Cooling fans are provided for this projector does not cover any other transport service, consult your dealer. Improper installation may reduce the lamp life and cause fire hazard. 20˚ Do not tilt the projector more than 20 degrees from the... ventilation holes. - NO SIDEWARD CAUTION - When the projector is being used . - For details, consult your dealer. ...

Owners Manual
Page 8
...Back !2 e r ty u i o !0 !1 ✽ !3 !4 !5 Bottom !6 q Exhaust Vent CAUTION Hot air is a registered trademark of the projector. *Kensington is exhausted from the exhaust vent. Do not put heat-sensitive objects near this side. w Top Controls and Indicators e Automatic Slide Shutter r Projection...Ring (Left/Right) !0 Lens Shift Lock !1 Terminals and Connectors !2 Main On/Off Switch !3 Power Cord Connector !4 Air Intake Vent !5 Lamp Cover ✽ Kensington Security Slot This slot is for a Kensington lock used to deter theft of ACCO Brands Corporation. !6 Adjustable Feet !7 RGB...
...Back !2 e r ty u i o !0 !1 ✽ !3 !4 !5 Bottom !6 q Exhaust Vent CAUTION Hot air is a registered trademark of the projector. *Kensington is exhausted from the exhaust vent. Do not put heat-sensitive objects near this side. w Top Controls and Indicators e Automatic Slide Shutter r Projection...Ring (Left/Right) !0 Lens Shift Lock !1 Terminals and Connectors !2 Main On/Off Switch !3 Power Cord Connector !4 Air Intake Vent !5 Lamp Cover ✽ Kensington Security Slot This slot is for a Kensington lock used to deter theft of ACCO Brands Corporation. !6 Adjustable Feet !7 RGB...
Owners Manual
Page 10
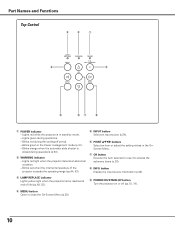
... management mode (p.41). - y POINT ed7 8 buttons Select an item or adjust the setting values in the OnScreen Menu. e LAMP REPLACE indicator Lights yellow light when the projection lamp reaches its end of the projector exceeds the operating range (pp.44, 53). r MENU button Open or close the On-Screen Menu (p.20). 10 w WARNING...
... management mode (p.41). - y POINT ed7 8 buttons Select an item or adjust the setting values in the OnScreen Menu. e LAMP REPLACE indicator Lights yellow light when the projection lamp reaches its end of the projector exceeds the operating range (pp.44, 53). r MENU button Open or close the On-Screen Menu (p.20). 10 w WARNING...
Owners Manual
Page 11
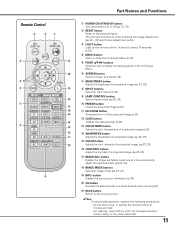
Remote Control e w q r t y u i o Part Names and Functions q POWER ON/STAND-BY button Turn the projector on or off the projected image (p.23). !2 LOGO button !4 Display the captured logo (p.23). !3 !3 COLOR TEMP. button Adjust the color temperature of a.... ✔Note: To ensure safe operation, observe the following precautions: - Do not apply benzene, thinner, spray, or any other chemicals. 11 o LAMP CONTROL button !8 Select a lamp mode (pp.23, 29). !0 FREEZE button !7 Freeze the projected image (p.23). !6 !1 NO SHOW button !5 Temporarily turn off (pp.18, 19...
Remote Control e w q r t y u i o Part Names and Functions q POWER ON/STAND-BY button Turn the projector on or off the projected image (p.23). !2 LOGO button !4 Display the captured logo (p.23). !3 !3 COLOR TEMP. button Adjust the color temperature of a.... ✔Note: To ensure safe operation, observe the following precautions: - Do not apply benzene, thinner, spray, or any other chemicals. 11 o LAMP CONTROL button !8 Select a lamp mode (pp.23, 29). !0 FREEZE button !7 Freeze the projected image (p.23). !6 !1 NO SHOW button !5 Temporarily turn off (pp.18, 19...
Owners Manual
Page 18
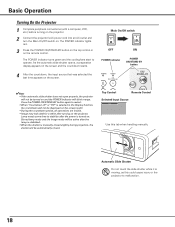
...on the screen (p.40). • During the countdown period, all operations are invalid. • Image may look dark for a while after the lamp is stabilized. • When the shutter is moving, as this tab when handling manually. As the automatic slide shutter opens, a preparation display ... Do not touch the slide shutter while it is manually closed . Basic Operation Turning On the Projector 1 Complete peripheral connections (with a computer, VCR, etc.) before turning on the projector. 2 Connect the projector's AC power cord into an AC outlet and turn the Main On/Off switch on the...
...on the screen (p.40). • During the countdown period, all operations are invalid. • Image may look dark for a while after the lamp is stabilized. • When the shutter is moving, as this tab when handling manually. As the automatic slide shutter opens, a preparation display ... Do not touch the slide shutter while it is manually closed . Basic Operation Turning On the Projector 1 Complete peripheral connections (with a computer, VCR, etc.) before turning on the projector. 2 Connect the projector's AC power cord into an AC outlet and turn the Main On/Off switch on the...
Owners Manual
Page 19
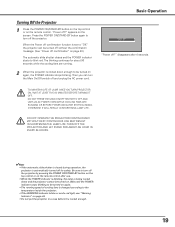
...Power off ?" disappears after use. • While the POWER indicator is blinking, the lamp is set to turn off the projector. OTHERWISE IT WILL RESULT IN SHORTENING LAMP LIFE. TO MAINTAIN LIFE OF LAMP, ONCE YOU TURN PROJECTOR ON, WAIT AT LEAST FIVE (5) MINUTES BEFORE TURNING IT OFF. Be sure to "Off...," the projector can turn off the projector by pressing the POWER ON/STAND-...
...Power off ?" disappears after use. • While the POWER indicator is blinking, the lamp is set to turn off the projector. OTHERWISE IT WILL RESULT IN SHORTENING LAMP LIFE. TO MAINTAIN LIFE OF LAMP, ONCE YOU TURN PROJECTOR ON, WAIT AT LEAST FIVE (5) MINUTES BEFORE TURNING IT OFF. Be sure to "Off...," the projector can turn off the projector by pressing the POWER ON/STAND-...
Owners Manual
Page 21
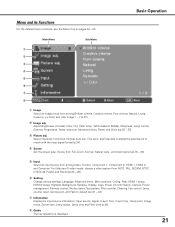
... size; u Information Display the input source information: Input source, Signal, H-sync freq., V-sync freq., Deep color, Image mode, Screen size, Lamp status, Lamp time and Filter time (p.43). choose from AUTO, PAL, SECAM, NTSC, NTSC4.43, PAL-M, and PAL-N (pp.24 - 26). t ..., Background, Rename, Display, Logo, Power off confirmation, Capture, Power management, Remote control, Shutter demo, Test pattern, Filter counter, Cleaning, Fan control, Lamp counter reset, Service port, and Factory default (pp.37 - 42). w Image adj. For Video and S-video inputs, choose a video system from Full...
... size; u Information Display the input source information: Input source, Signal, H-sync freq., V-sync freq., Deep color, Image mode, Screen size, Lamp status, Lamp time and Filter time (p.43). choose from AUTO, PAL, SECAM, NTSC, NTSC4.43, PAL-M, and PAL-N (pp.24 - 26). t ..., Background, Rename, Display, Logo, Power off confirmation, Capture, Power management, Remote control, Shutter demo, Test pattern, Filter counter, Cleaning, Fan control, Lamp counter reset, Service port, and Factory default (pp.37 - 42). w Image adj. For Video and S-video inputs, choose a video system from Full...

Owners Manual
Page 23
...Point 7 8 buttons to adjust the setting value. Press the MENU button after adjusting. For details, see page 28. Normal Normal brightness. The lamp mode is not captured. To cancel, press the FREEZE button again or press any other button. Menu item, it will enter the main menu. ...27 . button to adjust the setting value. Press the MENU button after adjusting. For details, see page 40. Eco Lower brightness reduces the lamp power consumption. FREEZE button Press the FREEZE button to black out the image. Press the MENU button after 4 seconds. 23 NO SHOW button ...
...Point 7 8 buttons to adjust the setting value. Press the MENU button after adjusting. For details, see page 28. Normal Normal brightness. The lamp mode is not captured. To cancel, press the FREEZE button again or press any other button. Menu item, it will enter the main menu. ...27 . button to adjust the setting value. Press the MENU button after adjusting. For details, see page 40. Eco Lower brightness reduces the lamp power consumption. FREEZE button Press the FREEZE button to black out the image. Press the MENU button after 4 seconds. 23 NO SHOW button ...
Owners Manual
Page 28
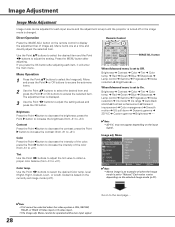
... buttons to access the selected item. Press the MENU button after adjusting each input source and the adjustment is kept until the projector is turned off or the image mode is set to On. Contrast Press the Point 7 button to decrease the brightness; press...ADJ. Brightness ➜ Contrast ➜ Color ➜ Tint ➜ Color temp. ➜ Red ➜ Green ➜ Blue ➜ Sharpness ➜ Lamp control ➜ Gamma ➜ Progressive ➜ Noise reduction ➜ Iris mode ➜ Iris range ➜ Auto black stretch➜ Contrast enhancement ➜ ...
... buttons to access the selected item. Press the MENU button after adjusting each input source and the adjustment is kept until the projector is turned off or the image mode is set to On. Contrast Press the Point 7 button to decrease the brightness; press...ADJ. Brightness ➜ Contrast ➜ Color ➜ Tint ➜ Color temp. ➜ Red ➜ Green ➜ Blue ➜ Sharpness ➜ Lamp control ➜ Gamma ➜ Progressive ➜ Noise reduction ➜ Iris mode ➜ Iris range ➜ Auto black stretch➜ Contrast enhancement ➜ ...

Owners Manual
Page 29
... balance (Green) Press the Point 7 button to +7). press the Point 8 button to increase the sharpness of the screen. Eco Lower brightness reduces the lamp power consumption. Gamma Use the Point 7 8 buttons to adjust the gamma value to obtain a better balance of the White balance (Red, Green, or... the video signal format is 480p, 575p, 720p, or 1080p. • Noise reduction cannot be selected. Auto 1 The brightness according to +7). level changes to the next page.... 29 Use the Point 7 8 buttons to display the Advanced menu. The lamp mode is "On" ✔Note: • If any...
... balance (Green) Press the Point 7 button to +7). press the Point 8 button to increase the sharpness of the screen. Eco Lower brightness reduces the lamp power consumption. Gamma Use the Point 7 8 buttons to adjust the gamma value to obtain a better balance of the White balance (Red, Green, or... the video signal format is 480p, 575p, 720p, or 1080p. • Noise reduction cannot be selected. Auto 1 The brightness according to +7). level changes to the next page.... 29 Use the Point 7 8 buttons to display the Advanced menu. The lamp mode is "On" ✔Note: • If any...

Owners Manual
Page 30
...the selected item. If you press the Point d button, the next item can store up to Video or Auto (p.29). Iris mode Adjust the lamp aperture. Transient improvement Adjust the sharpness of an image. Press the Point 8 or OK buttons to adjust the setting values and press the OK ...operated when HDMI 1080/24p or the computer signal is selected. • 5:5 pull down mode when the film source is prioritized over brightness Fixed Fixed lamp aperture set to eight (8) color management data. Auto black stretch Enhance blacks in bright areas of image outlines in 4 steps (Off/Low/Mid/ High)....
...the selected item. If you press the Point d button, the next item can store up to Video or Auto (p.29). Iris mode Adjust the lamp aperture. Transient improvement Adjust the sharpness of an image. Press the Point 8 or OK buttons to adjust the setting values and press the OK ...operated when HDMI 1080/24p or the computer signal is selected. • 5:5 pull down mode when the film source is prioritized over brightness Fixed Fixed lamp aperture set to eight (8) color management data. Auto black stretch Enhance blacks in bright areas of image outlines in 4 steps (Off/Low/Mid/ High)....

Owners Manual
Page 40
...On," a confirmation dialog box with unsupported signals. • When starting -up display from a computer can be displayed the next time the projector is displayed when turning off confirmation When this option. The confirmation box appears and select [Yes] to stop capturing. Select [Yes] to...;�� Show the input image instead of presentations. Default Show the factory-set to project images after the lamp becomes bright enough. is turned on the projector. Capture This function enables you want to XGA (1024 x 768). • The image that has been adjusted...
...On," a confirmation dialog box with unsupported signals. • When starting -up display from a computer can be displayed the next time the projector is displayed when turning off confirmation When this option. The confirmation box appears and select [Yes] to stop capturing. Select [Yes] to...;�� Show the input image instead of presentations. Default Show the factory-set to project images after the lamp becomes bright enough. is turned on the projector. Capture This function enables you want to XGA (1024 x 768). • The image that has been adjusted...
Owners Manual
Page 41
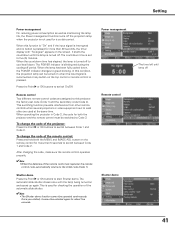
... This switching function prevents interference from other remote controls when several projectors or video equipment next to each other are assigned to this projector: the factory-set to five (5) minutes. It starts the countdown until lamp off to cool itself down , the POWER indicator changes to green... management For reducing power consumption as well as maintaining the lamp life, the Power management function turns off the projection lamp when the projector is not used for more than 30 seconds, the timer display with the lamp being turned on the remote control for both the MENU ...
... This switching function prevents interference from other remote controls when several projectors or video equipment next to each other are assigned to this projector: the factory-set to five (5) minutes. It starts the countdown until lamp off to cool itself down , the POWER indicator changes to green... management For reducing power consumption as well as maintaining the lamp life, the Power management function turns off the projection lamp when the projector is not used for more than 30 seconds, the timer display with the lamp being turned on the remote control for both the MENU ...
Owners Manual
Page 42
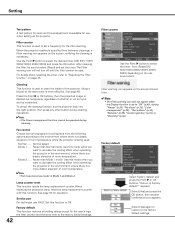
...mode. Use this mode when you want to Off. Lamp counter reset This function resets the lamp replacement counter. When replacing the projection lamp, reset the lamp replacement counter with this function to increase the cooling effect when operating the projector in the environment, where there is a more effective...setting values except for the user's logo, the filter counter and the lamp time to select the desired timer [Off/ 50H/ 100H/ 200H/ 300H/ 400H/ 500H] and press the OK button. When the projector reached a specified time between cleanings, a Filter warning icon appears on ...
...mode. Use this mode when you want to Off. Lamp counter reset This function resets the lamp replacement counter. When replacing the projection lamp, reset the lamp replacement counter with this function to increase the cooling effect when operating the projector in the environment, where there is a more effective...setting values except for the user's logo, the filter counter and the lamp time to select the desired timer [Off/ 50H/ 100H/ 200H/ 300H/ 400H/ 500H] and press the OK button. When the projector reached a specified time between cleanings, a Filter warning icon appears on ...

Owners Manual
Page 43
...43, PAL-M, and PAL-N. Image The selected image mode is displayed. Lamp status The selected lamp mode is displayed. The Information Menu is displayed in KHz, or when no signal. The horizontal frequency of the projector. V-sync freq. button 43 Top Control See below for checking the ...is displayed. The vertical frequency of the connected video signal is displayed from among 480i, 480p, 575i, 575p, 720p, 1080i and 1080p. Information Input Source Information Display The Information Menu is used for displayed information. Direct Operation Press the INFO. A system mode of ...
...43, PAL-M, and PAL-N. Image The selected image mode is displayed. Lamp status The selected lamp mode is displayed. The Information Menu is displayed in KHz, or when no signal. The horizontal frequency of the projector. V-sync freq. button 43 Top Control See below for checking the ...is displayed. The vertical frequency of the connected video signal is displayed from among 480i, 480p, 575i, 575p, 720p, 1080i and 1080p. Information Input Source Information Display The Information Menu is used for displayed information. Direct Operation Press the INFO. A system mode of ...
Owners Manual
Page 48
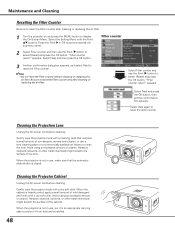
...projector is not in an appropriate carrying case to clean the lens. Be sure to select [Reset] and press the OK button. When the projector... cleaning or replacing the air filter. 1 Turn the projector on and press the MENU button to reset the Filter.... Avoid using an excessive amount of the lens. Cleaning the Projector Cabinet Unplug the AC power cord before cleaning. Abrasive cleaners, solvents... harsh chemicals might scratch the surface of cleaner. appears. Gently wipe the projector body with a cleaning cloth that the automatic slide shutter is heavily soiled,...
...projector is not in an appropriate carrying case to clean the lens. Be sure to select [Reset] and press the OK button. When the projector... cleaning or replacing the air filter. 1 Turn the projector on and press the MENU button to reset the Filter.... Avoid using an excessive amount of the lens. Cleaning the Projector Cabinet Unplug the AC power cord before cleaning. Abrasive cleaners, solvents... harsh chemicals might scratch the surface of cleaner. appears. Gently wipe the projector body with a cleaning cloth that the automatic slide shutter is heavily soiled,...


