Owners Manual
Page 2
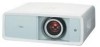
...terminals. ✔Note: • The On-Screen Menu and figures in multimedia features, a palette of 1.07 billion colors, and matrix liquid crystal display (LCD) technology. ◆ Short Throw & Wide-Range Zoom Lens The 2x Short Throw & Wide-Range Zoom Lens is capable of throwing a 100" diagonal ...also be selected (see pages 23, 29). ◆ Simple Computer System Setting The Multi-scan system of this manual are subject to customize the screen logo (see page 37). ◆ Two HDMI Terminals The projector has two HDMI (High Definition Multimedia Interface) terminals. It opens and ...
...terminals. ✔Note: • The On-Screen Menu and figures in multimedia features, a palette of 1.07 billion colors, and matrix liquid crystal display (LCD) technology. ◆ Short Throw & Wide-Range Zoom Lens The 2x Short Throw & Wide-Range Zoom Lens is capable of throwing a 100" diagonal ...also be selected (see pages 23, 29). ◆ Simple Computer System Setting The Multi-scan system of this manual are subject to customize the screen logo (see page 37). ◆ Two HDMI Terminals The projector has two HDMI (High Definition Multimedia Interface) terminals. It opens and ...
Owners Manual
Page 3
... Rear Terminal 9 Top Control 10 Remote Control 11 Remote Control Operating Range 12 Remote Control Battery Installation 12 Installation 13 Positioning the Projector 13 Adjustable Feet 13 Moving the Lens 14 Connecting to Video Equipment (Video, S-Video) 15 Connecting to Video Equipment (Component) ... Setting 37 Information 43 Input Source Information Display 43 Maintenance and Cleaning 44 Warning Indicator 44 Cleaning the RGB panels 45 Cleaning the Air Filter 47 Resetting the Filter Counter 48 Cleaning the Projection Lens 48 Cleaning the Projector Cabinet ...
... Rear Terminal 9 Top Control 10 Remote Control 11 Remote Control Operating Range 12 Remote Control Battery Installation 12 Installation 13 Positioning the Projector 13 Adjustable Feet 13 Moving the Lens 14 Connecting to Video Equipment (Video, S-Video) 15 Connecting to Video Equipment (Component) ... Setting 37 Information 43 Input Source Information Display 43 Maintenance and Cleaning 44 Warning Indicator 44 Cleaning the RGB panels 45 Cleaning the Air Filter 47 Resetting the Filter Counter 48 Cleaning the Projection Lens 48 Cleaning the Projector Cabinet ...
Owners Manual
Page 4
...where you leave the projector unclean for a long ...projector produces intense light from your local ...operate the projector properly. Ne...operating this projector, read ...projector from the power outlet. If the projector...projector is critical for the Protection of your projector...projector in greasy, wet, or smoky conditions such as possible, otherwise eye damage could result. If the projector is designed and manufactured with a vacuum cleaner. This projector...the projector periodically...SANYO product is unused for Protection of the projector...projector or the service center. If your projector...
...where you leave the projector unclean for a long ...projector produces intense light from your local ...operate the projector properly. Ne...operating this projector, read ...projector from the power outlet. If the projector...projector is critical for the Protection of your projector...projector in greasy, wet, or smoky conditions such as possible, otherwise eye damage could result. If the projector is designed and manufactured with a vacuum cleaner. This projector...the projector periodically...SANYO product is unused for Protection of the projector...projector or the service center. If your projector...
Owners Manual
Page 10
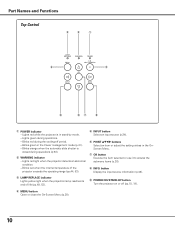
...the projection lamp reaches its end of the projector exceeds the operating range (pp.44, 53). button Display the input source information (p.43). Lights green during the cooling-off (pp.18, 19). y POINT ed7 8 buttons Select an item or adjust the setting values in the OnScreen Menu. w WARNING... indicator - Lights red light when the projector detects an abnormal condition. - r MENU button Open or close the On-Screen Menu (p.20). 10
...the projection lamp reaches its end of the projector exceeds the operating range (pp.44, 53). button Display the input source information (p.43). Lights green during the cooling-off (pp.18, 19). y POINT ed7 8 buttons Select an item or adjust the setting values in the OnScreen Menu. w WARNING... indicator - Lights red light when the projector detects an abnormal condition. - r MENU button Open or close the On-Screen Menu (p.20). 10
Owners Manual
Page 11
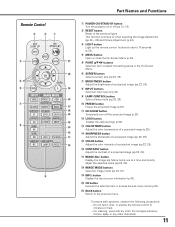
...thinner, splay, or any other chemicals. 11 Remote Control e w q r t y u i o Part Names and Functions q POWER ON/STAND-BY button Turn the projector on or off the projected image (p.23). !2 LOGO button !4 Display the captured logo (p.23). !3 !3 COLOR TEMP. w RESET button Reset to when selecting the ... previous figure. r MENU button Open or close the On-Screen Menu (p.20). @1 t POINT ed7 8 buttons Select an item or adjust the setting values in the On-Screen Menu. @0 y SCREEN button Select a screen size (pp.22, 35). To ensure safe operation, observe the following ...
...thinner, splay, or any other chemicals. 11 Remote Control e w q r t y u i o Part Names and Functions q POWER ON/STAND-BY button Turn the projector on or off the projected image (p.23). !2 LOGO button !4 Display the captured logo (p.23). !3 !3 COLOR TEMP. w RESET button Reset to when selecting the ... previous figure. r MENU button Open or close the On-Screen Menu (p.20). @1 t POINT ed7 8 buttons Select an item or adjust the setting values in the On-Screen Menu. @0 y SCREEN button Select a screen size (pp.22, 35). To ensure safe operation, observe the following ...
Owners Manual
Page 12
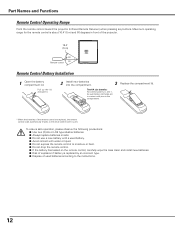
...remote control code automatically returns to the instructions. 12 Part Names and Functions Remote Control Operating Range Point the remote control toward the projector (Infrared Remote Receiver) when pressing any buttons. To ensure safe operation, please observe the following precautions: ● Use two (2)... AA or LR6 type alkaline batteries. ● Always replace batteries in sets. ● Do not use a new battery with a used battery. ● Avoid contact with pins in front of used batteries according to...
...remote control code automatically returns to the instructions. 12 Part Names and Functions Remote Control Operating Range Point the remote control toward the projector (Infrared Remote Receiver) when pressing any buttons. To ensure safe operation, please observe the following precautions: ● Use two (2)... AA or LR6 type alkaline batteries. ● Always replace batteries in sets. ● Do not use a new battery with a used battery. ● Avoid contact with pins in front of used batteries according to...
Owners Manual
Page 15
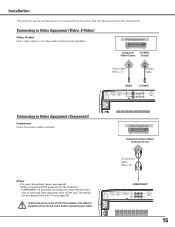
... order the optional cables, see page 34). Then adjust the value of both the projector and external equipment from 0 to +31 (see page 58. • When connecting HDTV equipment to the projector's COMPONENT 1/2 terminals, horizontal line noise may be connected up to Video Equipment (Video..., S-Video) Video, S-video Use a video cable or a S-video cable (commercially available). Unplug the power cords of Fine sync. The setting can be noted only ...
... order the optional cables, see page 34). Then adjust the value of both the projector and external equipment from 0 to +31 (see page 58. • When connecting HDTV equipment to the projector's COMPONENT 1/2 terminals, horizontal line noise may be connected up to Video Equipment (Video..., S-Video) Video, S-video Use a video cable or a S-video cable (commercially available). Unplug the power cords of Fine sync. The setting can be noted only ...

Owners Manual
Page 19
...is being cooled down enough to be turned off without the confirmation message. (See "Power off confirmation" on page 44. • Do not put the projector in a case before it is set to turn the Main On/Off switch off confirmation function is cooled enough. 19 Be sure to "Off," the... projector can turn off the projector by pressing the POWER ON/STAND-BY button on the top control or on the remote control after 4 seconds. DO NOT OPERATE THE PROJECTOR CONTINUOUSLY ...
...is being cooled down enough to be turned off without the confirmation message. (See "Power off confirmation" on page 44. • Do not put the projector in a case before it is set to turn the Main On/Off switch off confirmation function is cooled enough. 19 Be sure to "Off," the... projector can turn off the projector by pressing the POWER ON/STAND-BY button on the top control or on the remote control after 4 seconds. DO NOT OPERATE THE PROJECTOR CONTINUOUSLY ...
Owners Manual
Page 20
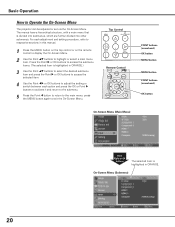
...Submenu) 20 Basic Operation How to exit the On-Screen Menu. press the MENU button again to Operate the On-Screen Menu The projector can be adjusted or set via the On-Screen Menu. Press the Point 8 or OK buttons to access the submenu items. (The selected item is highlighted ...press the Point 8 or OK buttons to access the selected item. 4 Use the Point 7 8 or OK buttons to adjust the setting or switch between each adjustment and setting procedure, refer to highlight or select a main menu item. Top Control Remote Control POINT buttons (arrowhead) OK button MENU button MENU button...
...Submenu) 20 Basic Operation How to exit the On-Screen Menu. press the MENU button again to Operate the On-Screen Menu The projector can be adjusted or set via the On-Screen Menu. Press the Point 8 or OK buttons to access the submenu items. (The selected item is highlighted ...press the Point 8 or OK buttons to access the selected item. 4 Use the Point 7 8 or OK buttons to adjust the setting or switch between each adjustment and setting procedure, refer to highlight or select a main menu item. Top Control Remote Control POINT buttons (arrowhead) OK button MENU button MENU button...
Owners Manual
Page 21
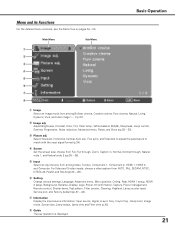
... wide 2 (pp.35 - 36). choose from AUTO, PAL, SECAM, NTSC, NTSC4.43, PAL-M, and PAL-N (pp.24 - 26). y Setting Change various settings; Language, Advanced menu, Menu position, Ceiling, Rear, HDMI 1 setup, HDMI 2 setup, Background, Rename, Display, Logo, Power off confirmation, Capture,...Color temp., White balance (R/G/B), Sharpness, Lamp control, Gamma, Progressive, Noise reduction, Advanced menu, Reset, and Store (pp.28 - 33). r Screen Set the screen size; i Guide The key operation is displayed. 21 t Input Select an input source from among Video, S-video, Component 1, Component 2, HDMI...
... wide 2 (pp.35 - 36). choose from AUTO, PAL, SECAM, NTSC, NTSC4.43, PAL-M, and PAL-N (pp.24 - 26). y Setting Change various settings; Language, Advanced menu, Menu position, Ceiling, Rear, HDMI 1 setup, HDMI 2 setup, Background, Rename, Display, Logo, Power off confirmation, Capture,...Color temp., White balance (R/G/B), Sharpness, Lamp control, Gamma, Progressive, Noise reduction, Advanced menu, Reset, and Store (pp.28 - 33). r Screen Set the screen size; i Guide The key operation is displayed. 21 t Input Select an input source from among Video, S-video, Component 1, Component 2, HDMI...

Owners Manual
Page 23
...the selected item. Press the MENU button after adjusting each Image adj. For details, see page 28. LOGO button Display the image set in the logo setting. Auto 1 The brightness according to display the Color temp. button LOGO button LAMP CONTROL button IMAGE MODE buttons IMAGE ADJ. For ...than Auto 1. BRIGHTNESS button Press the BRIGHTNESS button to display the Brightness adjustment bar and use the Point 7 8 buttons to adjust the setting value. NO SHOW button Press the NO SHOW button to freeze the picture on the screen. Basic Operation IMAGE MODE buttons Press the ...
...the selected item. Press the MENU button after adjusting each Image adj. For details, see page 28. LOGO button Display the image set in the logo setting. Auto 1 The brightness according to display the Color temp. button LOGO button LAMP CONTROL button IMAGE MODE buttons IMAGE ADJ. For ...than Auto 1. BRIGHTNESS button Press the BRIGHTNESS button to display the Brightness adjustment bar and use the Point 7 8 buttons to adjust the setting value. NO SHOW button Press the NO SHOW button to freeze the picture on the screen. Basic Operation IMAGE MODE buttons Press the ...

Owners Manual
Page 24
... Press the VIDEO, S-VIDEO, C1, C2, H1, H2, or PC buttons on the remote control according to HDMI2 or vice versa, the signal may be set on a proper signal form via menu operation (see below) to the VIDEO jack, press VIDEO. C1 When the video signal is connected to the COMPONENT...
... Press the VIDEO, S-VIDEO, C1, C2, H1, H2, or PC buttons on the remote control according to HDMI2 or vice versa, the signal may be set on a proper signal form via menu operation (see below) to the VIDEO jack, press VIDEO. C1 When the video signal is connected to the COMPONENT...
Owners Manual
Page 25
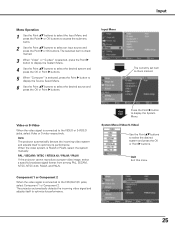
... Menu and press the Point 8 or OK buttons to access the submenu items. 2 Use the Point ed buttons to optimize its performance. The projector automatically detects the incoming video signal and adjusts itself to the VIDEO or S-VIDEO jacks, select Video or S-video respectively. Input Menu Input The... currently set item is selected, press the Point 8 button to display the Source Select Menu. 6 Use the Point ed buttons to select the desired system...
... Menu and press the Point 8 or OK buttons to access the submenu items. 2 Use the Point ed buttons to optimize its performance. The projector automatically detects the incoming video signal and adjusts itself to the VIDEO or S-VIDEO jacks, select Video or S-video respectively. Input Menu Input The... currently set item is selected, press the Point 8 button to display the Source Select Menu. 6 Use the Point ed buttons to select the desired system...
Owners Manual
Page 26
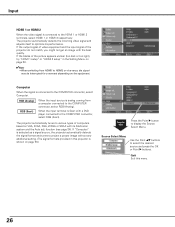
...vice versa, the signal may be interrupted for a moment depending on the equipment. If "Computer" is selected as a signal source, the projector automatically detects the signal format and tunes to the COMPUTER connector, select RGB (Analog). When the input terminal is analog coming from a ...computer connected to project a proper image without any additional setting. (The signal formats provided in the Setting Menu on page 38. ✔Note: • When switching from HDMI1 to the HDMI 1 or HDMI 2 terminals, select HDMI...
...vice versa, the signal may be interrupted for a moment depending on the equipment. If "Computer" is selected as a signal source, the projector automatically detects the signal format and tunes to the COMPUTER connector, select RGB (Analog). When the input terminal is analog coming from a ...computer connected to project a proper image without any additional setting. (The signal formats provided in the Setting Menu on page 38. ✔Note: • When switching from HDMI1 to the HDMI 1 or HDMI 2 terminals, select HDMI...
Owners Manual
Page 27
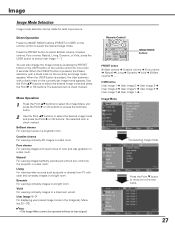
...You can be operated without any control by pressing the PRESET button or the USER button on the currently set image mode appears. Brilliant cinema For viewing movies in the Image adj. User image 1 - 7 For...displaying user preset image mode in a brightish room. Pure cinema For viewing images with a check mark on the currently set image mode appears. Menu (pp.28 - 33). ✔Note: • The Image Menu cannot be made ...Image mode selection can also change the Image mode by the projector in a dark room. Press the Point d button to move on the remote control to select User image...
...You can be operated without any control by pressing the PRESET button or the USER button on the currently set image mode appears. Brilliant cinema For viewing movies in the Image adj. User image 1 - 7 For...displaying user preset image mode in a brightish room. Pure cinema For viewing images with a check mark on the currently set image mode appears. Menu (pp.28 - 33). ✔Note: • The Image Menu cannot be made ...Image mode selection can also change the Image mode by the projector in a dark room. Press the Point d button to move on the remote control to select User image...
Owners Manual
Page 28
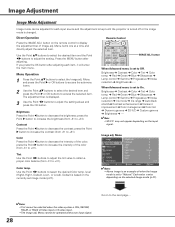
...Point 7 button to +31). Press the MENU button after adjusting each input source and the adjustment is kept until the projector is turned off or the image mode is set to display the adjustment bar of the color (from -31 to select the Image adj. press the Point 8 button to... for each item, it will enter the main menu. button When Advanced menu is changed. Menu cannot be selected when the video system is set to select the desired Color temp. Image adj. Each value varies depending on the remote control to "Natural." Menu Operation 1 Press the Point...
...Point 7 button to +31). Press the MENU button after adjusting each input source and the adjustment is kept until the projector is turned off or the image mode is set to display the adjustment bar of the color (from -31 to select the Image adj. press the Point 8 button to... for each item, it will enter the main menu. button When Advanced menu is changed. Menu cannot be selected when the video system is set to select the desired Color temp. Image adj. Each value varies depending on the remote control to "Natural." Menu Operation 1 Press the Point...
Owners Manual
Page 29
... be displayed in progressive. For still pictures. Noise reduction mode is 480p, 575p, 720p, or 1080p. With this function, the projector reproduces pictures faithful to +7). level changes to +31). Press the Point 8 or OK buttons to adjust the setting values and press the OK button. Use the Point 7 8 buttons to access the selected...
... be displayed in progressive. For still pictures. Noise reduction mode is 480p, 575p, 720p, or 1080p. With this function, the projector reproduces pictures faithful to +7). level changes to +31). Press the Point 8 or OK buttons to adjust the setting values and press the OK button. Use the Point 7 8 buttons to access the selected...

Owners Manual
Page 30
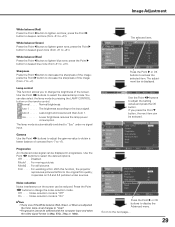
... any color. Iris mode Adjust the lamp aperture. Use the Point 7 8 buttons to eight (8) color management data. Fixed lamp aperture set to access the selected item. Auto black stretch Enhance blacks in bright areas of memory colors List 2 . . . Color list Select ...• Acoustic noise increases when "Fast" option is displayed. Image Adjustment Advanced menu This function can be selected only when Advanced menu in the Setting Menu (see "COLOR MANAGEMENT" on page 32. You can be selected. Select from the following options: Normal . . Normal open -close speed...
... any color. Iris mode Adjust the lamp aperture. Use the Point 7 8 buttons to eight (8) color management data. Fixed lamp aperture set to access the selected item. Auto black stretch Enhance blacks in bright areas of memory colors List 2 . . . Color list Select ...• Acoustic noise increases when "Fast" option is displayed. Image Adjustment Advanced menu This function can be selected only when Advanced menu in the Setting Menu (see "COLOR MANAGEMENT" on page 32. You can be selected. Select from the following options: Normal . . Normal open -close speed...

Owners Manual
Page 31
... balance of the gamma bar. The colored gamma pointer indicates where you change the 3D-Y/C mode. The whilte gamma pointer indicates where the value is set to adjust the gamma value. Select Custom gamma in Gamma R, the Gamma G with the colored gamma pointer on the screen as you are... set . ✔Notes: • Default position of the gamma pointer is made . • The values are making an adjustment. Use the Point ed buttons to choose ...
... balance of the gamma bar. The colored gamma pointer indicates where you change the 3D-Y/C mode. The whilte gamma pointer indicates where the value is set to adjust the gamma value. Select Custom gamma in Gamma R, the Gamma G with the colored gamma pointer on the screen as you are... set . ✔Notes: • Default position of the gamma pointer is made . • The values are making an adjustment. Use the Point ed buttons to choose ...

Owners Manual
Page 33
... RESET button on page 27. ✔Note: • If you change the image mode (see page 27) or turn off the POWER without storing adjusted settings, all the adjusted settings will be reset. • When resetting, the adjusted data in Advanced menu will be reset whether or not Advanced menu in the...
... RESET button on page 27. ✔Note: • If you change the image mode (see page 27) or turn off the POWER without storing adjusted settings, all the adjusted settings will be reset. • When resetting, the adjusted data in Advanced menu will be reset whether or not Advanced menu in the...


