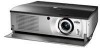
Owners Manual
Page 2
...Apple Computer,Inc. Indicator 46 18 Air Filter Care and Cleaning 46 Cleaning the Projection Lens 46 Troubleshooting 47 19 Indicators and Projector Condition 48 Technical Specifications 49 Dimensions 50 19 Configuration of Terminals 51 19 Optional Parts 51 20 20 21 21 22 23 ...41 10 Screen Size Adjustment (Menu Operation) 41 10 11 12 13 Setting 42 14 14 Setting 42 15 Appendix 44 15 15 Lamp Replacement 44 16 Lamp Replace Counter 45 17 Warning Temp. G IBM, VGA, XGA, and PS/2 are trademarks or registered trademarks of its respective corporation. ...
...Apple Computer,Inc. Indicator 46 18 Air Filter Care and Cleaning 46 Cleaning the Projection Lens 46 Troubleshooting 47 19 Indicators and Projector Condition 48 Technical Specifications 49 Dimensions 50 19 Configuration of Terminals 51 19 Optional Parts 51 20 20 21 21 22 23 ...41 10 Screen Size Adjustment (Menu Operation) 41 10 11 12 13 Setting 42 14 14 Setting 42 15 Appendix 44 15 15 Lamp Replacement 44 16 Lamp Replace Counter 45 17 Warning Temp. G IBM, VGA, XGA, and PS/2 are trademarks or registered trademarks of its respective corporation. ...
Owners Manual
Page 3
... and try the solutions in not only shortening the product-life, but also malfunctions, fire hazard, or other accidents. This projector provides many convenient features and functions. Do not stare directly into the beam. Be especially careful that children do not stare ...the projector from the power outlet. G This projector should be maintained. Do not cover the ventilation slot on the top, sides and rear of this manual thoroughly and operate the projector properly. G If the projector is exhausted from the projection lens. NO USERSERVICEABLE PARTS INSIDE EXCEPT LAMP REPLACEMENT. ...
... and try the solutions in not only shortening the product-life, but also malfunctions, fire hazard, or other accidents. This projector provides many convenient features and functions. Do not stare directly into the beam. Be especially careful that children do not stare ...the projector from the power outlet. G This projector should be maintained. Do not cover the ventilation slot on the top, sides and rear of this manual thoroughly and operate the projector properly. G If the projector is exhausted from the projection lens. NO USERSERVICEABLE PARTS INSIDE EXCEPT LAMP REPLACEMENT. ...

Owners Manual
Page 12
...on . Part Names and Functions Top Controls and Indicators LAMP REPLACE INDICATOR Turns yellow when the life of the projection lamp draws to select an item or adjust value in Digital zoom mode. (p41) 12 INDICATOR Flashes red when internal projector temperature is too high. (p46) READY INDICATOR Lights ... also used to execute the item selected. And it flashes green in stand-by mode. READY LAMP REPLACE ON-OFF LAMP LAMP INDICATOR Becomes dim when the projector is in Power management mode. (p43) WARNING TEMP. They are also used to expand the image in Digital zoom mode. (p41...
...on . Part Names and Functions Top Controls and Indicators LAMP REPLACE INDICATOR Turns yellow when the life of the projection lamp draws to select an item or adjust value in Digital zoom mode. (p41) 12 INDICATOR Flashes red when internal projector temperature is too high. (p46) READY INDICATOR Lights ... also used to execute the item selected. And it flashes green in stand-by mode. READY LAMP REPLACE ON-OFF LAMP LAMP INDICATOR Becomes dim when the projector is in Power management mode. (p43) WARNING TEMP. They are also used to expand the image in Digital zoom mode. (p41...
Owners Manual
Page 22
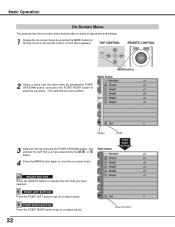
... the item that you have selected. POINT RIGHT BUTTON SELECT BUTTON Press the SELECT button to go on or adjust values. READY LAMP REPLACE ON-OFF LAMP On-Screen Menu The projector has the on-screen menu that provides a variety of adjustment and settings. 1 Display the on -screen menu. POINT LEFT BUTTON Press the...
... the item that you have selected. POINT RIGHT BUTTON SELECT BUTTON Press the SELECT button to go on or adjust values. READY LAMP REPLACE ON-OFF LAMP On-Screen Menu The projector has the on-screen menu that provides a variety of adjustment and settings. 1 Display the on -screen menu. POINT LEFT BUTTON Press the...

Owners Manual
Page 31
...) Input Source Selection (Direct Operation) WARNING TEMP. READY INPUT BUTTON LAMP REPLACE You can select Computer input or Video input with the POINT UP/DOWN button, and then press the POINT RIGHT button to the "COMPUTER IN" on .) Computer If the projector cannot reproduce proper image, select a correct input source through menu operation...
...) Input Source Selection (Direct Operation) WARNING TEMP. READY INPUT BUTTON LAMP REPLACE You can select Computer input or Video input with the POINT UP/DOWN button, and then press the POINT RIGHT button to the "COMPUTER IN" on .) Computer If the projector cannot reproduce proper image, select a correct input source through menu operation...

Owners Manual
Page 43
... remote control code automatically returns to project the image from a ceiling mounted projector. After counting down for over 10 seconds. When operating the projector in the Setting menu to reset the Lamp Replace Counter. Lamp counter reset This function is used to "Code 1." This function is used to project the image to reduce power consumption...
... remote control code automatically returns to project the image from a ceiling mounted projector. After counting down for over 10 seconds. When operating the projector in the Setting menu to reset the Lamp Replace Counter. Lamp counter reset This function is used to "Code 1." This function is used to project the image to reduce power consumption...
Owners Manual
Page 44
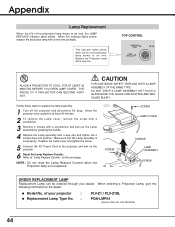
... indicator lights yellow when the life of the projection lamp draws to the dealer. CAUTION FOR CONTINUED SAFETY, REPLACE WITH A LAMP ASSEMBLY OF THE SAME TYPE. When ordering a Projection Lamp, give the following information to an end. Allow the projector to be ordered through your projector : G Replacement Lamp Type No. : PLV-Z1 / PLV-Z1BL POA-LMP54 (Service Parts No. 610 302...
... indicator lights yellow when the life of the projection lamp draws to the dealer. CAUTION FOR CONTINUED SAFETY, REPLACE WITH A LAMP ASSEMBLY OF THE SAME TYPE. When ordering a Projection Lamp, give the following information to an end. Allow the projector to be ordered through your projector : G Replacement Lamp Type No. : PLV-Z1 / PLV-Z1BL POA-LMP54 (Service Parts No. 610 302...
Owners Manual
Page 45
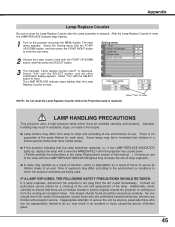
... SELECT button, and the other similar lamps. The LAMP REPLACE indicator stops lighting after the Lamp Replace Counter is replaced. Improper handling may increase the risk of lamp explosion. G If the projector indicates that there are familiar with the LAMP REPLACE INDICATOR lighted may result in a shorter...or conditions in which must be cleaned up , replace the lamp with a new one should be replaced, i.e., if the LAMP REPLACE INDICATOR lights up carefully. If a lamp explodes, disconnect the projector's AC plug from lamp to lamp and according to the environment of use. Contact ...
... SELECT button, and the other similar lamps. The LAMP REPLACE indicator stops lighting after the Lamp Replace Counter is replaced. Improper handling may increase the risk of lamp explosion. G If the projector indicates that there are familiar with the LAMP REPLACE INDICATOR lighted may result in a shorter...or conditions in which must be cleaned up , replace the lamp with a new one should be replaced, i.e., if the LAMP REPLACE INDICATOR lights up carefully. If a lamp explodes, disconnect the projector's AC plug from lamp to lamp and according to the environment of use. Contact ...
Owners Manual
Page 46
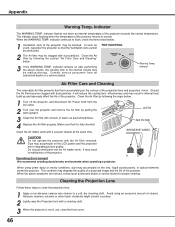
... dry cleaning cloth. TOP CONTROL WARNING TEMP. READY LAMP REPLACE ON-OFF LAMWParning Temp. indicator Air Filter Care and ...Air filter removed. AIR FILTER AIR INTAKE VANTS CAUTION Do not operate the projector with a brush or wash out dust and particles. 4 Replace the Air filter properly. Cleaning the Projection Lens Follow these steps to ... elements inside the projector. Operating Environment We recommend avoiding dusty/smoky environments when operating a projector. When using an excessive amount of the projector. This condition may accumulate on the LCD panels and the projection...
... dry cleaning cloth. TOP CONTROL WARNING TEMP. READY LAMP REPLACE ON-OFF LAMWParning Temp. indicator Air Filter Care and ...Air filter removed. AIR FILTER AIR INTAKE VANTS CAUTION Do not operate the projector with a brush or wash out dust and particles. 4 Replace the Air filter properly. Cleaning the Projection Lens Follow these steps to ... elements inside the projector. Operating Environment We recommend avoiding dusty/smoky environments when operating a projector. When using an excessive amount of the projector. This condition may accumulate on the LCD panels and the projection...

Owners Manual
Page 48
... is disconnected, or the front cover is closed.) The temperature inside the projector is READY to normal. Flashing stops when the temperature returns to be replaced. LAMP REPLACE (page 44) Off Yellow Light The projection lamp needs to obtain service. 48 Green Flashing WARNING TEMP. (page 46) ...Off Red Flashing The projector is OFF. (The MAIN ON/OFF switch is off or...
... is disconnected, or the front cover is closed.) The temperature inside the projector is READY to normal. Flashing stops when the temperature returns to be replaced. LAMP REPLACE (page 44) Off Yellow Light The projection lamp needs to obtain service. 48 Green Flashing WARNING TEMP. (page 46) ...Off Red Flashing The projector is OFF. (The MAIN ON/OFF switch is off or...

Owners Manual
Page 50
READY LAMP REPLACE ON-OFF LAMP MENU SELECT INPUT 9.70 (246.5) 4.27 (108.5) 50 Appendix Unit : inch (mm) 11.8˚ (Max.) Dimensions 13.11 (333) WARNING TEMP.
READY LAMP REPLACE ON-OFF LAMP MENU SELECT INPUT 9.70 (246.5) 4.27 (108.5) 50 Appendix Unit : inch (mm) 11.8˚ (Max.) Dimensions 13.11 (333) WARNING TEMP.

