Owners Manual
Page 2
... OR CHEMICALS, IT MAY BECOME DETERIORATED. CAUTION Not for an extended time, unplug the projector from your local community waste collection/recycling centre. NO USER-SERVICEABLE PARTS INSIDE EXCEPT LAMP REPLACEMENT. This symbol means that children do not stare directly into the ...REFER SERVICING TO QUALIFIED SERVICE PERSONNEL. Your SANYO product is designed and manufactured with a vacuum cleaner. CAUTION ON HANGING FROM THE CEILING When hanging the projector from the projection lens. TO THE OWNER Before operating this projector, read this manual again, check operations...
... OR CHEMICALS, IT MAY BECOME DETERIORATED. CAUTION Not for an extended time, unplug the projector from your local community waste collection/recycling centre. NO USER-SERVICEABLE PARTS INSIDE EXCEPT LAMP REPLACEMENT. This symbol means that children do not stare directly into the ...REFER SERVICING TO QUALIFIED SERVICE PERSONNEL. Your SANYO product is designed and manufactured with a vacuum cleaner. CAUTION ON HANGING FROM THE CEILING When hanging the projector from the projection lens. TO THE OWNER Before operating this projector, read this manual again, check operations...

Owners Manual
Page 3
... overheating. The openings should use a mounting kit approved by the operating instructions as the original part. Never push objects of airconditioning equipment. Do not install the projector near a swimming pool, etc... Do not allow anything to protect it from the wall outlet...table. b. If liquid has been spilled into this projector on the power cord. If the projector has been exposed to persons. d. e. If the projector has been dropped or the cabinet has been damaged. f. When replacement parts are covered by the manufacturers. Unauthorized substitutions may ...
... overheating. The openings should use a mounting kit approved by the operating instructions as the original part. Never push objects of airconditioning equipment. Do not install the projector near a swimming pool, etc... Do not allow anything to protect it from the wall outlet...table. b. If liquid has been spilled into this projector on the power cord. If the projector has been exposed to persons. d. e. If the projector has been dropped or the cabinet has been damaged. f. When replacement parts are covered by the manufacturers. Unauthorized substitutions may ...

Owners Manual
Page 4
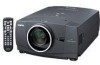
...which is no guarantee that to which is not suitable for a Class B digital device, pursuant to part 15 of the plug (i.e. Model Number Trade Name Responsible party Address Telephone No. : PLV-75/PLV-80/PLV-75L/PLV-80L : Sanyo : SANYO FISHER COMPANY : 21605 Plummer Street, Chatsworth, California 91311 : (818)998-7322 AC POWER CORD ...the following code: Green-and-yellow Earth Blue Neutral Brown Live As the colours of the wires in the mains lead of this projector meets the requirement for help. Should the fuse need to be replaced, an ASTA approved BS 1362 fuse must be cut off and...
...which is no guarantee that to which is not suitable for a Class B digital device, pursuant to part 15 of the plug (i.e. Model Number Trade Name Responsible party Address Telephone No. : PLV-75/PLV-80/PLV-75L/PLV-80L : Sanyo : SANYO FISHER COMPANY : 21605 Plummer Street, Chatsworth, California 91311 : (818)998-7322 AC POWER CORD ...the following code: Green-and-yellow Earth Blue Neutral Brown Live As the colours of the wires in the mains lead of this projector meets the requirement for help. Should the fuse need to be replaced, an ASTA approved BS 1362 fuse must be cut off and...
Owners Manual
Page 5
...PREPARATION 7 SELECTING COMPUTER SYSTEM PC ADJUSTMENT 24 26 AUTO PC ADJUSTMENT 26 NAME OF EACH PART OF PROJECTOR 7 MANUAL PC ADJUSTMENT 27 SETTING-UP PROJECTOR CONNECTING AC POWER CORD POSITIONING PROJECTOR LENS INSTALLATION ADJUSTABLE FEET 8 PICTURE IMAGE SELECT 29 8 IMAGE LEVEL SELECT 29 9 PICTURE... TREE 50 22 COMPATIBLE COMPUTER SPECIFICATIONS 52 22 22 23 INDICATORS AND PROJECTOR CONDITION TECHNICAL SPECIFICATIONS 53 55 23 PJ LINK NOTICE 56 23 CONFIGURATIONS OF TERMINALS 57 OPTIONAL PARTS 58 LENS REPLACEMENT 58 PIN CODE NUMBER MEMO 59 TRADEMARKS ● ...
...PREPARATION 7 SELECTING COMPUTER SYSTEM PC ADJUSTMENT 24 26 AUTO PC ADJUSTMENT 26 NAME OF EACH PART OF PROJECTOR 7 MANUAL PC ADJUSTMENT 27 SETTING-UP PROJECTOR CONNECTING AC POWER CORD POSITIONING PROJECTOR LENS INSTALLATION ADJUSTABLE FEET 8 PICTURE IMAGE SELECT 29 8 IMAGE LEVEL SELECT 29 9 PICTURE... TREE 50 22 COMPATIBLE COMPUTER SPECIFICATIONS 52 22 22 23 INDICATORS AND PROJECTOR CONDITION TECHNICAL SPECIFICATIONS 53 55 23 PJ LINK NOTICE 56 23 CONFIGURATIONS OF TERMINALS 57 OPTIONAL PARTS 58 LENS REPLACEMENT 58 PIN CODE NUMBER MEMO 59 TRADEMARKS ● ...
Owners Manual
Page 7
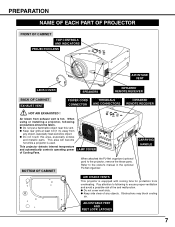
...away from overheating. ADJUSTABLE FEET AND FEET LOCK LATCHES 7 Air blown from exhaust vent is used. Refer to the projector, remove the these parts. When using or installing a projector, following to following precautions should be taken. ● Do not put a flammable object near this area, especially... CARRYING HANDLE BOTTOM OF CABINET When attached the PJ-Net organizer (optional part) to the owner's manual in the optional PJ-Net organizer. PREPARATION NAME OF EACH PART OF PROJECTOR FRONT OF CABINET TOP CONTROLS AND INDICATORS PROJECTION LENS AIR INTAKE VENT LENS...
...away from overheating. ADJUSTABLE FEET AND FEET LOCK LATCHES 7 Air blown from exhaust vent is used. Refer to the projector, remove the these parts. When using or installing a projector, following to following precautions should be taken. ● Do not put a flammable object near this area, especially... CARRYING HANDLE BOTTOM OF CABINET When attached the PJ-Net organizer (optional part) to the owner's manual in the optional PJ-Net organizer. PREPARATION NAME OF EACH PART OF PROJECTOR FRONT OF CABINET TOP CONTROLS AND INDICATORS PROJECTION LENS AIR INTAKE VENT LENS...

Owners Manual
Page 22
...on Remote Control Unit. KEYSTONE ADJUSTMENT If a projected picture has keystone distortion, correct the image with POINT RIGHT button. 22 Reduce the left part, and press POINT RIGHT button to page 38.) Keystone dialog box appears. 2 Correct keystone distortion by pressing POINT UP/DOWN/LEFT/RIGHT ... 1 Press FOCUS button on Top Control or FOCUS ▲/▼ button on Remote Control Unit. Press POINT UP button to reduce the upper part of direction being corrected turn(s) red. • Arrow(s) disappear(s) at the maximum correction. • If you press the KEYSTONE button on ...
...on Remote Control Unit. KEYSTONE ADJUSTMENT If a projected picture has keystone distortion, correct the image with POINT RIGHT button. 22 Reduce the left part, and press POINT RIGHT button to page 38.) Keystone dialog box appears. 2 Correct keystone distortion by pressing POINT UP/DOWN/LEFT/RIGHT ... 1 Press FOCUS button on Top Control or FOCUS ▲/▼ button on Remote Control Unit. Press POINT UP button to reduce the upper part of direction being corrected turn(s) red. • Arrow(s) disappear(s) at the maximum correction. • If you press the KEYSTONE button on ...
Owners Manual
Page 45
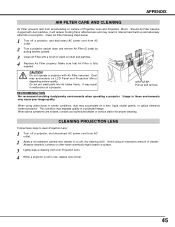
...accumulate on LCD Panel and Projection Mirror degrading picture quality. When above symptoms are noticed, contact your authorized dealer or service station for proper cleaning. Make sure that Air Filter is not in internal heat build up and remove. Do not put small parts into Air ...Intake Vents. RECOMMENDATION We recommend avoiding dusty/smoky environments when operating a projector. When using an excessive amount of a projected image. Avoid using under dusty or smoky conditions,...
...accumulate on LCD Panel and Projection Mirror degrading picture quality. When above symptoms are noticed, contact your authorized dealer or service station for proper cleaning. Make sure that Air Filter is not in internal heat build up and remove. Do not put small parts into Air ...Intake Vents. RECOMMENDATION We recommend avoiding dusty/smoky environments when operating a projector. When using an excessive amount of a projected image. Avoid using under dusty or smoky conditions,...
Owners Manual
Page 46
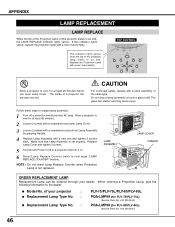
...LAMP COVER HANDLE ORDER REPLACEMENT LAMP Replacement Lamp can be ordered through your projector : ● Replacement Lamp Type No. : ● Replacement Lamp Type No. : PLV-75/PLV-75L/PLV-80/PLV-80L POA-LMP99 (for PLV-75/PLV-75L) (Service Parts No. 610 325 2940) POA-LMP98 (for at least 45 minutes ... turn it on. 6 Reset Lamp Replace Counter (refer to an end. The inside of a projector can shatter and may cause injury. If this projector draws to cool for PLV-80/PLV-80L) (Service Parts No. 610 325 2957) 46 Follow these steps to the dealer. ● Model No. When ordering...
...LAMP COVER HANDLE ORDER REPLACEMENT LAMP Replacement Lamp can be ordered through your projector : ● Replacement Lamp Type No. : ● Replacement Lamp Type No. : PLV-75/PLV-75L/PLV-80/PLV-80L POA-LMP99 (for PLV-75/PLV-75L) (Service Parts No. 610 325 2940) POA-LMP98 (for at least 45 minutes ... turn it on. 6 Reset Lamp Replace Counter (refer to an end. The inside of a projector can shatter and may cause injury. If this projector draws to cool for PLV-80/PLV-80L) (Service Parts No. 610 325 2957) 46 Follow these steps to the dealer. ● Model No. When ordering...
Owners Manual
Page 58
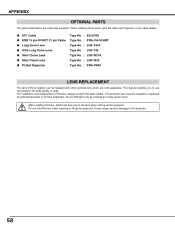
This feature enables you to the projector. 58 APPENDIX OPTIONAL PARTS The parts listed below are sold separately. to the sales dealer. ● DVI Cable ● HDB 15 pin-SCART 21 pin Cable ● Long Zoom Lens ● ... be replaced with other optional lens which are optionally supplied. Do not attempt to the lens when setting up the projector. Do not hold the lens when carrying or lifting the projector. For installation and replacement of uses. After installing the lens, attach the lens cap to do by well-trained sales...
This feature enables you to the projector. 58 APPENDIX OPTIONAL PARTS The parts listed below are sold separately. to the sales dealer. ● DVI Cable ● HDB 15 pin-SCART 21 pin Cable ● Long Zoom Lens ● ... be replaced with other optional lens which are optionally supplied. Do not attempt to the lens when setting up the projector. Do not hold the lens when carrying or lifting the projector. For installation and replacement of uses. After installing the lens, attach the lens cap to do by well-trained sales...

Owners Manual
Page 60
M4YA) SANYO Electric Co., Ltd Printed in Japan Part No. 610 324 1739 (1AA6P1P4949--
M4YA) SANYO Electric Co., Ltd Printed in Japan Part No. 610 324 1739 (1AA6P1P4949--
