Owners Manual
Page 1
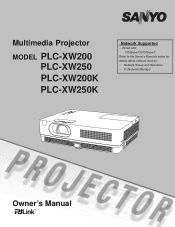
Multimedia Projector MODEL PLC-XW200 PLC-XW250 PLC-XW200K PLC-XW250K Network Supported □ Wired LAN 100-Base-TX/10-Base-T Refer to the Owner's Manuals below for details about network function. □ Network Set-up and Operation □ PJ Network Manager Owner's Manual
Multimedia Projector MODEL PLC-XW200 PLC-XW250 PLC-XW200K PLC-XW250K Network Supported □ Wired LAN 100-Base-TX/10-Base-T Refer to the Owner's Manuals below for details about network function. □ Network Set-up and Operation □ PJ Network Manager Owner's Manual
Owners Manual
Page 2
...colors, and matrix liquid crystal display (LCD) technology. ♦ Compact Design ♦ Security Function This projector is available in this manual are subject to focus on the top control or remote control (p.53). output conveniently. (p.49) ♦ Multilanguage Menu Display Operation ... enables Input search, Auto Keystone correction and Auto PC adjustment by selecting the similar ♦ Logo Function color to the owner's manual of "Network Set-up display or The projector provides a switchable interface terminal. For details, refer to the wall color from the...
...colors, and matrix liquid crystal display (LCD) technology. ♦ Compact Design ♦ Security Function This projector is available in this manual are subject to focus on the top control or remote control (p.53). output conveniently. (p.49) ♦ Multilanguage Menu Display Operation ... enables Input search, Auto Keystone correction and Auto PC adjustment by selecting the similar ♦ Logo Function color to the owner's manual of "Network Set-up display or The projector provides a switchable interface terminal. For details, refer to the wall color from the...

Owners Manual
Page 3
... Sound Adjustment 24 Remote Control Operation 25 Computer Input 27 Input Source Selection (RGB: Computer 1/Computer 2) 27 Computer System Selection 28 Auto PC Adjustment 29 Manual PC Adjustment 30 Image Mode Selection 32 Image Adjustment 33 Screen Size Adjustment 34 Video Input 36 Input Source Selection (Video, S-video) 36 Input Source...
... Sound Adjustment 24 Remote Control Operation 25 Computer Input 27 Input Source Selection (RGB: Computer 1/Computer 2) 27 Computer System Selection 28 Auto PC Adjustment 29 Manual PC Adjustment 30 Image Mode Selection 32 Image Adjustment 33 Screen Size Adjustment 34 Video Input 36 Input Source Selection (Video, S-video) 36 Input Source...

Owners Manual
Page 4
... your projector, and can also be recycled and/or reused. To the Owner Before installing and operating this projector, read this manual again, check operations and cable connections and try the solutions in fire hazard. -Allowing the proper amount of space on pages...If your local community waste collection/recycling centre. THIS SYMBOL INDICATES THAT THERE ARE IMPORTANT OPERATING AND MAINTENANCE INSTRUCTIONS IN THE OWNER'S MANUAL WITH THIS UNIT. The symbol mark means that electrical and electronic equipment, batteries and accumulators, at your projector seems to operate ...
... your projector, and can also be recycled and/or reused. To the Owner Before installing and operating this projector, read this manual again, check operations and cable connections and try the solutions in fire hazard. -Allowing the proper amount of space on pages...If your local community waste collection/recycling centre. THIS SYMBOL INDICATES THAT THERE ARE IMPORTANT OPERATING AND MAINTENANCE INSTRUCTIONS IN THE OWNER'S MANUAL WITH THIS UNIT. The symbol mark means that electrical and electronic equipment, batteries and accumulators, at your projector seems to operate ...
Owners Manual
Page 8
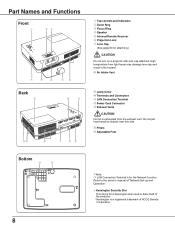
... near this side. ⑭ Filters ⑮ Adjustable Foot Bottom ⑭ ⑮ Note: ⑪ LAN Connection Terminal is for a Kensington lock used to the owner's manual of ACCO Brands Corporation. 8 Refer to deter theft of the projector. Kensington is a registered trademark of "Network Set-up and Operation" . Kensington Security...
... near this side. ⑭ Filters ⑮ Adjustable Foot Bottom ⑭ ⑮ Note: ⑪ LAN Connection Terminal is for a Kensington lock used to the owner's manual of ACCO Brands Corporation. 8 Refer to deter theft of the projector. Kensington is a registered trademark of "Network Set-up and Operation" . Kensington Security...

Owners Manual
Page 9
.... ⑤ VIDEO IN Connect the composite video output signal to this jack (p.15). ⑥ LAN Connection Terminal Connect the LAN cable (refer to the owner's manual of "Network Set-up and Operation"). ⑦ AUDIO IN Connect the audio output signal from a computer to this terminal (p.14). -
.... ⑤ VIDEO IN Connect the composite video output signal to this jack (p.15). ⑥ LAN Connection Terminal Connect the LAN cable (refer to the owner's manual of "Network Set-up and Operation"). ⑦ AUDIO IN Connect the audio output signal from a computer to this terminal (p.14). -

Owners Manual
Page 19
... a security code that you entered an incorrect PIN code, PIN code and the number will be started. A PIN code consists of the projector. Repeat this manual and keep it to correct, and then enter the correct number. Setting a PIN code prevents unauthorized use the Point ◄ ► buttons to move the...
... a security code that you entered an incorrect PIN code, PIN code and the number will be started. A PIN code consists of the projector. Repeat this manual and keep it to correct, and then enter the correct number. Setting a PIN code prevents unauthorized use the Point ◄ ► buttons to move the...
Owners Manual
Page 21
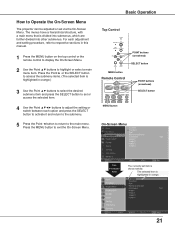
... the selected item. 4 Use the Point buttons to adjust the setting or switch between each adjustment and setting procedure, refer to respective sections in this manual. 1 Press the MENU button on the top control or the remote control to display the On-Screen Menu. 2 Use the Point ▲▼ buttons to...
... the selected item. 4 Use the Point buttons to adjust the setting or switch between each adjustment and setting procedure, refer to respective sections in this manual. 1 Press the MENU button on the top control or the remote control to display the On-Screen Menu. 2 Use the Point ▲▼ buttons to...
Owners Manual
Page 22
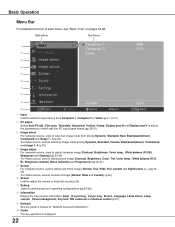
... freq., V-sync freq., Screen, Language, Lamp status, Lamp counter , Power management, Key lock, PIN code lock and Remote control (p.57). ⑨ Network See the owner's manual of "Network Set-up and Operation". ⑩ Guide The key operation is displayed. 22 For Video source, used to adjust picture image [Contrast, Brightness, Color...
... freq., V-sync freq., Screen, Language, Lamp status, Lamp counter , Power management, Key lock, PIN code lock and Remote control (p.57). ⑨ Network See the owner's manual of "Network Set-up and Operation". ⑩ Guide The key operation is displayed. 22 For Video source, used to adjust picture image [Contrast, Brightness, Color...
Owners Manual
Page 23
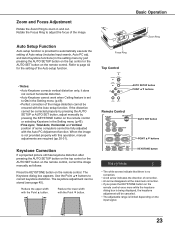
...the Setting menu (p.45). • Fine sync, Total dots, Horizontal and Vertical position of the image distortion cannot be ensured with this operation, manual adjustments are required (pp.30-31). If the distortion cannot be fully adjusted with the Auto PC Adjustment function. Use the Point ▲▼...keystone distortion after pressing the AUTO SETUP button on the top control or the AUTO SET button on the remote control, correct the image manually as follows: Press the KEYSTONE button on the remote control or selecting Keystone in the Setting menu (p.49). • Perfect correction of...
...the Setting menu (p.45). • Fine sync, Total dots, Horizontal and Vertical position of the image distortion cannot be ensured with this operation, manual adjustments are required (pp.30-31). If the distortion cannot be fully adjusted with the Auto PC Adjustment function. Use the Point ▲▼...keystone distortion after pressing the AUTO SETUP button on the top control or the AUTO SET button on the remote control, correct the image manually as follows: Press the KEYSTONE button on the remote control or selecting Keystone in the Setting menu (p.49). • Perfect correction of...
Owners Manual
Page 28
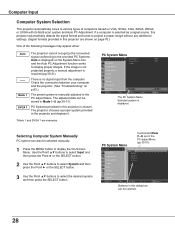
... provided in this projector are examples. The adjusted data can be stored in this projector is manually adjusted in the projector and displays it. Selecting Computer System Manually PC system can be selected manually. 1 Press the MENU button to select the desired system and then press the SELECT button.... are shown on page 70.) One of computers based on p.63.) The preset system is chosen. If the image is not projected properly, a manual adjustment is no signal input from the computer. Use the Point ▲▼ buttons to select Input and then press the Point ► or...
... provided in this projector are examples. The adjusted data can be stored in this projector is manually adjusted in the projector and displays it. Selecting Computer System Manually PC system can be selected manually. 1 Press the MENU button to select the desired system and then press the SELECT button.... are shown on page 70.) One of computers based on p.63.) The preset system is chosen. If the image is not projected properly, a manual adjustment is no signal input from the computer. Use the Point ▲▼ buttons to select Input and then press the Point ► or...

Owners Manual
Page 29
PC adjust Menu To store adjustment parameters The adjusted parameters from the Auto PC Adjustment can be fully adjusted with this operation, manual adjustments are stored, the setting can be operated when 480i, 575i, 480p, 575p, 720p,1035i or 1080i is selected in the PC System Menu (see ...
PC adjust Menu To store adjustment parameters The adjusted parameters from the Auto PC Adjustment can be fully adjusted with this operation, manual adjustments are stored, the setting can be operated when 480i, 575i, 480p, 575p, 720p,1035i or 1080i is selected in the PC System Menu (see ...

Owners Manual
Page 30
...9668;► buttons to match your PC image. Display area V Use the Point ◄► buttons to match those parameters manually adjusted. Computer Input Manual PC Adjustment Some computers employ special signal formats which may not be tuned by this projector. 30 Total dots Use the Point &#...◄► buttons to store those signal formats. Display area H Use the Point ◄► buttons to display the On-Screen Menu. Manual PC Adjustment enables you to recall the setting for a specific computer. 1 Press the MENU button to adjust the horizontal area displayed by this ...
...9668;► buttons to match your PC image. Display area V Use the Point ◄► buttons to match those parameters manually adjusted. Computer Input Manual PC Adjustment Some computers employ special signal formats which may not be tuned by this projector. 30 Total dots Use the Point &#...◄► buttons to store those signal formats. Display area H Use the Point ◄► buttons to display the On-Screen Menu. Manual PC Adjustment enables you to recall the setting for a specific computer. 1 Press the MENU button to adjust the horizontal area displayed by this ...

Owners Manual
Page 35
... zoom - The projected image can work only when the image is larger than the screen size. Computer Input Custom Adjust the screen scale and position manually with the D.ZOOM ▲▼ buttons. Note: • When no signal is detected, Normal is set to display a confirmation box. Adjust the Horizontal/Vertical...
... zoom - The projected image can work only when the image is larger than the screen size. Computer Input Custom Adjust the screen scale and position manually with the D.ZOOM ▲▼ buttons. Note: • When no signal is detected, Normal is set to display a confirmation box. Adjust the Horizontal/Vertical...

Owners Manual
Page 38
... a specific component video signal format from among 480i, 575i, 480p, 575p, 720p, 1035i, and 1080i. When Video System is PAL-M or PAL-N, select the system manually. PAL/SECAM/NTSC/NTSC4.43/PAL-M/PAL-N If the projector cannot reproduce proper video image, select a specific broadcast signal format from among PAL, SECAM, NTSC...
... a specific component video signal format from among 480i, 575i, 480p, 575p, 720p, 1035i, and 1080i. When Video System is PAL-M or PAL-N, select the system manually. PAL/SECAM/NTSC/NTSC4.43/PAL-M/PAL-N If the projector cannot reproduce proper video image, select a specific broadcast signal format from among PAL, SECAM, NTSC...

Owners Manual
Page 42
... is used. Use the Point ▲▼ buttons to all adjusted values. Adjust the Horizontal/Vertical screen position. Custom Adjust the screen scale and position manually with this function.
... is used. Use the Point ▲▼ buttons to all adjusted values. Adjust the Horizontal/Vertical screen position. Custom Adjust the screen scale and position manually with this function.
Owners Manual
Page 44
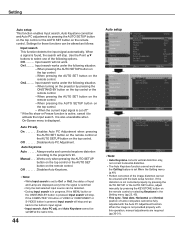
... is also unavailable when On-Screen menu is not corrected properly by pressing the AUTO SETUP or the AUTO SET button, adjust manually by pressing the ON/STAND-BY button on the top control. Auto Keystone Auto Always works and corrects keystone distortion according to ...• The Auto Keystone function cannot work . Input search works under the following situation. - When pressing the AUTO SETUP button on the remote control. - Manual . . . Off Disables Auto Keystone. Note: • While Input search is pressed, Input search will stop . When a signal is active, cancel...
... is also unavailable when On-Screen menu is not corrected properly by pressing the AUTO SETUP or the AUTO SET button, adjust manually by pressing the ON/STAND-BY button on the top control. Auto Keystone Auto Always works and corrects keystone distortion according to ...• The Auto Keystone function cannot work . Input search works under the following situation. - When pressing the AUTO SETUP button on the remote control. - Manual . . . Off Disables Auto Keystone. Note: • While Input search is pressed, Input search will stop . When a signal is active, cancel...

Owners Manual
Page 51
... projector via network, modify network environment, and receive an e-mail about projector status while the projector is not available. Supply the power to the owner's manual of Closed Caption is displayed in gray while it is powered off the projector via network.
... projector via network, modify network environment, and receive an e-mail about projector status while the projector is not available. Supply the power to the owner's manual of Closed Caption is displayed in gray while it is powered off the projector via network.
Owners Manual
Page 62
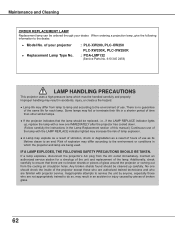
Some lamps may fail or terminate their life in the Lamp Replacement section of this manual.) Continuous use of the lamp with projector service. Risk of explosion may differ from lamp to lamp and according to the environment of use ...Replacement lamp can be cleaned up , replace the lamp with a new one should be ordered through your projector ● Replacement Lamp Type No. : PLC-XW200, PLC-XW250 PLC-XW200K, PLC-XW250K : POA-LMP132 (Service Parts No. 610 345 2456) LAMP HANDLING PRECAUTIONS This projector uses a high-pressure lamp which the projector and lamp are...
Some lamps may fail or terminate their life in the Lamp Replacement section of this manual.) Continuous use of the lamp with projector service. Risk of explosion may differ from lamp to lamp and according to the environment of use ...Replacement lamp can be cleaned up , replace the lamp with a new one should be ordered through your projector ● Replacement Lamp Type No. : PLC-XW200, PLC-XW250 PLC-XW200K, PLC-XW250K : POA-LMP132 (Service Parts No. 610 345 2456) LAMP HANDLING PRECAUTIONS This projector uses a high-pressure lamp which the projector and lamp are...
Owners Manual
Page 64
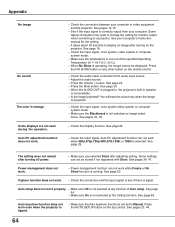
... not work even when the projector is signal. Some displays are not seen during the operation. Check the connection between your computer's instruction manual for monitor output when connecting to display an image after turning on the top control. See pages 34, 41. Check the connection and ...the input signal to Manual. Make sure the Auto keystone function is not out of Auto setup. See pages 23, 44 64 See pages 14-16. - Make sure...
... not work even when the projector is signal. Some displays are not seen during the operation. Check the connection between your computer's instruction manual for monitor output when connecting to display an image after turning on the top control. See pages 34, 41. Check the connection and ...the input signal to Manual. Make sure the Auto keystone function is not out of Auto setup. See pages 23, 44 64 See pages 14-16. - Make sure...


