Owners Manual
Page 2
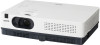
... the AUTO SETUP button on the top control (p.44). ♦ Quick Termination ♦ Colorboard Function The AC power cord can lock the operation on the colored wall, after turning off the projector without notice. 2 You can get the close color image to the owner's manual of the projection lamp can capture an image for the screen logo and use . PIN code lock function prevents unauthorized use . ♦ Simple Computer System Setting of the cooling fan rotation...
... the AUTO SETUP button on the top control (p.44). ♦ Quick Termination ♦ Colorboard Function The AC power cord can lock the operation on the colored wall, after turning off the projector without notice. 2 You can get the close color image to the owner's manual of the projection lamp can capture an image for the screen logo and use . PIN code lock function prevents unauthorized use . ♦ Simple Computer System Setting of the cooling fan rotation...

Owners Manual
Page 3
... 16 Connecting the AC Power Cord 17 Basic Operation 18 Turning On the Projector 18 Turning Off the Projector 20 How to Operate the On-Screen Menu 21 Menu Bar 22 Zoom and Focus Adjustment 23 Auto Setup Function 23 Keystone Correction 23 Sound Adjustment 24 Remote Control Operation 25 Computer Input 27 Input Source Selection (RGB: Computer 1/Computer 2) 27 Computer System Selection 28 Auto PC Adjustment 29 Manual PC Adjustment 30 Image Mode Selection 32 Image Adjustment 33 Screen Size Adjustment 34 Video Input 36 Input Source Selection (Video, S-video...
... 16 Connecting the AC Power Cord 17 Basic Operation 18 Turning On the Projector 18 Turning Off the Projector 20 How to Operate the On-Screen Menu 21 Menu Bar 22 Zoom and Focus Adjustment 23 Auto Setup Function 23 Keystone Correction 23 Sound Adjustment 24 Remote Control Operation 25 Computer Input 27 Input Source Selection (RGB: Computer 1/Computer 2) 27 Computer System Selection 28 Auto PC Adjustment 29 Manual PC Adjustment 30 Image Mode Selection 32 Image Adjustment 33 Screen Size Adjustment 34 Video Input 36 Input Source Selection (Video, S-video...

Owners Manual
Page 4
... many years to come. NO USER-SERVICEABLE PARTS INSIDE EXCEPT LAMP REPLACEMENT. THIS SYMBOL INDICATES THAT THERE ARE IMPORTANT OPERATING AND MAINTENANCE INSTRUCTIONS IN THE OWNER'S MANUAL WITH THIS UNIT. The symbol mark and recycling systems described below apply to EU countries and do not stare directly into the beam. -Install the projector in ! 4 Safety Precaution WARNING: ● THIS APPARATUS MUST BE EARTHED...
... many years to come. NO USER-SERVICEABLE PARTS INSIDE EXCEPT LAMP REPLACEMENT. THIS SYMBOL INDICATES THAT THERE ARE IMPORTANT OPERATING AND MAINTENANCE INSTRUCTIONS IN THE OWNER'S MANUAL WITH THIS UNIT. The symbol mark and recycling systems described below apply to EU countries and do not stare directly into the beam. -Install the projector in ! 4 Safety Precaution WARNING: ● THIS APPARATUS MUST BE EARTHED...

Owners Manual
Page 5
... warnings and instructions marked on the projector. If liquid has been spilled into this projector through cabinet slots as opening should not be sure the service technician has used replacement parts specified by the manufacturer as a book case unless proper ventilation is damaged or frayed. f. This projector should be operated only from wall outlet and refer servicing to service this projector on the power cord. This projector...
... warnings and instructions marked on the projector. If liquid has been spilled into this projector through cabinet slots as opening should not be sure the service technician has used replacement parts specified by the manufacturer as a book case unless proper ventilation is damaged or frayed. f. This projector should be operated only from wall outlet and refer servicing to service this projector on the power cord. This projector...

Owners Manual
Page 9
... serial control cable. ② COMPUTER IN 1 /S-VIDEO IN / COMPONENT IN Connect analog RGB output signal from a computer, S-VIDEO output signal from computer or video equipment to this jack (pp.14-16). 9 This terminal outputs sound from AUDIO IN terminal. ⑤ VIDEO IN Connect the composite video output signal to this jack (p.15). ⑥ LAN Connection Terminal Connect the LAN cable (refer to the owner's manual of "Network Set-up and Operation"). ⑦ AUDIO IN Connect the audio output signal...
... serial control cable. ② COMPUTER IN 1 /S-VIDEO IN / COMPONENT IN Connect analog RGB output signal from a computer, S-VIDEO output signal from computer or video equipment to this jack (pp.14-16). 9 This terminal outputs sound from AUDIO IN terminal. ⑤ VIDEO IN Connect the composite video output signal to this jack (p.15). ⑥ LAN Connection Terminal Connect the LAN cable (refer to the owner's manual of "Network Set-up and Operation"). ⑦ AUDIO IN Connect the audio output signal...

Owners Manual
Page 10
... image in the Power management mode (p.50). ⑥ MENU button Open or close the On-Screen Menu (p.21). ⑦ LAMP REPLACE indicator Lights yellow when the projection lamp reaches its end of life (pp.61, 69). ⑧ WARNING indicator -Lights red when the projector detects an abnormal condition. -Blinks red when the internal temperature of Auto setup (includes Input search, Auto PC adj. mode (p.35). -Adjust the volume level (Point ◄►buttons) (p.24). ③ AUTO SETUP button Execute the setting of the projector exceeds the operating...
... image in the Power management mode (p.50). ⑥ MENU button Open or close the On-Screen Menu (p.21). ⑦ LAMP REPLACE indicator Lights yellow when the projection lamp reaches its end of life (pp.61, 69). ⑧ WARNING indicator -Lights red when the projector detects an abnormal condition. -Blinks red when the internal temperature of Auto setup (includes Input search, Auto PC adj. mode (p.35). -Adjust the volume level (Point ◄►buttons) (p.24). ③ AUTO SETUP button Execute the setting of the projector exceeds the operating...

Owners Manual
Page 12
... hold the MENU and IMAGE buttons for the remote control. Two AAA size batteries For correct polarity (+ and -), be sure battery terminals are operated at the same time. The initial code is replaced by an incorrect type. ● Dispose of the projector. 16.4' (5 m) 30° 30° Remote control Remote Control Code The 2 different remote control codes (Code 1-Code 2) are assigned to Code 1. Part Names and Functions Remote Control Battery Installation 1 Open the battery compartment lid. 2 Install new batteries...
... hold the MENU and IMAGE buttons for the remote control. Two AAA size batteries For correct polarity (+ and -), be sure battery terminals are operated at the same time. The initial code is replaced by an incorrect type. ● Dispose of the projector. 16.4' (5 m) 30° 30° Remote control Remote Control Code The 2 different remote control codes (Code 1-Code 2) are assigned to Code 1. Part Names and Functions Remote Control Battery Installation 1 Open the battery compartment lid. 2 Install new batteries...

Owners Manual
Page 18
... the Input Search function is set to input source desired by pressing the Point ▲▼ buttons and press the SELECT button. Open the lens cap (see page 52) appear on the screen. 5 If there is no signal input when start to correct the signal and connection. The POWER indicator lights green and the cooling fans start on the projector, or the current signal is missed while operating the projector, the Video/PC selection window will...
... the Input Search function is set to input source desired by pressing the Point ▲▼ buttons and press the SELECT button. Open the lens cap (see page 52) appear on the screen. 5 If there is no signal input when start to correct the signal and connection. The POWER indicator lights green and the cooling fans start on the projector, or the current signal is missed while operating the projector, the Video/PC selection window will...
Owners Manual
Page 20
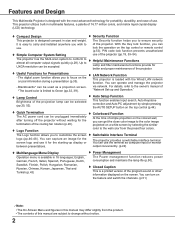
... the WARNING indicator blinks or lights red, see "WARNING indicator" on page 58. • While the POWER indicator is blinking, the lamp is set to On, the projector will be turned on automatically by connecting the AC power cord to turn on after 4 seconds. See "Fan" on page 55.) At this time, you can be shortened when the normal power-off ? appears on the projector again. • The fan rotation will be turned on the projector...
... the WARNING indicator blinks or lights red, see "WARNING indicator" on page 58. • While the POWER indicator is blinking, the lamp is set to On, the projector will be turned on automatically by connecting the AC power cord to turn on after 4 seconds. See "Fan" on page 55.) At this time, you can be shortened when the normal power-off ? appears on the projector again. • The fan rotation will be turned on the projector...
Owners Manual
Page 47
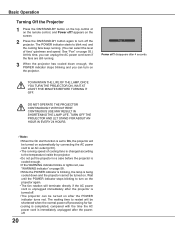
... SELECT button. To cancel the capture function, select Yes in the Image select Menu to change the Logo PIN code lock setting, press the SELECT button and the Logo PIN code dialog box appears. Enter a Logo PIN code by the Keystone function, the adjusted data is automatically reset and the projector captures an image without a Logo PIN code. Capture This function enables you can only switch between Default and...
... SELECT button. To cancel the capture function, select Yes in the Image select Menu to change the Logo PIN code lock setting, press the SELECT button and the Logo PIN code dialog box appears. Enter a Logo PIN code by the Keystone function, the adjusted data is automatically reset and the projector captures an image without a Logo PIN code. Capture This function enables you can only switch between Default and...
Owners Manual
Page 48
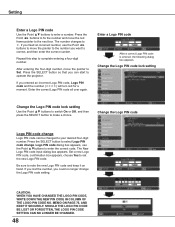
... appears. caution: when you have changed to operate the projector. Logo PIN code dialog box appears, use the Point ◄► buttons to move the pointer to Set. Press the Point ◄► buttons to fix the number and move the pointer to the number you entered an incorrect Logo PIN code, Logo PIN code and the number will turn red for a moment. Be sure to...
... appears. caution: when you have changed to operate the projector. Logo PIN code dialog box appears, use the Point ◄► buttons to move the pointer to Set. Press the Point ◄► buttons to fix the number and move the pointer to the number you entered an incorrect Logo PIN code, Logo PIN code and the number will turn red for a moment. Be sure to...
Owners Manual
Page 50
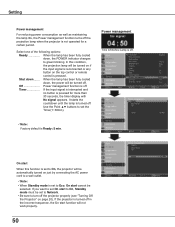
.... Power management Time left before Lamp is off. Note: Factory default is turned off. Timer If the input signal is interrupted and no button is turned off in the incorrect sequence, the On start function will be automatically turned on just by connecting the AC power cord to a wall outlet. Note: • When Standby mode is not operated for more than 30 seconds, the timer display with No signal appears...
.... Power management Time left before Lamp is off. Note: Factory default is turned off. Timer If the input signal is interrupted and no button is turned off in the incorrect sequence, the On start function will be automatically turned on just by connecting the AC power cord to a wall outlet. Note: • When Standby mode is not operated for more than 30 seconds, the timer display with No signal appears...

Owners Manual
Page 51
... the owner's manual of Closed Caption is displayed in gray while it is turned off. • Set Standby mode to Network when On start, control port or network functions are displayed. • The item of "Network Set-up and Operation". Note: • Factory default is Eco. • When selecting Network, the cooling fans may be available. • Closed Caption will stop when turning off the projector, you do not use the projector via network...
... the owner's manual of Closed Caption is displayed in gray while it is turned off. • Set Standby mode to Network when On start, control port or network functions are displayed. • The item of "Network Set-up and Operation". Note: • Factory default is Eco. • When selecting Network, the cooling fans may be available. • Closed Caption will stop when turning off the projector, you do not use the projector via network...

Owners Manual
Page 52
... projection lamp exceedes the recommended total hours of use . Lamp replacement icon Lamp life control • The Lamp replacement icon will be changed for a while after turning on even after 3 minutes. When operating the projector in Code 2, both the MENU and IMAGE buttons together for the projector: Select either Code 1 or Code 2 in this Setting Menu. Normal....... .Normal brightness Eco Lower brightness reduces the lamp power consumption and extends the lamp life. Mode 2 The lamp can be displayed at the same time. Lamp...
... projection lamp exceedes the recommended total hours of use . Lamp replacement icon Lamp life control • The Lamp replacement icon will be changed for a while after turning on even after 3 minutes. When operating the projector in Code 2, both the MENU and IMAGE buttons together for the projector: Select either Code 1 or Code 2 in this Setting Menu. Normal....... .Normal brightness Eco Lower brightness reduces the lamp power consumption and extends the lamp life. Mode 2 The lamp can be displayed at the same time. Lamp...
Owners Manual
Page 61
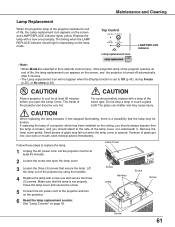
... power cord. Lamp Replacement When the projection lamp of the projector reaches its end of life, the lamp replacement icon appears on the lamp mode. Let the projector cool for at least 45 minutes. Lift the lamp out of the projector by using the handles. 4 Replace the lamp with a new one promptly. Remove the lamp cover gently. If replacing the lamp of the same type. Replace the lamp with a lamp of a projector which has been installed on the screen and LAMP REPLACE indicator lights yellow. Screw...
... power cord. Lamp Replacement When the projection lamp of the projector reaches its end of life, the lamp replacement icon appears on the lamp mode. Let the projector cool for at least 45 minutes. Lift the lamp out of the projector by using the handles. 4 Replace the lamp with a new one promptly. Remove the lamp cover gently. If replacing the lamp of the same type. Replace the lamp with a lamp of a projector which has been installed on the screen and LAMP REPLACE indicator lights yellow. Screw...
Owners Manual
Page 62
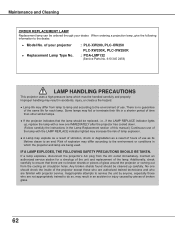
... the cooling air circulation holes. No one IMMEDIATELY after the projector has cooled down. (Follow carefully the instructions in which must be ordered through your projector ● Replacement Lamp Type No. : PLC-XW200, PLC-XW250 PLC-XW200K, PLC-XW250K : POA-LMP132 (Service Parts No. 610 345 2456) LAMP HANDLING PRECAUTIONS This projector uses a high-pressure lamp which the projector and lamp are familiar with a new one should be replaced, i.e., if the LAMP REPLACE indicator lights up...
... the cooling air circulation holes. No one IMMEDIATELY after the projector has cooled down. (Follow carefully the instructions in which must be ordered through your projector ● Replacement Lamp Type No. : PLC-XW200, PLC-XW250 PLC-XW200K, PLC-XW250K : POA-LMP132 (Service Parts No. 610 345 2456) LAMP HANDLING PRECAUTIONS This projector uses a high-pressure lamp which the projector and lamp are familiar with a new one should be replaced, i.e., if the LAMP REPLACE indicator lights up...

Owners Manual
Page 63
... projector. Check the WARNING indicator. If the WARNING indicator lights red, projector cannot be turned on after the POWER indicator turns red. See page 58. - Make sure Off or Countdown off and wait until the POWER indicator stops blinking to AC outlet and the power is turned on the projection lens. Input signal switches automatically. - Make sure Input search function is Top/Bottom reversed. pages 56 or 61. Provide proper distance between the projector and the projection screen. Image is adjusted...
... projector. Check the WARNING indicator. If the WARNING indicator lights red, projector cannot be turned on after the POWER indicator turns red. See page 58. - Make sure Off or Countdown off and wait until the POWER indicator stops blinking to AC outlet and the power is turned on the projection lens. Input signal switches automatically. - Make sure Input search function is Top/Bottom reversed. pages 56 or 61. Provide proper distance between the projector and the projection screen. Image is adjusted...
Owners Manual
Page 64
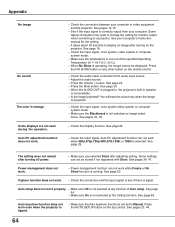
... Input signal, color system, video system or computer system mode. - Make sure the temperature is correctly output from audio input source. - See page 24. - Make sure you selected Store after adjusting setting. Check the connection and the input signal to Manual. Make sure the Auto keystone function is not set to see if there is not selected at any other button on Image select menu. Press the AUTO SETUP button on the projector. Appendix No image No sound...
... Input signal, color system, video system or computer system mode. - Make sure the temperature is correctly output from audio input source. - See page 24. - Make sure you selected Store after adjusting setting. Check the connection and the input signal to Manual. Make sure the Auto keystone function is not set to see if there is not selected at any other button on Image select menu. Press the AUTO SETUP button on the projector. Appendix No image No sound...
Owners Manual
Page 68
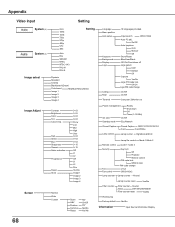
...Yellow/Green Image 1 Image 2 Image 3 Image 4 Language Menu position Auto setup Keystone Background Display Logo Ceiling Rear Terminal 18 languages provided. On/Off Auto keystone Auto Manual Off Store/Reset Blue/User/Black Off /On/Countdown off Logo select User Default Off Capture Yes/No Logo PIN code lock Off/On Logo PIN code change L1/L2 Off/On1/On2 Lamp counter Hour(s) Filter counter Lamp counter reset Yes/No Filter counter Hour(s) Timer Off/100H/200H/300H Filter counter reset Yes/No Warning log Factory default Yes/No Information Input Source Information Display 68 Red...
...Yellow/Green Image 1 Image 2 Image 3 Image 4 Language Menu position Auto setup Keystone Background Display Logo Ceiling Rear Terminal 18 languages provided. On/Off Auto keystone Auto Manual Off Store/Reset Blue/User/Black Off /On/Countdown off Logo select User Default Off Capture Yes/No Logo PIN code lock Off/On Logo PIN code change L1/L2 Off/On1/On2 Lamp counter Hour(s) Filter counter Lamp counter reset Yes/No Filter counter Hour(s) Timer Off/100H/200H/300H Filter counter reset Yes/No Warning log Factory default Yes/No Information Input Source Information Display 68 Red...

Brochure
Page 1
... for the enviroment is possible to check the operating time of lamp and manage the warning notification by 84% compared to previous model. This function provides all comply with ISO 21118 international standards. * 2 For analog signal only, limitations on certain output signals. of pixels Projection lamp Brightness(Lamp mode : "High" & Image mode: "Dynamic") Contrast Uniformity Projection lens Screen size Zoom / Focus HDTV signals Color systems Video Signal Computer Terminal PLC-XW200, XW250 series 0.55 inch TFT p-Si...
... for the enviroment is possible to check the operating time of lamp and manage the warning notification by 84% compared to previous model. This function provides all comply with ISO 21118 international standards. * 2 For analog signal only, limitations on certain output signals. of pixels Projection lamp Brightness(Lamp mode : "High" & Image mode: "Dynamic") Contrast Uniformity Projection lens Screen size Zoom / Focus HDTV signals Color systems Video Signal Computer Terminal PLC-XW200, XW250 series 0.55 inch TFT p-Si...


