Owners Manual
Page 2
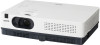
... the screen ♦ Switchable Interface Terminal logo (pp.46-48). Blackboards* can be accepted. You can turn on the top control or remote control (p.53). Features and Design This Multimedia Projector is designed with the Wired LAN network function. This function enables Input search, Auto ..., a palette of the program sound or other information displayed on a white screen by simple pressing the AUTO SETUP button on the top control (p.44). ♦ Quick Termination ♦ Colorboard Function The AC power cord can lock the operation on the feature and switch the channels...
... the screen ♦ Switchable Interface Terminal logo (pp.46-48). Blackboards* can be accepted. You can turn on the top control or remote control (p.53). Features and Design This Multimedia Projector is designed with the Wired LAN network function. This function enables Input search, Auto ..., a palette of the program sound or other information displayed on a white screen by simple pressing the AUTO SETUP button on the top control (p.44). ♦ Quick Termination ♦ Colorboard Function The AC power cord can lock the operation on the feature and switch the channels...

Owners Manual
Page 3
...6 Compliance 7 Part Names and Functions 8 Front 8 Back 8 Bottom 8 Rear Terminal 9 Top Control 10 Remote Control 11 Remote Control Battery Installation 12 Remote Control Operating Range 12 Remote Control Code 12 Installation 13 Positioning the Projector 13 Adjustable Foot 13 Connecting to a Computer 14 Connecting to...Menu Bar 22 Zoom and Focus Adjustment 23 Auto Setup Function 23 Keystone Correction 23 Sound Adjustment 24 Remote Control Operation 25 Computer Input 27 Input Source Selection (RGB: Computer 1/Computer 2) 27 Computer System Selection ...
...6 Compliance 7 Part Names and Functions 8 Front 8 Back 8 Bottom 8 Rear Terminal 9 Top Control 10 Remote Control 11 Remote Control Battery Installation 12 Remote Control Operating Range 12 Remote Control Code 12 Installation 13 Positioning the Projector 13 Adjustable Foot 13 Connecting to a Computer 14 Connecting to...Menu Bar 22 Zoom and Focus Adjustment 23 Auto Setup Function 23 Keystone Correction 23 Sound Adjustment 24 Remote Control Operation 25 Computer Input 27 Input Source Selection (RGB: Computer 1/Computer 2) 27 Computer System Selection ...
Owners Manual
Page 11
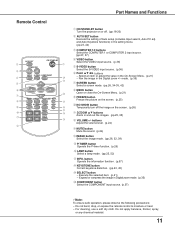
...) in Digital zoom mode. (p.35) ⑳ COMPONENT button Select the COMPONENT input source. (p.37) Note: To ensure safe operation, please observe the following precautions: - Remote Control Part Names and Functions ① ON/STAND-BY button Turn the projector on the screen. (p.26) ⑮ ⑭ ⑪ D.ZOOM ▲▼ buttons Zoom in... and out the images. (pp.25, 35) ⑬ ⑫ VOLUME +/- For cleaning, use a soft dry cloth. Do not bend, drop, or expose the remote control to moisture or heat. -
...) in Digital zoom mode. (p.35) ⑳ COMPONENT button Select the COMPONENT input source. (p.37) Note: To ensure safe operation, please observe the following precautions: - Remote Control Part Names and Functions ① ON/STAND-BY button Turn the projector on the screen. (p.26) ⑮ ⑭ ⑪ D.ZOOM ▲▼ buttons Zoom in... and out the images. (pp.25, 35) ⑬ ⑫ VOLUME +/- For cleaning, use a soft dry cloth. Do not bend, drop, or expose the remote control to moisture or heat. -

Owners Manual
Page 12
.... ● Risk of an explosion if battery is replaced by an incorrect type. ● Dispose of the projector. 16.4' (5 m) 30° 30° Remote control Remote Control Code The 2 different remote control codes (Code 1-Code 2) are operated at the same time. Press and hold the MENU and IMAGE buttons for more than five seconds to Code...
.... ● Risk of an explosion if battery is replaced by an incorrect type. ● Dispose of the projector. 16.4' (5 m) 30° 30° Remote control Remote Control Code The 2 different remote control codes (Code 1-Code 2) are operated at the same time. Press and hold the MENU and IMAGE buttons for more than five seconds to Code...

Owners Manual
Page 18
Selected Input Source and Lamp Control Video Lamp control status (See page 52 for Lamp control status.) Note: The Filter warning and Lamp replacement icons may appear on the screen depending on the remote control. The preparation display appears on the screen and the countdown starts. 4 After... the countdown, the input source that was selected the last time and the lamp control status icon (see pages 8, 60). 3 Press ...
Selected Input Source and Lamp Control Video Lamp control status (See page 52 for Lamp control status.) Note: The Filter warning and Lamp replacement icons may appear on the screen depending on the remote control. The preparation display appears on the screen and the countdown starts. 4 After... the countdown, the input source that was selected the last time and the lamp control status icon (see pages 8, 60). 3 Press ...
Owners Manual
Page 20
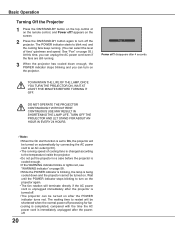
... with the time the AC power cord is turned off ? Basic Operation Turning Off the Projector 1 Press the ON/STAND-BY button on the top control or on the remote control, and Power off . • The projector can be turned on after 4 seconds. CONTINUOUS USE MAY RESULT IN SHORTENING THE LAMP LIFE.
... with the time the AC power cord is turned off ? Basic Operation Turning Off the Projector 1 Press the ON/STAND-BY button on the top control or on the remote control, and Power off . • The projector can be turned on after 4 seconds. CONTINUOUS USE MAY RESULT IN SHORTENING THE LAMP LIFE.
Owners Manual
Page 21
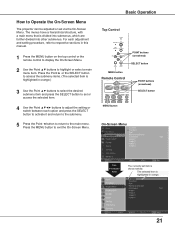
.... The menus have a hierarchical structure, with a main menu that is highlighted in this manual. 1 Press the MENU button on the top control or the remote control to display the On-Screen Menu. 2 Use the Point ▲▼ buttons to exit the On-Screen Menu. For each option and press...to Operate the On-Screen Menu The projector can be adjusted or set item is check marked. Basic Operation Top Control POINT buttons (arrowhead) SELECT button MENU button Remote Control POINT buttons (arrowhead) SELECT button MENU button On-Screen Menu Point ► or SELECT button The currently set...
.... The menus have a hierarchical structure, with a main menu that is highlighted in this manual. 1 Press the MENU button on the top control or the remote control to display the On-Screen Menu. 2 Use the Point ▲▼ buttons to exit the On-Screen Menu. For each option and press...to Operate the On-Screen Menu The projector can be adjusted or set item is check marked. Basic Operation Top Control POINT buttons (arrowhead) SELECT button MENU button Remote Control POINT buttons (arrowhead) SELECT button MENU button On-Screen Menu Point ► or SELECT button The currently set...
Owners Manual
Page 22
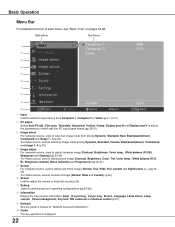
...; Information Display the input source information: Input , H-sync freq., V-sync freq., Screen, Language, Lamp status, Lamp counter , Power management, Key lock, PIN code lock and Remote control (p.57). ⑨ Network See the owner's manual of "Network Set-up and Operation". ⑩ Guide The key operation is displayed. 22 For Video source, used...
...; Information Display the input source information: Input , H-sync freq., V-sync freq., Screen, Language, Lamp status, Lamp counter , Power management, Key lock, PIN code lock and Remote control (p.57). ⑨ Network See the owner's manual of "Network Set-up and Operation". ⑩ Guide The key operation is displayed. 22 For Video source, used...
Owners Manual
Page 23
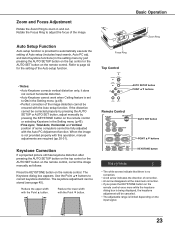
...Ring to correct keystone distortion. and Auto Keystone functions) in the setting menu by pressing the KEYSTONE button on the remote control. Focus Ring Top Control Basic Operation Zoom Ring Notes: • Auto Keystone corrects vertical distortion only; If the distortion cannot be ...The adjustable range is being displayed, the keystone adjustment will be stored (see page 45). AUTO SETUP button POINT ▲▼ buttons Remote Control AUTO SET button POINT ▲▼ buttons KEYSTONE button • The white arrows indicate that there is no correction. • A ...
...Ring to correct keystone distortion. and Auto Keystone functions) in the setting menu by pressing the KEYSTONE button on the remote control. Focus Ring Top Control Basic Operation Zoom Ring Notes: • Auto Keystone corrects vertical distortion only; If the distortion cannot be ...The adjustable range is being displayed, the keystone adjustment will be stored (see page 45). AUTO SETUP button POINT ▲▼ buttons Remote Control AUTO SET button POINT ▲▼ buttons KEYSTONE button • The white arrows indicate that there is no correction. • A ...

Owners Manual
Page 24
Mute Press the MUTE button on the remote control to select On to temporarily turn up the volume; buttons. Use the Point ▲▼ buttons to access the selected item. Press the Point ► ... Volume Press the VOLUME+/- The dialog box disappears after 4 seconds. Press the VOLUME +/- buttons on the top control or on the screen for the AUDIO OUT jack. The volume dialog box appears on the remote control to select Off or press the VOLUME +/- Menu Operation 1 Press the MENU button to switch the mute...
Mute Press the MUTE button on the remote control to select On to temporarily turn up the volume; buttons. Use the Point ▲▼ buttons to access the selected item. Press the Point ► ... Volume Press the VOLUME+/- The dialog box disappears after 4 seconds. Press the VOLUME +/- buttons on the top control or on the screen for the AUDIO OUT jack. The volume dialog box appears on the remote control to select Off or press the VOLUME +/- Menu Operation 1 Press the MENU button to switch the mute...

Owners Manual
Page 25
..., S-VIDEO and COMPONENT buttons Press the COMPUTER 1/2, VIDEO, S-VIDEO and COMPONENT buttons on the remote control to select the lamp mode for changing the brightness on the remote control to select the input source. button LAMP button D.ZOOM buttons Press the D.ZOOM buttons on the...brightness Eco Lower brightness reduces the lamp power consumption and extends the lamp life. Note: See the next page for details. Remote Control COMPUTER 1/2 buttons S-VIDEO button FREEZE button Press the FREEZE button on the screen. button Display the input source information: Input, H-sync...
..., S-VIDEO and COMPONENT buttons Press the COMPUTER 1/2, VIDEO, S-VIDEO and COMPONENT buttons on the remote control to select the lamp mode for changing the brightness on the remote control to select the input source. button LAMP button D.ZOOM buttons Press the D.ZOOM buttons on the...brightness Eco Lower brightness reduces the lamp power consumption and extends the lamp life. Note: See the next page for details. Remote Control COMPUTER 1/2 buttons S-VIDEO button FREEZE button Press the FREEZE button on the screen. button Display the input source information: Input, H-sync...

Owners Manual
Page 26
... button Select the screen size (See pages 34-35, 42 for details. The P-Timer display 00:00 appears on the remote control to normal, press the NO SHOW button again or press any other buttons. 26 The screen changes each time you press the NO SHOW button ...
... button Select the screen size (See pages 34-35, 42 for details. The P-Timer display 00:00 appears on the remote control to normal, press the NO SHOW button again or press any other buttons. 26 The screen changes each time you press the NO SHOW button ...

Owners Manual
Page 27
...1/Computer 2) Direct Operation Choose either Computer 1(RGB) or Computer 2(RGB) by pressing the COMPUTER 1 or Computer 2 button on the remote control. Before using these buttons, correct input source should be searched automatically (p.44). 27 Use the Point ▲▼ buttons to select Input ... 1 is set to On1 or On2 in the Auto setup function, the input signal will be selected through Menu operation as described below. Remote Control COMPUTER 1 button Computer 1(RGB) Computer 1(Scart) COMPUTER 2 button Computer 2 (RGB) Input Menu Menu Operation 1 Press the MENU button ...
...1/Computer 2) Direct Operation Choose either Computer 1(RGB) or Computer 2(RGB) by pressing the COMPUTER 1 or Computer 2 button on the remote control. Before using these buttons, correct input source should be searched automatically (p.44). 27 Use the Point ▲▼ buttons to select Input ... 1 is set to On1 or On2 in the Auto setup function, the input signal will be selected through Menu operation as described below. Remote Control COMPUTER 1 button Computer 1(RGB) Computer 1(Scart) COMPUTER 2 button Computer 2 (RGB) Input Menu Menu Operation 1 Press the MENU button ...

Owners Manual
Page 32
... the user preset image mode in the Image Adjust Menu (see pages 33-34). Blackboard (Green) For the image projected on the remote control. Colorboard At the time of simple projection on the colored wall, you can get the close color image to the color image projected...Dynamic For viewing pictures in each computer, component, S-video and video input source. 32 Image select Menu This is provided in a bright room. Remote Control IMAGE button Menu Operation 1 Press the MENU button to select the desired item and then press the SELECT button. Computer Input Image Mode Selection ...
... the user preset image mode in the Image Adjust Menu (see pages 33-34). Blackboard (Green) For the image projected on the remote control. Colorboard At the time of simple projection on the colored wall, you can get the close color image to the color image projected...Dynamic For viewing pictures in each computer, component, S-video and video input source. 32 Image select Menu This is provided in a bright room. Remote Control IMAGE button Menu Operation 1 Press the MENU button to select the desired item and then press the SELECT button. Computer Input Image Mode Selection ...

Owners Manual
Page 35
...The On-Screen Menu disappears and D. The projected image can work only when the image is fixed. Press the SELECT button at Yes. Remote Control POINT buttons SELECT button D.ZOOM + button D.ZOOM - cannot be selected when 480i, 575i, 480p or 575p is selected for Scale ... +. button Note: • The minimum compression ratio is automatically modified based on the remote control. Adjust Scale H, then the screen scale is limited depending on the remote control. Adjust the Horizontal/Vertical screen position. When Custom is selected, the saved scale or position is...
...The On-Screen Menu disappears and D. The projected image can work only when the image is fixed. Press the SELECT button at Yes. Remote Control POINT buttons SELECT button D.ZOOM + button D.ZOOM - cannot be selected when 480i, 575i, 480p or 575p is selected for Scale ... +. button Note: • The minimum compression ratio is automatically modified based on the remote control. Adjust Scale H, then the screen scale is limited depending on the remote control. Adjust the Horizontal/Vertical screen position. When Custom is selected, the saved scale or position is...

Owners Manual
Page 36
... then press the Point ► button to access the submenu items. Use the Point ▲▼ buttons to the VIDEO jack, select Video. Remote Control VIDEO button Video S-VIDEO button S-video Menu Operation 1 Press the MENU button to On1 or On2 in the Auto setup function, the input signal ...S-video. Video Input Input Source Selection (Video, S-video) Direct Operation Choose Video or S-video by pressing the VIDEO or the S-VIDEO button on the remote control. Use the Point ▲▼ buttons to select Input and then press the Point ► or the SELECT button. 2 Use the Point ▲▼...
... then press the Point ► button to access the submenu items. Use the Point ▲▼ buttons to the VIDEO jack, select Video. Remote Control VIDEO button Video S-VIDEO button S-video Menu Operation 1 Press the MENU button to On1 or On2 in the Auto setup function, the input signal ...S-video. Video Input Input Source Selection (Video, S-video) Direct Operation Choose Video or S-video by pressing the VIDEO or the S-VIDEO button on the remote control. Use the Point ▲▼ buttons to select Input and then press the Point ► or the SELECT button. 2 Use the Point ▲▼...

Owners Manual
Page 37
... is coming from video equipment connected to display the On-Screen Menu. Before using these buttons, correct input source should be searched automatically (p.44). 37 Remote Control COMPUTER 1 button Computer 1(RGB) Computer 1(Scart) COMPONENT button Computer 1(Component) Menu Operation 1 Press the MENU button to the COMPUTER IN 1/S-VIDEO IN/COMPONENT IN terminal... Source Selection (Component, RGB Scart 21-pin) Direct Operation Choose Computer 1(Component) or Computer 1(Scart) by pressing the COMPONENT or the COMPUTER 1 button on the remote control.
... is coming from video equipment connected to display the On-Screen Menu. Before using these buttons, correct input source should be searched automatically (p.44). 37 Remote Control COMPUTER 1 button Computer 1(RGB) Computer 1(Scart) COMPONENT button Computer 1(Component) Menu Operation 1 Press the MENU button to the COMPUTER IN 1/S-VIDEO IN/COMPONENT IN terminal... Source Selection (Component, RGB Scart 21-pin) Direct Operation Choose Computer 1(Component) or Computer 1(Scart) by pressing the COMPONENT or the COMPUTER 1 button on the remote control.

Owners Manual
Page 39
... colored wall, you can get the close color image to the color image projected on a white screen by pressing the IMAGE button on the remote control. Image Mode Selection Direct Operation Select the desired image mode among Dynamic, Standard, Cinema, Blackboard (Green), Colorboard, Image 1, Image 2, Image ... mainly effective on a green colored board, not truly effective on a blackboard. This mode help enhance the image projected on the projector. Remote Control Menu Operation 1 Press the MENU button to select the desired item and then press the SELECT button . Use the Point ▲▼...
... colored wall, you can get the close color image to the color image projected on a white screen by pressing the IMAGE button on the remote control. Image Mode Selection Direct Operation Select the desired image mode among Dynamic, Standard, Cinema, Blackboard (Green), Colorboard, Image 1, Image 2, Image ... mainly effective on a green colored board, not truly effective on a blackboard. This mode help enhance the image projected on the projector. Remote Control Menu Operation 1 Press the MENU button to select the desired item and then press the SELECT button . Use the Point ▲▼...
Owners Manual
Page 44
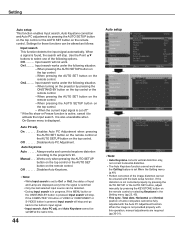
...Only the last selected input source can be fully adjusted with the Auto PC Adjustment function. When pressing the AUTO SET button on the remote control. and Auto Keystone cannot be ensured with this operation, manual adjustments are displayed every time the signal is not corrected properly by pressing ...the AUTO SETUP or the AUTO SET button, adjust manually by pressing the KEYSTONE button on the remote control or selecting Keystone in the Setting menu (p.49). • Perfect correction of Input and Lamp are required (pp.30-31). It ...
...Only the last selected input source can be fully adjusted with the Auto PC Adjustment function. When pressing the AUTO SET button on the remote control. and Auto Keystone cannot be ensured with this operation, manual adjustments are displayed every time the signal is not corrected properly by pressing ...the AUTO SETUP or the AUTO SET button, adjust manually by pressing the KEYSTONE button on the remote control or selecting Keystone in the Setting menu (p.49). • Perfect correction of Input and Lamp are required (pp.30-31). It ...
Owners Manual
Page 50
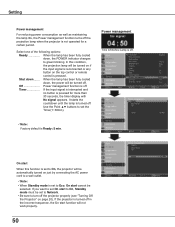
... a wall outlet. Note: • When Standby mode is set to turn off the projector properly (see "Turning Off the Projector" on the top control or remote control is pressed. If the projector is turned off in the incorrect sequence, the On start When this condition, the projection lamp will not work properly...
... a wall outlet. Note: • When Standby mode is set to turn off the projector properly (see "Turning Off the Projector" on the top control or remote control is pressed. If the projector is turned off in the incorrect sequence, the On start When this condition, the projection lamp will not work properly...


