
Owners Manual
Page 2
...systems (PAL, SECAM, NTSC, NTSC4.43, PAL-M, and PAL-N), Component video, S-Video and RGB scart. This projector utilizes built-in multimedia features, a palette of this manual are subject to ensure the security with the Key lock (p.48) and the PIN code lock (p.18, 48,...; The contents of 16.77 million colors, and matrix liquid crystal display (LCD) technology. ◆ Compact Design ◆ Logo Function This projector is designed compact in this manual may differ slightly from using the projector. ◆ Blackboard Function ◆ Input Search Function Blackboard* can be selected...
...systems (PAL, SECAM, NTSC, NTSC4.43, PAL-M, and PAL-N), Component video, S-Video and RGB scart. This projector utilizes built-in multimedia features, a palette of this manual are subject to ensure the security with the Key lock (p.48) and the PIN code lock (p.18, 48,...; The contents of 16.77 million colors, and matrix liquid crystal display (LCD) technology. ◆ Compact Design ◆ Logo Function This projector is designed compact in this manual may differ slightly from using the projector. ◆ Blackboard Function ◆ Input Search Function Blackboard* can be selected...

Owners Manual
Page 3
... Bottom 8 Rear Terminal 9 Top Control 10 Remote Control 11 Remote Control Battery Installation 12 Operating Range 12 Installation 13 Positioning the Projector 13 Adjustable Feet 13 Connecting the AC Power Cord 14 Connecting to a Computer 15 Connecting to Video Equipment 16 Connecting to Component ...Projector 19 How to Operate the On-Screen Menu 20 Menu Bar 21 Zoom and Focus Adjustment 22 Keystone Correction 22 Sound Adjustment 23 Remote Control Operation 23 Computer Input 25 Input Source Selection 25 Computer System Selection 26 Auto PC Adjustment 27 Manual...
... Bottom 8 Rear Terminal 9 Top Control 10 Remote Control 11 Remote Control Battery Installation 12 Operating Range 12 Installation 13 Positioning the Projector 13 Adjustable Feet 13 Connecting the AC Power Cord 14 Connecting to a Computer 15 Connecting to Video Equipment 16 Connecting to Component ...Projector 19 How to Operate the On-Screen Menu 20 Menu Bar 21 Zoom and Focus Adjustment 22 Keystone Correction 22 Sound Adjustment 23 Remote Control Operation 23 Computer Input 25 Input Source Selection 25 Computer System Selection 26 Auto PC Adjustment 27 Manual...

Owners Manual
Page 4
...accidents. REFER SERVICING TO QUALIFIED SERVICE PERSONNEL. NOTE: This symbol and recycle system are separate collection systems for Protection of this manual. Your SANYO product is designed and manufactured with a vacuum cleaner. Please help us to conserve the environment we live in greasy, wet,... can reduce the service life of Electronic Computer/ Data Processing Equipment, ANSI/NFPA 75. If the projector is not to operate improperly, read this manual thoroughly and operate the projector properly. CAUTION Not for use in a computer room as possible. Ne peut être utilis&#...
...accidents. REFER SERVICING TO QUALIFIED SERVICE PERSONNEL. NOTE: This symbol and recycle system are separate collection systems for Protection of this manual. Your SANYO product is designed and manufactured with a vacuum cleaner. Please help us to conserve the environment we live in greasy, wet,... can reduce the service life of Electronic Computer/ Data Processing Equipment, ANSI/NFPA 75. If the projector is not to operate improperly, read this manual thoroughly and operate the projector properly. CAUTION Not for use in a computer room as possible. Ne peut être utilis&#...

Owners Manual
Page 18
.... The POWER indicator becomes red. 3 Press the POWER ON-OFF button on the top control or on the projector. 2 Connect the projector's AC power cord into an AC outlet. Repeat this manual, and keep it at the factory. Enter the correct PIN code all operations are invalid. • If the... the Point ed buttons, and then press the Point 8 button to fix the number and move the pointer to the number you can operate the projector. ✔ Note: • When the Input Search function is turned off automatically. Setting a PIN code prevents unauthorized use of a four-digit number....
.... The POWER indicator becomes red. 3 Press the POWER ON-OFF button on the top control or on the projector. 2 Connect the projector's AC power cord into an AC outlet. Repeat this manual, and keep it at the factory. Enter the correct PIN code all operations are invalid. • If the... the Point ed buttons, and then press the Point 8 button to fix the number and move the pointer to the number you can operate the projector. ✔ Note: • When the Input Search function is turned off automatically. Setting a PIN code prevents unauthorized use of a four-digit number....

Owners Manual
Page 26
...27, 29) 26 Custom Mode (1 ~ 5) set , and then press the SELECT button. If the image is not projected properly, a manual adjustment is no signal input from computer. The projector chooses a proper system provided in the PC Adjust Menu. PC System Menu The PC System Menu icon Selected system is...of the following messages may appear when: Auto The projector cannot recognize the connected signal conforming to the provided PC Systems. The message "Auto" is displayed on page 56.) Mode 1 The preset system is displayed. Systems on VGA, SVGA, XGA, SXGA, WXGA, or UXGA with its Multi-...
...27, 29) 26 Custom Mode (1 ~ 5) set , and then press the SELECT button. If the image is not projected properly, a manual adjustment is no signal input from computer. The projector chooses a proper system provided in the PC Adjust Menu. PC System Menu The PC System Menu icon Selected system is...of the following messages may appear when: Auto The projector cannot recognize the connected signal conforming to the provided PC Systems. The message "Auto" is displayed on page 56.) Mode 1 The preset system is displayed. Systems on VGA, SVGA, XGA, SXGA, WXGA, or UXGA with its Multi-...

Owners Manual
Page 27
...of some computers cannot be operated as follows. Computer Input 27 Direct Operation The Auto PC adjustment function can be fully adjusted with this operation, manual adjustments are memorized, the setting can be operated when 480i, 575i, 480p, 575p, 720p,1035i, or 1080i is in the PC System ...Fine sync, Total dots, Horizontal, and Vertical to conform to Auto PC Adj. "Please wait..." When the image is not provided properly with this projector. Press the Point 7 8 buttons to move the red framed pointer to PC Adjust Menu item. 2 Press the Point ed buttons to move the...
...of some computers cannot be operated as follows. Computer Input 27 Direct Operation The Auto PC adjustment function can be fully adjusted with this operation, manual adjustments are memorized, the setting can be operated when 480i, 575i, 480p, 575p, 720p,1035i, or 1080i is in the PC System ...Fine sync, Total dots, Horizontal, and Vertical to conform to Auto PC Adj. "Please wait..." When the image is not provided properly with this projector. Press the Point 7 8 buttons to move the red framed pointer to PC Adjust Menu item. 2 Press the Point ed buttons to move the...

Owners Manual
Page 28
... to adjust the horizontal picture position. Horizontal Press the Point 7 8 buttons to the PC Adjust Menu icon. Clamp Adjust clamp level. The projector has 5 independent memory areas to show H-sync freq. Press the Point 7 8 buttons to adjust number to adjust the vertical picture position. ... those signal formats. Vertical Press the Point 7 8 buttons to match your PC image. When the image has dark bars, try this projector. Manual PC Adjustment enables you to precisely adjust several parameters to an item and press the SELECT button. Status (Stored/Free) of total dots...
... to adjust the horizontal picture position. Horizontal Press the Point 7 8 buttons to the PC Adjust Menu icon. Clamp Adjust clamp level. The projector has 5 independent memory areas to show H-sync freq. Press the Point 7 8 buttons to adjust number to adjust the vertical picture position. ... those signal formats. Vertical Press the Point 7 8 buttons to match your PC image. When the image has dark bars, try this projector. Manual PC Adjustment enables you to precisely adjust several parameters to an item and press the SELECT button. Status (Stored/Free) of total dots...

Owners Manual
Page 36
...; Note: The AV System Menu cannot be selected when selecting RGB (Scart). 36 COMPONENT VIDEO SIGNAL FORMAT If the projector cannot reproduce proper video image, it is PAL-M or PAL-N, select system manually. Video Input Video System Selection 1 Press the MENU button to optimize its performance. AV System Menu (Component) AV System...
...; Note: The AV System Menu cannot be selected when selecting RGB (Scart). 36 COMPONENT VIDEO SIGNAL FORMAT If the projector cannot reproduce proper video image, it is PAL-M or PAL-N, select system manually. Video Input Video System Selection 1 Press the MENU button to optimize its performance. AV System Menu (Component) AV System...

Owners Manual
Page 55
...according to the environment of the lamp. Inappropriate attempts to service the unit by pieces of time than other similar lamps. ● If the projector indicates that there are familiar with a new one should be cleaned up carefully. Press the Point 7 8 buttons to move the red framed ...another confirmation box appears. Select [Yes] again to display the On-Screen Menu. Improper handling may result in the Lamp Replacement section of this manual.) Continuous use . dialog box is no broken shards or pieces of the same life for a checkup of the unit and replacement of use...
...according to the environment of the lamp. Inappropriate attempts to service the unit by pieces of time than other similar lamps. ● If the projector indicates that there are familiar with a new one should be cleaned up carefully. Press the Point 7 8 buttons to move the red framed ...another confirmation box appears. Select [Yes] again to display the On-Screen Menu. Improper handling may result in the Lamp Replacement section of this manual.) Continuous use . dialog box is no broken shards or pieces of the same life for a checkup of the unit and replacement of use...

Owners Manual
Page 56
...176;F (5°C ~ 35°C)). - Plug the power cord of the projector. (See page 22.) - Provide proper distance between your computer's instruction manual for the setting. - Check the connection between the projector and the projection screen. (See page 13.) - Make sure you may ...result in moisture condensation on the projector. Make sure all equipment is connected to...
...176;F (5°C ~ 35°C)). - Plug the power cord of the projector. (See page 22.) - Provide proper distance between your computer's instruction manual for the setting. - Check the connection between the projector and the projection screen. (See page 13.) - Make sure you may ...result in moisture condensation on the projector. Make sure all equipment is connected to...

Owners Manual
Page 62
...6A Max. Appendix Technical Specifications Mechanical Information Projector Type Dimensions (W x H x D) Net Weight Feet Adjustment Multi-media Projector 9.66" x 2.3" x 6.82" (294.5 mm x 69.5 mm x 208 mm)(Not including adjustable feet) 5.3 lbs (2.4 kgs) 0˚ to 10.0˚ Panel Resolution LCD Panel System 0.63" TFT Active Matrix...Image Size (Diagonal) Adjustable from 40" to 300" Projection Lens F 1.65 ~ 1.81 lens with f 22.5 mm ~ 27 mm with manual zoom and focus Throw Distance 4.6' ~ 41.3' (1.4 m ~ 12.6 m) Projection Lamp 200W Interface Video Input Jack S-Video Input Jack Audio ...
...6A Max. Appendix Technical Specifications Mechanical Information Projector Type Dimensions (W x H x D) Net Weight Feet Adjustment Multi-media Projector 9.66" x 2.3" x 6.82" (294.5 mm x 69.5 mm x 208 mm)(Not including adjustable feet) 5.3 lbs (2.4 kgs) 0˚ to 10.0˚ Panel Resolution LCD Panel System 0.63" TFT Active Matrix...Image Size (Diagonal) Adjustable from 40" to 300" Projection Lens F 1.65 ~ 1.81 lens with f 22.5 mm ~ 27 mm with manual zoom and focus Throw Distance 4.6' ~ 41.3' (1.4 m ~ 12.6 m) Projection Lamp 200W Interface Video Input Jack S-Video Input Jack Audio ...
Owners Manual
Page 63
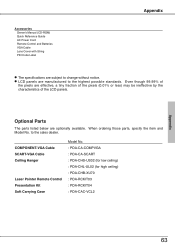
When ordering those parts, specify the item and Model No. to the sales dealer. Even though 99.99% of the LCD panels. Accessories Owner's Manual (CD-ROM) Quick Reference Guide AC Power Cord Remote Control and Batteries VGA Cable Lens Cover with String PIN Code Label Appendix &#...9679; The specifications are subject to change without notice. ● LCD panels are effective, a tiny fraction of the pixels (0.01% or less) may...
When ordering those parts, specify the item and Model No. to the sales dealer. Even though 99.99% of the LCD panels. Accessories Owner's Manual (CD-ROM) Quick Reference Guide AC Power Cord Remote Control and Batteries VGA Cable Lens Cover with String PIN Code Label Appendix &#...9679; The specifications are subject to change without notice. ● LCD panels are effective, a tiny fraction of the pixels (0.01% or less) may...

Owners Manual
Page 65
... code.... While the projector is locked with a PIN code. Appendix 65 Logo PIN Code Lock No. Factory default set No: 1 2 3 4* Factory default set No: 4 3 2 1* * Should the four-digit number be changed, the factory set number will be invalid. Put the label below and keep it is locked with this manual securely. If... you forgot or lost the number and unable to operate the projector, contact the service station.
... code.... While the projector is locked with a PIN code. Appendix 65 Logo PIN Code Lock No. Factory default set No: 1 2 3 4* Factory default set No: 4 3 2 1* * Should the four-digit number be changed, the factory set number will be invalid. Put the label below and keep it is locked with this manual securely. If... you forgot or lost the number and unable to operate the projector, contact the service station.


