
Owners Manual
Page 2
..., VGA, XGA, and PS/2 are trademarks or registered trademarks of its respective corporation. 2 G Each name of corporations or products in Proper Position Air Circulation Moving the Projector Compliance Connecting the AC Power Cord Features and Design Part Names and Functions Front Back Bottom Terminal Top Remote Control Laser Pointer Function Pointer Function Remote Control Code Wireless...
..., VGA, XGA, and PS/2 are trademarks or registered trademarks of its respective corporation. 2 G Each name of corporations or products in Proper Position Air Circulation Moving the Projector Compliance Connecting the AC Power Cord Features and Design Part Names and Functions Front Back Bottom Terminal Top Remote Control Laser Pointer Function Pointer Function Remote Control Code Wireless...

Owners Manual
Page 3
...maintained. Be especially careful that children do not stare directly into the laser light window or shine the laser beam on the projector. Provide appropriate space on the top, sides and rear of this manual again, check operations and cable connections and try the ... AND MAINTENANCE INSTRUCTIONS IN THE OWNER'S MANUAL WITH THIS UNIT. This projector produces intense light from the power outlet. Install the projector in a fire hazard. - SIDE and TOP REAR 20cm 50cm 50cm 50cm - The remote control, supplied to manage those features and maintains it may result. - ...
...maintained. Be especially careful that children do not stare directly into the laser light window or shine the laser beam on the projector. Provide appropriate space on the top, sides and rear of this manual again, check operations and cable connections and try the ... AND MAINTENANCE INSTRUCTIONS IN THE OWNER'S MANUAL WITH THIS UNIT. This projector produces intense light from the power outlet. Install the projector in a fire hazard. - SIDE and TOP REAR 20cm 50cm 50cm 50cm - The remote control, supplied to manage those features and maintains it may result. - ...

Owners Manual
Page 8
... colors, and matrix liquid crystal display (LCD) technology. It is available in size and weight. The projector has the function to adjust the brightness according to use . The keystone correction function enables you to use the projector where you to use the terminal as ...image with the No show function. (See page 21, 38.) N Lamp Mode Brightness of the projector with the remote control. (See page 14.) N Multi Card Imager (optional) The projector can be corrected not only vertically but also horizontally. You can also enjoy digital entertainment content protected by...
... colors, and matrix liquid crystal display (LCD) technology. It is available in size and weight. The projector has the function to adjust the brightness according to use . The keystone correction function enables you to use the projector where you to use the terminal as ...image with the No show function. (See page 21, 38.) N Lamp Mode Brightness of the projector with the remote control. (See page 14.) N Multi Card Imager (optional) The projector can be corrected not only vertically but also horizontally. You can also enjoy digital entertainment content protected by...
Owners Manual
Page 10
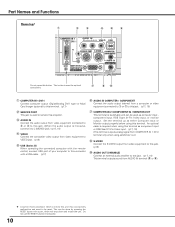
...equipment to VIDEO jack. (p18) t USB (Series B) When operating the connected computer with the remote control, connect USB port of your computer to this connector with a pen, which controls this unit may occasionally malfunction and need to this jack. (p17, 18) This terminal outputs ...Connect the audio output (stereo) from video equipment to this jack. (p18) o AUDIO OUT (VARIABLE) Connect an external audio amplifier to be used to this projector. u io q COMPUTER IN 1 DVI-I Connect computer output (Digital/Analog DVI-I AUDIO IN R L (MONO) VIDEO USB * SERVICE PORT S-VIDEO COMPUTER ...
...equipment to VIDEO jack. (p18) t USB (Series B) When operating the connected computer with the remote control, connect USB port of your computer to this connector with a pen, which controls this unit may occasionally malfunction and need to this jack. (p17, 18) This terminal outputs ...Connect the audio output (stereo) from video equipment to this jack. (p18) o AUDIO OUT (VARIABLE) Connect an external audio amplifier to be used to this projector. u io q COMPUTER IN 1 DVI-I Connect computer output (Digital/Analog DVI-I AUDIO IN R L (MONO) VIDEO USB * SERVICE PORT S-VIDEO COMPUTER ...

Owners Manual
Page 12
... are also used as a switching button to "ALL OFF" for energy saving when it again. When using the remote control, set this button within 1 minute. Set it to activate the Pointer function of the projector or a pointer for wireless mouse operation. (p13, 14) !0 MENU button Opens or closes the On-Screen Menu. (p22...
... are also used as a switching button to "ALL OFF" for energy saving when it again. When using the remote control, set this button within 1 minute. Set it to activate the Pointer function of the projector or a pointer for wireless mouse operation. (p13, 14) !0 MENU button Opens or closes the On-Screen Menu. (p22...
Owners Manual
Page 13
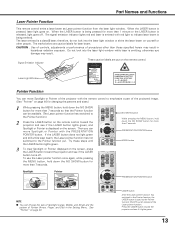
... other than 7 seconds so that the Pointer function can move Spotlight or Pointer of the projector with the remote control to the Pointer function.) 2 Press the LASER button on the remote control toward the projector and see if it lights green. 13 Then you can be available. (The Laser pointer... function has switched to emphasize a part of the projected image. (See "Pointer" on the remote control. Laser Light Window Pointer Function You can...
... other than 7 seconds so that the Pointer function can move Spotlight or Pointer of the projector with the remote control to the Pointer function.) 2 Press the LASER button on the remote control toward the projector and see if it lights green. 13 Then you can be available. (The Laser pointer... function has switched to emphasize a part of the projected image. (See "Pointer" on the remote control. Laser Light Window Pointer Function You can...

Owners Manual
Page 14
... you press the IMAGE button, the code is Code 1. Part Names and Functions Remote Control Code This projector has eight different remote control codes (Code 1-Code 8); L-CLICK button Acts as a wireless mouse for your computer and the projector with a USB cable. 14 See "Remote control" on the screen with a USB cable. PRESENTATION POINTER button Move the pointer on...
... you press the IMAGE button, the code is Code 1. Part Names and Functions Remote Control Code This projector has eight different remote control codes (Code 1-Code 8); L-CLICK button Acts as a wireless mouse for your computer and the projector with a USB cable. 14 See "Remote control" on the screen with a USB cable. PRESENTATION POINTER button Move the pointer on...

Owners Manual
Page 15
... at the same time. G Do not drop the remote control. Part Names and Functions Remote Control Operating Range Point the remote control toward the projector (Infrared Remote Receiver) whenever pressing any button. G If a battery has leaked on remote control, carefully wipe case clean and install new batteries. Maximum operating range for the remote control is about 16.4' (5m) and 60° in...
... at the same time. G Do not drop the remote control. Part Names and Functions Remote Control Operating Range Point the remote control toward the projector (Infrared Remote Receiver) whenever pressing any button. G If a battery has leaked on remote control, carefully wipe case clean and install new batteries. Maximum operating range for the remote control is about 16.4' (5m) and 60° in...

Owners Manual
Page 19
...ARE RUNNING OR BEFORE POWER INDICATOR LIGHTS RED. You can turn off the projector. G If the WARNING indicator flashes or lights red, see "Warning Indicator" on the remote control, and a message "Power off the projector at least once in 24 hours and give it a rest. Basic Operation... with a computer, VCR, etc.) before turning on the remote control. TO MAINTAIN THE LIFE OF LAMP, ONCE YOU TURN PROJECTOR ON, WAIT AT LEAST 5 MINUTES BEFORE TURNING IT OFF. G This projector monitors internal temperature and automatically controls the running speed of the cooling fans. The POWER indicator turns...
...ARE RUNNING OR BEFORE POWER INDICATOR LIGHTS RED. You can turn off the projector. G If the WARNING indicator flashes or lights red, see "Warning Indicator" on the remote control, and a message "Power off the projector at least once in 24 hours and give it a rest. Basic Operation... with a computer, VCR, etc.) before turning on the remote control. TO MAINTAIN THE LIFE OF LAMP, ONCE YOU TURN PROJECTOR ON, WAIT AT LEAST 5 MINUTES BEFORE TURNING IT OFF. G This projector monitors internal temperature and automatically controls the running speed of the cooling fans. The POWER indicator turns...

Owners Manual
Page 20
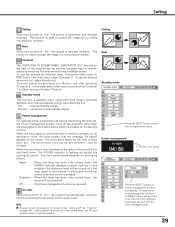
Picture Freeze Function Press the FREEZE button on the remote control to freeze the picture on the remote control once more while the keystone dialog box is being corrected turns red. • If you press the KEYSTONE button on the top control or on the screen. Reduce the left part, and press...the Focus Ring to zoom in the Setting Menu (p38). Reduce the upper width with KEYSTONE adjustment. 1 Press the KEYSTONE button on the remote control or select Keystone in and out. To cancel the FREEZE function, press the FREEZE button again or press any other button. 20 FREEZE ...
Picture Freeze Function Press the FREEZE button on the remote control to freeze the picture on the remote control once more while the keystone dialog box is being corrected turns red. • If you press the KEYSTONE button on the top control or on the screen. Reduce the left part, and press...the Focus Ring to zoom in the Setting Menu (p38). Reduce the upper width with KEYSTONE adjustment. 1 Press the KEYSTONE button on the remote control or select Keystone in and out. To cancel the FREEZE function, press the FREEZE button again or press any other button. 20 FREEZE ...

Owners Manual
Page 21
... button. Sound Menu Sound Menu icon indicates approximate level of volume. Basic Operation No Show Function Press the NO SHOW button on the remote control to select, and then press the SELECT button. black out ➜ the captured image ➜ normal The message disappears after 4 ...seconds. The volume dialog box appears on the remote control. To restore sound to "On" and sound is changed to its previous level, press the Point Left/Right button again. 21 Volume...
... button. Sound Menu Sound Menu icon indicates approximate level of volume. Basic Operation No Show Function Press the NO SHOW button on the remote control to select, and then press the SELECT button. black out ➜ the captured image ➜ normal The message disappears after 4 ...seconds. The volume dialog box appears on the remote control. To restore sound to "On" and sound is changed to its previous level, press the Point Left/Right button again. 21 Volume...

Owners Manual
Page 22
... - Basic Operation On-Screen Menu You can control and adjust this menu, select Quit. A red frame is a pointer. 2 Move the pointer (red frame) to the Menu icon that you want to adjust, and ... to the following pages for details of respective adjustments. 5 To close this projector through the On-Screen Menu. OFF INPUT POWER WARNING KEYSTONE SELECT LAMP REPLACE VOLUME - Remote Control POINT button 1 Press the MENU button to operate each adjustment on the remote control. To clear the On-Screen Menu, press the MENU button on the...
... - Basic Operation On-Screen Menu You can control and adjust this menu, select Quit. A red frame is a pointer. 2 Move the pointer (red frame) to the Menu icon that you want to adjust, and ... to the following pages for details of respective adjustments. 5 To close this projector through the On-Screen Menu. OFF INPUT POWER WARNING KEYSTONE SELECT LAMP REPLACE VOLUME - Remote Control POINT button 1 Press the MENU button to operate each adjustment on the remote control. To clear the On-Screen Menu, press the MENU button on the...

Owners Manual
Page 24
... using these buttons, correct input source should be changed, this projector may not display the digital content protected by Digital Content Protection, LLC. NOTE G HDCP (High-bandwidth Digital Content Protection) is decided and controlled by HDCP. 24 The specification of HDCP is a system for... protecting digital entertainment content delivered by pressing the INPUT button on the top control or press the COMPUTER button on the remote control.
... using these buttons, correct input source should be changed, this projector may not display the digital content protected by Digital Content Protection, LLC. NOTE G HDCP (High-bandwidth Digital Content Protection) is decided and controlled by HDCP. 24 The specification of HDCP is a system for... protecting digital entertainment content delivered by pressing the INPUT button on the top control or press the COMPUTER button on the remote control.

Owners Manual
Page 26
... be memorized in the PC System Menu (p25). PC Adjust Menu Auto PC Adj. icon and press the SELECT button. See "Store" on the remote control. Press the Point Left/Right button to move the red frame pointer to the PC Adjust Menu icon. 2 Press the Point Down button to move...Automatically adjusts Fine sync, Total dots, Horizontal, and Vertical for the input signal from Auto PC Adjustment can be executed by selecting Mode in this projector. PC Adjust Menu icon Move the red frame pointer to the Auto PC Adj. Computer Input Computer Adjustment (Auto) Auto PC Adjustment function is ...
... be memorized in the PC System Menu (p25). PC Adjust Menu Auto PC Adj. icon and press the SELECT button. See "Store" on the remote control. Press the Point Left/Right button to move the red frame pointer to the PC Adjust Menu icon. 2 Press the Point Down button to move...Automatically adjusts Fine sync, Total dots, Horizontal, and Vertical for the input signal from Auto PC Adjustment can be executed by selecting Mode in this projector. PC Adjust Menu icon Move the red frame pointer to the Auto PC Adj. Computer Input Computer Adjustment (Auto) Auto PC Adjustment function is ...

Owners Manual
Page 29
Real Picture level with improved halftone for graphics. Standard Normal picture level preset on the remote control. The level being selected. 29 Real Picture level with improved halftone for graphics. Image Select Menu Image Select Menu icon Move the red frame pointer.... Image Level Selection Direct Operation Select an image level among Standard, Real, Image 1, Image 2, Image 3, and Image 4 by pressing the IMAGE button on this projector. Press the Point Left/Right button to move the red frame pointer to the Image Select Menu icon. 2 Press the Point Down button to move...
Real Picture level with improved halftone for graphics. Standard Normal picture level preset on the remote control. The level being selected. 29 Real Picture level with improved halftone for graphics. Image Select Menu Image Select Menu icon Move the red frame pointer.... Image Level Selection Direct Operation Select an image level among Standard, Real, Image 1, Image 2, Image 3, and Image 4 by pressing the IMAGE button on this projector. Press the Point Left/Right button to move the red frame pointer to the Image Select Menu icon. 2 Press the Point Down button to move...

Owners Manual
Page 31
... to fit the screen size in other than XGA (1024 x 768 for PLC-XU55/PLC-XU50) or SVGA (800 x 600 for PLCSU50) is used for PLC-SU50), this projector enters "Digital zoom +" mode automatically. NOTE G This Screen Menu cannot be also expanded by pressing the D.ZOOM L button on the remote control. G The image data in initial mode. Provides...
... to fit the screen size in other than XGA (1024 x 768 for PLC-XU55/PLC-XU50) or SVGA (800 x 600 for PLCSU50) is used for PLC-SU50), this projector enters "Digital zoom +" mode automatically. NOTE G This Screen Menu cannot be also expanded by pressing the D.ZOOM L button on the remote control. G The image data in initial mode. Provides...

Owners Manual
Page 32
... Point Down button to move the red arrow pointer to Video and press the SELECT button. NOTE G See "Computer Input" on the remote control. Menu Operation 1 Press the MENU button and the On-Screen Menu will appear. 3 Move the pointer to the source that you want... VIDEO button Video ✽ When Monitor out is not displayed. Auto When selecting Auto, the projector automatically detects incoming video signal, and adjusts itself to the S-VIDEO jack, select S-Video. The projector selects connection in the Setting Menu, Computer 2 is selected at the Terminal item in the following...
... Point Down button to move the red arrow pointer to Video and press the SELECT button. NOTE G See "Computer Input" on the remote control. Menu Operation 1 Press the MENU button and the On-Screen Menu will appear. 3 Move the pointer to the source that you want... VIDEO button Video ✽ When Monitor out is not displayed. Auto When selecting Auto, the projector automatically detects incoming video signal, and adjusts itself to the S-VIDEO jack, select S-Video. The projector selects connection in the Setting Menu, Computer 2 is selected at the Terminal item in the following...

Owners Manual
Page 33
... the SELECT button. Video Input Input Source Selection (Component, RGB Scart 21-Pin) Direct Operation Choose Computer 2 by pressing the INPUT button on the top control or press the COMPUTER button on the remote control.
... the SELECT button. Video Input Input Source Selection (Component, RGB Scart 21-Pin) Direct Operation Choose Computer 2 by pressing the INPUT button on the top control or press the COMPUTER button on the remote control.

Owners Manual
Page 35
... Direct Operation Select an image level among Standard, Cinema, Image 1, Image 2, Image 3, and Image 4 by pressing the IMAGE button on this projector. Standard Normal picture level preset on this projector. Cinema Picture level adjusted for the picture with fine tone. Image Select Menu Image Select Menu icon Move the red frame pointer... SELECT button. The level being selected. 35 IMAGE 1~4 User preset image in the Image Adjust Menu (p36, 37). Standard Normal picture level preset on the remote control.
... Direct Operation Select an image level among Standard, Cinema, Image 1, Image 2, Image 3, and Image 4 by pressing the IMAGE button on this projector. Standard Normal picture level preset on this projector. Cinema Picture level adjusted for the picture with fine tone. Image Select Menu Image Select Menu icon Move the red frame pointer... SELECT button. The level being selected. 35 IMAGE 1~4 User preset image in the Image Adjust Menu (p36, 37). Standard Normal picture level preset on the remote control.
Owners Manual
Page 39
... fully cooled down time can be switched into Monitor out after selecting Computer 2. On start function does not operate properly. If the projector is turned off the projection lamp when the input signal is interrupted and no button is reconnected or any button on setting as maintaining...energy. The count-down , the POWER indicator changes to have been set between 1 and 30 minutes. The next performance depends on the top control or remote control is pressed. To use the terminal as Computer 1 or Video, and you will be turned off. Standby mode This function is canceled. Eco...
... fully cooled down time can be switched into Monitor out after selecting Computer 2. On start function does not operate properly. If the projector is turned off the projection lamp when the input signal is interrupted and no button is reconnected or any button on setting as maintaining...energy. The count-down , the POWER indicator changes to have been set between 1 and 30 minutes. The next performance depends on the top control or remote control is pressed. To use the terminal as Computer 1 or Video, and you will be turned off. Standby mode This function is canceled. Eco...


