
Owners Manual
Page 2
...Blackboard✳ can be used for the starting display of 16.77 million colors, and matrix liquid crystal display (LCD) technology. ◆ Compact Design This projector is available in size and weight. English, German, French, Italian, Spanish, Portuguese, Dutch, Swedish, Russian, Chinese...See page 39.) ◆ Power Management The Power management function reduces power consumption and maintain the lamp life. (See page 41.) ◆ Switcheable Interface Terminal The projector provides a switcheable interface terminal. You can use the terminal as a projection screen. ✳ The...
...Blackboard✳ can be used for the starting display of 16.77 million colors, and matrix liquid crystal display (LCD) technology. ◆ Compact Design This projector is available in size and weight. English, German, French, Italian, Spanish, Portuguese, Dutch, Swedish, Russian, Chinese...See page 39.) ◆ Power Management The Power management function reduces power consumption and maintain the lamp life. (See page 41.) ◆ Switcheable Interface Terminal The projector provides a switcheable interface terminal. You can use the terminal as a projection screen. ✳ The...
Owners Manual
Page 3
...Rear Terminal 9 Top Control 10 Remote Control 11 Operating Range 11 Remote Control Battery Installation 12 Installation 13 Positioning the Projector 13 Adjustable Feet 13 Connecting the AC Power Cord 14 Connecting to a Computer 15 Connecting to Video Equipment 16 Connecting...Attaching the Lens Cover 46 Cleaning the Projection Lens 47 Cleaning the Projector Cabinet 47 Lamp Replacement 48 Lamp Replace Counter 49 Appendix 50 Troubleshooting 50 Indicators and Projector Condition 52 Menu Tree 53 Compatible Computer Specifications 55 Technical Specifications ...
...Rear Terminal 9 Top Control 10 Remote Control 11 Operating Range 11 Remote Control Battery Installation 12 Installation 13 Positioning the Projector 13 Adjustable Feet 13 Connecting the AC Power Cord 14 Connecting to a Computer 15 Connecting to Video Equipment 16 Connecting...Attaching the Lens Cover 46 Cleaning the Projection Lens 47 Cleaning the Projector Cabinet 47 Lamp Replacement 48 Lamp Replace Counter 49 Appendix 50 Troubleshooting 50 Indicators and Projector Condition 52 Menu Tree 53 Compatible Computer Specifications 55 Technical Specifications ...
Owners Manual
Page 4
... ANSI/NFPA 75 Standard for the Protection of Electronic Computer/Data Processing Equipment, ANSI/NFPA 75. NO USER-SERVICEABLE PARTS INSIDE EXCEPT LAMP REPLACEMENT. Safety Precaution WARNING : TO REDUCE THE RISK OF FIRE OR ELECTRIC SHOCK, DO NOT EXPOSE THIS APPLIANCE TO RAIN OR MOISTURE...and cable connections and try the solutions in the "Troubleshooting" section in the end of this manual thoroughly and operate the projector properly. This projector provides many convenient features and functions. Do not stare directly into the beam. - Be especially careful that children do not ...
... ANSI/NFPA 75 Standard for the Protection of Electronic Computer/Data Processing Equipment, ANSI/NFPA 75. NO USER-SERVICEABLE PARTS INSIDE EXCEPT LAMP REPLACEMENT. Safety Precaution WARNING : TO REDUCE THE RISK OF FIRE OR ELECTRIC SHOCK, DO NOT EXPOSE THIS APPLIANCE TO RAIN OR MOISTURE...and cable connections and try the solutions in the "Troubleshooting" section in the end of this manual thoroughly and operate the projector properly. This projector provides many convenient features and functions. Do not stare directly into the beam. - Be especially careful that children do not ...
Owners Manual
Page 6
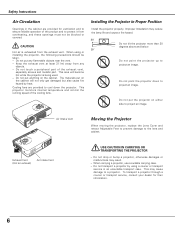
... ventilation and to ensure reliable operation of the product and to project an image. Do not drop or bump a projector, otherwise damages or malfunctions may reduce the lamp life and cause a fire hazard. 20˚ Do not tilt the projector more than 20 degrees above and below. 20˚ Do not point the...
... ventilation and to ensure reliable operation of the product and to project an image. Do not drop or bump a projector, otherwise damages or malfunctions may reduce the lamp life and cause a fire hazard. 20˚ Do not tilt the projector more than 20 degrees above and below. 20˚ Do not point the...
Owners Manual
Page 8
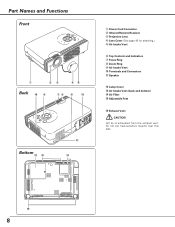
Do not put heat-sensitive objects near this side. !5 8 Part Names and Functions Front q we rt Back !6 y ui o !0 Bottom !2 !3 !1 !4 q Power Cord Connector w Infrared Remote Receiver e Projection Lens r Lens Cover (See page 46 for attaching.) t Air Intake Vent y Top Controls and Indicators u Focus Ring i Zoom Ring o Air Intake Vent !0 Terminals and Connectors !1 Speaker !2 Lamp Cover !3 Air Intake Vent (back and bottom) !4 Air Filter !5 Adjustable Feet !6 Exhaust Vent CAUTION Hot air is exhausted from the exhaust vent.
Do not put heat-sensitive objects near this side. !5 8 Part Names and Functions Front q we rt Back !6 y ui o !0 Bottom !2 !3 !1 !4 q Power Cord Connector w Infrared Remote Receiver e Projection Lens r Lens Cover (See page 46 for attaching.) t Air Intake Vent y Top Controls and Indicators u Focus Ring i Zoom Ring o Air Intake Vent !0 Terminals and Connectors !1 Speaker !2 Lamp Cover !3 Air Intake Vent (back and bottom) !4 Air Filter !5 Adjustable Feet !6 Exhaust Vent CAUTION Hot air is exhausted from the exhaust vent.

Owners Manual
Page 10
... blinks red when the internal temperature of the projector exceeds the operating range. (p45) u LAMP REPLACE indicator Turns yellow when the life of the projection lamp draws to be turned on or off. (p18, 19) y WARNING indicator Lights red when the projector detects abnormal condition. mode. (p31) t .... It is also used as VOLUME +/- VOLUME + KEYSTONE MENU SELECT LAMP REPLACE o i u q KEYSTONE button Corrects keystone distortion. (p22, 39) w INPUT button Selects input source. (p24, 32 ) e POWER ON-OFF button Turns the projector on . These are used to pan the image in the On-Screen...
... blinks red when the internal temperature of the projector exceeds the operating range. (p45) u LAMP REPLACE indicator Turns yellow when the life of the projection lamp draws to be turned on or off. (p18, 19) y WARNING indicator Lights red when the projector detects abnormal condition. mode. (p31) t .... It is also used as VOLUME +/- VOLUME + KEYSTONE MENU SELECT LAMP REPLACE o i u q KEYSTONE button Corrects keystone distortion. (p22, 39) w INPUT button Selects input source. (p24, 32 ) e POWER ON-OFF button Turns the projector on . These are used to pan the image in the On-Screen...
Owners Manual
Page 18
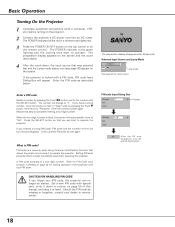
... you fixed a wrong number, move to "✳". Refer to "PIN code". Selected Input Source and Lamp Mode Lamp mode (See page 42 for locking operation of a four-digit number. If you can operate the projector. 18 Enter a correct PIN code all over again. Should the PIN code be missing or forgotten,... consult your PIN code, the projector can no longer be started. Repeat this manual, and keep it at hand. PIN code is PIN code? Press the SELECT button so that was selected last and the Lamp mode status icon (see page 42) appear on page ...
... you fixed a wrong number, move to "✳". Refer to "PIN code". Selected Input Source and Lamp Mode Lamp mode (See page 42 for locking operation of a four-digit number. If you can operate the projector. 18 Enter a correct PIN code all over again. Should the PIN code be missing or forgotten,... consult your PIN code, the projector can no longer be started. Repeat this manual, and keep it at hand. PIN code is PIN code? Press the SELECT button so that was selected last and the Lamp mode status icon (see page 42) appear on page ...
Owners Manual
Page 19
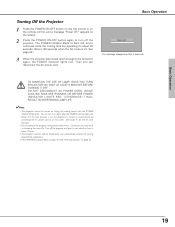
...the POWER indicator lights red. • When the On start function.) • Do not operate the projector continuously without rest. OTHERWISE IT WILL RESULT IN SHORTENING LAMP LIFE. ✔Note: • The projector cannot be turned on the screen. 2 Press the POWER ON-OFF button again to an AC outlet...page 41 for about an hour in shortening the lamp life. DO NOT DISCONNECT AC POWER CORD WHILE COOLING FANS ARE RUNNING OR BEFORE POWER INDICATOR LIGHTS RED. Then you can turn off the projector. See page 44.) 3 When the projector has cooled down enough to be turned on ...
...the POWER indicator lights red. • When the On start function.) • Do not operate the projector continuously without rest. OTHERWISE IT WILL RESULT IN SHORTENING LAMP LIFE. ✔Note: • The projector cannot be turned on the screen. 2 Press the POWER ON-OFF button again to an AC outlet...page 41 for about an hour in shortening the lamp life. DO NOT DISCONNECT AC POWER CORD WHILE COOLING FANS ARE RUNNING OR BEFORE POWER INDICATOR LIGHTS RED. Then you can turn off the projector. See page 44.) 3 When the projector has cooled down enough to be turned on ...
Owners Manual
Page 20
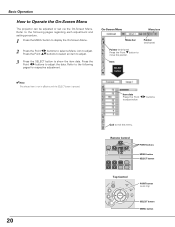
... the pointer. SELECT VOLUME+ D.ZOOM PAGE KEYSTONE NO SHOW AUTO PC P-TIMER IMAGE FREEZE MUTE Top Control ON - VOLUME + KEYSTONE MENU SELECT LAMP REPLACE POINT buttons MENU button SELECT button POINT button (outer ring) SELECT button MENU button On-Screen Menu Menu icon Menu bar Pointer (red frame...display the On-Screen Menu. 2 Press the Point 7 8 buttons to select a Menu icon to adjust. Refer to Operate the On-Screen Menu The projector can be adjusted or set via the On-Screen Menu. Press the Point 7 8 buttons to show the item data. Basic Operation How to the following...
... the pointer. SELECT VOLUME+ D.ZOOM PAGE KEYSTONE NO SHOW AUTO PC P-TIMER IMAGE FREEZE MUTE Top Control ON - VOLUME + KEYSTONE MENU SELECT LAMP REPLACE POINT buttons MENU button SELECT button POINT button (outer ring) SELECT button MENU button On-Screen Menu Menu icon Menu bar Pointer (red frame...display the On-Screen Menu. 2 Press the Point 7 8 buttons to select a Menu icon to adjust. Refer to Operate the On-Screen Menu The projector can be adjusted or set via the On-Screen Menu. Press the Point 7 8 buttons to show the item data. Basic Operation How to the following...
Owners Manual
Page 21
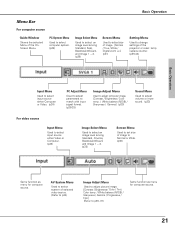
... Image 1 ~ 4. (p29) Screen Menu Used to adjust size of image. [Normal / True / Wide / Digital zoom +/-] (p31) Setting Menu Used to change settings of the projector or reset lamp replace counter. (p39-44) Basic Operation Input Menu Used to select input source either Computer or Video. (p24) PC Adjust Menu Used to adjust...
... Image 1 ~ 4. (p29) Screen Menu Used to adjust size of image. [Normal / True / Wide / Digital zoom +/-] (p31) Setting Menu Used to change settings of the projector or reset lamp replace counter. (p39-44) Basic Operation Input Menu Used to select input source either Computer or Video. (p24) PC Adjust Menu Used to adjust...
Owners Manual
Page 41
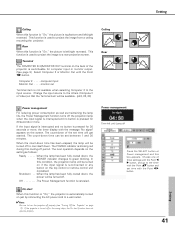
...On start When this condition, the projection lamp will be turned off properly (see "Turning Off the Projector" on the back of the projector is pressed. This function is canceled. The next operation depends on the setting as maintaining the lamp life, the Power Management function turns off... The count-down , the power will get started. This function is not available when selecting Computer 2 to turn the projector off . Power management Time left until Lamp off period. Choose one of the set time with the message "No signal" appears on the top control or remote ...
...On start When this condition, the projection lamp will be turned off properly (see "Turning Off the Projector" on the back of the projector is pressed. This function is canceled. The next operation depends on the setting as maintaining the lamp life, the Power Management function turns off... The count-down , the power will get started. This function is not available when selecting Computer 2 to turn the projector off . Power management Time left until Lamp off period. Choose one of the set time with the message "No signal" appears on the top control or remote ...
Owners Manual
Page 42
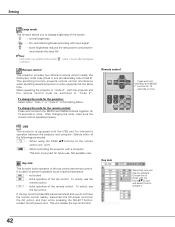
...and this Setting Menu. Press and hold MENU and IMAGE buttons for the projector; SELECT VOLUME+ Press and hold both the projector and the remote control must be switched to activate it. 42 Setting Lamp mode This function allows you do not have the remote control nearby, ... top control lock. Select either of these with a computer. USB This projector is equipped with input signal ···· lower brightness reduces the lamp power consumption and extends the lamp life ✔Note: Lamp mode is not switched into Eco mode ( is useful to change brightness ...
...and this Setting Menu. Press and hold MENU and IMAGE buttons for the projector; SELECT VOLUME+ Press and hold both the projector and the remote control must be switched to activate it. 42 Setting Lamp mode This function allows you do not have the remote control nearby, ... top control lock. Select either of these with a computer. USB This projector is equipped with input signal ···· lower brightness reduces the lamp power consumption and extends the lamp life ✔Note: Lamp mode is not switched into Eco mode ( is useful to change brightness ...
Owners Manual
Page 44
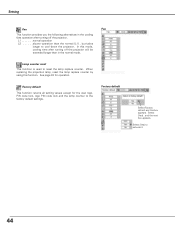
...function. Select [Yes] , and the next box appears. Select [Yes] to the factory default settings. Lamp counter reset This function is used to cool down the projector. In this mode, cooling time after turning off the projector will be extended longer than the normal (L1) , but takes longer to reset the... lamp replace counter. See page 49 for the user logo, PIN code lock, logo PIN code...
...function. Select [Yes] , and the next box appears. Select [Yes] to the factory default settings. Lamp counter reset This function is used to cool down the projector. In this mode, cooling time after turning off the projector will be extended longer than the normal (L1) , but takes longer to reset the... lamp replace counter. See page 49 for the user logo, PIN code lock, logo PIN code...
Owners Manual
Page 45
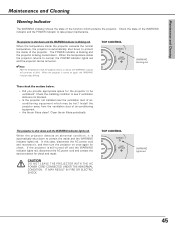
.... TOP CONTROL WARNING LECT LAMP REPLACE VOLUME + WARNING lights red 45 Check the state of air-conditioning equipment. - When the temperature inside the projector returns to take proper maintenance. When the projector detects an abnormal condition, it , and then turn the projector on . ✔Note:... indicator lights red, disconnect the AC power cord and contact the service station for the projector to see if ventilation slots are not blocked. - TOP CONTROL WARNING LECT LAMP REPLACE WARNING blinking red Then check the matters below: - Did you provide appropriate space for...
.... TOP CONTROL WARNING LECT LAMP REPLACE VOLUME + WARNING lights red 45 Check the state of air-conditioning equipment. - When the temperature inside the projector returns to take proper maintenance. When the projector detects an abnormal condition, it , and then turn the projector on . ✔Note:... indicator lights red, disconnect the AC power cord and contact the service station for the projector to see if ventilation slots are not blocked. - TOP CONTROL WARNING LECT LAMP REPLACE WARNING blinking red Then check the matters below: - Did you provide appropriate space for...
Owners Manual
Page 48
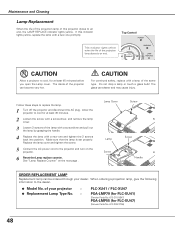
... cool for at least 45 minutes before you open the Lamp cover. SELECT WARNING LAMP REPLACE VOLUME + CAUTION Allow a projector to cool, for PLC-XU47) (Service Parts No. 610 309 2706) 48 Lamp Cover Screw Lamp Screw Screw Handle ORDER REPLACEMENT LAMP Replacement lamp can become very hot. Replace the lamp cover and tighten the screw. 5 Connect the AC power...
... cool for at least 45 minutes before you open the Lamp cover. SELECT WARNING LAMP REPLACE VOLUME + CAUTION Allow a projector to cool, for PLC-XU47) (Service Parts No. 610 309 2706) 48 Lamp Cover Screw Lamp Screw Screw Handle ORDER REPLACEMENT LAMP Replacement lamp can become very hot. Replace the lamp cover and tighten the screw. 5 Connect the AC power...
Owners Manual
Page 49
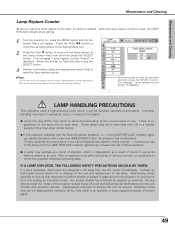
..., THE FOLLOWING SAFETY PRECAUTIONS SHOULD BE TAKEN. is replaced. Contact an authorized service station for each lamp. Move the pointer to reset the Lamp replace counter only after replacing the lamp. If a lamp explodes, disconnect the projector's AC plug from the cooling air circulation holes. Move the pointer to [Yes] and then press the SELECT...
..., THE FOLLOWING SAFETY PRECAUTIONS SHOULD BE TAKEN. is replaced. Contact an authorized service station for each lamp. Move the pointer to reset the Lamp replace counter only after replacing the lamp. If a lamp explodes, disconnect the projector's AC plug from the cooling air circulation holes. Move the pointer to [Yes] and then press the SELECT...
Owners Manual
Page 50
...- Wait 90-120 seconds after the projector is turned on. - If the WARNING indicator lights red, the projector cannot be turned on after turning on page 41.) - Check the projection lamp. (See page 48.) - Check the projection lens to a projector. Moving the projector from a cool to a warm place... may need to change the setting for the setting. - In such cases, leave the projector OFF and wait until condensation disappears. - ...
...- Wait 90-120 seconds after the projector is turned on. - If the WARNING indicator lights red, the projector cannot be turned on after turning on page 41.) - Check the projection lamp. (See page 48.) - Check the projection lens to a projector. Moving the projector from a cool to a warm place... may need to change the setting for the setting. - In such cases, leave the projector OFF and wait until condensation disappears. - ...
Owners Manual
Page 52
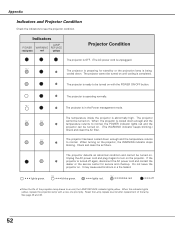
... ✽ When the life of the lamp. If the ✽ projector is cooled down . The projector cannot be turned on . Indicators LAMP POWER WARNING REPLACE red/green red yellow Projector Condition The projector is OFF. (The AC power cord is unplugged.) ✽ The projector is preparing for service and checkup. The projector detects an abnormal condition and cannot...
... ✽ When the life of the lamp. If the ✽ projector is cooled down . The projector cannot be turned on . Indicators LAMP POWER WARNING REPLACE red/green red yellow Projector Condition The projector is OFF. (The AC power cord is unplugged.) ✽ The projector is preparing for service and checkup. The projector detects an abnormal condition and cannot...
Owners Manual
Page 54
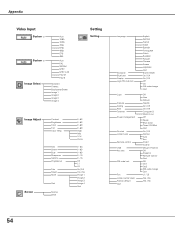
... 3 Image 4 Quit Language Keystone Blue back Display Logo PIN code lock Logo Capture Ceiling Rear Terminal Power management On start Lamp mode Remote control USB Key lock PIN code lock Fan Lamp counter reset Factory default Quit English German French Italian Spanish Portuguese Dutch Swedish Russian Chinese Korean Japanese Quit Store / Reset... Yes/No On / Off On / Off Computer 2 Monitor out Off Ready Shut down Timer(1-30 Min) Quit On / Off Normal Auto Eco Code 1 Code 2 Mouse / Projector Off Projector Remote Control Quit Off On1 On2 PIN code change Quit L1 / L2 Yes / No Yes / No 54
... 3 Image 4 Quit Language Keystone Blue back Display Logo PIN code lock Logo Capture Ceiling Rear Terminal Power management On start Lamp mode Remote control USB Key lock PIN code lock Fan Lamp counter reset Factory default Quit English German French Italian Spanish Portuguese Dutch Swedish Russian Chinese Korean Japanese Quit Store / Reset... Yes/No On / Off On / Off Computer 2 Monitor out Off Ready Shut down Timer(1-30 Min) Quit On / Off Normal Auto Eco Code 1 Code 2 Mouse / Projector Off Projector Remote Control Quit Off On1 On2 PIN code change Quit L1 / L2 Yes / No Yes / No 54
Owners Manual
Page 56
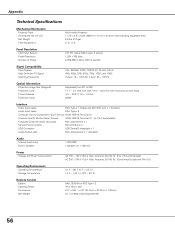
... A Max. Appendix Technical Specifications Mechanical Information Projector Type Dimensions (W x H x D) Net Weight Feet Adjustment Multi-media Projector 11.73" x 2.8" x 8.39" (298mm x 71mm x 213mm) (Not including adjustable feet) 6.0 lbs (2.7kgs) 0˚ to 11.8˚ Panel Resolution LCD Panel System Panel Resolution Number of Pixels ...and 1080i H-sync. 15 ~ 100 KHz, V-sync. 50 ~ 100 Hz Optical Information Projection Image Size (Diagonal) Projection Lens Throw Distance Projection Lamp Adjustable from 33" to 300" F 1.7 ~ 2.1 lens with f 26.7 mm ~ 32.0 mm with manual zoom and focus 4.3' ~...
... A Max. Appendix Technical Specifications Mechanical Information Projector Type Dimensions (W x H x D) Net Weight Feet Adjustment Multi-media Projector 11.73" x 2.8" x 8.39" (298mm x 71mm x 213mm) (Not including adjustable feet) 6.0 lbs (2.7kgs) 0˚ to 11.8˚ Panel Resolution LCD Panel System Panel Resolution Number of Pixels ...and 1080i H-sync. 15 ~ 100 KHz, V-sync. 50 ~ 100 Hz Optical Information Projection Image Size (Diagonal) Projection Lens Throw Distance Projection Lamp Adjustable from 33" to 300" F 1.7 ~ 2.1 lens with f 26.7 mm ~ 32.0 mm with manual zoom and focus 4.3' ~...


