Owners Manual
Page 3
... of Contents 3 To the Owner 4 Safety Instructions 5 Air Circulation 6 Installing the Projector in Proper Position 6 Moving the Projector 6 Compliance 7 Part Names and Functions 8 Front 8 Back 8 Bottom 8 Rear Terminal 9 Top Control 10 Remote Control 11 Operating Range 11 Remote Control Battery Installation 12 Installation 13 Positioning the Projector 13 Adjustable Feet 13 Connecting the AC Power Cord 14 Connecting...
... of Contents 3 To the Owner 4 Safety Instructions 5 Air Circulation 6 Installing the Projector in Proper Position 6 Moving the Projector 6 Compliance 7 Part Names and Functions 8 Front 8 Back 8 Bottom 8 Rear Terminal 9 Top Control 10 Remote Control 11 Operating Range 11 Remote Control Battery Installation 12 Installation 13 Positioning the Projector 13 Adjustable Feet 13 Connecting the AC Power Cord 14 Connecting...
Owners Manual
Page 9
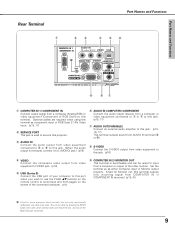
... will shut down and restart the unit. This can be reset. Do not use the PAGE ed buttons on the remote control to scroll back and forth pages on the screen of your computer to this port when you wish to service this terminal...jack. (When the audio output is switcheable and can be done by pressing the RESET button with a pen, which controls this unit may occasionally malfunction and need to be used to use the RESET function excessively. 9 Part Names and ... terminal outputs sound from a computer (Analog RGB) or video equipment (Component or RGB Scart) to this projector.
... will shut down and restart the unit. This can be reset. Do not use the PAGE ed buttons on the remote control to scroll back and forth pages on the screen of your computer to this port when you wish to service this terminal...jack. (When the audio output is switcheable and can be done by pressing the RESET button with a pen, which controls this unit may occasionally malfunction and need to be used to use the RESET function excessively. 9 Part Names and ... terminal outputs sound from a computer (Analog RGB) or video equipment (Component or RGB Scart) to this projector.

Owners Manual
Page 11
..., p39) !4 Point ed 7 8 ( VOLUME + / - ) buttons - Do not bend, drop the remote control or expose Remote Control to use soft dry cloth. SELECT VOLUME+ t !3 !2 y D.ZOOM PAGE KEYSTONE NO SHOW !1 u AUTO PC P-TIMER IMAGE FREEZE MUTE i o !0 Part Names and Functions q POWER ON-OFF button Turns the projector on or off the image on the screen when giving...
..., p39) !4 Point ed 7 8 ( VOLUME + / - ) buttons - Do not bend, drop the remote control or expose Remote Control to use soft dry cloth. SELECT VOLUME+ t !3 !2 y D.ZOOM PAGE KEYSTONE NO SHOW !1 u AUTO PC P-TIMER IMAGE FREEZE MUTE i o !0 Part Names and Functions q POWER ON-OFF button Turns the projector on or off the image on the screen when giving...

Owners Manual
Page 12
... if battery is replaced by an incorrect type. - Avoid contact with water or liquid. - If a battery has leaked on remote control, carefully wipe case clean and install new batteries. - To ensure safe operation, please observe the following precautions : - Do not expose the... remote control to the instructions. 12 Part Names and Functions Remote Control Battery Installation 1 Remove the battery compartment lid. Pull up and remove the lid. 2 Slide the batteries into the ...
... if battery is replaced by an incorrect type. - Avoid contact with water or liquid. - If a battery has leaked on remote control, carefully wipe case clean and install new batteries. - To ensure safe operation, please observe the following precautions : - Do not expose the... remote control to the instructions. 12 Part Names and Functions Remote Control Battery Installation 1 Remove the battery compartment lid. Pull up and remove the lid. 2 Slide the batteries into the ...
Owners Manual
Page 15
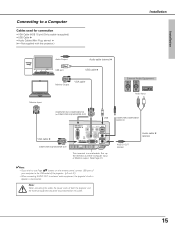
...IN AUDIO OUT (AVRARIAIALBEL)E) This terminal is supplied.) • USB Cable ✽ • Audio Cables (Mini Plug: stereo Not supplied with this projector.) Installation Audio Output Audio cable (stereo) ✽ USB port USB cable ✽ Monitor Output VGA cable Monitor Input External Audio Equipment Audio Input COMPUTER ... or Monitor output. (See Page 41.) ✔Note: • If you wish to use Page ed buttons on the remote control, connect USB port of your computer to the USB socket of both the projector and the external equipment should be disconnected from AC outlet.
...IN AUDIO OUT (AVRARIAIALBEL)E) This terminal is supplied.) • USB Cable ✽ • Audio Cables (Mini Plug: stereo Not supplied with this projector.) Installation Audio Output Audio cable (stereo) ✽ USB port USB cable ✽ Monitor Output VGA cable Monitor Input External Audio Equipment Audio Input COMPUTER ... or Monitor output. (See Page 41.) ✔Note: • If you wish to use Page ed buttons on the remote control, connect USB port of your computer to the USB socket of both the projector and the external equipment should be disconnected from AC outlet.
Owners Manual
Page 18
... moment and lights red. 3 Press the POWER ON-OFF button on the top control or on page 43 for Lamp mode.) Enter a PIN code Select a number by pressing the Point d button, then return to operate the projector. PIN code is locked with a PIN code, PIN code Input Dialog Box will ... button. Should the PIN code be missing or forgotten, consult your PIN code, the projector can start to complete entering a four-digit number. PIN code Input Dialog Box Pointer After the OK icon disappears, you can no longer be started. The POWER indicator blinks red in Setting on the remote control.
... moment and lights red. 3 Press the POWER ON-OFF button on the top control or on page 43 for Lamp mode.) Enter a PIN code Select a number by pressing the Point d button, then return to operate the projector. PIN code is locked with a PIN code, PIN code Input Dialog Box will ... button. Should the PIN code be missing or forgotten, consult your PIN code, the projector can start to complete entering a four-digit number. PIN code Input Dialog Box Pointer After the OK icon disappears, you can no longer be started. The POWER indicator blinks red in Setting on the remote control.
Owners Manual
Page 19
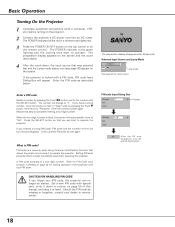
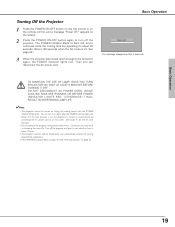
Then you can turn off the projector. Basic Operation Turning Off the Projector 1 Press the POWER ON-OFF button on the top control or on the remote control, and a message "Power off the projector and give it a rest about 90 seconds. (About 120 seconds when the fan mode is turned on ...the POWER indicator lights red. • When the On start function is on, this projector is L2. Continuous use may result in every 24 hours. • This projector monitors internal temperature and automatically controls the running speed of the cooling fans. • If the WARNING indicator blinks or ...
Then you can turn off the projector. Basic Operation Turning Off the Projector 1 Press the POWER ON-OFF button on the top control or on the remote control, and a message "Power off the projector and give it a rest about 90 seconds. (About 120 seconds when the fan mode is turned on ...the POWER indicator lights red. • When the On start function is on, this projector is L2. Continuous use may result in every 24 hours. • This projector monitors internal temperature and automatically controls the running speed of the cooling fans. • If the WARNING indicator blinks or ...
Owners Manual
Page 20
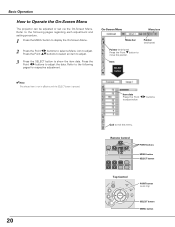
... SELECT button POINT button (outer ring) SELECT button MENU button SELECT VOLUME+ D.ZOOM PAGE KEYSTONE NO SHOW AUTO PC P-TIMER IMAGE FREEZE MUTE Top Control ON - On-Screen Menu Menu icon Menu bar Pointer (red frame) Pointer (red frame) Press the Point d button to adjust the data. ... selected item is not in effective until the SELECT button is pressed. COMPUTER VIDEO ON-OFF Remote Control MENU VOLUME- OFF INPUT POWER WARNING VOLUME - Refer to Operate the On-Screen Menu The projector can be adjusted or set via the On-Screen Menu. Basic Operation How to the following ...
... SELECT button POINT button (outer ring) SELECT button MENU button SELECT VOLUME+ D.ZOOM PAGE KEYSTONE NO SHOW AUTO PC P-TIMER IMAGE FREEZE MUTE Top Control ON - On-Screen Menu Menu icon Menu bar Pointer (red frame) Pointer (red frame) Press the Point d button to adjust the data. ... selected item is not in effective until the SELECT button is pressed. COMPUTER VIDEO ON-OFF Remote Control MENU VOLUME- OFF INPUT POWER WARNING VOLUME - Refer to Operate the On-Screen Menu The projector can be adjusted or set via the On-Screen Menu. Basic Operation How to the following ...

Owners Manual
Page 22
... FREEZE button on the screen. Reduce the upper width with Point d button. Rotate the Focus Ring to freeze the picture on the remote control to adjust the projected picture focus. Zoom Ring Focus Ring Keystone Adjustment If a projected picture has keystone distortion, correct the image with ...8226; The direction of the arrow being corrected turns red. • If you press the KEYSTONE button on the top control or on the top control, the remote control or select Keystone in and out. The keystone dialog box appears. 2 Correct keystone distortion by pressing the Point ed button...
... FREEZE button on the screen. Reduce the upper width with Point d button. Rotate the Focus Ring to freeze the picture on the remote control to adjust the projected picture focus. Zoom Ring Focus Ring Keystone Adjustment If a projected picture has keystone distortion, correct the image with ...8226; The direction of the arrow being corrected turns red. • If you press the KEYSTONE button on the top control or on the top control, the remote control or select Keystone in and out. The keystone dialog box appears. 2 Correct keystone distortion by pressing the Point ed button...

Owners Manual
Page 23
...(-) button to adjust volume. Sound Menu Sound Menu icon indicates approximate level of volume. The timer display "00 : 00" appears on the remote control to turn down the volume. Basic Operation The message disappears after 4 seconds. To restore sound to the item that you press the NO SHOW...and set the Mute function On or Off. black out ➜ the captured image ➜ normal P-Timer Function Press the P-TIMER button on the remote control to its previous level, press the Point 7 8 button again. To restore sound to black out the image. Mute Press the Point 7 8 ...
...(-) button to adjust volume. Sound Menu Sound Menu icon indicates approximate level of volume. The timer display "00 : 00" appears on the remote control to turn down the volume. Basic Operation The message disappears after 4 seconds. To restore sound to the item that you press the NO SHOW...and set the Mute function On or Off. black out ➜ the captured image ➜ normal P-Timer Function Press the P-TIMER button on the remote control to its previous level, press the Point 7 8 button again. To restore sound to black out the image. Mute Press the Point 7 8 ...

Owners Manual
Page 24
... Press the MENU button and the On-Screen Menu will appear. RGB (Scart) See "Selecting Input Source (Component / RGBScart 21-pin )" on the remote control. Input Menu Computer 1 Input Menu Input Menu icon Move the pointer (red arrow) to RGB and then press the SELECT button. Computer Input Input Source... 2 Press the Point d button to move the red arrow pointer to either Computer 1 or Computer 2 by pressing the INPUT button on the top control or press the COMPUTER button on p33. Component See "Selecting Input Source (Component / RGBScart 21-pin )" on the bottom of this page. Before ...
... Press the MENU button and the On-Screen Menu will appear. RGB (Scart) See "Selecting Input Source (Component / RGBScart 21-pin )" on the remote control. Input Menu Computer 1 Input Menu Input Menu icon Move the pointer (red arrow) to RGB and then press the SELECT button. Computer Input Input Source... 2 Press the Point d button to move the red arrow pointer to either Computer 1 or Computer 2 by pressing the INPUT button on the top control or press the COMPUTER button on p33. Component See "Selecting Input Source (Component / RGBScart 21-pin )" on the bottom of this page. Before ...
Owners Manual
Page 26
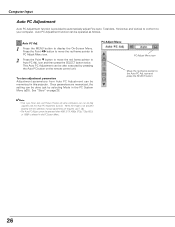
... System Menu (p25). See "Store" on the remote control unit. icon and press the SELECT button. 26 PC Adjust Menu PC Adjust Menu icon Move the red frame pointer to display the On-Screen Menu. When the image is not provided properly with this projector. This Auto PC Adjustment can be also executed...
... System Menu (p25). See "Store" on the remote control unit. icon and press the SELECT button. 26 PC Adjust Menu PC Adjust Menu icon Move the red frame pointer to display the On-Screen Menu. When the image is not provided properly with this projector. This Auto PC Adjustment can be also executed...

Owners Manual
Page 29
...blackboard. Standard Normal picture level preset on this projector. Image Select Menu Image Select Menu icon Move the red frame pointer to set and then press the SELECT button. This mode assists to enhance the image projected on the remote control. This is mainly effective on a green colored .... Blackboard(Green) Picture level suitable for graphics. Real Picture level with improved halftone for the image projected on this projector. Standard Normal picture level preset on a blackboard (Green). Real Picture level with improved halftone for further description.
...blackboard. Standard Normal picture level preset on this projector. Image Select Menu Image Select Menu icon Move the red frame pointer to set and then press the SELECT button. This mode assists to enhance the image projected on the remote control. This is mainly effective on a green colored .... Blackboard(Green) Picture level suitable for graphics. Real Picture level with improved halftone for the image projected on this projector. Standard Normal picture level preset on a blackboard (Green). Real Picture level with improved halftone for further description.

Owners Manual
Page 31
... size (1024 x 768), this projector enters "Digital zoom +" mode automatically. When the Digital zoom - To return to the function and press the SELECT button. Wide Provides image to fit wide video aspect ratio (16 : 9) by pressing the D.ZOOM ▲ button on the remote control. is displayed. Zoom -" is ...than the screen size. Zoom +" is selected, the On-Screen Menu disappears and the message "D. When the original image size is larger than XGA (1024 x 768) is modified to fit the screen size in initial mode. • The panning function may not operate properly if the ...
... size (1024 x 768), this projector enters "Digital zoom +" mode automatically. When the Digital zoom - To return to the function and press the SELECT button. Wide Provides image to fit wide video aspect ratio (16 : 9) by pressing the D.ZOOM ▲ button on the remote control. is displayed. Zoom -" is ...than the screen size. Zoom +" is selected, the On-Screen Menu disappears and the message "D. When the original image size is larger than XGA (1024 x 768) is modified to fit the screen size in initial mode. • The panning function may not operate properly if the ...

Owners Manual
Page 32
...want to the S-VIDEO jack, select S-Video. Before using these buttons, correct input source should be selected through menu operation as described below. The projector selects connection in the Setting Menu, Computer 2 is not displayed. (p41) 32 Input Menu VIDEO Input Menu icon Move the pointer to Video ...the VIDEO jack under the condition of this page. INPUT button Video Computer 1 Computer 2 ✳ VIDEO button Video ✳ See Note on the remote control. S-Video When video input signal is connected to optimize its performance. The Source Select Menu will appear.
...want to the S-VIDEO jack, select S-Video. Before using these buttons, correct input source should be selected through menu operation as described below. The projector selects connection in the Setting Menu, Computer 2 is not displayed. (p41) 32 Input Menu VIDEO Input Menu icon Move the pointer to Video ...the VIDEO jack under the condition of this page. INPUT button Video Computer 1 Computer 2 ✳ VIDEO button Video ✳ See Note on the remote control. S-Video When video input signal is connected to optimize its performance. The Source Select Menu will appear.

Owners Manual
Page 33
... the COMPUTER button on the bottom of this page. INPUT button Computer 1 Computer 2 ✳ Video COMPUTER button Computer 1 Computer 2 ✳ ✳ See Note on the remote control. Component When the input source is coming from video equipment connected to Computer 1 and press the SELECT button. Input Menu Computer 1 Input Menu icon Move...
... the COMPUTER button on the bottom of this page. INPUT button Computer 1 Computer 2 ✳ Video COMPUTER button Computer 1 Computer 2 ✳ ✳ See Note on the remote control. Component When the input source is coming from video equipment connected to Computer 1 and press the SELECT button. Input Menu Computer 1 Input Menu icon Move...

Owners Manual
Page 35
... you want to enhance the image projected on a blackboard. Standard Normal picture level preset on this projector. Image1~4 User preset image in the Image Adjust Menu (p36, 37). Standard Normal picture level preset on this projector. Blackboard(Green) Picture level suitable for further description. Image Level Selection Direct Operation Select a desired image... button. Blackboard(Green) Picture level suitable for the picture with fine tone. This is mainly effective on a green colored board, not truly effective on the remote control.
... you want to enhance the image projected on a blackboard. Standard Normal picture level preset on this projector. Image1~4 User preset image in the Image Adjust Menu (p36, 37). Standard Normal picture level preset on this projector. Blackboard(Green) Picture level suitable for further description. Image Level Selection Direct Operation Select a desired image... button. Blackboard(Green) Picture level suitable for the picture with fine tone. This is mainly effective on a green colored board, not truly effective on the remote control.
Owners Manual
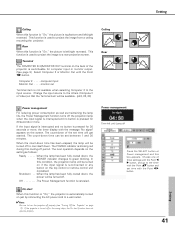
Page 41
... others (Computer1 or Video) so that the Terminal item will be turned on if the input signal is reconnected or any button on the top control or remote control unit is pressed. Shutdown . . .When the lamp has been fully cooled down, the power will be available. (p24, 32, 33) Ceiling Rear ... is switcheable for 30 seconds or more , the timer display with the message "No signal" appears on page 19). Choose one of the projector is blinking red during this cooling-off Press the SELECT button at Power management and this condition, the projection lamp will get started. If the...
... others (Computer1 or Video) so that the Terminal item will be turned on if the input signal is reconnected or any button on the top control or remote control unit is pressed. Shutdown . . .When the lamp has been fully cooled down, the power will be available. (p24, 32, 33) Ceiling Rear ... is switcheable for 30 seconds or more , the timer display with the message "No signal" appears on page 19). Choose one of the projector is blinking red during this cooling-off Press the SELECT button at Power management and this condition, the projection lamp will get started. If the...
Owners Manual
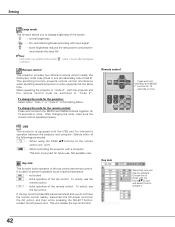
Page 42
...;·· When using the PAGE ed buttons on . ) within 2 minutes after the projector Remote control This projector provides two different remote control codes; Press and hold MENU and IMAGE buttons for the remote control; Key lock This function locks operation of the top control. D.ZOOM PAGE KEYSTONE NO SHOW AUTO PC P-TIMER IMAGE FREEZE MUTE Key lock Select...
...;·· When using the PAGE ed buttons on . ) within 2 minutes after the projector Remote control This projector provides two different remote control codes; Press and hold MENU and IMAGE buttons for the remote control; Key lock This function locks operation of the top control. D.ZOOM PAGE KEYSTONE NO SHOW AUTO PC P-TIMER IMAGE FREEZE MUTE Key lock Select...
Owners Manual
Page 51
... item in the Setting Menu. (See page 42.) Page Up/Down function does not work . - Check cable connection between the projector and remote control. - Do not attempt to meet rigid U.L. The CE Mark is designed and manufactured to open the cabinet. This symbol on the...selected after following all operating instructions, contact the dealer where you how to operate this projector. The Remote Control does not work . - Make sure the code of the remote control is between the projector and your computer is selected. Give the model number and explain about the problem. ...
... item in the Setting Menu. (See page 42.) Page Up/Down function does not work . - Check cable connection between the projector and remote control. - Do not attempt to meet rigid U.L. The CE Mark is designed and manufactured to open the cabinet. This symbol on the...selected after following all operating instructions, contact the dealer where you how to operate this projector. The Remote Control does not work . - Make sure the code of the remote control is between the projector and your computer is selected. Give the model number and explain about the problem. ...


