

Owners Manual
Page 2
... can be captured and used for portability, durability, and ease of 16.77 million colors, and matrix liquid crystal display (LCD) technology. ◆ Compact Design This projector is designed compact in size and weight. Computers, 6 Color systems, Component video, S-video and RGB scart. ◆ ... and 39.) ◆ Multilanguage Menu Display Operation menu is available in the Setting menu. (See page 42.) ◆ Compatibility The projector widely accepts various video and computer input signals including; You can use the terminal as a projection screen. ✳ The board color ...
... can be captured and used for portability, durability, and ease of 16.77 million colors, and matrix liquid crystal display (LCD) technology. ◆ Compact Design This projector is designed compact in size and weight. Computers, 6 Color systems, Component video, S-video and RGB scart. ◆ ... and 39.) ◆ Multilanguage Menu Display Operation menu is available in the Setting menu. (See page 42.) ◆ Compatibility The projector widely accepts various video and computer input signals including; You can use the terminal as a projection screen. ✳ The board color ...

Owners Manual
Page 3
... Bottom 8 Rear Terminal 9 Top Control 10 Remote Control 11 Operating Range 11 Remote Control Battery Installation 12 Installation 13 Positioning the Projector 13 Adjustable Feet 13 Connecting the AC Power Cord 14 Connecting to a Computer 15 Connecting to Video Equipment 16 Connecting to Component ...Video Equipment 17 Basic Operation 18 Turning On the Projector 18 Turning Off the Projector 19 How to Operate the On-Screen Menu 20 Menu Bar 21 Zoom and Focus Adjustment 22 Keystone ...
... Bottom 8 Rear Terminal 9 Top Control 10 Remote Control 11 Operating Range 11 Remote Control Battery Installation 12 Installation 13 Positioning the Projector 13 Adjustable Feet 13 Connecting the AC Power Cord 14 Connecting to a Computer 15 Connecting to Video Equipment 16 Connecting to Component ...Video Equipment 17 Basic Operation 18 Turning On the Projector 18 Turning Off the Projector 19 How to Operate the On-Screen Menu 20 Menu Bar 21 Zoom and Focus Adjustment 22 Keystone ...

Owners Manual
Page 4
...ARE IMPORTANT OPERATING AND MAINTENANCE INSTRUCTIONS IN THE OWNER'S MANUAL WITH THIS UNIT. Do not stare directly into the beam. - Install the projector in the Standard for the Protection of Electronic Computer/Data Processing Equipment, ANSI/NFPA 75. Heat build- SIDE and TOP REAR 20cm ..., sides and rear of Electronic Computer/Data Processing Equipment 4 Do not put any flammable object or spray can also be maintained. This projector provides many convenient features and functions. Safety Precaution WARNING : TO REDUCE THE RISK OF FIRE OR ELECTRIC SHOCK, DO NOT EXPOSE THIS...
...ARE IMPORTANT OPERATING AND MAINTENANCE INSTRUCTIONS IN THE OWNER'S MANUAL WITH THIS UNIT. Do not stare directly into the beam. - Install the projector in the Standard for the Protection of Electronic Computer/Data Processing Equipment, ANSI/NFPA 75. Heat build- SIDE and TOP REAR 20cm ..., sides and rear of Electronic Computer/Data Processing Equipment 4 Do not put any flammable object or spray can also be maintained. This projector provides many convenient features and functions. Safety Precaution WARNING : TO REDUCE THE RISK OF FIRE OR ELECTRIC SHOCK, DO NOT EXPOSE THIS...

Owners Manual
Page 5
... never be placed near the ventilation duct of airconditioning equipment. e. Upon completion of any kind into the projector. For added protection to the projector. The projector may touch dangerous voltage points or short out parts that have the same characteristics as they may fall, ...be sure the service technician has used replacement parts specified by following conditions: a. Slots and openings in safe operating condition. This projector should be read before cleaning. for ventilation, to ensure reliable operation of the equipment and to rain or use . Wall or...
... never be placed near the ventilation duct of airconditioning equipment. e. Upon completion of any kind into the projector. For added protection to the projector. The projector may touch dangerous voltage points or short out parts that have the same characteristics as they may fall, ...be sure the service technician has used replacement parts specified by following conditions: a. Slots and openings in safe operating condition. This projector should be read before cleaning. for ventilation, to ensure reliable operation of the equipment and to rain or use . Wall or...

Owners Manual
Page 6
...provided to cool down to protect it from overheating, and these openings must not be taken. - Do not put the projector on either side to a projector. Do not put on the cabinet. Cooling fans are provided for their information. 6 Improper Installation may reduce the lamp ... and cabinet. Exhaust Vent (Hot air exhaust) Air Intake Vent USE CAUTION IN CARRYING OR TRANSPORTING THE PROJECTOR - When carrying a projector, use a suitable carrying case. - To transport a projector through a courier or transport service, consult your dealer for ventilation and to ensure reliable operation of the...
...provided to cool down to protect it from overheating, and these openings must not be taken. - Do not put the projector on either side to a projector. Do not put on the cabinet. Cooling fans are provided for their information. 6 Improper Installation may reduce the lamp ... and cabinet. Exhaust Vent (Hot air exhaust) Air Intake Vent USE CAUTION IN CARRYING OR TRANSPORTING THE PROJECTOR - When carrying a projector, use a suitable carrying case. - To transport a projector through a courier or transport service, consult your dealer for ventilation and to ensure reliable operation of the...
Owners Manual
Page 7
... try to defeat this projector meets the requirement for the United Kingdom : This cord is already fitted with a moulded plug incorporating a fuse, the value of which the receiver is no guarantee that interference will fit into the power outlet. Model Numbers Trade Name Responsible party Address Telephone No. : PLC-XU41 : Sanyo : SANYO FISHER COMPANY : 21605...
... try to defeat this projector meets the requirement for the United Kingdom : This cord is already fitted with a moulded plug incorporating a fuse, the value of which the receiver is no guarantee that interference will fit into the power outlet. Model Numbers Trade Name Responsible party Address Telephone No. : PLC-XU41 : Sanyo : SANYO FISHER COMPANY : 21605...

Owners Manual
Page 9
... IN AUDIO OUT (VARIABLE) o iu q COMPUTER IN 1/ COMPONENT IN Connect output signal from a computer (Analog RGB) or video equipment (Component or RGB Scart) to this projector. Optional cables are required when using this terminal as either Computer input or Monitor output properly. (Used for input from a computer or output to be...
... IN AUDIO OUT (VARIABLE) o iu q COMPUTER IN 1/ COMPONENT IN Connect output signal from a computer (Analog RGB) or video equipment (Component or RGB Scart) to this projector. Optional cables are required when using this terminal as either Computer input or Monitor output properly. (Used for input from a computer or output to be...

Owners Manual
Page 10
...value in the stand-by mode. button. (p23) o MENU button Opens or closes the On-Screen Menu. (p20) 10 It turns red when the projector is under operation. OFF INPUT POWER WARNING VOLUME - VOLUME + KEYSTONE MENU SELECT LAMP REPLACE o i u q KEYSTONE button Corrects keystone distortion. (p22, 39...) w INPUT button Selects input source. (p24, 32 ) e POWER ON-OFF button Turns the projector on . This also blinks red when the internal temperature of the projector exceeds the operating range. (p45) u LAMP REPLACE indicator Turns yellow when the life of the projection lamp draws...
...value in the stand-by mode. button. (p23) o MENU button Opens or closes the On-Screen Menu. (p20) 10 It turns red when the projector is under operation. OFF INPUT POWER WARNING VOLUME - VOLUME + KEYSTONE MENU SELECT LAMP REPLACE o i u q KEYSTONE button Corrects keystone distortion. (p22, 39...) w INPUT button Selects input source. (p24, 32 ) e POWER ON-OFF button Turns the projector on . This also blinks red when the internal temperature of the projector exceeds the operating range. (p45) u LAMP REPLACE indicator Turns yellow when the life of the projection lamp draws...

Owners Manual
Page 11
...Digital zoom mode. (p31) To ensure safe operation, please observe the following precautions : - Expands / compresses the image in front of the projector. 16.4' (5 m) 30° 30° 11 Do not bend, drop the remote control or expose Remote Control to use soft dry cloth...value in Digital zoom +/- Pan the image in the On-Screen Menu. (p20) - mode. (p31) - Operating Range Point the remote control toward the projector (Infrared Remote Receiver) when pressing any chemical material. SELECT VOLUME+ t !3 !2 y D.ZOOM PAGE KEYSTONE NO SHOW !1 u AUTO PC P-TIMER IMAGE FREEZE...
...Digital zoom mode. (p31) To ensure safe operation, please observe the following precautions : - Expands / compresses the image in front of the projector. 16.4' (5 m) 30° 30° 11 Do not bend, drop the remote control or expose Remote Control to use soft dry cloth...value in Digital zoom +/- Pan the image in the On-Screen Menu. (p20) - mode. (p31) - Operating Range Point the remote control toward the projector (Infrared Remote Receiver) when pressing any chemical material. SELECT VOLUME+ t !3 !2 y D.ZOOM PAGE KEYSTONE NO SHOW !1 u AUTO PC P-TIMER IMAGE FREEZE...

Owners Manual
Page 13
...3m) - 32.8'(10.0m). It is designed to adjust the position and tilt. 3 To retract the adjustable feet, lift the front of the projector. 2 Release the feet lock latches to lock the adjustable feet and rotate the adjustable feet to project on picture quality. Keystone distortion of the projected... image can be adjusted up to 11.8 degrees with the adjustable feet. 1 Lift the front of the projector and pull upward the feet lock latches on both sides of the projector and pull and undo the feet lock latches. Zoom 247" Min. Zoom A (Center) 33" B Screen Size (W x H) mm 4 :...
...3m) - 32.8'(10.0m). It is designed to adjust the position and tilt. 3 To retract the adjustable feet, lift the front of the projector. 2 Release the feet lock latches to lock the adjustable feet and rotate the adjustable feet to project on picture quality. Keystone distortion of the projected... image can be adjusted up to 11.8 degrees with the adjustable feet. 1 Lift the front of the projector and pull upward the feet lock latches on both sides of the projector and pull and undo the feet lock latches. Zoom 247" Min. Zoom A (Center) 33" B Screen Size (W x H) mm 4 :...

Owners Manual
Page 14
...To the AC outlet. (200 - 240 V AC) 14 Installation Connecting the AC Power Cord This projector uses nominal input voltages of power system. This projector automatically selects the correct input voltage. Connect the projector with AC power cord, it is not in Stand-by mode and consumes a little electric power.... To power cord connector on . (See page 15-17 for connection.) CAUTION For safety, unplug AC power cord when the projector is in use a projector. When this equipment and must meet requirement of the country where you are not sure of the type of power being supplied. ...
...To the AC outlet. (200 - 240 V AC) 14 Installation Connecting the AC Power Cord This projector uses nominal input voltages of power system. This projector automatically selects the correct input voltage. Connect the projector with AC power cord, it is not in Stand-by mode and consumes a little electric power.... To power cord connector on . (See page 15-17 for connection.) CAUTION For safety, unplug AC power cord when the projector is in use a projector. When this equipment and must meet requirement of the country where you are not sure of the type of power being supplied. ...

Owners Manual
Page 15
... If you wish to use Page ed buttons on the remote control, connect USB port of your computer to the USB socket of both the projector and the external equipment should be disconnected from AC outlet. I AUDIO IN R L (MONO) VIDEO USB SERVICE PORT S-VIDEO COMPUTER / / ...AUDIO OUT (AVRARIAIALBEL)E) This terminal is supplied.) • USB Cable ✽ • Audio Cables (Mini Plug: stereo Not supplied with this projector.) Installation Audio Output USB port Audio cable (stereo) ✽ USB cable ✽ Monitor Output VGA cable External Audio Equipment Monitor Input Audio Input ...
... If you wish to use Page ed buttons on the remote control, connect USB port of your computer to the USB socket of both the projector and the external equipment should be disconnected from AC outlet. I AUDIO IN R L (MONO) VIDEO USB SERVICE PORT S-VIDEO COMPUTER / / ...AUDIO OUT (AVRARIAIALBEL)E) This terminal is supplied.) • USB Cable ✽ • Audio Cables (Mini Plug: stereo Not supplied with this projector.) Installation Audio Output USB port Audio cable (stereo) ✽ USB cable ✽ Monitor Output VGA cable External Audio Equipment Monitor Input Audio Input ...

Owners Manual
Page 16
Note: When connecting the cable, the power cords of connecting both the projector and the external equipment should be disconnected from AC outlet. 16 I AUDIO IN R L (MONO) VIDEO USB SERVICE PORT S-VIDEO COMPUTER / / CCOOMMPPOONNEENNTT RESET...connection • Video and Audio Cable (RCA x 3) ✽ • S-VIDEO Cable ✽ • Audio Cables (Mini Plug: stereo Not supplied with this projector.) S-Video Output Composite Video and Audio Output (R) (L) (Video) S-Video cable ✽ Video and audio cable✽ External Audio Equipment Audio Input S-VIDEO (R) (L) AUDIO...
Note: When connecting the cable, the power cords of connecting both the projector and the external equipment should be disconnected from AC outlet. 16 I AUDIO IN R L (MONO) VIDEO USB SERVICE PORT S-VIDEO COMPUTER / / CCOOMMPPOONNEENNTT RESET...connection • Video and Audio Cable (RCA x 3) ✽ • S-VIDEO Cable ✽ • Audio Cables (Mini Plug: stereo Not supplied with this projector.) S-Video Output Composite Video and Audio Output (R) (L) (Video) S-Video cable ✽ Video and audio cable✽ External Audio Equipment Audio Input S-VIDEO (R) (L) AUDIO...

Owners Manual
Page 17
... the external equipment should be disconnected from AC outlet. 17 Installation Connecting to external audio equipment, the projector's built-in speaker is disconnected. I AUDIO IN R L (MONO) VIDEO USB SERVICE PORT S-VIDEO COMPUTER / / CCOOMMPPOONNEENNTT RESET COMCOPMUPTUETRERIINN 22/ ...x 2 or RCA x 2) ✽ • Scart-VGA Cable ✽ • Component-VGA Cable ✽ (✽ = Not supplied with this projector.) Installation RGB Scart 21-pin Output Component Video Output (Y, Pb/Cb, Pr/Cr) Audio Output Scart-VGA cable ✽ Component-VGA cable✽ Audio cable...
... the external equipment should be disconnected from AC outlet. 17 Installation Connecting to external audio equipment, the projector's built-in speaker is disconnected. I AUDIO IN R L (MONO) VIDEO USB SERVICE PORT S-VIDEO COMPUTER / / CCOOMMPPOONNEENNTT RESET COMCOPMUPTUETRERIINN 22/ ...x 2 or RCA x 2) ✽ • Scart-VGA Cable ✽ • Component-VGA Cable ✽ (✽ = Not supplied with this projector.) Installation RGB Scart 21-pin Output Component Video Output (Y, Pb/Cb, Pr/Cr) Audio Output Scart-VGA cable ✽ Component-VGA cable✽ Audio cable...

Owners Manual
Page 18
...starts. 4 After the count-down in a moment and lights red. 3 Press the POWER ON-OFF button on the top control or on the projector. 2 Connect the projector's AC power cord into an AC outlet. Enter the PIN code as instructed below. 16 The preparation display disappears after 20 seconds. If you...a security code using Personal Identification Number that allows the person who knows it down , the input source that you forget your PIN code, the projector can start to "✳". PIN code is PIN code? Selected Input Source and Lamp Mode Lamp mode (See page 42 for locking operation of the...
...starts. 4 After the count-down in a moment and lights red. 3 Press the POWER ON-OFF button on the top control or on the projector. 2 Connect the projector's AC power cord into an AC outlet. Enter the PIN code as instructed below. 16 The preparation display disappears after 20 seconds. If you...a security code using Personal Identification Number that allows the person who knows it down , the input source that you forget your PIN code, the projector can start to "✳". PIN code is PIN code? Selected Input Source and Lamp Mode Lamp mode (See page 42 for locking operation of the...

Owners Manual
Page 19
...WHILE COOLING FANS ARE RUNNING OR BEFORE POWER INDICATOR LIGHTS RED. OTHERWISE IT WILL RESULT IN SHORTENING LAMP LIFE. ✔Note: • The projector cannot be turned on automatically by connecting the AC power cord to turn it a rest about 90 seconds. (About 120 seconds when the fan... mode is turned on again, the POWER indicator lights red. Continuous use may result in every 24 hours. • This projector monitors internal temperature and automatically controls the running speed of the cooling fans. • If the WARNING indicator blinks or lights red, see "...
...WHILE COOLING FANS ARE RUNNING OR BEFORE POWER INDICATOR LIGHTS RED. OTHERWISE IT WILL RESULT IN SHORTENING LAMP LIFE. ✔Note: • The projector cannot be turned on automatically by connecting the AC power cord to turn it a rest about 90 seconds. (About 120 seconds when the fan... mode is turned on again, the POWER indicator lights red. Continuous use may result in every 24 hours. • This projector monitors internal temperature and automatically controls the running speed of the cooling fans. • If the WARNING indicator blinks or lights red, see "...
Owners Manual
Page 20
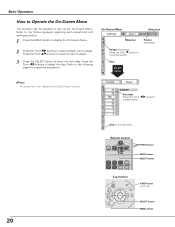
On-Screen Menu Menu icon Menu bar Pointer (red frame) Pointer (red frame) Press the Point d button to Operate the On-Screen Menu The projector can be adjusted or set via the On-Screen Menu. OFF INPUT POWER WARNING VOLUME - Item SELECT button ✔Note: The selected item is not ...
On-Screen Menu Menu icon Menu bar Pointer (red frame) Pointer (red frame) Press the Point d button to Operate the On-Screen Menu The projector can be adjusted or set via the On-Screen Menu. OFF INPUT POWER WARNING VOLUME - Item SELECT button ✔Note: The selected item is not ...

Owners Manual
Page 21
...), and Image 1 ~ 4. (p29) Screen Menu Used to adjust size of image. [Normal / True / Wide / Digital zoom +/-] (p31) Setting Menu Used to change settings of the projector or reset lamp replace counter. (p39-44) Basic Operation Input Menu Used to select input source either Computer or Video. (p24) PC Adjust Menu Used...
...), and Image 1 ~ 4. (p29) Screen Menu Used to adjust size of image. [Normal / True / Wide / Digital zoom +/-] (p31) Setting Menu Used to change settings of the projector or reset lamp replace counter. (p39-44) Basic Operation Input Menu Used to select input source either Computer or Video. (p24) PC Adjust Menu Used...

Owners Manual
Page 25
... set , and then press the SELECT button. If Computer is selected as a signal source, this projector, Auto PC Adjustment function works to various types of computers based on VGA, SVGA, XGA or SXGA with its Multi-scan system and Auto PC Adjustment. Adjustment data can be selected. When the... ) Mode 1 User preset system manually adjusted in the PC Adjust Menu. (p27, 28) Computer Input 25 Computer Input Computer System Selection This projector automatically tunes to display proper images and the message "Auto" is displayed on the PC System menu box. Press the Point 7 8 buttons to...
... set , and then press the SELECT button. If Computer is selected as a signal source, this projector, Auto PC Adjustment function works to various types of computers based on VGA, SVGA, XGA or SXGA with its Multi-scan system and Auto PC Adjustment. Adjustment data can be selected. When the... ) Mode 1 User preset system manually adjusted in the PC Adjust Menu. (p27, 28) Computer Input 25 Computer Input Computer System Selection This projector automatically tunes to display proper images and the message "Auto" is displayed on the PC System menu box. Press the Point 7 8 buttons to...

Owners Manual
Page 26
... the red frame pointer to the Auto PC Adj. To store adjustment parameters Adjustment parameters from Auto PC Adjustment can be fully adjusted with this projector. This Auto PC Adjustment can not be operated as follows. Auto PC Adjustment function can be memorized in this operation, manual adjustments are memorized, the...
... the red frame pointer to the Auto PC Adj. To store adjustment parameters Adjustment parameters from Auto PC Adjustment can be fully adjusted with this projector. This Auto PC Adjustment can not be operated as follows. Auto PC Adjustment function can be memorized in this operation, manual adjustments are memorized, the...


