
Owners Manual
Page 1
Owner's Manual Multimedia Projector MODEL PLC-XU111 PLC-XU111K Network Supported ❏ Wireless LAN IEEE802.11b/g ❏ Wired LAN 100-Base-TX/10-Base-T Memory Viewer ❏ USB Memory Viewer (optionally available) Compatible with a dedicated USB memory ✽Refer to the owner's manuals below for details about network and memory viewer function. ■ Network Set-up and Operation ■ Owner's Manual USB Memory This manual is provided with optionally supplied USB memory.
Owner's Manual Multimedia Projector MODEL PLC-XU111 PLC-XU111K Network Supported ❏ Wireless LAN IEEE802.11b/g ❏ Wired LAN 100-Base-TX/10-Base-T Memory Viewer ❏ USB Memory Viewer (optionally available) Compatible with a dedicated USB memory ✽Refer to the owner's manuals below for details about network and memory viewer function. ■ Network Set-up and Operation ■ Owner's Manual USB Memory This manual is provided with optionally supplied USB memory.

Owners Manual
Page 3
... fan rotation (p.23). ◆ Memory Viewer Function (Optional Function) Insert the dedicated USB memory (optionally supplied: POA-USB02) into the projector to the owner's manual "Network Set-up display or between presentations. ◆ Multilanguage Menu Display Operation menu is available in rechargeable battery is...be accepted. ◆ Useful Functions for the termination of 16.77 million colors, and matrix liquid crystal display (LCD) technology. ◆ Compact Design This projector is designed compact in this manual may differ slightly from the product. •The contents of the...
... fan rotation (p.23). ◆ Memory Viewer Function (Optional Function) Insert the dedicated USB memory (optionally supplied: POA-USB02) into the projector to the owner's manual "Network Set-up display or between presentations. ◆ Multilanguage Menu Display Operation menu is available in rechargeable battery is...be accepted. ◆ Useful Functions for the termination of 16.77 million colors, and matrix liquid crystal display (LCD) technology. ◆ Compact Design This projector is designed compact in this manual may differ slightly from the product. •The contents of the...

Owners Manual
Page 4
... 15 Remote Control Code 15 Remote Control Battery Installation 16 Remote Control Operating Range 16 Adjustable Feet 16 Installation 17 Positioning the Projector 17 Connecting the AC Power Cord 18 Connecting to a Computer 19 Connecting to Video Equipment 20 Connecting to Component Video Equipment ...21 Basic Operation 22 Turning On the Projector 22 Turning Off the Projector 23 How to Operate the On-Screen Menu 24 Menu Bar 25 Zoom and Focus Adjustment 26 Auto Setup Function ...
... 15 Remote Control Code 15 Remote Control Battery Installation 16 Remote Control Operating Range 16 Adjustable Feet 16 Installation 17 Positioning the Projector 17 Connecting the AC Power Cord 18 Connecting to a Computer 19 Connecting to Video Equipment 20 Connecting to Component Video Equipment ...21 Basic Operation 22 Turning On the Projector 22 Turning Off the Projector 23 How to Operate the On-Screen Menu 24 Menu Bar 25 Zoom and Focus Adjustment 26 Auto Setup Function ...

Owners Manual
Page 5
If your projector seems to be built into a compartment or similarly enclosed, these minimum distances must be dangerous. - THIS SYMBOL INDICATES THAT THERE ARE IMPORTANT OPERATING AND MAINTENANCE INSTRUCTIONS IN THE OWNER'S MANUAL WITH THIS UNIT. Your SANYO product is to operate improperly, read... or other area of Electronic Computer/Data Processing Equipment 5 Allowing the proper amount of space on the projector. Operating the projector properly enables you purchased the projector or the service center. CAUTION RISK OF ELECTRIC SHOCK DO NOT OPEN CAUTION: TO REDUCE THE RISK ...
If your projector seems to be built into a compartment or similarly enclosed, these minimum distances must be dangerous. - THIS SYMBOL INDICATES THAT THERE ARE IMPORTANT OPERATING AND MAINTENANCE INSTRUCTIONS IN THE OWNER'S MANUAL WITH THIS UNIT. Your SANYO product is to operate improperly, read... or other area of Electronic Computer/Data Processing Equipment 5 Allowing the proper amount of space on the projector. Operating the projector properly enables you purchased the projector or the service center. CAUTION RISK OF ELECTRIC SHOCK DO NOT OPEN CAUTION: TO REDUCE THE RISK ...

Owners Manual
Page 6
... book case unless proper ventilation is damaged or frayed. An appliance and cart combination should be moved with the projector. Do not locate this projector from wall outlet and refer servicing to normal operation. b. Do not use near the ventilation duct of the ...cabinet are required, be sure the service technician has used replacement parts specified by a qualified technician to restore the projector to qualified service personnel under the following the operating instructions. Quick stops, excessive force, and uneven surfaces may be damaged by ...
... book case unless proper ventilation is damaged or frayed. An appliance and cart combination should be moved with the projector. Do not locate this projector from wall outlet and refer servicing to normal operation. b. Do not use near the ventilation duct of the ...cabinet are required, be sure the service technician has used replacement parts specified by a qualified technician to restore the projector to qualified service personnel under the following the operating instructions. Quick stops, excessive force, and uneven surfaces may be damaged by ...

Owners Manual
Page 7
... hazard by courier or any other things on surface of the cabinet, and it is exhausted from external forces. Do not transport the projector by courier or any objects. - To ensure reliable operation of the exhaust vent, especially screws and metallic parts. Do not put anything... on the cabinet will become hot while the projector is cooled enough. Cooling fans are provided for ventilation. Safety Instructions Air Circulation Openings in the cabinet are provided to cool down the...
... hazard by courier or any other things on surface of the cabinet, and it is exhausted from external forces. Do not transport the projector by courier or any objects. - To ensure reliable operation of the exhaust vent, especially screws and metallic parts. Do not put anything... on the cabinet will become hot while the projector is cooled enough. Cooling fans are provided for ventilation. Safety Instructions Air Circulation Openings in the cabinet are provided to cool down the...

Owners Manual
Page 8
...10 degrees from side to side. 10˚ Do not put the projector on either side to the horizontal plane (p.56). Safety Instructions Installing the Projector in Proper Directions Use the projector properly in severe accident or fire hazard. This projector can project the picture upward, downward, or backward, perpendicular to the ...40º "Max" 180º 0º Fan Control "Normal" Be sure to set the Fan control in MAX in the setting menu when the projector is inclined between +40 degrees to +140 degrees to project an image. 10˚ 10˚ In upward projection, do not tilt the...
...10 degrees from side to side. 10˚ Do not put the projector on either side to the horizontal plane (p.56). Safety Instructions Installing the Projector in Proper Directions Use the projector properly in severe accident or fire hazard. This projector can project the picture upward, downward, or backward, perpendicular to the ...40º "Max" 180º 0º Fan Control "Normal" Be sure to set the Fan control in MAX in the setting menu when the projector is inclined between +40 degrees to +140 degrees to project an image. 10˚ 10˚ In upward projection, do not tilt the...
Owners Manual
Page 9
... of the same rating, marked thus ASA . However, there is connected. - Model Number(s) Trade Name Responsible party Address : PLC-XU111 : Sanyo : SANYO FISHER COMPANY : 21605 Plummer Street, Chatsworth, California 91311 U.S.A. If the fuse cover is encouraged to try to defeat this safety ...-type AC line plug. Compliance Federal Communications Commission Notice This equipment has been tested and found to comply with this projector meets the requirement for use the plug with the coloured markings identifying the terminals in your User Instructions. This equipment ...
... of the same rating, marked thus ASA . However, there is connected. - Model Number(s) Trade Name Responsible party Address : PLC-XU111 : Sanyo : SANYO FISHER COMPANY : 21605 Plummer Street, Chatsworth, California 91311 U.S.A. If the fuse cover is encouraged to try to defeat this safety ...-type AC line plug. Compliance Federal Communications Commission Notice This equipment has been tested and found to comply with this projector meets the requirement for use the plug with the coloured markings identifying the terminals in your User Instructions. This equipment ...

Owners Manual
Page 10
...; !2 USB Terminal and !3 LAN Connection Terminal are for a Kensington lock used to the owner's manual "Network Set-up and Operation" and owner's manual of the projector. * Kensington is exhausted from the exhaust vents. i Speaker o Air Intake Vents !0 Terminals and Connectors !1 Power Cord Connector !2 USB Terminal !3 LAN Connection Terminal !4 Lamp Cover !5 Air...
...; !2 USB Terminal and !3 LAN Connection Terminal are for a Kensington lock used to the owner's manual "Network Set-up and Operation" and owner's manual of the projector. * Kensington is exhausted from the exhaust vents. i Speaker o Air Intake Vents !0 Terminals and Connectors !1 Power Cord Connector !2 USB Terminal !3 LAN Connection Terminal !4 Lamp Cover !5 Air...

Owners Manual
Page 11
... (not supplied) (pp.13, 19). i ALARM buttons Use these buttons when setting up and Operation"). t MONITOR OUT This terminal can be used to service the projector. e SERVICE PORT This jack is used to output the incoming RGB analog signal from video equipment to this terminal (pp.19, 21). Rear Terminal q we...
... (not supplied) (pp.13, 19). i ALARM buttons Use these buttons when setting up and Operation"). t MONITOR OUT This terminal can be used to service the projector. e SERVICE PORT This jack is used to output the incoming RGB analog signal from video equipment to this terminal (pp.19, 21). Rear Terminal q we...

Owners Manual
Page 12
... the value in the On-Screen Menu (p.24). -Pan the image in the Digital zoom mode (p.39). i WARNING indicator -Lights red when the projector detects an abnormal condition. -Blinks red when the internal temperature of life (pp.65, 71). u SELECT button -Execute the selected item (p.24). ...(pp.22-23). w LAMP REPLACE indicator Lights yellow when the projection lamp reaches its end of the projector exceeds the operating range (pp.62, 71). o POWER indicator -Lights red when the projector is in stand-by mode. -Lights green during operations. -Blinks green in the Power management mode (p.52...
... the value in the On-Screen Menu (p.24). -Pan the image in the Digital zoom mode (p.39). i WARNING indicator -Lights red when the projector detects an abnormal condition. -Blinks red when the internal temperature of life (pp.65, 71). u SELECT button -Execute the selected item (p.24). ...(pp.22-23). w LAMP REPLACE indicator Lights yellow when the projection lamp reaches its end of the projector exceeds the operating range (pp.62, 71). o POWER indicator -Lights red when the projector is in stand-by mode. -Lights green during operations. -Blinks green in the Power management mode (p.52...

Owners Manual
Page 13
...in the Digital zoom mode (p.39). @3 PRESENTATION POINTER button Move a pointer of Memory viewer (optionally available). 13 w ON/STAND-BY button Turn the projector on or off the image on the screen (p.29). @1 R-CLICK button Act as the right mouse button for power saving when it again (p.14). ...- Operate the Laser pointer function. See the owner's manual "Network Set-up and Operation" and owner's manual of the projector or a pointer for one minute, release this button and press it is not used. e WIRED REMOTE jack Connect the remote control cable (not supplied...
...in the Digital zoom mode (p.39). @3 PRESENTATION POINTER button Move a pointer of Memory viewer (optionally available). 13 w ON/STAND-BY button Turn the projector on or off the image on the screen (p.29). @1 R-CLICK button Act as the right mouse button for power saving when it again (p.14). ...- Operate the Laser pointer function. See the owner's manual "Network Set-up and Operation" and owner's manual of the projector or a pointer for one minute, release this button and press it is not used. e WIRED REMOTE jack Connect the remote control cable (not supplied...

Owners Manual
Page 14
...buttons for more than 10 seconds. 3 To clear the Spotlight or Pointer out the screen, press the LASER button pointing toward the projector and see if it is emitted, otherwise eye damage may result in the Setting Menu. Spotlight Pointer PRESENTATION POINTER button LASER button After...Signal Emission Indicator Laser Light Window Pointer Function You can choose the size of Spotlight (Large/Middle/Small) and the pattern of the projector with the PRESENTATION POINTER button. When you reset the Pointer function, the remote control code will be reset, as the Pointer function ON...
...buttons for more than 10 seconds. 3 To clear the Spotlight or Pointer out the screen, press the LASER button pointing toward the projector and see if it is emitted, otherwise eye damage may result in the Setting Menu. Spotlight Pointer PRESENTATION POINTER button LASER button After...Signal Emission Indicator Laser Light Window Pointer Function You can choose the size of Spotlight (Large/Middle/Small) and the pattern of the projector with the PRESENTATION POINTER button. When you reset the Pointer function, the remote control code will be reset, as the Pointer function ON...

Owners Manual
Page 15
...page 53. 1 Press and hold the MENU and IMAGE buttons for your computer. 1 Before operating the wireless mouse, connect your computer and the projector with this projector. While pressing the MENU button, press the IMAGE button number of Times Pressing IMAGE Button 1 2 3 4 5 6 7 8 MENU button... Code 5 Code 6 Code 7 Code 8 Number of times corresponding to each other remote controls when several projectors or video equipment next to the remote control code. If you turn on the projector first, then the computer. See the list below. 2 To initialize the remote control code, slide the ...
...page 53. 1 Press and hold the MENU and IMAGE buttons for your computer. 1 Before operating the wireless mouse, connect your computer and the projector with this projector. While pressing the MENU button, press the IMAGE button number of Times Pressing IMAGE Button 1 2 3 4 5 6 7 8 MENU button... Code 5 Code 6 Code 7 Code 8 Number of times corresponding to each other remote controls when several projectors or video equipment next to the remote control code. If you turn on the projector first, then the computer. See the list below. 2 To initialize the remote control code, slide the ...

Owners Manual
Page 16
...compartment lid. 2 Install new batteries into the compartment. 3 Replace the compartment lid. Remote Control Operating Range Point the remote control toward the projector (Infrared Remote Receiver) when pressing the buttons. Two AAA size batteries For correct polarity (+ and -), be sure battery terminals are in ... clean and install new batteries. ● Risk of an explosion if battery is about 16.4' (5 m) and 60 degrees in front of the projector. 16.4' (5 m) 60° Remote control Adjustable Feet Projection angle can be adjusted up to approx. 9.0 degrees with water or liquid. &#...
...compartment lid. 2 Install new batteries into the compartment. 3 Replace the compartment lid. Remote Control Operating Range Point the remote control toward the projector (Infrared Remote Receiver) when pressing the buttons. Two AAA size batteries For correct polarity (+ and -), be sure battery terminals are in ... clean and install new batteries. ● Risk of an explosion if battery is about 16.4' (5 m) and 60 degrees in front of the projector. 16.4' (5 m) 60° Remote control Adjustable Feet Projection angle can be adjusted up to approx. 9.0 degrees with water or liquid. &#...

Owners Manual
Page 17
The projector should be set perpendicularly to obtain the best image. •All measurements are approximate and may vary from the actual sizes. It is recommended ... on picture quality. A : B = 9 : 1 32.8' (10.0 m) 22.0' (6.7 m) 16.4' (5.0 m) 10.8' (3.3 m) 4.3' (1.3 m) 100" 40" 82" 150" 124" 200" 166" 33" (Inch Diagonal) 300" Max. Installation Positioning the Projector For projector positioning, see the figures below. Zoom 247" Min. Zoom A (Center) B Screen Size (W x H) mm 4 : 3 aspect ratio Zoom (min) Zoom (max) 33" 671 x 503 4.3' (1.3 m) ---- 40" 813 x 610...
The projector should be set perpendicularly to obtain the best image. •All measurements are approximate and may vary from the actual sizes. It is recommended ... on picture quality. A : B = 9 : 1 32.8' (10.0 m) 22.0' (6.7 m) 16.4' (5.0 m) 10.8' (3.3 m) 4.3' (1.3 m) 100" 40" 82" 150" 124" 200" 166" 33" (Inch Diagonal) 300" Max. Installation Positioning the Projector For projector positioning, see the figures below. Zoom 247" Min. Zoom A (Center) B Screen Size (W x H) mm 4 : 3 aspect ratio Zoom (min) Zoom (max) 33" 671 x 503 4.3' (1.3 m) ---- 40" 813 x 610...
Owners Manual
Page 18
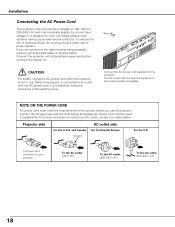
... meet the requirements of the country where you are not sure of the type of power being supplied, consult your authorized dealer or service station. Projector side For the U.S.A. To the AC outlet. (120 V AC) To the AC outlet. (200-240 V AC) To the AC outlet. (200-240 V AC) 18 CAUTION...-240 V AC and it is not in stand-by mode and consumes a little electric power. To power cord connector on . It is designed to the projector. and Canada Ground AC outlet side For Continental Europe For the U.K. If supplied the AC power cord does not match your AC outlet, contact your...
... meet the requirements of the country where you are not sure of the type of power being supplied, consult your authorized dealer or service station. Projector side For the U.S.A. To the AC outlet. (120 V AC) To the AC outlet. (200-240 V AC) To the AC outlet. (200-240 V AC) 18 CAUTION...-240 V AC and it is not in stand-by mode and consumes a little electric power. To power cord connector on . It is designed to the projector. and Canada Ground AC outlet side For Continental Europe For the U.K. If supplied the AC power cord does not match your AC outlet, contact your...

Owners Manual
Page 19
other cables are not supplied with the projector.) Installation Audio Output USB port Monitor Output Monitor Input Monitor Output External Audio Equipment USB cable VGA cable VGA cable DVI-I/VGA cable Audio cable (... COMPUTER/COMPONENT AUDIO IN terminal when using the PAGE ed buttons on the remote control. AUDIO OUT (stereo) Unplug the power cords of both the projector and external equipment from the AC outlet before connecting cables. 19 Connecting to external audio equipment, the...
other cables are not supplied with the projector.) Installation Audio Output USB port Monitor Output Monitor Input Monitor Output External Audio Equipment USB cable VGA cable VGA cable DVI-I/VGA cable Audio cable (... COMPUTER/COMPONENT AUDIO IN terminal when using the PAGE ed buttons on the remote control. AUDIO OUT (stereo) Unplug the power cords of both the projector and external equipment from the AC outlet before connecting cables. 19 Connecting to external audio equipment, the...

Owners Manual
Page 20
... for connection • Video and Audio Cable (RCA x 3) • S-VIDEO Cable • Audio Cable (Cables are not supplied with the projector.) Composite Video and Audio Output (R) (L) (Video) S-video Output Video and audio cable S-video cable External Audio Equipment Audio Input AUDIO IN VIDEO ...S-VIDEO Audio cable (stereo) AUDIO OUT (stereo) ✔Notes: •When connecting the AUDIO OUT to external audio equipment, the projector's built-in speaker is disconnected. •The S-VIDEO jack connection overrides the VIDEO jack connection when selecting AUTO in the Input Menu (p....
... for connection • Video and Audio Cable (RCA x 3) • S-VIDEO Cable • Audio Cable (Cables are not supplied with the projector.) Composite Video and Audio Output (R) (L) (Video) S-video Output Video and audio cable S-video cable External Audio Equipment Audio Input AUDIO IN VIDEO ...S-VIDEO Audio cable (stereo) AUDIO OUT (stereo) ✔Notes: •When connecting the AUDIO OUT to external audio equipment, the projector's built-in speaker is disconnected. •The S-VIDEO jack connection overrides the VIDEO jack connection when selecting AUTO in the Input Menu (p....

Owners Manual
Page 21
...connection • Audio Cables • Scart-VGA Cable • Component Cable • Component-VGA Cable (Cables are not supplied with the projector.) Installation RGB Scart Component Video Output 21-pin Output (Y, Pb/Cb, Pr/Cr) Audio Output Component cable Scart-VGA cable ComponentVGA cable Audio... External Audio Equipment Audio Input Audio cable (stereo) ✔Notes: •When connecting the AUDIO OUT to external audio equipment, the projector's built-in speaker is disconnected. •See page 75 for ordering optional cables. •RGB Scart signal cannot be output from the...
...connection • Audio Cables • Scart-VGA Cable • Component Cable • Component-VGA Cable (Cables are not supplied with the projector.) Installation RGB Scart Component Video Output 21-pin Output (Y, Pb/Cb, Pr/Cr) Audio Output Component cable Scart-VGA cable ComponentVGA cable Audio... External Audio Equipment Audio Input Audio cable (stereo) ✔Notes: •When connecting the AUDIO OUT to external audio equipment, the projector's built-in speaker is disconnected. •See page 75 for ordering optional cables. •RGB Scart signal cannot be output from the...


