
Owners Manual
Page 1
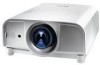
Multimedia Projector MODEL PLC-XT35/PLC-XT35L* (*Models without lens.) Owner's Manual
Multimedia Projector MODEL PLC-XT35/PLC-XT35L* (*Models without lens.) Owner's Manual
Owners Manual
Page 2
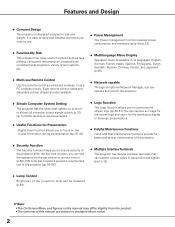
... Multi-use . ◆ Power Management The Power management function reduces power consumption and maintains lamp life (p.53). ◆ Functionally Rich This projector has many useful functions such as a PC wireless mouse. Digital zoom function allows you to focus on the top control or remote control ...function allows you can be accepted. ◆ Useful Functions for better and proper maintenance of this manual may differ slightly from the product. • The contents of the projector. ◆ Security Function The Security function helps you wish to customize the screen logo (pp....
... Multi-use . ◆ Power Management The Power management function reduces power consumption and maintains lamp life (p.53). ◆ Functionally Rich This projector has many useful functions such as a PC wireless mouse. Digital zoom function allows you to focus on the top control or remote control ...function allows you can be accepted. ◆ Useful Functions for better and proper maintenance of this manual may differ slightly from the product. • The contents of the projector. ◆ Security Function The Security function helps you wish to customize the screen logo (pp....

Owners Manual
Page 3
... 16 Remote Control Receivers and Operating Range 16 Adjustable Feet 16 Remote Control Code 17 Installation 18 Positioning the Projector 18 Moving the Lens 18 Lens Installation 19 Connecting to a Computer (Digital and Analog RGB) 20 Connecting ...Projector Control 28 Sound Adjustment 29 Operating with Remote Control 30 Laser Pointer Function 32 Pointer Function 32 Wireless Mouse Operation 33 Input Selection 34 Input 34 Input Source Selection 35 Video System Selection 36 Computer Adjustment 37 Computer System Selection 37 Auto PC Adjustment 38 Manual...
... 16 Remote Control Receivers and Operating Range 16 Adjustable Feet 16 Remote Control Code 17 Installation 18 Positioning the Projector 18 Moving the Lens 18 Lens Installation 19 Connecting to a Computer (Digital and Analog RGB) 20 Connecting ...Projector Control 28 Sound Adjustment 29 Operating with Remote Control 30 Laser Pointer Function 32 Pointer Function 32 Wireless Mouse Operation 33 Input Selection 34 Input 34 Input Source Selection 35 Video System Selection 36 Computer Adjustment 37 Computer System Selection 37 Auto PC Adjustment 38 Manual...

Owners Manual
Page 4
...or other area of the unit. THIS SYMBOL INDICATES THAT DANGEROUS VOLTAGE CONSTITUTING A RISK OF ELECTRIC SHOCK IS PRESENT WITHIN THIS UNIT. Your SANYO product is to prevent A Breakdown or a disaster. Do not stare directly into the lens as much as defined in a proper position... and not applied to come. Operating the projector properly enables you purchased the projector or the service center. NOTE: This symbol and recycle system are separate collection systems for the Protection of this manual thoroughly. If the projector is designed and manufactured with oil or chemicals...
...or other area of the unit. THIS SYMBOL INDICATES THAT DANGEROUS VOLTAGE CONSTITUTING A RISK OF ELECTRIC SHOCK IS PRESENT WITHIN THIS UNIT. Your SANYO product is to prevent A Breakdown or a disaster. Do not stare directly into the lens as much as defined in a proper position... and not applied to come. Operating the projector properly enables you purchased the projector or the service center. NOTE: This symbol and recycle system are separate collection systems for the Protection of this manual thoroughly. If the projector is designed and manufactured with oil or chemicals...

Owners Manual
Page 24
... Lamp control status. ✔Note: • The Filter warning and Lamp replacement icons may appear on the screen depending on the projector. 2 Connect the projector's AC power cord into an AC outlet. Setting a PIN code prevents unauthorized use the Point 7 button to move the red frame... want to operate the projector. Enter the PIN code as the initial PIN code at hand. Refer to operate. Basic Operation Turning On the Projector 1 Complete peripheral connections (with a computer, VCR, etc.) before turning on the usage state of the projector. Repeat this manual and keep it to...
... Lamp control status. ✔Note: • The Filter warning and Lamp replacement icons may appear on the screen depending on the projector. 2 Connect the projector's AC power cord into an AC outlet. Setting a PIN code prevents unauthorized use the Point 7 button to move the red frame... want to operate the projector. Enter the PIN code as the initial PIN code at hand. Refer to operate. Basic Operation Turning On the Projector 1 Complete peripheral connections (with a computer, VCR, etc.) before turning on the usage state of the projector. Repeat this manual and keep it to...

Owners Manual
Page 26
... buttons SELECT button Menu icon Menu bar Pointer (red frame ) Pointer (red frame ) Press the Point ed buttons to adjust the values. Quit Exit this manual. 1 Press the MENU button on the top control or the remote control to display the On-Screen Menu. 2 Use the Point 7 8 buttons to Operate the...
... buttons SELECT button Menu icon Menu bar Pointer (red frame ) Pointer (red frame ) Press the Point ed buttons to adjust the values. Quit Exit this manual. 1 Press the MENU button on the top control or the remote control to display the On-Screen Menu. 2 Use the Point 7 8 buttons to Operate the...

Owners Manual
Page 35
... performance. Video When the video signal is connected. S-video* When the S-video signal is connected. * If the projector cannot reproduce proper video image, select a system manually (see "Video System Selection" on page 36). S-video 2. RGB (AV HDCP) When the HDCP video signal is... RGB (PC digital) When the RGB PC (digital) signal is connected. * If the projector cannot reproduce proper video image, select a system manually (see "Video System Selection" on page 36). The projector selects the connection in the following order: Video* 1. Use the Point 7 8 buttons to...
... performance. Video When the video signal is connected. S-video* When the S-video signal is connected. * If the projector cannot reproduce proper video image, select a system manually (see "Video System Selection" on page 36). S-video 2. RGB (AV HDCP) When the HDCP video signal is... RGB (PC digital) When the RGB PC (digital) signal is connected. * If the projector cannot reproduce proper video image, select a system manually (see "Video System Selection" on page 36). The projector selects the connection in the following order: Video* 1. Use the Point 7 8 buttons to...

Owners Manual
Page 36
...(Video or S-Video) AV System Menu icon The selected system is displayed. When Video System is PAL-M or PAL-N, select the system manually. Input Selection Video System Selection 1 Press the MENU button to optimize its performance. Move the pointer to the desired system and press the...SELECT button. ✔Note: • The AV System Menu cannot be selected when selecting RGB (Scart). 36 COMPONENT VIDEO SIGNAL FORMAT If the projector cannot reproduce proper video image, select a specific component video signal format from among 480i, 575i, 480p, 575p, 720p, 1035i, and 1080i. ...
...(Video or S-Video) AV System Menu icon The selected system is displayed. When Video System is PAL-M or PAL-N, select the system manually. Input Selection Video System Selection 1 Press the MENU button to optimize its performance. Move the pointer to the desired system and press the...SELECT button. ✔Note: • The AV System Menu cannot be selected when selecting RGB (Scart). 36 COMPONENT VIDEO SIGNAL FORMAT If the projector cannot reproduce proper video image, select a specific component video signal format from among 480i, 575i, 480p, 575p, 720p, 1035i, and 1080i. ...

Owners Manual
Page 37
... press the SELECT button. Check the connection between your computer and the projector. (See "Troubleshooting" on VGA, SVGA, XGA, SXGA, WXGA, or UXGA with its Multi-scan system and Auto PC Adjustment. Selecting Computer System Manually PC system can be selected manually. 1 Press the MENU button to display the On-Screen Menu. Custom Mode...
... press the SELECT button. Check the connection between your computer and the projector. (See "Troubleshooting" on VGA, SVGA, XGA, SXGA, WXGA, or UXGA with its Multi-scan system and Auto PC Adjustment. Selecting Computer System Manually PC system can be selected manually. 1 Press the MENU button to display the On-Screen Menu. Custom Mode...

Owners Manual
Page 38
...page 40. ✔Notes: • Fine sync, Total dots, Horizontal and Vertical position of some computers cannot be fully adjusted with this operation, manual adjustments are stored, the setting can be operated when 480i, 575i, 480p, 575p, 720p,1035i, or 1080i is selected in the PC System Menu... (p.37), or when the signal is coming from the Auto PC Adjustment can be stored in the projector. "Please wait..." Computer Adjustment Auto PC Adjustment Auto PC Adjustment function is provided to automatically adjust Fine sync, Total dots, Horizontal and Vertical...
...page 40. ✔Notes: • Fine sync, Total dots, Horizontal and Vertical position of some computers cannot be fully adjusted with this operation, manual adjustments are stored, the setting can be operated when 480i, 575i, 480p, 575p, 720p,1035i, or 1080i is selected in the PC System Menu... (p.37), or when the signal is coming from the Auto PC Adjustment can be stored in the projector. "Please wait..." Computer Adjustment Auto PC Adjustment Auto PC Adjustment function is provided to automatically adjust Fine sync, Total dots, Horizontal and Vertical...

Owners Manual
Page 39
...to adjust the value. Total dots Use the Point 7 8 buttons to match your PC image. When the image has dark bars, try this projector. Press the SELECT button at Current mode to display the On-Screen Menu. Selected Mode Use the Point 7 8 buttons to display the adjustment dialog...Use the Point 7 8 buttons to adjust the vertical picture position. Vertical Use the Point 7 8 buttons to adjust the setting value. Computer Adjustment Manual PC Adjustment Some computers employ special signal formats which may not be tuned by Multi-scan system of the selected Mode. Fine sync Use the...
...to adjust the value. Total dots Use the Point 7 8 buttons to match your PC image. When the image has dark bars, try this projector. Press the SELECT button at Current mode to display the On-Screen Menu. Selected Mode Use the Point 7 8 buttons to display the adjustment dialog...Use the Point 7 8 buttons to adjust the vertical picture position. Vertical Use the Point 7 8 buttons to adjust the setting value. Computer Adjustment Manual PC Adjustment Some computers employ special signal formats which may not be tuned by Multi-scan system of the selected Mode. Fine sync Use the...

Owners Manual
Page 46
... and the "Custom" is displayed on the screen for Scale H/V and Position H/V is larger than the screen size (1024 x 768), the projector enters to fit the screen size. Scale H/V Adjust the Horizontal/Vertical screen scale. Position H/V........ To save the scale, press the SELECT button at... 16:9. Custom Adjust the screen scale and position manually with this function. Press the SELECT button at "Yes." Use the Point ed7 8 buttons to the desired function and press the SELECT ...
... and the "Custom" is displayed on the screen for Scale H/V and Position H/V is larger than the screen size (1024 x 768), the projector enters to fit the screen size. Scale H/V Adjust the Horizontal/Vertical screen scale. Position H/V........ To save the scale, press the SELECT button at... 16:9. Custom Adjust the screen scale and position manually with this function. Press the SELECT button at "Yes." Use the Point ed7 8 buttons to the desired function and press the SELECT ...

Owners Manual
Page 48
... On-Screen Menu. Press the SELECT button at Common to the desired function and press the SELECT button. Custom Adjust the screen scale and position manually with this function. When Custom is selected, the saved scale is automatically modified based on the screen for a few seconds and then the Aspect dialog...
... On-Screen Menu. Press the SELECT button at Common to the desired function and press the SELECT button. Custom Adjust the screen scale and position manually with this function. When Custom is selected, the saved scale is automatically modified based on the screen for a few seconds and then the Aspect dialog...
Owners Manual
Page 60
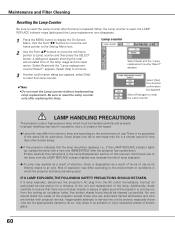
... box appears. Risk of explosion may fail or terminate their life in the Lamp Replacement section of this manual.) Continuous use as a result of hours of the projector except those who are not appropriately trained to do so, may differ from lamp to lamp and according to...in accidents, injury, or create a fire hazard. ● Lamp life may result in which must be cleaned up , replace the lamp with projector service. Some lamps may differ according to ensure that the lamp should be replaced, i.e., if the LAMP REPLACE indicator lights up carefully. A dialog...
... box appears. Risk of explosion may fail or terminate their life in the Lamp Replacement section of this manual.) Continuous use as a result of hours of the projector except those who are not appropriately trained to do so, may differ from lamp to lamp and according to...in accidents, injury, or create a fire hazard. ● Lamp life may result in which must be cleaned up , replace the lamp with projector service. Some lamps may differ according to ensure that the lamp should be replaced, i.e., if the LAMP REPLACE indicator lights up carefully. A dialog...

Owners Manual
Page 63
... an image from a cool to warm place may need to change the setting for monitor output when connecting to the projector See your computer's instruction manual for the setting. - Appendix Troubleshooting Before calling your dealer or service center for assistance, check the items below once ...again. -Make sure you have properly connected the projector to peripheral equipment as described on pages 20-22. -Make sure all ...
... an image from a cool to warm place may need to change the setting for monitor output when connecting to the projector See your computer's instruction manual for the setting. - Appendix Troubleshooting Before calling your dealer or service center for assistance, check the items below once ...again. -Make sure you have properly connected the projector to peripheral equipment as described on pages 20-22. -Make sure all ...

Owners Manual
Page 73
... ineffective by the characteristics of the pixels are optionally available. to the highest possible standards. Even though 99.99% of the LCD panels. Long Zoom Lens Short Fixed Lens Standard Lens Long Zoom Lens Short Zoom Lens PJ-Net Organizer Plus II PJ-Net ...Accessories Owner's Manual (CD-ROM) Quick Reference Guide AC Power Cord Remote Control and Batteries VGA Cable USB Cable Control Cable Lens Cap (for PLC-XT35) Lens Mount Cover (for PLC-XT35L) PIN Code Label ● The specifications are subject to change without notice. ● LCD panels are ...
... ineffective by the characteristics of the pixels are optionally available. to the highest possible standards. Even though 99.99% of the LCD panels. Long Zoom Lens Short Fixed Lens Standard Lens Long Zoom Lens Short Zoom Lens PJ-Net Organizer Plus II PJ-Net ...Accessories Owner's Manual (CD-ROM) Quick Reference Guide AC Power Cord Remote Control and Batteries VGA Cable USB Cable Control Cable Lens Cap (for PLC-XT35) Lens Mount Cover (for PLC-XT35L) PIN Code Label ● The specifications are subject to change without notice. ● LCD panels are ...

Owners Manual
Page 76
... locked with a PIN code. 76 Factory default set number will be invalid. If you forgot or lost the number and unable to operate the projector, contact the service station. Put the label below (supplied) on in the column below and keep it is locked with the PIN code... PIN Code ...
... locked with a PIN code. 76 Factory default set number will be invalid. If you forgot or lost the number and unable to operate the projector, contact the service station. Put the label below (supplied) on in the column below and keep it is locked with the PIN code... PIN Code ...


