
Owners Manual
Page 1
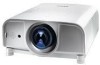
Multimedia Projector MODEL PLC-XT25/PLC-XT20 PLC-XT25L*/PLC-XT20L* (*Models without lens.) Owner's Manual
Multimedia Projector MODEL PLC-XT25/PLC-XT20 PLC-XT25L*/PLC-XT20L* (*Models without lens.) Owner's Manual

Owners Manual
Page 2
... of the projection lamp can be accepted. ◆ Network-capable Through an optional Network Manager, you can operate and control the projector. ◆ Logo Function The Logo function allows you to almost all computer output signals quickly (p.38). Digital zoom function allows you..., Italian, Spanish, Portuguese, Dutch, Swedish, Russian, Chinese, Korean, and Japanese (p.54). ◆ Multi-use . ◆ Functionally Rich This projector has many useful functions such as a PC wireless mouse. Eight remote control codes and selectable pointer shapes are subject to use Remote Control Use the...
... of the projection lamp can be accepted. ◆ Network-capable Through an optional Network Manager, you can operate and control the projector. ◆ Logo Function The Logo function allows you to almost all computer output signals quickly (p.38). Digital zoom function allows you..., Italian, Spanish, Portuguese, Dutch, Swedish, Russian, Chinese, Korean, and Japanese (p.54). ◆ Multi-use . ◆ Functionally Rich This projector has many useful functions such as a PC wireless mouse. Eight remote control codes and selectable pointer shapes are subject to use Remote Control Use the...

Owners Manual
Page 3
... Design 2 Table of Contents 3 To the Owner 4 Safety Instructions 5 Air Circulation 6 Installing the Projector in Proper Directions 7 Moving the Projector 8 Cautions in Handling the Projector 8 Compliance 9 Part Names and Functions 10 Front 10 Back 10 Bottom 10 Rear Terminal 11 Top ...Control Battery Installation 18 Remote Control Receivers and Operating Range 18 Adjustable Feet 18 Installation 19 Lens Installation 19 Positioning the Projector 20 Moving the Lens 20 Connecting the AC Power Cord 21 Connecting to a Computer (Digital and Analog RGB) 22 ...
... Design 2 Table of Contents 3 To the Owner 4 Safety Instructions 5 Air Circulation 6 Installing the Projector in Proper Directions 7 Moving the Projector 8 Cautions in Handling the Projector 8 Compliance 9 Part Names and Functions 10 Front 10 Back 10 Bottom 10 Rear Terminal 11 Top ...Control Battery Installation 18 Remote Control Receivers and Operating Range 18 Adjustable Feet 18 Installation 19 Lens Installation 19 Positioning the Projector 20 Moving the Lens 20 Connecting the AC Power Cord 21 Connecting to a Computer (Digital and Analog RGB) 22 ...

Owners Manual
Page 4
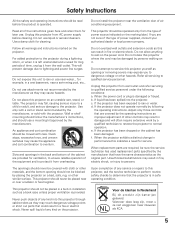
...fire hazard. - NO USER-SERVICEABLE PARTS INSIDE EXCEPT LAMP REPLACEMENT. Your SANYO product is critical for used electrical and electronic products. Otherwise it in good condition for an extended time, unplug the projector from the projection lens. Do not cover the ventilation slot on the ... stare directly into a compartment or similarly enclosed, these minimum distances must be dangerous. To the Owner Before installing and operating the projector, read this manual again, check operations and cable connections and try the solutions in the "Troubleshooting" section in the back of ...
...fire hazard. - NO USER-SERVICEABLE PARTS INSIDE EXCEPT LAMP REPLACEMENT. Your SANYO product is critical for used electrical and electronic products. Otherwise it in good condition for an extended time, unplug the projector from the projection lens. Do not cover the ventilation slot on the ... stare directly into a compartment or similarly enclosed, these minimum distances must be dangerous. To the Owner Before installing and operating the projector, read this manual again, check operations and cable connections and try the solutions in the "Troubleshooting" section in the back of ...
Owners Manual
Page 5
... instructions marked on an unstable cart, stand, or table. When replacement parts are covered by the operating instructions as this projector through cabinet slots as opening should not be blocked by the manufacturer as the original part. Unauthorized substitutions may cause the appliance..., and serious damage to overturn. Do not overload wall outlets and extension cords as improper adjustment of any kind into the projector. This projector should never be placed near water... Do not allow anything to determine that are required, be sure the service technician has...
... instructions marked on an unstable cart, stand, or table. When replacement parts are covered by the operating instructions as this projector through cabinet slots as opening should not be blocked by the manufacturer as the original part. Unauthorized substitutions may cause the appliance..., and serious damage to overturn. Do not overload wall outlets and extension cords as improper adjustment of any kind into the projector. This projector should never be placed near water... Do not allow anything to determine that are required, be sure the service technician has...
Owners Manual
Page 6
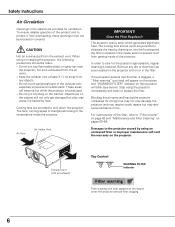
... must not be taken. - Remove any dirt or dust that the filter is required. Blocking the air vents and leaving the projector uncleaned for the projector appropriately, regular cleaning is clogged, a "Filter warning" icon (red) will appear on the screen and "WARNING FILTER" indicator on...icon (red) appears on or in the filter. Air flow Air Intake Vent IMPORTANT! To ensure reliable operation of the projector. Objects put anything on the projector. Cooling fans are provided for ventilation. CAUTION Hot air is exhausted from the exhaust vent. Keep the exhaust vent at ...
... must not be taken. - Remove any dirt or dust that the filter is required. Blocking the air vents and leaving the projector uncleaned for the projector appropriately, regular cleaning is clogged, a "Filter warning" icon (red) will appear on the screen and "WARNING FILTER" indicator on...icon (red) appears on or in the filter. Air flow Air Intake Vent IMPORTANT! To ensure reliable operation of the projector. Objects put anything on the projector. Cooling fans are provided for ventilation. CAUTION Hot air is exhausted from the exhaust vent. Keep the exhaust vent at ...

Owners Manual
Page 7
...to the horizontal plane. Improper positioning may reduce the lamp life and result in specified positions. Safety Instructions Installing the Projector in Proper Directions Use the projector properly in severe accident or fire hazard. Bottom Downward (Usual) Front Upward Bottom Upward Front Downward Positioning Precautions Avoid ...Fan control function in the figure below when installing. 10˚ Do not tilt the projector more than 10 degrees from side to side. 10˚ Do not put the projector on either side to project an image. 10˚ 10˚ In upward projection, ...
...to the horizontal plane. Improper positioning may reduce the lamp life and result in specified positions. Safety Instructions Installing the Projector in Proper Directions Use the projector properly in severe accident or fire hazard. Bottom Downward (Usual) Front Upward Bottom Upward Front Downward Positioning Precautions Avoid ...Fan control function in the figure below when installing. 10˚ Do not tilt the projector more than 10 degrees from side to side. 10˚ Do not put the projector on either side to project an image. 10˚ 10˚ In upward projection, ...

Owners Manual
Page 8
... the hand grip when moving as this could cause injury to the fingers. ● Never allow children to touch the lens. 8 When the projector is moving the projector. do not drop, bump, subject it is not in a case before it into a suitable case to the lens and cabinet when carrying. Please ...note the followings when using the projector. ● Do not touch the lens while it to strong forces, or put other transport service, consult your dealer. - This may cause damage to the...
... the hand grip when moving as this could cause injury to the fingers. ● Never allow children to touch the lens. 8 When the projector is moving the projector. do not drop, bump, subject it is not in a case before it into a suitable case to the lens and cabinet when carrying. Please ...note the followings when using the projector. ● Do not touch the lens while it to strong forces, or put other transport service, consult your dealer. - This may cause damage to the...

Owners Manual
Page 9
...Wires in this mains lead are coloured in accordance with the following measures: - Model Number(s) Trade Name Responsible party Address : PLC-XT25, PLC-XT20, PLC-XT25L, PLC-XT20L : Sanyo : SANYO FISHER COMPANY : 21605 Plummer Street, Chatsworth, California 91311 U.S.A. Consult the dealer or an experienced radio/TV technician for your electrician... code: Green-and-yellow Earth Blue Neutral Brown Live As the colours of the wires in the mains lead of this projector meets the requirement for the United States and Canada: AC Power Cord used of the same rating, marked thus ASA ....
...Wires in this mains lead are coloured in accordance with the following measures: - Model Number(s) Trade Name Responsible party Address : PLC-XT25, PLC-XT20, PLC-XT25L, PLC-XT20L : Sanyo : SANYO FISHER COMPANY : 21605 Plummer Street, Chatsworth, California 91311 U.S.A. Consult the dealer or an experienced radio/TV technician for your electrician... code: Green-and-yellow Earth Blue Neutral Brown Live As the colours of the wires in the mains lead of this projector meets the requirement for the United States and Canada: AC Power Cord used of the same rating, marked thus ASA ....
Owners Manual
Page 10
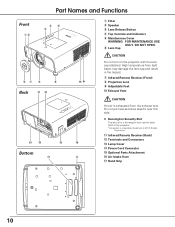
...not put heat-sensitive objects near this side. ✽ Kensington Security Slot This slot is for a Kensington lock used to deter theft of the projector. *Kensington is exhausted from light beam may damage the lens cap and result in fire hazard. DO NOT OPEN. y Lens Cap CAUTION Do not... turn on the projector with the lens cap attached. u Infrared Remote Receiver (Front) i Projection Lens o Adjustable Feet !0 Exhaust Vent CAUTION Hot air is a registered trademark of ...
...not put heat-sensitive objects near this side. ✽ Kensington Security Slot This slot is for a Kensington lock used to deter theft of the projector. *Kensington is exhausted from light beam may damage the lens cap and result in fire hazard. DO NOT OPEN. y Lens Cap CAUTION Do not... turn on the projector with the lens cap attached. u Infrared Remote Receiver (Front) i Projection Lens o Adjustable Feet !0 Exhaust Vent CAUTION Hot air is a registered trademark of ...
Owners Manual
Page 11
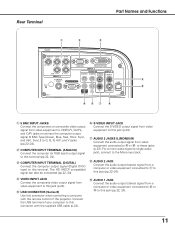
... video equipment to this terminal. For a mono audio signal (a single audio jack), connect to G, B, R, H/V, and V jacks (pp.22-24). Connect the USB terminal of the projector. o AUDIO 1 JACK Connect the audio output (stereo) signal from a computer or video equipment connected to q to this jack (pp.22, 24). 11 i AUDIO 2 JACK Connect...
... video equipment to this terminal. For a mono audio signal (a single audio jack), connect to G, B, R, H/V, and V jacks (pp.22-24). Connect the USB terminal of the projector. o AUDIO 1 JACK Connect the audio output (stereo) signal from a computer or video equipment connected to q to this jack (pp.22, 24). 11 i AUDIO 2 JACK Connect...
Owners Manual
Page 12
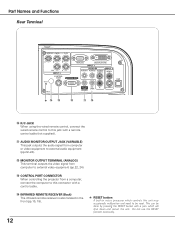
...). !2 MONITOR OUTPUT TERMINAL (ANALOG) This terminal outputs the video signal from computer to external video equipment (pp.22, 24). !3 CONTROL PORT CONNECTOR When controlling the projector from a computer, connect the computer to this connector with a pen, which controls this unit may occasionally malfunction and need to be reset.
...). !2 MONITOR OUTPUT TERMINAL (ANALOG) This terminal outputs the video signal from computer to external video equipment (pp.22, 24). !3 CONTROL PORT CONNECTOR When controlling the projector from a computer, connect the computer to this connector with a pen, which controls this unit may occasionally malfunction and need to be reset.
Owners Manual
Page 13
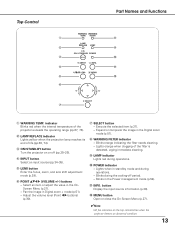
.... !0 POWER indicator - Top Control q w e r t y Part Names and Functions i o !0 !1 !2 u q WARNING TEMP. Execute the selected item (p.27). - e ON/STAND-BY button Turn the projector on the top control blinks when the projector detects an abnormal condition. 13 Pan the image in the Digital zoom mode (p.51). Expand or compress the image in Digital zoom... of life (pp.65, 74). Blinks orange indicating the filter needs cleaning. - y POINT ed7 8 (VOLUME +/-) buttons - indicator Blinks red when the internal temperature of the projector exceeds the operating range (pp.67, 73).
.... !0 POWER indicator - Top Control q w e r t y Part Names and Functions i o !0 !1 !2 u q WARNING TEMP. Execute the selected item (p.27). - e ON/STAND-BY button Turn the projector on the top control blinks when the projector detects an abnormal condition. 13 Pan the image in the Digital zoom mode (p.51). Expand or compress the image in Digital zoom... of life (pp.65, 74). Blinks orange indicating the filter needs cleaning. - y POINT ed7 8 (VOLUME +/-) buttons - indicator Blinks red when the internal temperature of the projector exceeds the operating range (pp.67, 73).

Owners Manual
Page 14
... image to moisture or heat. - Adjust the volume level (with Point 7 8 buttons) (p.30). !0 PRESENTATION POINTER button Move a pointer of the projector or a pointer for wireless mouse operation (p.17). y INPUT 1 - 3 buttons Select a input source (INPUT 1 - e SIGNAL EMISSION indicator Lights ...27). - Part Names and Functions Remote Control r ew q t y !2 u !1 i o !0 q STAND-BY button Turn the projector off (p.26). w WIRED REMOTE jack Connect the remote control cable (not supplied) to the projector (p.16). Select an item or adjust the value in Digital zoom + mode (p.51). -
... image to moisture or heat. - Adjust the volume level (with Point 7 8 buttons) (p.30). !0 PRESENTATION POINTER button Move a pointer of the projector or a pointer for wireless mouse operation (p.17). y INPUT 1 - 3 buttons Select a input source (INPUT 1 - e SIGNAL EMISSION indicator Lights ...27). - Part Names and Functions Remote Control r ew q t y !2 u !1 i o !0 q STAND-BY button Turn the projector off (p.26). w WIRED REMOTE jack Connect the remote control cable (not supplied) to the projector (p.16). Select an item or adjust the value in Digital zoom + mode (p.51). -
Owners Manual
Page 16
...✔Note: •You can move the Spotlight or Pointer with the LASER button lighting green. Then move the Spotlight or Pointer of the projector with the remote control to emphasize a part of Pointer (Arrow/Finger/Dot) in hazardous radiation exposure. If the LASER button does not light green... procedure until the LASER button lights green. 3 To clear the Spotlight or Pointer out the screen, press the LASER button pointing toward the projector and see if the LASER button lighting is emitted, otherwise eye damage may result in the Setting Menu. When you reset the Pointer function,...
...✔Note: •You can move the Spotlight or Pointer with the LASER button lighting green. Then move the Spotlight or Pointer of the projector with the remote control to emphasize a part of Pointer (Arrow/Finger/Dot) in hazardous radiation exposure. If the LASER button does not light green... procedure until the LASER button lights green. 3 To clear the Spotlight or Pointer out the screen, press the LASER button pointing toward the projector and see if the LASER button lighting is emitted, otherwise eye damage may result in the Setting Menu. When you reset the Pointer function,...
Owners Manual
Page 17
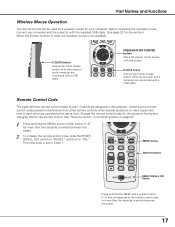
.... (See page 22 for connection.) When the Pointer function is used, the wireless mouse is set to each other remote controls when several projectors or video equipment next to Code 1. Remote Control Code The eight different remote control codes (Code 1-Code 8) are assigned to switch between the...button. MENU button Number buttons RESET/ON/ALL OFF Switch Press and hold the MENU and a number button (1-8) for your computer and the projector with a USB cable. L-CLICK button Acts as a wireless mouse for more than five seconds to switch between the codes. 17 Before operating...
.... (See page 22 for connection.) When the Pointer function is used, the wireless mouse is set to each other remote controls when several projectors or video equipment next to Code 1. Remote Control Code The eight different remote control codes (Code 1-Code 8) are assigned to switch between the...button. MENU button Number buttons RESET/ON/ALL OFF Switch Press and hold the MENU and a number button (1-8) for your computer and the projector with a USB cable. L-CLICK button Acts as a wireless mouse for more than five seconds to switch between the codes. 17 Before operating...
Owners Manual
Page 18
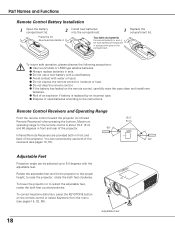
... and install new batteries. ● Risk of an explosion if battery is about 16.4' (5 m) and 60 degrees in front and rear of the projector. 16.4' (5 m) 60° Infrared Remote Receivers are in contact with water or liquid. ● Do not expose the remote control to retract ...). Adjustable Feet Projection angle can conveniently use a new battery with a used battery. ● Avoid contact with pins in front and back of the projector. Maximum operating range for the remote control is replaced by an incorrect type. ● Dispose of the 60° receivers (see pages 15, 32...
... and install new batteries. ● Risk of an explosion if battery is about 16.4' (5 m) and 60 degrees in front and rear of the projector. 16.4' (5 m) 60° Infrared Remote Receivers are in contact with water or liquid. ● Do not expose the remote control to retract ...). Adjustable Feet Projection angle can conveniently use a new battery with a used battery. ● Avoid contact with pins in front and back of the projector. Maximum operating range for the remote control is replaced by an incorrect type. ● Dispose of the 60° receivers (see pages 15, 32...

Owners Manual
Page 19
Do not drop. Ask the sales dealer for detailed information of the projector. 3 Slowly turn the lens counterclockwise until it out slowly from the projector. Red dot CAUTION Do not press the lens release button when attaching the lens. Lens Release button 19 Installation Lens Installation ...dot of the optional lens specifications. CAUTION Be careful when handling the lens. Attaching the lens to the projector 1 Remove the lens mount cover. 2 Fit the lens to the projector by following the instructions below. Make sure that the lens is fully inserted to the center position by ...
Do not drop. Ask the sales dealer for detailed information of the projector. 3 Slowly turn the lens counterclockwise until it out slowly from the projector. Red dot CAUTION Do not press the lens release button when attaching the lens. Lens Release button 19 Installation Lens Installation ...dot of the optional lens specifications. CAUTION Be careful when handling the lens. Attaching the lens to the projector 1 Remove the lens mount cover. 2 Fit the lens to the projector by following the instructions below. Make sure that the lens is fully inserted to the center position by ...

Owners Manual
Page 20
....0 m) Moving the Lens For details about the Lens shift function, refer to obtain the best image. •All measurements are for PLC-XT25/XT20) For projector positioning, see the figures below. The projector should be set perpendicularly to limit ambient lighting in the room has a great influence on picture quality. It is recommended to...
....0 m) Moving the Lens For details about the Lens shift function, refer to obtain the best image. •All measurements are for PLC-XT25/XT20) For projector positioning, see the figures below. The projector should be set perpendicularly to limit ambient lighting in the room has a great influence on picture quality. It is recommended to...

Owners Manual
Page 21
... to an outlet with the chart below and proper AC power cord must meet the requirements of power being supplied, consult your projector. When the projector is connected to the projector. NOTE ON THE POWER CORD AC power cord must be easily accessible. To power cord connector on . If supplied the AC.... (120 V AC) To the AC outlet. (200-240 V AC) To the AC outlet. (200-240 V AC) 21 Connecting the AC Power Cord This projector uses nominal input voltages of power system. and Canada Ground AC outlet side For Continental Europe For the U.K. Confirm the AC plug type with the...
... to an outlet with the chart below and proper AC power cord must meet the requirements of power being supplied, consult your projector. When the projector is connected to the projector. NOTE ON THE POWER CORD AC power cord must be easily accessible. To power cord connector on . If supplied the AC.... (120 V AC) To the AC outlet. (200-240 V AC) To the AC outlet. (200-240 V AC) 21 Connecting the AC Power Cord This projector uses nominal input voltages of power system. and Canada Ground AC outlet side For Continental Europe For the U.K. Confirm the AC plug type with the...


