
Owners Manual
Page 3
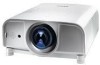
...Table of Contents 3 To the Owner 4 Safety Instructions 5 Air Circulation 6 Installing the Projector in Proper Directions 7 Moving the Projector 8 Cautions in Handling the Projector 8 Compliance 9 Part Names and Functions 10 Front 10 Back 10 Bottom 10 Rear Terminal 11 Top Control 13... Cleaning the Projection Lens 68 Cleaning the Projector Cabinet 68 Appendix 69 Troubleshooting 69 Menu Tree 71 Indicators and Projector Condition 73 Compatible Computer Specifications 75 Technical Specifications 77 Optional Parts 78 PJ Link Notice 79 Configurations of ...
...Table of Contents 3 To the Owner 4 Safety Instructions 5 Air Circulation 6 Installing the Projector in Proper Directions 7 Moving the Projector 8 Cautions in Handling the Projector 8 Compliance 9 Part Names and Functions 10 Front 10 Back 10 Bottom 10 Rear Terminal 11 Top Control 13... Cleaning the Projection Lens 68 Cleaning the Projector Cabinet 68 Appendix 69 Troubleshooting 69 Menu Tree 71 Indicators and Projector Condition 73 Compatible Computer Specifications 75 Technical Specifications 77 Optional Parts 78 PJ Link Notice 79 Configurations of ...

Owners Manual
Page 4
...computer room as possible, otherwise eye damage could result. Improper operation may cause a breakdown or a disaster. NO USER-SERVICEABLE PARTS INSIDE EXCEPT LAMP REPLACEMENT. THIS SYMBOL INDICATES THAT DANGEROUS VOLTAGE CONSTITUTING A RISK OF ELECTRIC SHOCK IS PRESENT WITHIN THIS UNIT. READ... service life of this booklet. If your projector, and can be dangerous. REFER SERVICING TO QUALIFIED SERVICE PERSONNEL. Your SANYO product is critical for an extended time, unplug the projector from the projection lens. If the projector is unused for proper air circulation and cooling...
...computer room as possible, otherwise eye damage could result. Improper operation may cause a breakdown or a disaster. NO USER-SERVICEABLE PARTS INSIDE EXCEPT LAMP REPLACEMENT. THIS SYMBOL INDICATES THAT DANGEROUS VOLTAGE CONSTITUTING A RISK OF ELECTRIC SHOCK IS PRESENT WITHIN THIS UNIT. READ... service life of this booklet. If your projector, and can be dangerous. REFER SERVICING TO QUALIFIED SERVICE PERSONNEL. Your SANYO product is critical for an extended time, unplug the projector from the projection lens. If the projector is unused for proper air circulation and cooling...
Owners Manual
Page 5
... should follow the manufacturer's instructions, and should not be moved with the projector. This projector should never be sure the service technician has used replacement parts specified by a qualified technician to restore the projector to persons. Do not allow anything to the projector. b. Unauthorized substitutions may expose you are required, be placed near the ventilation...
... should follow the manufacturer's instructions, and should not be moved with the projector. This projector should never be sure the service technician has used replacement parts specified by a qualified technician to restore the projector to persons. Do not allow anything to the projector. b. Unauthorized substitutions may expose you are required, be placed near the ventilation...
Owners Manual
Page 6
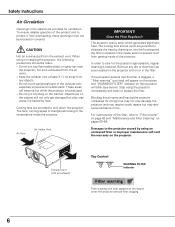
... the filter is exhausted from getting inside of the product and to the temperature inside the projector. Do not touch peripheral parts of the filter, refer to care for a long time may not only damage the projector and may require costly repairs but also may also cause accidents or fire. Cooling fans are... cabinet are provided to dissipate the heat by heat. Air flow Air Intake Vent IMPORTANT! For maintenance of the exhaust vent, especially screws and metallic parts. Do not put anything on the screen when the projector detects filter clogging. 6
... the filter is exhausted from getting inside of the product and to the temperature inside the projector. Do not touch peripheral parts of the filter, refer to care for a long time may not only damage the projector and may require costly repairs but also may also cause accidents or fire. Cooling fans are... cabinet are provided to dissipate the heat by heat. Air flow Air Intake Vent IMPORTANT! For maintenance of the exhaust vent, especially screws and metallic parts. Do not put anything on the screen when the projector detects filter clogging. 6

Owners Manual
Page 8
... the lens. 8 Do not transport the projector by courier or any other transport service in Handling the Projector Do not hold the lens and the peripheral part. Cautions in an unsuitable transport case. Please note the followings when using the projector. ● Do not touch the lens... while it is moving the projector. Safety Instructions Moving the Projector Use the hand grip...
... the lens. 8 Do not transport the projector by courier or any other transport service in Handling the Projector Do not hold the lens and the peripheral part. Cautions in an unsuitable transport case. Please note the followings when using the projector. ● Do not touch the lens... while it is moving the projector. Safety Instructions Moving the Projector Use the hand grip...

Owners Manual
Page 9
...PLC-XT20, PLC-XT25L, PLC-XT20L : Sanyo : SANYO FISHER COMPANY : 21605 Plummer Street, Chatsworth, California 91311 U.S.A. Do not try to correct the interference by the safety earth symbol or coloured green or green-and-yellow. GROUND AC Power Cord for the United Kingdom: This cord is detachable, never use in Subpart B of Part... modifications should be sure that interference will fit into an outlet on the pin face of the equipment. If this projector meets the requirement for your User Instructions. Should you purchased it is coloured brown must be used in a residential ...
...PLC-XT20, PLC-XT25L, PLC-XT20L : Sanyo : SANYO FISHER COMPANY : 21605 Plummer Street, Chatsworth, California 91311 U.S.A. Do not try to correct the interference by the safety earth symbol or coloured green or green-and-yellow. GROUND AC Power Cord for the United Kingdom: This cord is detachable, never use in Subpart B of Part... modifications should be sure that interference will fit into an outlet on the pin face of the equipment. If this projector meets the requirement for your User Instructions. Should you purchased it is coloured brown must be used in a residential ...
Owners Manual
Page 10
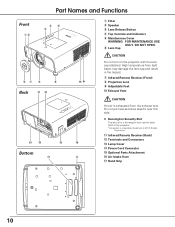
...Receiver (Back) !2 Terminals and Connectors !3 Lamp Cover !4 Power Cord Connector !5 Optional Parts Attachment !6 Air Intake Vent !7 Hand Grip 10 y Lens Cap CAUTION Do not turn on the projector with the lens cap attached. u Infrared Remote Receiver (Front) i Projection Lens o ...Adjustable Feet !0 Exhaust Vent CAUTION Hot air is a registered trademark of the projector. *Kensington is exhausted from light beam may damage the lens cap and result in fire hazard. DO NOT OPEN. High temperature from the exhaust vent. Part Names and Functions Front qw rt e yu i o Back !1 !2 !0...
...Receiver (Back) !2 Terminals and Connectors !3 Lamp Cover !4 Power Cord Connector !5 Optional Parts Attachment !6 Air Intake Vent !7 Hand Grip 10 y Lens Cap CAUTION Do not turn on the projector with the lens cap attached. u Infrared Remote Receiver (Front) i Projection Lens o ...Adjustable Feet !0 Exhaust Vent CAUTION Hot air is a registered trademark of the projector. *Kensington is exhausted from light beam may damage the lens cap and result in fire hazard. DO NOT OPEN. High temperature from the exhaust vent. Part Names and Functions Front qw rt e yu i o Back !1 !2 !0...
Owners Manual
Page 11
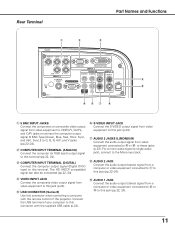
...output signal from a computer or video equipment connected to q to G, B, R, H/V, and V jacks (pp.22-24). Connect the USB terminal of the projector. y S-VIDEO INPUT JACK Connect the S-VIDEO output signal from a computer or video equipment connected to w or e to this connector with the remote control .../Y, Cb/Pb, and Cr/Pr jacks or connect the computer output signal (5 BNC Type [Green, Blue, Red, Horiz. Rear Terminal q w Part Names and Functions e r t o iu y q 5 BNC INPUT JACKS Connect the component or composite video output signal from video equipment to the Mono input...
...output signal from a computer or video equipment connected to q to G, B, R, H/V, and V jacks (pp.22-24). Connect the USB terminal of the projector. y S-VIDEO INPUT JACK Connect the S-VIDEO output signal from a computer or video equipment connected to w or e to this connector with the remote control .../Y, Cb/Pb, and Cr/Pr jacks or connect the computer output signal (5 BNC Type [Green, Blue, Red, Horiz. Rear Terminal q w Part Names and Functions e r t o iu y q 5 BNC INPUT JACKS Connect the component or composite video output signal from video equipment to the Mono input...
Owners Manual
Page 12
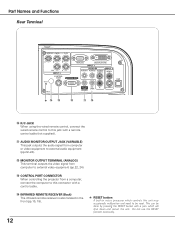
This can be reset. Part Names and Functions Rear Terminal ✽ !4 !3 !2 !1 !0 !0 R/C JACK When using the wired remote control, connect the wired remote control to this jack with a remote control cable (...). !2 MONITOR OUTPUT TERMINAL (ANALOG) This terminal outputs the video signal from computer to external video equipment (pp.22, 24). !3 CONTROL PORT CONNECTOR When controlling the projector from a computer, connect the computer to this unit may occasionally malfunction and need to be done by pressing the RESET button with a control cable. !4 INFRARED...
This can be reset. Part Names and Functions Rear Terminal ✽ !4 !3 !2 !1 !0 !0 R/C JACK When using the wired remote control, connect the wired remote control to this jack with a remote control cable (...). !2 MONITOR OUTPUT TERMINAL (ANALOG) This terminal outputs the video signal from computer to external video equipment (pp.22, 24). !3 CONTROL PORT CONNECTOR When controlling the projector from a computer, connect the computer to this unit may occasionally malfunction and need to be done by pressing the RESET button with a control cable. !4 INFRARED...
Owners Manual
Page 13
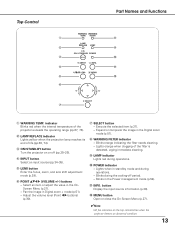
... 8 (VOLUME +/-) buttons - Blinks orange indicating the filter needs cleaning. - e ON/STAND-BY button Turn the projector on the top control blinks when the projector detects an abnormal condition. 13 Pan the image in the Power management mode (p.58). !1 INFO. Blinks in Digital ... during the cooling-off (pp.25-26). Lights orange when clogging of the projector exceeds the operating range (pp.67, 73). i WARNING FILTER indicator - o LAMP indicator Lights red during operations. - Top Control q w e r t y Part Names and Functions i o !0 !1 !2 u q WARNING TEMP. indicator Blinks...
... 8 (VOLUME +/-) buttons - Blinks orange indicating the filter needs cleaning. - e ON/STAND-BY button Turn the projector on the top control blinks when the projector detects an abnormal condition. 13 Pan the image in the Power management mode (p.58). !1 INFO. Blinks in Digital ... during the cooling-off (pp.25-26). Lights orange when clogging of the projector exceeds the operating range (pp.67, 73). i WARNING FILTER indicator - o LAMP indicator Lights red during operations. - Top Control q w e r t y Part Names and Functions i o !0 !1 !2 u q WARNING TEMP. indicator Blinks...

Owners Manual
Page 14
... level (with Point 7 8 buttons) (p.30). !0 PRESENTATION POINTER button Move a pointer of the projector or a pointer for wireless mouse operation (p.17). t ON button Turn the projector on the screen (p.31). Part Names and Functions Remote Control r ew q t y !2 u !1 i o !0 q STAND-BY button Turn the projector off (p.26). w WIRED REMOTE jack Connect the remote control cable (not supplied...
... level (with Point 7 8 buttons) (p.30). !0 PRESENTATION POINTER button Move a pointer of the projector or a pointer for wireless mouse operation (p.17). t ON button Turn the projector on the screen (p.31). Part Names and Functions Remote Control r ew q t y !2 u !1 i o !0 q STAND-BY button Turn the projector off (p.26). w WIRED REMOTE jack Connect the remote control cable (not supplied...
Owners Manual
Page 16
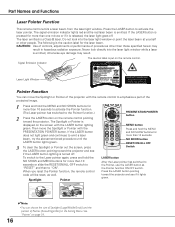
... LASER button is pressed for more than those specified herein may result. Then move the Spotlight or Pointer of the projector with the remote control to emphasize a part of the projected image. 1 Press and hold the MENU and NO SHOW buttons for more than 10 seconds or slide...a laser is released, the laser light goes off . The Spotlight or Pointer is turned off . Press the LASER button pointing toward the projector. See "Pointer" on the screen with the PRESENTATION POINTER button. Spotlight Pointer PRESENTATION POINTER button MENU button Press and hold the NO SHOW and...
... LASER button is pressed for more than those specified herein may result. Then move the Spotlight or Pointer of the projector with the remote control to emphasize a part of the projected image. 1 Press and hold the MENU and NO SHOW buttons for more than 10 seconds or slide...a laser is released, the laser light goes off . The Spotlight or Pointer is turned off . Press the LASER button pointing toward the projector. See "Pointer" on the screen with the PRESENTATION POINTER button. Spotlight Pointer PRESENTATION POINTER button MENU button Press and hold the NO SHOW and...
Owners Manual
Page 17
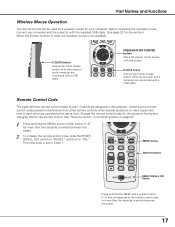
... 1-Code 8) are connected with a USB cable. Switching the remote control codes prevents interference from other remote controls when several projectors or video equipment next to each other are connected with a USB cable. L-CLICK button Acts as right (click) mouse button while the... button Move the pointer on page 57. 1 Press and hold the MENU and a number button (1-8) that for your computer and the projector with this projector. Part Names and Functions Wireless Mouse Operation The remote control can be used , the wireless mouse is not available. See "Remote control" in...
... 1-Code 8) are connected with a USB cable. Switching the remote control codes prevents interference from other remote controls when several projectors or video equipment next to each other are connected with a USB cable. L-CLICK button Acts as right (click) mouse button while the... button Move the pointer on page 57. 1 Press and hold the MENU and a number button (1-8) that for your computer and the projector with this projector. Part Names and Functions Wireless Mouse Operation The remote control can be used , the wireless mouse is not available. See "Remote control" in...
Owners Manual
Page 18
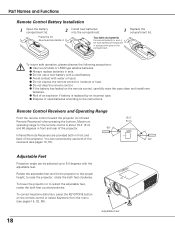
... if battery is about 16.4' (5 m) and 60 degrees in front and rear of the projector. to retract the adjustable feet, rotate the both feet clockwise. To lower the projector or to raise the projector, rotate the both feet counterclockwise. Part Names and Functions Remote Control Battery Installation 1 Open the battery compartment lid. 2 Install new...
... if battery is about 16.4' (5 m) and 60 degrees in front and rear of the projector. to retract the adjustable feet, rotate the both feet clockwise. To lower the projector or to raise the projector, rotate the both feet counterclockwise. Part Names and Functions Remote Control Battery Installation 1 Open the battery compartment lid. 2 Install new...
Owners Manual
Page 54
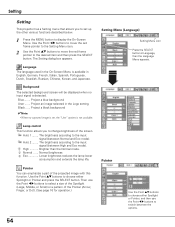
...options. 54 Language The language used in the On-Screen Menu is detected. Project a blue background User ....... Pointer You can emphasize a part of the Pointer (Arrow, Finger, or Dot). (See page 16 for operation.) Setting Menu (Language) Setting Menu icon Press the SELECT...Language, then the Language Menu appears. High Brighter than the Normal mode. The Setting dialog box appears. Auto 2 ........ Setting Setting This projector has a Setting menu that allows you to change brightness of the screen. Project a black background ✔Note: •When no ...
...options. 54 Language The language used in the On-Screen Menu is detected. Project a blue background User ....... Pointer You can emphasize a part of the Pointer (Arrow, Finger, or Dot). (See page 16 for operation.) Setting Menu (Language) Setting Menu icon Press the SELECT...Language, then the Language Menu appears. High Brighter than the Normal mode. The Setting dialog box appears. Auto 2 ........ Setting Setting This projector has a Setting menu that allows you to change brightness of the screen. Project a black background ✔Note: •When no ...
Owners Manual
Page 64
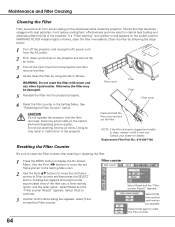
...and any other liquid matter. Doing so may result in internal heat buildup and adversely affect the life of the projector. A dialog box appears showing the total accumulated time of the projector. Select [Yes] to continue. 3 Another confirmation dialog box appears, select [Yes] to Filter counter and ...Press and hold the filter cover and pull out the filter. appears. Filter counter Select Reset and the "Filter counter Reset?" Replacement Filter Part No.: 910-330-7184 Resetting the Filter Counter Be sure to reset the Filter counter after cleaning or replacing the filter. 1 Press the...
...and any other liquid matter. Doing so may result in internal heat buildup and adversely affect the life of the projector. A dialog box appears showing the total accumulated time of the projector. Select [Yes] to continue. 3 Another confirmation dialog box appears, select [Yes] to Filter counter and ...Press and hold the filter cover and pull out the filter. appears. Filter counter Select Reset and the "Filter counter Reset?" Replacement Filter Part No.: 910-330-7184 Resetting the Filter Counter Be sure to reset the Filter counter after cleaning or replacing the filter. 1 Press the...

Owners Manual
Page 65
... injury. The timing when the LAMP REPLACE indicator should light is set properly. The glass can be ordered through your projector : PLC-XT25, PLC-XT20, PLC-XT25L, PLC-XT20L ● Replacement Lamp Type No. : POA-LMP105 (Service Parts No. 610 330 7329) 65 Lift the lamp out of the same type lamp. When ordering, give the following...
... injury. The timing when the LAMP REPLACE indicator should light is set properly. The glass can be ordered through your projector : PLC-XT25, PLC-XT20, PLC-XT25L, PLC-XT20L ● Replacement Lamp Type No. : POA-LMP105 (Service Parts No. 610 330 7329) 65 Lift the lamp out of the same type lamp. When ordering, give the following...
Owners Manual
Page 72
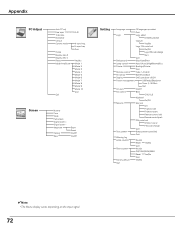
.../Shutdown Timer (1-30 Min) Quit On start On/Off Fan control Slant Off/L1/L2 Highland On/Off Security Key lock Off Projector (all) Projector (part) Remote control (all) Remote control (part) PIN code lock Off/On 1/On 2 PIN code change Quit Test pattern 8 test patterns provided Quit Warning log Lamp counter Hour(s) Reset...
.../Shutdown Timer (1-30 Min) Quit On start On/Off Fan control Slant Off/L1/L2 Highland On/Off Security Key lock Off Projector (all) Projector (part) Remote control (all) Remote control (part) PIN code lock Off/On 1/On 2 PIN code change Quit Test pattern 8 test patterns provided Quit Warning log Lamp counter Hour(s) Reset...


