Owners Manual
Page 3
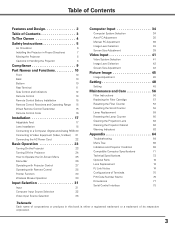
... 42 Screen Size Adjustment 43 Picture Image 45 Image Adjustment 45 Setting 48 Setting 48 Maintenance and Care 56 Filter Instructions 56 Replacing the Filter Cartridge 57 Resetting the Filter Counter 58 Resetting the Scroll Counter 58 Lamp Replacement 59 Resetting the Lamp Counter 60 Cleaning the Projection Lens 62 Cleaning the Projector Cabinet...
... 42 Screen Size Adjustment 43 Picture Image 45 Image Adjustment 45 Setting 48 Setting 48 Maintenance and Care 56 Filter Instructions 56 Replacing the Filter Cartridge 57 Resetting the Filter Counter 58 Resetting the Scroll Counter 58 Lamp Replacement 59 Resetting the Lamp Counter 60 Cleaning the Projection Lens 62 Cleaning the Projector Cabinet...
Owners Manual
Page 14
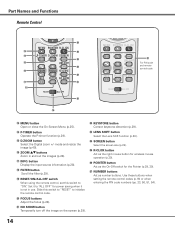
...). @2 KEYSTONE button Correct keystone distortion (p.29). @3 LENS SHIFT button Select the Lens Shift function (p.28). @4 SCREEN button Select the screen size (p.28). @5 R-CLICK button Act as the right mouse button for wireless mouse operation (p.30). @6 POINTER button Act as the On-Off... switch for power saving when it to "ON." Set it is not in and out the images (p.28). !7 INFO. Part Names and Functions Remote Control @6 !3 @5 !4 @4 !5 @3 !6 @2 !7 @1 !8 @0 !9 @7 For PIN code and remote control code. !3 MENU button ...
...). @2 KEYSTONE button Correct keystone distortion (p.29). @3 LENS SHIFT button Select the Lens Shift function (p.28). @4 SCREEN button Select the screen size (p.28). @5 R-CLICK button Act as the right mouse button for wireless mouse operation (p.30). @6 POINTER button Act as the On-Off... switch for power saving when it to "ON." Set it is not in and out the images (p.28). !7 INFO. Part Names and Functions Remote Control @6 !3 @5 !4 @4 !5 @3 !6 @2 !7 @1 !8 @0 !9 @7 For PIN code and remote control code. !3 MENU button ...

Owners Manual
Page 26
...menu for Computer Source. AV System Menu Used to set the projector's operating configurations (pp. 48-55). Setting Menu Used to select the system of selected video source (p. 41). Image Adjust Menu Used to adjust the size of the image. [Normal/True/ Wide/Full screen/Custom/ Keystone/Ceiling/Rear...of each menu, see "Menu Tree" on pages 66-68. Screen Menu Used to select an image level among Standard, Real, and Image 1-10 (p. 38). Image Select Menu Used to adjust the size of the image. [Normal/Wide/Custom/ Keystone/Ceiling/Rear/ Reset] (pp. 43-44). 26 Same function ...
...menu for Computer Source. AV System Menu Used to set the projector's operating configurations (pp. 48-55). Setting Menu Used to select the system of selected video source (p. 41). Image Adjust Menu Used to adjust the size of the image. [Normal/True/ Wide/Full screen/Custom/ Keystone/Ceiling/Rear...of each menu, see "Menu Tree" on pages 66-68. Screen Menu Used to select an image level among Standard, Real, and Image 1-10 (p. 38). Image Select Menu Used to adjust the size of the image. [Normal/Wide/Custom/ Keystone/Ceiling/Rear/ Reset] (pp. 43-44). 26 Same function ...
Owners Manual
Page 28
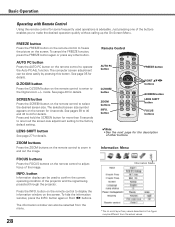
... the buttons enables you to confirm the current operating condition of the projector and the signal being projected through the projector. Press and hold the SCREEN button for details. To hide the ...figure may be done easily by pressing this button. values described in and out the image. FREEZE button Press the FREEZE button on the screen for details. The computer screen ...button Press the SCREEN button on the remote control to enter to select the desired screen size. Press the INFO. The information window can be selected from the actual values. button FREEZE...
... the buttons enables you to confirm the current operating condition of the projector and the signal being projected through the projector. Press and hold the SCREEN button for details. To hide the ...figure may be done easily by pressing this button. values described in and out the image. FREEZE button Press the FREEZE button on the screen for details. The computer screen ...button Press the SCREEN button on the remote control to enter to select the desired screen size. Press the INFO. The information window can be selected from the actual values. button FREEZE...
Owners Manual
Page 39
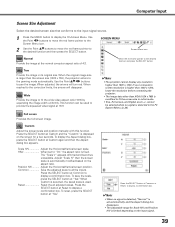
SCREEN MENU Screen Menu icon Normal Provide the image at "Yes." When the original image size is larger than the screen size (1024 x 768), the projector enters to "On," the aspect ratio is fixed. This function can be selected when no signal is ...detected, "Normal" is used to all adjusted values. Full screen Provides the full screen image. ✔Note: • The projector cannot display any resolution higher than XGA...
SCREEN MENU Screen Menu icon Normal Provide the image at "Yes." When the original image size is larger than the screen size (1024 x 768), the projector enters to "On," the aspect ratio is fixed. This function can be selected when no signal is ...detected, "Normal" is used to all adjusted values. Full screen Provides the full screen image. ✔Note: • The projector cannot display any resolution higher than XGA...
Owners Manual
Page 40
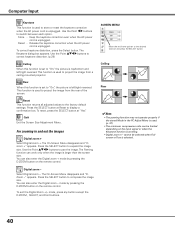
...this function is set to "On," the picture is left /right reversed. Reset This function returns all adjusted values to compress the image size. The Panning function can be selected when Full screen or True is unplugged. Press the SELECT button to the factory default settings....top/bottom and left /right reversed. The On-Screen Menu disappears and "D. Computer Input Keystone This function is used to project the image from a ceiling-mounted projector. Store . . . Release the keystone correction when the AC power cord is selected. 40 To correct keystone distortion, press the...
...this function is set to "On," the picture is left /right reversed. Reset This function returns all adjusted values to compress the image size. The Panning function can be selected when Full screen or True is unplugged. Press the SELECT button to the factory default settings....top/bottom and left /right reversed. The On-Screen Menu disappears and "D. Computer Input Keystone This function is used to project the image from a ceiling-mounted projector. Store . . . Release the keystone correction when the AC power cord is selected. 40 To correct keystone distortion, press the...
Owners Manual
Page 43
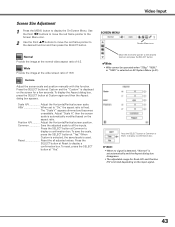
...buttons to move the red frame pointer to display a confirmation box. Press the SELECT button at the wide screen ratio of 4:3. Video Input Screen Size Adjustment 1 Press the MENU button to display a confirmation box. ✔Note: • When no signal is detected, "Normal" is set to...;Note: • Wide cannot be operated when "720p," "1035i," or "1080i" is used. SCREEN MENU Screen Menu icon Normal Provide the image at Custom and the "Custom" is fixed. Custom Adjust the screen scale and position manually with this function. Press the SELECT button at the ...
...buttons to move the red frame pointer to display a confirmation box. Press the SELECT button at the wide screen ratio of 4:3. Video Input Screen Size Adjustment 1 Press the MENU button to display a confirmation box. ✔Note: • When no signal is detected, "Normal" is set to...;Note: • Wide cannot be operated when "720p," "1035i," or "1080i" is used. SCREEN MENU Screen Menu icon Normal Provide the image at Custom and the "Custom" is fixed. Custom Adjust the screen scale and position manually with this function. Press the SELECT button at the ...
Owners Manual
Page 44
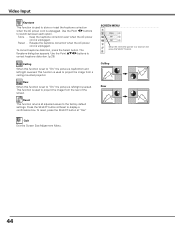
... the SELECT button at "Yes." To correct keystone distortion, press the Select button. This function is used to project the image from a ceiling-mounted projector. Ceiling Rear Quit Exit the Screen Size Adjustment Menu. 44 Release the keystone correction when the AC power cord is top/bottom and left /right reversed. Use the...
... the SELECT button at "Yes." To correct keystone distortion, press the Select button. This function is used to project the image from a ceiling-mounted projector. Ceiling Rear Quit Exit the Screen Size Adjustment Menu. 44 Release the keystone correction when the AC power cord is top/bottom and left /right reversed. Use the...


