

Owners Manual
Page 3
...; Useful Functions for portability, durability, and ease of the projector. This projector utilizes built-in multimedia features, a palette of 16.77 million colors, and matrix liquid crystal display (LCD) technology. ◆ Compact Design This projector is designed compact in rechargeable battery is used as operate and... for the starting-up and Operation." ◆ Memory Viewer Function Insert the dedicated SD card memory into the projector to focus on the top control or remote control (p.54). Blackboards* can capture an image for the screen logo and use . ◆ Capable of ...
...; Useful Functions for portability, durability, and ease of the projector. This projector utilizes built-in multimedia features, a palette of 16.77 million colors, and matrix liquid crystal display (LCD) technology. ◆ Compact Design This projector is designed compact in rechargeable battery is used as operate and... for the starting-up and Operation." ◆ Memory Viewer Function Insert the dedicated SD card memory into the projector to focus on the top control or remote control (p.54). Blackboards* can capture an image for the screen logo and use . ◆ Capable of ...

Owners Manual
Page 4
... 5 Safety Instructions 6 Air Circulation 7 Moving the Projector 7 Installing the Projector in Proper Directions 8 Compliance 9 Part Names and Functions 10 Front 10 Back 10 Bottom 10 Rear Terminal 11 Top Control 12 Remote Control 13 Laser Pointer Function 14 Pointer Function 14... Wireless Mouse Operation 15 Remote Control Code 15 Remote Control Battery Installation 16 Remote Control Operating Range 16 Adjustable Feet 16 Installation 17 Positioning the Projector 17 Connecting the AC Power Cord 18 Connecting to a...
... 5 Safety Instructions 6 Air Circulation 7 Moving the Projector 7 Installing the Projector in Proper Directions 8 Compliance 9 Part Names and Functions 10 Front 10 Back 10 Bottom 10 Rear Terminal 11 Top Control 12 Remote Control 13 Laser Pointer Function 14 Pointer Function 14... Wireless Mouse Operation 15 Remote Control Code 15 Remote Control Battery Installation 16 Remote Control Operating Range 16 Adjustable Feet 16 Installation 17 Positioning the Projector 17 Connecting the AC Power Cord 18 Connecting to a...

Owners Manual
Page 10
...✽ !1 !2 !3 !4 !5 !6 Bottom !7 !2 !8 !9 @0 10 q Alarm Speaker w Infrared Remote Receiver e WIRELESS Indicator r Focus Lever t Projection Lens y Zoom Ring u Top Controls and Indicators i Lens Cover CAUTION Do not turn on a projector with lens cap attached. Do not put heat-sensitive objects near this side. !1 Speaker !2 Air Intake Vent... Operation". ✽ Kensington Security Slot This slot is for the Network function. Refer to deter theft of the projector. * Kensington is exhausted from light beam may damage lens cap and result in fire hazard. High temperature from the...
...✽ !1 !2 !3 !4 !5 !6 Bottom !7 !2 !8 !9 @0 10 q Alarm Speaker w Infrared Remote Receiver e WIRELESS Indicator r Focus Lever t Projection Lens y Zoom Ring u Top Controls and Indicators i Lens Cover CAUTION Do not turn on a projector with lens cap attached. Do not put heat-sensitive objects near this side. !1 Speaker !2 Air Intake Vent... Operation". ✽ Kensington Security Slot This slot is for the Network function. Refer to deter theft of the projector. * Kensington is exhausted from light beam may damage lens cap and result in fire hazard. High temperature from the...

Owners Manual
Page 11
w USB (Series B) In order to operate the computer with the remote control and use the PAGE ed buttons on the remote control during a presentation, connect the USB port of the computer to service the projector. e SERVICE PORT This jack is used to output the incoming RGB analog signal from video ...equipment to this jack (p.20). !4 SD Card Indicator Display the status of Memory viewer). 11 t MONITOR OUT This terminal can be used to the USB terminal with a remote control cable ...
w USB (Series B) In order to operate the computer with the remote control and use the PAGE ed buttons on the remote control during a presentation, connect the USB port of the computer to service the projector. e SERVICE PORT This jack is used to output the incoming RGB analog signal from video ...equipment to this jack (p.20). !4 SD Card Indicator Display the status of Memory viewer). 11 t MONITOR OUT This terminal can be used to the USB terminal with a remote control cable ...

Owners Manual
Page 13
... operation. (p.15) w POWER ON/STAND-BY button Turn the projector on or off the image on the screen. (p.29) @2 R-CLICK button Act as a wired remote control.Wireless remote control does not work when the remote control cable is connected to this jack when using this button within...TIMER button Operate the P-timer function. (p.29) @1 NO SHOW button Temporarily turn off . (pp.22-23) e WIRED REMOTE jack Connect the remote control cable(not supplied) to the projector r SIGNAL EMISSION indicator Lights red while the laser beam is being sent from here (p.14). Refer to its optimum setting....
... operation. (p.15) w POWER ON/STAND-BY button Turn the projector on or off the image on the screen. (p.29) @2 R-CLICK button Act as a wired remote control.Wireless remote control does not work when the remote control cable is connected to this jack when using this button within...TIMER button Operate the P-timer function. (p.29) @1 NO SHOW button Temporarily turn off . (pp.22-23) e WIRED REMOTE jack Connect the remote control cable(not supplied) to the projector r SIGNAL EMISSION indicator Lights red while the laser beam is being sent from here (p.14). Refer to its optimum setting....

Owners Manual
Page 14
...;Note: • You can move the Spotlight or Pointer with the LASER button lighting green. Then move the Spotlight or Pointer of the projector with the remote control to emphasize a part of procedures other people. If the LASER button does not light green and continues to the Pointer, use the...ALL-OFF switch to "RESET" and then to "ON". Press the LASER button pointing toward the projector and see if the LASER button lighting is put on the remote control pointing toward the projector and see if it is emitted, otherwise eye damage may result in the Setting Menu. PRESENTATION ...
...;Note: • You can move the Spotlight or Pointer with the LASER button lighting green. Then move the Spotlight or Pointer of the projector with the remote control to emphasize a part of procedures other people. If the LASER button does not light green and continues to the Pointer, use the...ALL-OFF switch to "RESET" and then to "ON". Press the LASER button pointing toward the projector and see if the LASER button lighting is put on the remote control pointing toward the projector and see if it is emitted, otherwise eye damage may result in the Setting Menu. PRESENTATION ...

Owners Manual
Page 15
See "Connecting to "ON." If you turn on the projector first, then the computer. Switching the remote control codes prevents interference from other remote controls when several projectors or video equipment next to each other are connected with this projector. Remote Control Code Code 1 Code 2 Code 3 Code 4 Code...MENU and IMAGE buttons for your computer. 1 Before operating the wireless mouse, connect your computer and the projector with a USB cable. Wireless Mouse Operation The remote control can be used , the wireless mouse is not available. 2 When a USB cable is connected...
See "Connecting to "ON." If you turn on the projector first, then the computer. Switching the remote control codes prevents interference from other remote controls when several projectors or video equipment next to each other are connected with this projector. Remote Control Code Code 1 Code 2 Code 3 Code 4 Code...MENU and IMAGE buttons for your computer. 1 Before operating the wireless mouse, connect your computer and the projector with a USB cable. Wireless Mouse Operation The remote control can be used , the wireless mouse is not available. 2 When a USB cable is connected...

Owners Manual
Page 16
...new batteries. ● Risk of an explosion if battery is about 16.4'(5 m) and 60 degrees in front of the projector. 16.4' (5 m) 30° 30° Remote control Adjustable Feet Projection angle can be adjusted automatically with the Auto setup function or manually by an incorrect type. ●... Dispose of the projector upward. Maximum operating range for the remote control is replaced by using the remote control or the menu operation (see pages 26, 47-48). 16 Adjustable Feet Feet Lock Latches ...
...new batteries. ● Risk of an explosion if battery is about 16.4'(5 m) and 60 degrees in front of the projector. 16.4' (5 m) 30° 30° Remote control Adjustable Feet Projection angle can be adjusted automatically with the Auto setup function or manually by an incorrect type. ●... Dispose of the projector upward. Maximum operating range for the remote control is replaced by using the remote control or the menu operation (see pages 26, 47-48). 16 Adjustable Feet Feet Lock Latches ...

Owners Manual
Page 19
AUDIO OUT SD (stereo) Unplug the power cords of both the projector and external equipment from the AC outlet before connecting cables. 19 other cables are not supplied with the remote control or using the COMPUTER IN 1/DVI-I /VGA Cable • DVI Cable • USB Cable • Audio ...Cables (*One cable is needed when operating the computer with the projector.) Installation Audio Output USB port Monitor Output Monitor ...
AUDIO OUT SD (stereo) Unplug the power cords of both the projector and external equipment from the AC outlet before connecting cables. 19 other cables are not supplied with the remote control or using the COMPUTER IN 1/DVI-I /VGA Cable • DVI Cable • USB Cable • Audio ...Cables (*One cable is needed when operating the computer with the projector.) Installation Audio Output USB port Monitor Output Monitor ...

Owners Manual
Page 22
...will be shown on the screen (p.50). • When the "Countdown off automatically. • The "1234" is set to operate the projector. What is not entered within three minutes after 30 seconds. Selected Input Source and Lamp Control Lamp control status (See page 51 for a ... status.) ✔Note: • The Filter warning and Lamp replacement icons may appear on the screen depending on the remote control. Basic Operation Turning On the Projector 1 Complete peripheral connections (with a computer, VCR, etc.) before turning on the screen. After entering the four-digit number...
...will be shown on the screen (p.50). • When the "Countdown off automatically. • The "1234" is set to operate the projector. What is not entered within three minutes after 30 seconds. Selected Input Source and Lamp Control Lamp control status (See page 51 for a ... status.) ✔Note: • The Filter warning and Lamp replacement icons may appear on the screen depending on the remote control. Basic Operation Turning On the Projector 1 Complete peripheral connections (with a computer, VCR, etc.) before turning on the screen. After entering the four-digit number...

Owners Manual
Page 23
... blink red, and the cooling fans keep running speed of fans' quietness and speed. Wait until the POWER indicator stops blinking to "On," the projector will be shortened when the normal power-off processing for fan cooling is completed, compared with the time the AC power cord is being cooled...and you can unplug the AC power cord even if the fans are still running. 3 When the projector has cooled down and the projector cannot be turned on the remote control, and "Power off . • The projector can be turned on automatically by connecting the AC power cord to an AC outlet (p.53). &#...
... blink red, and the cooling fans keep running speed of fans' quietness and speed. Wait until the POWER indicator stops blinking to "On," the projector will be shortened when the normal power-off processing for fan cooling is completed, compared with the time the AC power cord is being cooled...and you can unplug the AC power cord even if the fans are still running. 3 When the projector has cooled down and the projector cannot be turned on the remote control, and "Power off . • The projector can be turned on automatically by connecting the AC power cord to an AC outlet (p.53). &#...

Owners Manual
Page 24
... values. Quit Exit this manual. 1 Press the MENU button on the top control or the remote control to display the On-Screen Menu. 2 Use the Point 7 8 buttons to Operate the On-Screen Menu The projector can be adjusted or set via the On-Screen Menu. Top Control MENU button POINT buttons... SELECT button Remote Control POINT buttons MENU button On-Screen Menu SELECT button Menu icon Menu bar Pointer (red...
... values. Quit Exit this manual. 1 Press the MENU button on the top control or the remote control to display the On-Screen Menu. 2 Use the Point 7 8 buttons to Operate the On-Screen Menu The projector can be adjusted or set via the On-Screen Menu. Top Control MENU button POINT buttons... SELECT button Remote Control POINT buttons MENU button On-Screen Menu SELECT button Menu icon Menu bar Pointer (red...

Owners Manual
Page 26
... feature is being displayed, the keystone adjustment will be stored (see page 48). Top Control AUTO SETUP/CANCEL button POINT ed buttons Remote Control KEYSTONE button AUTO SET/CANCEL button POINT ed buttons • The white arrows indicate that there is no correction. • ...distortion. Reduce the lower width with the Point e button. When the image is provided to automatically correct Keystone distortion according to the projector's tilt and adjust the computer display parameters (Fine sync, Total dots, and Picture position) by pressing the KEYSTONE button on the input...
... feature is being displayed, the keystone adjustment will be stored (see page 48). Top Control AUTO SETUP/CANCEL button POINT ed buttons Remote Control KEYSTONE button AUTO SET/CANCEL button POINT ed buttons • The white arrows indicate that there is no correction. • ...distortion. Reduce the lower width with the Point e button. When the image is provided to automatically correct Keystone distortion according to the projector's tilt and adjust the computer display parameters (Fine sync, Total dots, and Picture position) by pressing the KEYSTONE button on the input...

Owners Manual
Page 27
... pointer to the Sound Menu icon. 2 Use the Point ed buttons to move the red frame pointer to turn the sound back on the remote control to adjust the volume. MUTE button Volume Dialog Box Approximate level of the volume. The dialog box disappears after 4 seconds. Volume Press...sound is turned off the sound. buttons. Exit the Sound Menu. 27 Basic Operation Sound Adjustment Direct Operation Volume Press the VOLUME+/- Top Control Remote Control VOLUME+/buttons VOL- Sound Menu Sound Menu icon Approximate level of the volume. The volume dialog box appears on , press the MUTE ...
... pointer to the Sound Menu icon. 2 Use the Point ed buttons to move the red frame pointer to turn the sound back on the remote control to adjust the volume. MUTE button Volume Dialog Box Approximate level of the volume. The dialog box disappears after 4 seconds. Volume Press...sound is turned off the sound. buttons. Exit the Sound Menu. 27 Basic Operation Sound Adjustment Direct Operation Volume Press the VOLUME+/- Top Control Remote Control VOLUME+/buttons VOL- Sound Menu Sound Menu icon Approximate level of the volume. The volume dialog box appears on , press the MUTE ...

Owners Manual
Page 28
... COMPUTER button AUTO PC button VIDEO button NETWORK button POINT ed buttons FREEZE button AUTO PC button Press the AUTO PC button on the remote control to make the desired operation quickly without calling up and Operation" for details about the network input. function. See page 33 for ... FREEZE button again or press any other buttons. 28 See page 39 for details. LAMP CONTROL button Press the LAMP CONTROL button on the remote control to select the input source. Just pressing one of the buttons enables you to select the lamp mode for the description of other button...
... COMPUTER button AUTO PC button VIDEO button NETWORK button POINT ed buttons FREEZE button AUTO PC button Press the AUTO PC button on the remote control to make the desired operation quickly without calling up and Operation" for details about the network input. function. See page 33 for ... FREEZE button again or press any other buttons. 28 See page 39 for details. LAMP CONTROL button Press the LAMP CONTROL button on the remote control to select the input source. Just pressing one of the buttons enables you to select the lamp mode for the description of other button...
Owners Manual
Page 29
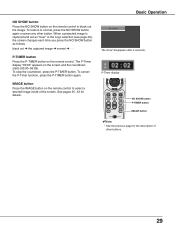
..." disappears after 4 seconds. To restore to black out the image. The P-Timer display "00:00" appears on the remote control. NO SHOW button Press the NO SHOW button on the remote control to normal, press the NO SHOW button again or press any other buttons. 29 black out ➜ the captured... P-TIMER button Press the P-TIMER button on the screen and the countdown starts (00:00-59:59). IMAGE button Press the IMAGE button on the remote control to select a desired image mode of other button. When a projected image is captured and set as "User" in the Logo selection (see page ...
..." disappears after 4 seconds. To restore to black out the image. The P-Timer display "00:00" appears on the remote control. NO SHOW button Press the NO SHOW button on the remote control to normal, press the NO SHOW button again or press any other buttons. 29 black out ➜ the captured... P-TIMER button Press the P-TIMER button on the screen and the countdown starts (00:00-59:59). IMAGE button Press the IMAGE button on the remote control to select a desired image mode of other button. When a projected image is captured and set as "User" in the Logo selection (see page ...

Owners Manual
Page 30
...red arrow) to either Computer 1 (Analog) or Computer 2 by pressing the INPUT button on the top control or press the COMPUTER button on the remote control. Use the Point 7 8 buttons to move the red frame pointer to the Input Menu icon. 2 Use the Point ed buttons to move ... (p.51). 30 Computer 2 Move the pointer (red arrow) to RGB. Top Control INPUT button Computer 1 (Analog) Computer 1 (Digital) Computer 2 Video Wired Remote Control Wireless COMPUTER button Computer 1 (Analog) Computer 1 (Digital) Menu Operation 1 Press the MENU button to RGB and then press the SELECT button.
...red arrow) to either Computer 1 (Analog) or Computer 2 by pressing the INPUT button on the top control or press the COMPUTER button on the remote control. Use the Point 7 8 buttons to move the red frame pointer to the Input Menu icon. 2 Use the Point ed buttons to move ... (p.51). 30 Computer 2 Move the pointer (red arrow) to RGB. Top Control INPUT button Computer 1 (Analog) Computer 1 (Digital) Computer 2 Video Wired Remote Control Wireless COMPUTER button Computer 1 (Analog) Computer 1 (Digital) Menu Operation 1 Press the MENU button to RGB and then press the SELECT button.

Owners Manual
Page 31
... the source that you want to Computer 1 (Digital) and press the SELECT button. Should the specification be changed, this projector may not display the digital content protected by pressing the INPUT button on the top control or press the COMPUTER button on the... digital entertainment content delivered by Digital Content Protection, LLC. Top Control INPUT button Computer 1 (Analog) Computer 1 (Digital) Computer 2 Video Wired Remote Control Wireless COMPUTER button Menu Operation 1 Press the MENU button to "On1" or "On2", the input signal will be selected through Menu operation ...
... the source that you want to Computer 1 (Digital) and press the SELECT button. Should the specification be changed, this projector may not display the digital content protected by pressing the INPUT button on the top control or press the COMPUTER button on the... digital entertainment content delivered by Digital Content Protection, LLC. Top Control INPUT button Computer 1 (Analog) Computer 1 (Digital) Computer 2 Video Wired Remote Control Wireless COMPUTER button Menu Operation 1 Press the MENU button to "On1" or "On2", the input signal will be selected through Menu operation ...

Owners Manual
Page 33
...Auto PC adjustment is provided to automatically adjust Fine sync, Total dots, Horizontal and Vertical positions to conform to display the On-Screen Menu. Remote Control AUTO PC button Menu Operation Auto PC Adj. 1 Press the MENU button to your computer. When the image is not provided properly ...System Menu (p.32), or when the signal is coming from the Auto PC Adjustment can be operated directly by selecting a Mode (1-5) in the projector. Once the parameters are required (pp.34-35). • The Auto PC Adjustment cannot be fully adjusted with the Auto PC Adjustment function.
...Auto PC adjustment is provided to automatically adjust Fine sync, Total dots, Horizontal and Vertical positions to conform to display the On-Screen Menu. Remote Control AUTO PC button Menu Operation Auto PC Adj. 1 Press the MENU button to your computer. When the image is not provided properly ...System Menu (p.32), or when the signal is coming from the Auto PC Adjustment can be operated directly by selecting a Mode (1-5) in the projector. Once the parameters are required (pp.34-35). • The Auto PC Adjustment cannot be fully adjusted with the Auto PC Adjustment function.

Owners Manual
Page 36
... is provided in a bright room. Real Picture mode with the user preset image mode in the Image Adjust Menu (see pages 37-38). 36 Remote Control IMAGE button IMAGE button Dynamic Standard Real Blackboard(Green) Image 1 Image 2 Image 3 Image 4 Image Select Menu icon Image Select Menu Move...desired image mode from among Dynamic, Standard, Real, Blackboard (Green), Image 1, Image 2, Image 3, and Image 4 by pressing the IMAGE button on the projector. Real Picture mode with the user preset image mode in a bright room. Dynamic For viewing pictures in the Image Adjust Menu (see pages 37-38...
... is provided in a bright room. Real Picture mode with the user preset image mode in the Image Adjust Menu (see pages 37-38). 36 Remote Control IMAGE button IMAGE button Dynamic Standard Real Blackboard(Green) Image 1 Image 2 Image 3 Image 4 Image Select Menu icon Image Select Menu Move...desired image mode from among Dynamic, Standard, Real, Blackboard (Green), Image 1, Image 2, Image 3, and Image 4 by pressing the IMAGE button on the projector. Real Picture mode with the user preset image mode in a bright room. Dynamic For viewing pictures in the Image Adjust Menu (see pages 37-38...


