
Owners Manual
Page 2
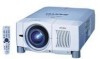
... into a compartment or similarly enclosed, the minimum distances must be dangerous. G This projector should be set in the "Trouble-shooting" section of the end of this manual again, check operations and cable connections and try the solutions in the way indicated. SIDE...for a considerable time. READ AND KEEP THIS OWNER'S MANUAL FOR LATER USE. REFER SERVICING TO QUALIFIED SERVICE PERSONNEL. This projector provides many convenient features and functions. Operating the projector properly enables you purchased the projector or the service center. Do not look into the ...
... into a compartment or similarly enclosed, the minimum distances must be dangerous. G This projector should be set in the "Trouble-shooting" section of the end of this manual again, check operations and cable connections and try the solutions in the way indicated. SIDE...for a considerable time. READ AND KEEP THIS OWNER'S MANUAL FOR LATER USE. REFER SERVICING TO QUALIFIED SERVICE PERSONNEL. This projector provides many convenient features and functions. Operating the projector properly enables you purchased the projector or the service center. Do not look into the ...
Owners Manual
Page 4
... of the equipment. Fuse covers are designed to stop operation of the plug. Should the fuse need to defeat this projector meets the requirement for use the plug with the instruction manual, may not correspond with the coloured markings identifying the terminals in accordance with the cover omitted. The wire which is...
... of the equipment. Fuse covers are designed to stop operation of the plug. Should the fuse need to defeat this projector meets the requirement for use the plug with the instruction manual, may not correspond with the coloured markings identifying the terminals in accordance with the cover omitted. The wire which is...

Owners Manual
Page 5
... DESIGN 6 COMPUTER MODE 25 SELECTING INPUT SOURCE 25 PREPARATION 7 SELECTING COMPUTER SYSTEM COMPATIBLE COMPUTER SPECIFICATIONS 25 27 PC ADJUSTMENT 28 NAME OF EACH PART OF PROJECTOR 7 AUTO PC ADJUSTMENT 28 SETTING-UP PROJECTOR 8 MANUAL PC ADJUSTMENT 29 CONNECTING AC POWER CORD 8 PICTURE IMAGE ADJUSTMENT 31 LENS INSTALLATION 9 IMAGE LEVEL SELECT 31 POSITIONING...
... DESIGN 6 COMPUTER MODE 25 SELECTING INPUT SOURCE 25 PREPARATION 7 SELECTING COMPUTER SYSTEM COMPATIBLE COMPUTER SPECIFICATIONS 25 27 PC ADJUSTMENT 28 NAME OF EACH PART OF PROJECTOR 7 AUTO PC ADJUSTMENT 28 SETTING-UP PROJECTOR 8 MANUAL PC ADJUSTMENT 29 CONNECTING AC POWER CORD 8 PICTURE IMAGE ADJUSTMENT 31 LENS INSTALLATION 9 IMAGE LEVEL SELECT 31 POSITIONING...

Owners Manual
Page 6
... for troublesome manual adjustment of your computer. N Progressive Scan Function This function converts interlace video signals into 1280 x 1024 dots. N Compatibility This projector widely accepts various video and computer input signals including; This projector is shipped with this projector for computer ...it easy to almost all computer output signals quickly. FEATURES AND DESIGN This Multimedia Projector is designed with Remote Control Unit only. N Keystone Correction Positioning height of signals from a computer between SXGA (1280 x 1024) and UXGA (1600 x 1200) is not in a...
... for troublesome manual adjustment of your computer. N Progressive Scan Function This function converts interlace video signals into 1280 x 1024 dots. N Compatibility This projector widely accepts various video and computer input signals including; This projector is shipped with this projector for computer ...it easy to almost all computer output signals quickly. FEATURES AND DESIGN This Multimedia Projector is designed with Remote Control Unit only. N Keystone Correction Positioning height of signals from a computer between SXGA (1280 x 1024) and UXGA (1600 x 1200) is not in a...

Owners Manual
Page 9
... image. PREPARATION LENS INSTALLATION Before setting up a projector, install Projection Lens on a flat projection surface. For installation, refer to installation manual supplied to page 22.) MOVED UP OR DOWN 9 SCREEN VENTILATION This projector is used and prepare suitable lens. G Do ...Projector. 1. G Keep rear grill at least 3 feet (1 m) away from taking cooling air through bottom vent. jector. This function makes it easy to protect it from overheating. NOTE; PLC-EF31N is designed to ensure proper ventilation and avoid a possible risk of a Projection Lens, refer to manual...
... image. PREPARATION LENS INSTALLATION Before setting up a projector, install Projection Lens on a flat projection surface. For installation, refer to installation manual supplied to page 22.) MOVED UP OR DOWN 9 SCREEN VENTILATION This projector is used and prepare suitable lens. G Do ...Projector. 1. G Keep rear grill at least 3 feet (1 m) away from taking cooling air through bottom vent. jector. This function makes it easy to protect it from overheating. NOTE; PLC-EF31N is designed to ensure proper ventilation and avoid a possible risk of a Projection Lens, refer to manual...
Owners Manual
Page 26
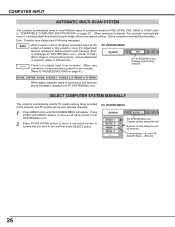
...connected signal as PC system provided in this projector and PC system can be also selected manually. 1 Press MENU button and ON-SCREEN MENU will appear. PC SYSTEM MENU PC SYSTEM Menu icon Displays system being selected. D-VGA, D-SVGA, D-XGA, D-SXGA 1, D-SXGA 2, D-SXGA3 or D-UXGA When digital ...is received on DVI terminal, above message is displayed on VGA, SVGA, XGA, SXGA or UXGA (refer to P29 and 30.) There is no signal input from computer. SELECT COMPUTER SYSTEM MANUALLY This projector automatically selects PC system among those provided in PC ADJUST Menu. (P29, 30)...
...connected signal as PC system provided in this projector and PC system can be also selected manually. 1 Press MENU button and ON-SCREEN MENU will appear. PC SYSTEM MENU PC SYSTEM Menu icon Displays system being selected. D-VGA, D-SVGA, D-XGA, D-SXGA 1, D-SXGA 2, D-SXGA3 or D-UXGA When digital ...is received on DVI terminal, above message is displayed on VGA, SVGA, XGA, SXGA or UXGA (refer to P29 and 30.) There is no signal input from computer. SELECT COMPUTER SYSTEM MANUALLY This projector automatically selects PC system among those provided in PC ADJUST Menu. (P29, 30)...

Owners Manual
Page 28
...Move a red frame pointer to your computer. icon and press SELECT button. 28 This Auto PC Adjustment can not be memorized in this function, manual adjustments are memorized, setting can be also executed by selecting Mode in Digital Signal input on DVI terminal and "RGB", "575p", "720p (HDTV)",...operated in PC SYSTEM Menu (P26). button on Top Control or on PC SYSTEM Menu (P26). When image is not provided properly through this projector. icon and then press SELECT button twice. Once parameters are required. (Refer to page 29, 30.) G Auto PC Adjustment function cannot be...
...Move a red frame pointer to your computer. icon and press SELECT button. 28 This Auto PC Adjustment can not be memorized in this function, manual adjustments are memorized, setting can be also executed by selecting Mode in Digital Signal input on DVI terminal and "RGB", "575p", "720p (HDTV)",...operated in PC SYSTEM Menu (P26). button on Top Control or on PC SYSTEM Menu (P26). When image is not provided properly through this projector. icon and then press SELECT button twice. Once parameters are required. (Refer to page 29, 30.) G Auto PC Adjustment function cannot be...

Owners Manual
Page 29
... of selected Mode. Horizontal Adjusts horizontal picture position. Vertical Adjusts vertical picture position. This projector has a Manual PC Adjustment to enable you want to match with those parameters manually adjusted. Press POINT LEFT/RIGHT button to move a red frame pointer to PC ADJUST ...However, some computers employ special signal formats which are different from display. Clamp Adjusts clamp position. COMPUTER INPUT MANUAL PC ADJUSTMENT This projector can automatically tune to recall setting for a specific computer whenever you use it. This enables you to display...
... of selected Mode. Horizontal Adjusts horizontal picture position. Vertical Adjusts vertical picture position. This projector has a Manual PC Adjustment to enable you want to match with those parameters manually adjusted. Press POINT LEFT/RIGHT button to move a red frame pointer to PC ADJUST ...However, some computers employ special signal formats which are different from display. Clamp Adjusts clamp position. COMPUTER INPUT MANUAL PC ADJUSTMENT This projector can automatically tune to recall setting for a specific computer whenever you use it. This enables you to display...

Owners Manual
Page 32
.../RIGHT buttons to move a red frame pointer to be operated when "RGB", "1035i (HDTV)", "1080i50 (HDTV)" or "1080i60 (HDTV)" is selected on . 3 Store To store manually preset image, move a red frame pointer to set and then press SELECT button. Dialog box display is displayed. Image Level Menu will appear. Quit Closes...
.../RIGHT buttons to move a red frame pointer to be operated when "RGB", "1035i (HDTV)", "1080i50 (HDTV)" or "1080i60 (HDTV)" is selected on . 3 Store To store manually preset image, move a red frame pointer to set and then press SELECT button. Dialog box display is displayed. Image Level Menu will appear. Quit Closes...

Owners Manual
Page 35
... it is 1035i, 1080i50 or 1080i60, select system manually first. When Video System is necessary to select a specific broadcast signal format among 480i, 575i, 480p, 575p, 720p, 1035i , 1080i50 or 1080i60. COMPONENT VIDEO SIGNAL FORMAT If projector cannot reproduce proper video image, it is PAL-M... or PAL-N, select system manually first. Press POINT LEFT/RIGHT buttons to move a red frame pointer to AV SYSTEM Menu icon. 2...
... it is 1035i, 1080i50 or 1080i60, select system manually first. When Video System is necessary to select a specific broadcast signal format among 480i, 575i, 480p, 575p, 720p, 1035i , 1080i50 or 1080i60. COMPONENT VIDEO SIGNAL FORMAT If projector cannot reproduce proper video image, it is PAL-M... or PAL-N, select system manually first. Press POINT LEFT/RIGHT buttons to move a red frame pointer to AV SYSTEM Menu icon. 2...
Owners Manual
Page 44
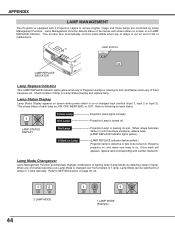
...12 30 Lamp Replace Indicator This LAMP REPLACE indicator lights yellow when any of lamp on Lamp Status Display and replace lamp. Restart a projector on, and make sure lamp is on Lamp Projection Lamp is nearing its end, and flashes when any of Projection Lamps is nearing ... with 2 Projection Lamps to 1 lamp. This function also automatically controls Lamp Mode when any of lamp. Refer to 2 lamps or 1 lamp manually. Refer to be switched to following for end of life or malfunctions. When image becomes darker or color becomes unnatural, replace lamp. (LAMP REPLACE...
...12 30 Lamp Replace Indicator This LAMP REPLACE indicator lights yellow when any of lamp on Lamp Status Display and replace lamp. Restart a projector on, and make sure lamp is on Lamp Projection Lamp is nearing its end, and flashes when any of Projection Lamps is nearing ... with 2 Projection Lamps to 1 lamp. This function also automatically controls Lamp Mode when any of lamp. Refer to 2 lamps or 1 lamp manually. Refer to be switched to following for end of life or malfunctions. When image becomes darker or color becomes unnatural, replace lamp. (LAMP REPLACE...

Owners Manual
Page 46
... the unit by pieces of lamp explosion. When ordering a Projection Lamp, give the following information to the environment of use of this manual. ) Continuous use . G Lamp lifetime may differ according to ensure that the lamp should be replaced, i.e., if the LAMP REPLACE ...REPLACEMENT LAMP Replacement Lamp can be ordered through your projector : G Replacement Lamp Type No. : PLC-EF31/EF31NL/EF31N POA-LMP39 (Service Parts No. 610 292 4848) LAMP HANDLING PRECAUTIONS This projector uses a high-pressure lamp which the projector and lamp are familiar with the LAMP REPLACE INDICATOR ...
... the unit by pieces of lamp explosion. When ordering a Projection Lamp, give the following information to the environment of use of this manual. ) Continuous use . G Lamp lifetime may differ according to ensure that the lamp should be replaced, i.e., if the LAMP REPLACE ...REPLACEMENT LAMP Replacement Lamp can be ordered through your projector : G Replacement Lamp Type No. : PLC-EF31/EF31NL/EF31N POA-LMP39 (Service Parts No. 610 292 4848) LAMP HANDLING PRECAUTIONS This projector uses a high-pressure lamp which the projector and lamp are familiar with the LAMP REPLACE INDICATOR ...

Owners Manual
Page 49
... length : 650±20nm) Owner's Manual AC Power Cord Wireless/Wired Remote Control Transmitter... x 1.3" x 7.6" (55mm x 34mm x 192mm) : 0.36 lbs (165 g) (including batteries) : Class II Laser (Max. G LCD panels are effective, however a tiny fraction of the pixels (0.01% or less) may be ineffective by the characteristics of Pixels Color System High ...Storage Temperature Remote Control Transmitter Accessories Multi-media Projector 17.3" x 9.1" x 23.8" (439 mm x 230 mm x 605.6 mm) 46.3 lbs (21 kg) Model PLC-EF31/EF31NL, 49.7 lbs (22.5 kg) Model PLC-EF31N 1.8" TFT Active Matrix type, 3...
... length : 650±20nm) Owner's Manual AC Power Cord Wireless/Wired Remote Control Transmitter... x 1.3" x 7.6" (55mm x 34mm x 192mm) : 0.36 lbs (165 g) (including batteries) : Class II Laser (Max. G LCD panels are effective, however a tiny fraction of the pixels (0.01% or less) may be ineffective by the characteristics of Pixels Color System High ...Storage Temperature Remote Control Transmitter Accessories Multi-media Projector 17.3" x 9.1" x 23.8" (439 mm x 230 mm x 605.6 mm) 46.3 lbs (21 kg) Model PLC-EF31/EF31NL, 49.7 lbs (22.5 kg) Model PLC-EF31N 1.8" TFT Active Matrix type, 3...


