

GXDB Remote Guide
Page 1
...OK ENTER Move the cursor in owner's manual first. Switch from one Video input source to normal TV viewing. Enable / disable digital CC caption options CC1-CC6 (digital) or CC1-CC4 CAPTION (analog...on -screen menu. Displays SLEEP timer. ON TIMER Displays the On-screen Help menu with your Sanyo HDTV. Power On or power Off your HDTV to increase - Set the loudness level of three...Hold for channel 6. USB CC PIX SHAPE AUDIO CAPTION SLEEP PICTURE SOUND HELP ON TIMER GXDB 1-800-877-5032 Cycle through the predeterSOUND mined sound modes. NOTE: Press and hold the 1 key to a channel ...
...OK ENTER Move the cursor in owner's manual first. Switch from one Video input source to normal TV viewing. Enable / disable digital CC caption options CC1-CC6 (digital) or CC1-CC4 CAPTION (analog...on -screen menu. Displays SLEEP timer. ON TIMER Displays the On-screen Help menu with your Sanyo HDTV. Power On or power Off your HDTV to increase - Set the loudness level of three...Hold for channel 6. USB CC PIX SHAPE AUDIO CAPTION SLEEP PICTURE SOUND HELP ON TIMER GXDB 1-800-877-5032 Cycle through the predeterSOUND mined sound modes. NOTE: Press and hold the 1 key to a channel ...
Owners Manual
Page 4
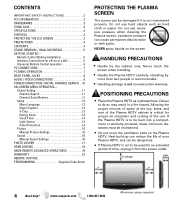
... Manual Sound Settings 16 PHOTO VIEWER 17 HDMI LINKING 18 GXDB REMOTE ADVANCED OPERATIONS 19 WARRANTY 23 REMOTE CONTROL PROGRAMMING Supplied Code Sheet PROTECTING THE PLASMA SCREEN The screen can cause permanent discoloration or dark spots. Failure to...JACKS 8 AUDIO / VIDEO CONNECTIONS 9 POWER CONNECTION / INITIAL CHANNEL SEARCH . .10 ON-SCREEN MENU OPERATION- POSITIONING PRECAUTIONS • Place this Plasma HDTV as hard cloth or paper. CONTENTS IMPORTANT SAFETY INSTRUCTIONS 2 FCC INFORMATION 3 TRADEMARKS 3 THINK GAIA 3 SPECIFICATIONS 3 DISPOSAL 3 PROTECTING THE LCD...
... Manual Sound Settings 16 PHOTO VIEWER 17 HDMI LINKING 18 GXDB REMOTE ADVANCED OPERATIONS 19 WARRANTY 23 REMOTE CONTROL PROGRAMMING Supplied Code Sheet PROTECTING THE PLASMA SCREEN The screen can cause permanent discoloration or dark spots. Failure to...JACKS 8 AUDIO / VIDEO CONNECTIONS 9 POWER CONNECTION / INITIAL CHANNEL SEARCH . .10 ON-SCREEN MENU OPERATION- POSITIONING PRECAUTIONS • Place this Plasma HDTV as hard cloth or paper. CONTENTS IMPORTANT SAFETY INSTRUCTIONS 2 FCC INFORMATION 3 TRADEMARKS 3 THINK GAIA 3 SPECIFICATIONS 3 DISPOSAL 3 PROTECTING THE LCD...
Owners Manual
Page 7
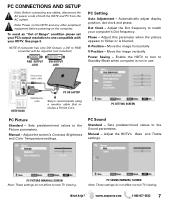
..., a DVI to one compatible with your computer's Dot frequency. Stereo mini audio cable HDTV BACK PC OR LAPTOP RGB Monitor cable Sanyo recommends using a monitor cable that includes a Ferrite Core. Adjust the screen's Contrast, Brightness and Color Temperature settings. H-Position - ...PC SETTING SCREEN PC Picture Standard - PC Sound Standard - Adjust the HDTV's Bass and Treble settings. PC SOUND (MANUAL) SCREEN Note: These settings do not affect normal TV viewing. Adjust this parameter when the picture appears to flicker or is ...
..., a DVI to one compatible with your computer's Dot frequency. Stereo mini audio cable HDTV BACK PC OR LAPTOP RGB Monitor cable Sanyo recommends using a monitor cable that includes a Ferrite Core. Adjust the screen's Contrast, Brightness and Color Temperature settings. H-Position - ...PC SETTING SCREEN PC Picture Standard - PC Sound Standard - Adjust the HDTV's Bass and Treble settings. PC SOUND (MANUAL) SCREEN Note: These settings do not affect normal TV viewing. Adjust this parameter when the picture appears to flicker or is ...

Owners Manual
Page 12
... Caption's Font, Background and Foreground display may be customized: Navigate the cursor (highlight.) Select / set the current time and on-time with the picture and sound. MENU LANGUAGE Choose between English, Spanish and French for your On Screen menu's display language. NOTE: Local broadcasters decide which caption signals to select Setup...
... Caption's Font, Background and Foreground display may be customized: Navigate the cursor (highlight.) Select / set the current time and on-time with the picture and sound. MENU LANGUAGE Choose between English, Spanish and French for your On Screen menu's display language. NOTE: Local broadcasters decide which caption signals to select Setup...
Owners Manual
Page 16
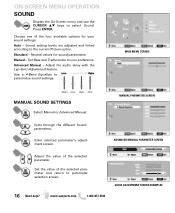
... use the CURSOR LM keys to personalize sound settings. Press ENTER. Set Bass and Treble levels to your sound settings: Auto - Advanced Manual - Choose one of the selected parameter. Manual - MAIN MENU SCREEN MANUAL SOUND SETTINGS Select Manual or Advanced Manual. Standard... SCREEN Adjust the value of the four available options for sound parameters. Use a 4-Band Equalizer to select Sound. Enter selected parameter's adjustment screen. MANUAL PARAMETER SCREEN Cycle through the different Sound parameters. Set the value of the selected parameter and return...
... use the CURSOR LM keys to personalize sound settings. Press ENTER. Set Bass and Treble levels to your sound settings: Auto - Advanced Manual - Choose one of the selected parameter. Manual - MAIN MENU SCREEN MANUAL SOUND SETTINGS Select Manual or Advanced Manual. Standard... SCREEN Adjust the value of the four available options for sound parameters. Use a 4-Band Equalizer to select Sound. Enter selected parameter's adjustment screen. MANUAL PARAMETER SCREEN Cycle through the different Sound parameters. Set the value of the selected parameter and return...


