
Quik 'N Easy Setup Guide
Page 1
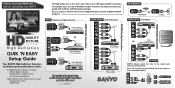
... Setup Guide Your SANYO High Definition Television can display great quality picture when: A High Definition signal is due to the same HDTV INPUT. Off-air digital antenna - HD external equipment High Definition AV connections are free digital broadcast signals available with a HD box and HD program package. HDMI cable The quality of the output jack, connector, and input jack. HD Satellite or Cable service - For example, if you suscribe to Satellite or Cable service you 're using...
... Setup Guide Your SANYO High Definition Television can display great quality picture when: A High Definition signal is due to the same HDTV INPUT. Off-air digital antenna - HD external equipment High Definition AV connections are free digital broadcast signals available with a HD box and HD program package. HDMI cable The quality of the output jack, connector, and input jack. HD Satellite or Cable service - For example, if you suscribe to Satellite or Cable service you 're using...
Quik 'N Easy Setup Guide
Page 2
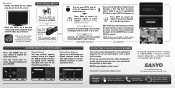
... search for Antenna signals or Cable signals connected to your owner's manual. excessive pressure can be glad to assist you receive Satellite or Cable service through a Set Top Box (receiver), please hook it up to display the On Screen menu. Sanyo Manufacturing Corp. 3333 Sanyo Road, Forrest City, AR 72335 Need help? AV SEARCH High quality pictrue is hooked up to select Channel Setting and press ENTER. Channel Scan Memory View a list of our Service associates will be...
... search for Antenna signals or Cable signals connected to your owner's manual. excessive pressure can be glad to assist you receive Satellite or Cable service through a Set Top Box (receiver), please hook it up to display the On Screen menu. Sanyo Manufacturing Corp. 3333 Sanyo Road, Forrest City, AR 72335 Need help? AV SEARCH High quality pictrue is hooked up to select Channel Setting and press ENTER. Channel Scan Memory View a list of our Service associates will be...
GXDB Remote Guide
Page 1
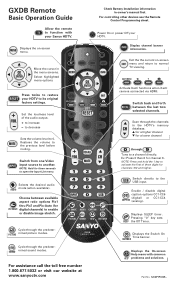
... a channel directly. USB Switch directly to another. Check Battery Installation information in the menu screens. Switch from one Video input source to the USB input. Choose between the last two selected channels. Enable / disable digital CC caption options CC1-CC6 (digital) or CC1-CC4 CAPTION (analog). Cycle through the predeterSOUND mined sound modes. Scan through Tune to enable or disable image stretch. Displays the Switch On Time banner. ON TIMER Displays the On-screen Help menu with your HDTV. Part...
... a channel directly. USB Switch directly to another. Check Battery Installation information in the menu screens. Switch from one Video input source to the USB input. Choose between the last two selected channels. Enable / disable digital CC caption options CC1-CC6 (digital) or CC1-CC4 CAPTION (analog). Cycle through the predeterSOUND mined sound modes. Scan through Tune to enable or disable image stretch. Displays the Switch On Time banner. ON TIMER Displays the On-screen Help menu with your HDTV. Part...
Owners Manual
Page 2
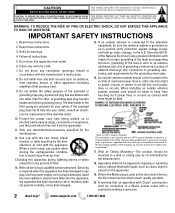
... all servicing to a wall or ceiling only as radiators, heat registers, stoves, or other apparatus (including amplifiers) that an apparatus with the manufacturer's instructions. 8. If an outside antenna system should be connected to the grounding system of the building, as close to dripping or splashing and no objects filled with liquids, such as power-supply cord or plug is provided...
... all servicing to a wall or ceiling only as radiators, heat registers, stoves, or other apparatus (including amplifiers) that an apparatus with the manufacturer's instructions. 8. If an outside antenna system should be connected to the grounding system of the building, as close to dripping or splashing and no objects filled with liquids, such as power-supply cord or plug is provided...
Owners Manual
Page 3
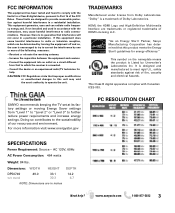
... and, if not installed and used in inches Need help . "As an Energy Star® Partner, Sanyo Manufacturing Corporation has determined that interference will not occur in a residential installation. safety standards against harmful interference in a particular installation. SANYO recommends keeping the TV set at its factory settings or moving Energy Saver settings from Dolby Laboratories. AC 120V, 60Hz AC Power Consumption: 464 watts Weight: 84 lbs...
... and, if not installed and used in inches Need help . "As an Energy Star® Partner, Sanyo Manufacturing Corporation has determined that interference will not occur in a residential installation. safety standards against harmful interference in a particular installation. SANYO recommends keeping the TV set at its factory settings or moving Energy Saver settings from Dolby Laboratories. AC 120V, 60Hz AC Power Consumption: 464 watts Weight: 84 lbs...
Owners Manual
Page 4
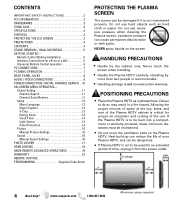
... Light Sensor 14 Panel Protection 14 Picture 15 Manual Picture Settings 15 Sound 16 Manual Sound Settings 16 PHOTO VIEWER 17 HDMI LINKING 18 GXDB REMOTE ADVANCED OPERATIONS 19 WARRANTY 23 REMOTE CONTROL PROGRAMMING Supplied Code Sheet PROTECTING THE PLASMA SCREEN The screen can be used for off-air or cable 5 Universal Remote Control operation 6 PC CONNECTIONS 7 PC MENU OPERATION 7 BACK PANEL JACKS 8 AUDIO / VIDEO CONNECTIONS 9 POWER CONNECTION / INITIAL CHANNEL SEARCH . .10 ON-SCREEN MENU OPERATION- Heat build-up can reduce the life of your Plasma HDTV...
... Light Sensor 14 Panel Protection 14 Picture 15 Manual Picture Settings 15 Sound 16 Manual Sound Settings 16 PHOTO VIEWER 17 HDMI LINKING 18 GXDB REMOTE ADVANCED OPERATIONS 19 WARRANTY 23 REMOTE CONTROL PROGRAMMING Supplied Code Sheet PROTECTING THE PLASMA SCREEN The screen can be used for off-air or cable 5 Universal Remote Control operation 6 PC CONNECTIONS 7 PC MENU OPERATION 7 BACK PANEL JACKS 8 AUDIO / VIDEO CONNECTIONS 9 POWER CONNECTION / INITIAL CHANNEL SEARCH . .10 ON-SCREEN MENU OPERATION- Heat build-up can reduce the life of your Plasma HDTV...
Owners Manual
Page 5
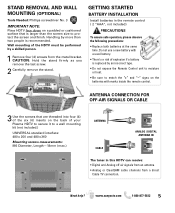
... (4) screws from a direct Cable TV connection. GETTING STARTED BATTERY INSTALLATION Install batteries in this HDTV can receive: • Digital and Analog off air signals from an antenna • Analog or ClearQAM cable channels from the metal bracket. STAND REMOVAL AND WALL MOUNTING (OPTIONAL) Tools Needed: Phillips screwdriver No. 3 IMPORTANT NOTE: Place HDTV face down on the batteries with a used battery. • There's a risk of explosion if a battery is recommended. Wall mounting of your Plasma HDTV...
... (4) screws from a direct Cable TV connection. GETTING STARTED BATTERY INSTALLATION Install batteries in this HDTV can receive: • Digital and Analog off air signals from an antenna • Analog or ClearQAM cable channels from the metal bracket. STAND REMOVAL AND WALL MOUNTING (OPTIONAL) Tools Needed: Phillips screwdriver No. 3 IMPORTANT NOTE: Place HDTV face down on the batteries with a used battery. • There's a risk of explosion if a battery is recommended. Wall mounting of your Plasma HDTV...
Owners Manual
Page 6
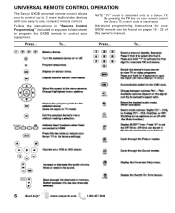
NOTE: "TV" mode is reactivated. To... 6 Need help? www.sanyoctv.com 1-800-877-5032 To... Press... Advanced programming instructions for your remote control the Sanyo TV control code is dedicated only to use, compact remote control. Press... By pressing the TV key on your GXDB remote can be found on pages 19 - 22 of this owner's manual. UNIVERSAL REMOTE CONTROL OPERATION The Sanyo GXDB universal remote control allows you to control up to 3 more audio/video devices...
NOTE: "TV" mode is reactivated. To... 6 Need help? www.sanyoctv.com 1-800-877-5032 To... Press... Advanced programming instructions for your remote control the Sanyo TV control code is dedicated only to use, compact remote control. Press... By pressing the TV key on your GXDB remote can be found on pages 19 - 22 of this owner's manual. UNIVERSAL REMOTE CONTROL OPERATION The Sanyo GXDB universal remote control allows you to control up to 3 more audio/video devices...
Owners Manual
Page 7
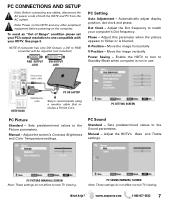
... DVI Output, a DVI to match your HDTV. Dot Clock - Adjust this parameter when the picture appears to flicker or is not in use. Enable the HDTV to turn to Standby Mode when computer is blurred. PC SOUND (MANUAL) SCREEN Note: These settings do not affect normal TV viewing. Move the image horizontally V-Position - Manual - PC CONNECTIONS AND SETUP Note: Before connecting any other peripheral equipment before powering on the computer. H-Position - Stereo mini audio cable HDTV...
... DVI Output, a DVI to match your HDTV. Dot Clock - Adjust this parameter when the picture appears to flicker or is not in use. Enable the HDTV to turn to Standby Mode when computer is blurred. PC SOUND (MANUAL) SCREEN Note: These settings do not affect normal TV viewing. Move the image horizontally V-Position - Manual - PC CONNECTIONS AND SETUP Note: Before connecting any other peripheral equipment before powering on the computer. H-Position - Stereo mini audio cable HDTV...
Owners Manual
Page 8
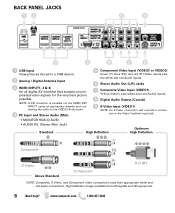
...and red (Audio) inputs. 8 Digital Audio Output (Coaxial) 9 S-Video Input (VIDEO1) NOTE: An S-Video connection will override a connection to the Video1 (yellow) input jack. • MONITOR RGB (D-SUB) • AUDIO R/L (Stereo Mini Jack) Standard High Definition Optimum High Definition Composite S-Video Above Standard Component H D M I NOTE: Composite, S-Video, and Component video connections need their appropriate white and red audio connections. www.sanyoctv.com 1-800-877-5032 BACK PANEL JACKS 1 USB Input View pictures stored in a USB device. 2 Analog / Digital Antenna Input 3 HDMI...
...and red (Audio) inputs. 8 Digital Audio Output (Coaxial) 9 S-Video Input (VIDEO1) NOTE: An S-Video connection will override a connection to the Video1 (yellow) input jack. • MONITOR RGB (D-SUB) • AUDIO R/L (Stereo Mini Jack) Standard High Definition Optimum High Definition Composite S-Video Above Standard Component H D M I NOTE: Composite, S-Video, and Component video connections need their appropriate white and red audio connections. www.sanyoctv.com 1-800-877-5032 BACK PANEL JACKS 1 USB Input View pictures stored in a USB device. 2 Analog / Digital Antenna Input 3 HDMI...
Owners Manual
Page 9
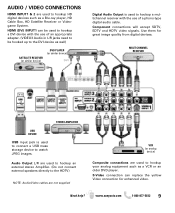
... SDTV, EDTV and HDTV video signals. Use them for enhanced video. Need help? MULTICHANNEL RECEIVER USB DEVICE USB input jack is used to hookup a multichannel receiver with the use of an appropriate adapter. (VIDEO3 Audio in L/R jacks need to be hooked up to the DVI device as well) SATELLITE RECEIVER (or similar device) DVD PLAYER (or similar device) DVI Digital Audio Output is used to connect a USB mass storage device to watch JPEG images. AUDIO / VIDEO CONNECTIONS HDMI INPUT1 & 2 are used to hookup your...
... SDTV, EDTV and HDTV video signals. Use them for enhanced video. Need help? MULTICHANNEL RECEIVER USB DEVICE USB input jack is used to hookup a multichannel receiver with the use of an appropriate adapter. (VIDEO3 Audio in L/R jacks need to be hooked up to the DVI device as well) SATELLITE RECEIVER (or similar device) DVD PLAYER (or similar device) DVI Digital Audio Output is used to connect a USB mass storage device to watch JPEG images. AUDIO / VIDEO CONNECTIONS HDMI INPUT1 & 2 are used to hookup your...

Owners Manual
Page 10
... STARTED- INITIAL SETUP SCREEN CHANNEL SEARCH METHOD SCREEN ON SCREEN HELP MENU Access an on -screen instructions to perform an Initial Channel Search. AV SEARCH Searches for on screen trouble shooting guide (in AC power cord 120V AC, 60Hz Turn On TV Wait for signals from devices connected to the Antenna terminal. Note: Power ON external devices connected to input Video1. CHANNEL SEARCH Checks Antenna and Cable signals connected to the AV input jacks. CHANNEL SEARCH PROGRESS SCREEN 10 Need help? www...
... STARTED- INITIAL SETUP SCREEN CHANNEL SEARCH METHOD SCREEN ON SCREEN HELP MENU Access an on -screen instructions to perform an Initial Channel Search. AV SEARCH Searches for on screen trouble shooting guide (in AC power cord 120V AC, 60Hz Turn On TV Wait for signals from devices connected to the Antenna terminal. Note: Power ON external devices connected to input Video1. CHANNEL SEARCH Checks Antenna and Cable signals connected to the AV input jacks. CHANNEL SEARCH PROGRESS SCREEN 10 Need help? www...

Owners Manual
Page 12
... MENU SCREEN SETUP MENU LANGUAGE SCREEN DIGITAL CAPTION SCREEN 12 Need help? Use the Setup menu to open these captions (digital or analog) and superimpose them on the desired language. MENU LANGUAGE Choose between English, Spanish and French for your On Screen menu's display language. A blue marker indicates the current selected option. DIGITAL CAPTION Captioning is textual information transmitted along with the Clock Timer, and establish the HDMI Linking CEC function. Turning Captioning ON causes the HDTV...
... MENU SCREEN SETUP MENU LANGUAGE SCREEN DIGITAL CAPTION SCREEN 12 Need help? Use the Setup menu to open these captions (digital or analog) and superimpose them on the desired language. MENU LANGUAGE Choose between English, Spanish and French for your On Screen menu's display language. A blue marker indicates the current selected option. DIGITAL CAPTION Captioning is textual information transmitted along with the Clock Timer, and establish the HDMI Linking CEC function. Turning Captioning ON causes the HDTV...
Owners Manual
Page 14
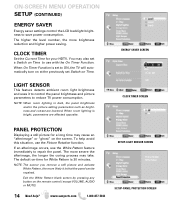
... White Pattern blank screen by pressing any button on Time to reduce TV power consumption. When On Timer Function is set to ON, the TV will automatically turn on at the previously set a Switch on the remote control (except VOLUME, AUDIO or MUTE) 14 Need help avoid this situation, use the White Pattern feature immediately to save power consumption. www.sanyoctv.com 1-800-877-5032 SETUP-LIGHT SENSOR SCREEN SETUP-PANEL PROTECTION SCREEN ENERGY SAVER SCREEN CLOCK TIMER SCREEN PANEL PROTECTION Displaying a still picture for your HDTV...
... White Pattern blank screen by pressing any button on Time to reduce TV power consumption. When On Timer Function is set to ON, the TV will automatically turn on at the previously set a Switch on the remote control (except VOLUME, AUDIO or MUTE) 14 Need help avoid this situation, use the White Pattern feature immediately to save power consumption. www.sanyoctv.com 1-800-877-5032 SETUP-LIGHT SENSOR SCREEN SETUP-PANEL PROTECTION SCREEN ENERGY SAVER SCREEN CLOCK TIMER SCREEN PANEL PROTECTION Displaying a still picture for your HDTV...

Owners Manual
Page 15
... input can have predetermined fixed picture parameter values, or one of the selected parameter. MAIN MENU SCREEN PICTURE SCREEN (MANUAL) Cycle through the different Picture parameters. Select Manual or Advanced Manual. Set the value of the selected parameter and return to select Picture. Advanced Manual offers a Detailed Setting sub-menu with the following options: Expanded DNR, White Balance, Vertical Sharpness, Edge Enhancer, H-Size and V-Size. ON-SCREEN MENU OPERATION PICTURE Display the On Screen menu and use...
... input can have predetermined fixed picture parameter values, or one of the selected parameter. MAIN MENU SCREEN PICTURE SCREEN (MANUAL) Cycle through the different Picture parameters. Select Manual or Advanced Manual. Set the value of the selected parameter and return to select Picture. Advanced Manual offers a Detailed Setting sub-menu with the following options: Expanded DNR, White Balance, Vertical Sharpness, Edge Enhancer, H-Size and V-Size. ON-SCREEN MENU OPERATION PICTURE Display the On Screen menu and use...
Owners Manual
Page 17
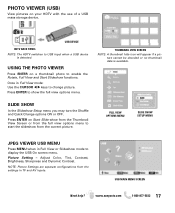
... Setup menu you may turn the Shuffle and Quick Change options ON or OFF. USB DEVICE HDTV BACK PANEL NOTE: The HDTV switches to enable the Rotate, Full View and Start Slideshow functions. Adjust Color, Tint, Contrast, Brightness, Sharpness and Dynamic Contrast. USB MAIN MENU SCREEN Need help? Picture Setting - Once in Full View mode: Use the CURSOR keys to show from the Thumbnail View Screen or from the current picture. Press ENTER to change picture...
... Setup menu you may turn the Shuffle and Quick Change options ON or OFF. USB DEVICE HDTV BACK PANEL NOTE: The HDTV switches to enable the Rotate, Full View and Start Slideshow functions. Adjust Color, Tint, Contrast, Brightness, Sharpness and Dynamic Contrast. USB MAIN MENU SCREEN Need help? Picture Setting - Once in Full View mode: Use the CURSOR keys to show from the Thumbnail View Screen or from the current picture. Press ENTER to change picture...
Owners Manual
Page 18
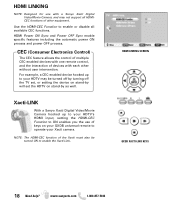
... your HDTV's HDMI input, setting the HDMI-CEC Function to your Xacti camera. Xacti-LINK With a Sanyo Xacti Digital Video/Movie Camera hooked up to ON enables you the use with a Sanyo Xacti Digital Video/Movie Camera, and may be turned ON to enable or disable all HDMICEC functions of devices with one remote control, and the interaction of other without user intervention. HDMI Power ON Sync and Power OFF Sync enable specific...
... your HDTV's HDMI input, setting the HDMI-CEC Function to your Xacti camera. Xacti-LINK With a Sanyo Xacti Digital Video/Movie Camera hooked up to ON enables you the use with a Sanyo Xacti Digital Video/Movie Camera, and may be turned ON to enable or disable all HDMICEC functions of devices with one remote control, and the interaction of other without user intervention. HDMI Power ON Sync and Power OFF Sync enable specific...
Owners Manual
Page 19
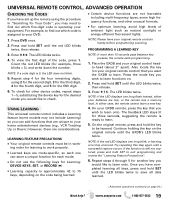
.... Place the GXDB and your original remote controls handy before programming Learning. The LED blinks twice. NOTE: If the red LED displays one can add functions that are unique to save all data learned. Need help? (Advanced operations continued on the original remote until the red LED blinks twice, then release. 3. NOTE: If a code digit is operating your GXDB remote, press the key that you wish...
.... Place the GXDB and your original remote controls handy before programming Learning. The LED blinks twice. NOTE: If the red LED displays one can add functions that are unique to save all data learned. Need help? (Advanced operations continued on the original remote until the red LED blinks twice, then release. 3. NOTE: If a code digit is operating your GXDB remote, press the key that you wish...
Owners Manual
Page 20
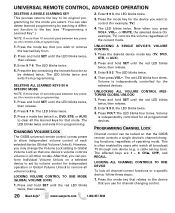
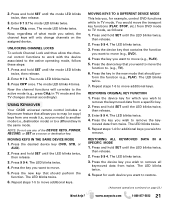
... hold SET until the red LED blinks twice, then release. 2. UNLOCKING ALL VOLUME CONTROL (RESTORING GLOBAL UNLOCK) 1. Volume is often enabled by teaching a different function to set -top box). Press 9 7 6. UNLOCKING A SINGLE DEVICE'S VOLUME CONTROL 1. Press the desired device mode key (TV, DVD, STB, or AUX). 2. The LED blinks twice and exits from programming. Press the mode key for channel changing control. 20 Need help? You can also delete learned programming by users who...
... hold SET until the red LED blinks twice, then release. 2. UNLOCKING ALL VOLUME CONTROL (RESTORING GLOBAL UNLOCK) 1. Volume is often enabled by teaching a different function to set -top box). Press 9 7 6. UNLOCKING A SINGLE DEVICE'S VOLUME CONTROL 1. Press the desired device mode key (TV, DVD, STB, or AUX). 2. The LED blinks twice and exits from programming. Press the mode key for channel changing control. 20 Need help? You can also delete learned programming by users who...
Owners Manual
Page 21
... and hold SET until the mode LED blinks twice, then release. 2. Repeat steps 1-6 to move the function to move additional keys. Enter 9 9 4. The LED blinks twice. 4. moved data from a specific key. 2. The mode LED blinks twice. Enter 9 7 3. Now the channel functions will only change channels on page 22.) Need help? Repeat steps 1-4 for example, control DVD functions while in the new mode that should per- The mode LED blinks 4 times. MOVING...
... and hold SET until the mode LED blinks twice, then release. 2. Repeat steps 1-6 to move the function to move additional keys. Enter 9 9 4. The LED blinks twice. 4. moved data from a specific key. 2. The mode LED blinks twice. Enter 9 7 3. Now the channel functions will only change channels on page 22.) Need help? Repeat steps 1-4 for example, control DVD functions while in the new mode that should per- The mode LED blinks 4 times. MOVING...


