
Quik 'N Easy Setup Guide
Page 2
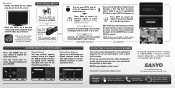
... Digital Air Add-On which searches for Antenna signals or Cable signals connected to select Channel Setting and press ENTER. excessive pressure can be glad to assist you receive Satellite or Cable service through a Set Top Box (receiver), please hook it 's not maintained properly. HDMI, the HDMI Logo and...HDTV's LCD SCREEN The screen can cause permanent discoloration or dark spots. Do not use hard objects such as hard cloth or paper. Sanyo Manufacturing Corp. 3333 Sanyo Road, Forrest City, AR 72335 Need help? Place the HDTV on a flat firm surface and allow adequate space on . Turn on...
... Digital Air Add-On which searches for Antenna signals or Cable signals connected to select Channel Setting and press ENTER. excessive pressure can be glad to assist you receive Satellite or Cable service through a Set Top Box (receiver), please hook it 's not maintained properly. HDMI, the HDMI Logo and...HDTV's LCD SCREEN The screen can cause permanent discoloration or dark spots. Do not use hard objects such as hard cloth or paper. Sanyo Manufacturing Corp. 3333 Sanyo Road, Forrest City, AR 72335 Need help? Place the HDTV on a flat firm surface and allow adequate space on . Turn on...
GXDB Remote Guide
Page 1
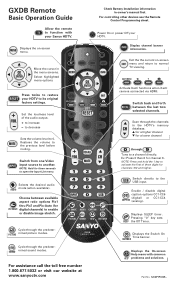
...decrease XACTI MENU W T LIST RESET Sets the volume level to another. Choose between the last two selected channels. Exit the the current on -screen menu. Scan through Tune to a channel directly. ON TIMER Displays the On-screen Help menu with your Sanyo HDTV. OK ENTER Move the cursor... mined picture modes. USB Switch directly to the USB input. Part No. 1JC6P1P0339-- Displays the on -screen menu and return to normal TV viewing. Enable / disable digital CC caption options CC1-CC6 (digital) or CC1-CC4 CAPTION (analog). GXDB Remote Basic Operation Guide Allow ...
...decrease XACTI MENU W T LIST RESET Sets the volume level to another. Choose between the last two selected channels. Exit the the current on -screen menu. Scan through Tune to a channel directly. ON TIMER Displays the On-screen Help menu with your Sanyo HDTV. OK ENTER Move the cursor... mined picture modes. USB Switch directly to the USB input. Part No. 1JC6P1P0339-- Displays the on -screen menu and return to normal TV viewing. Enable / disable digital CC caption options CC1-CC6 (digital) or CC1-CC4 CAPTION (analog). GXDB Remote Basic Operation Guide Allow ...
Owners Manual
Page 3
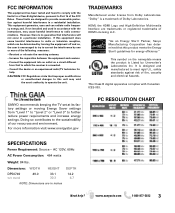
...www.energystar.gov PC RESOLUTION CHART SPECIFICATIONS Power Requirement: Source - SANYO recommends keeping the TV set at its factory settings or moving Energy Saver settings from "Level 1" to "Level 2" or "Level 3" to meet rigid U.L. Dimensions: WIDTH HEIGHT DEPTH DP50749 w/o stand 49.0 33.1 14.2 30.3 4.7 NOTE: ... instructions, may void the user's authority to the sustainability of the FCC Rules. Consult the dealer or an experienced radio/TV technician for energy efficiency." Connect the equipment into an outlet on , the user is designed and manufactured to further reduce...
...www.energystar.gov PC RESOLUTION CHART SPECIFICATIONS Power Requirement: Source - SANYO recommends keeping the TV set at its factory settings or moving Energy Saver settings from "Level 1" to "Level 2" or "Level 3" to meet rigid U.L. Dimensions: WIDTH HEIGHT DEPTH DP50749 w/o stand 49.0 33.1 14.2 30.3 4.7 NOTE: ... instructions, may void the user's authority to the sustainability of the FCC Rules. Consult the dealer or an experienced radio/TV technician for energy efficiency." Connect the equipment into an outlet on , the user is designed and manufactured to further reduce...
Owners Manual
Page 4
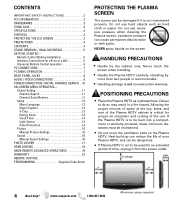
...STAND REMOVAL / WALL MOUNTING 5 GETTING STARTED- Never touch the screen when handling. • Handle the Plasma HDTV carefully. www.sanyoctv.com 1-800-877-5032 Minimum space required Chanel Setting 11 Channel Search 11 Channel Scan Memory 11 Setup 12 Menu Language 12 Digital Caption 12 V-Chip 13 ... Sound 16 Manual Sound Settings 16 PHOTO VIEWER 17 HDMI LINKING 18 GXDB REMOTE ADVANCED OPERATIONS 19 WARRANTY 23 REMOTE CONTROL PROGRAMMING Supplied Code Sheet PROTECTING THE PLASMA SCREEN The screen can be used for an extended period of the Plasma HDTV cabinet is to do ...
...STAND REMOVAL / WALL MOUNTING 5 GETTING STARTED- Never touch the screen when handling. • Handle the Plasma HDTV carefully. www.sanyoctv.com 1-800-877-5032 Minimum space required Chanel Setting 11 Channel Search 11 Channel Scan Memory 11 Setup 12 Menu Language 12 Digital Caption 12 V-Chip 13 ... Sound 16 Manual Sound Settings 16 PHOTO VIEWER 17 HDMI LINKING 18 GXDB REMOTE ADVANCED OPERATIONS 19 WARRANTY 23 REMOTE CONTROL PROGRAMMING Supplied Code Sheet PROTECTING THE PLASMA SCREEN The screen can be used for an extended period of the Plasma HDTV cabinet is to do ...
Owners Manual
Page 7
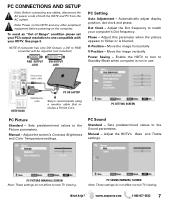
...OR LAPTOP RGB Monitor cable Sanyo recommends using a monitor cable that includes a Ferrite Core. Adjust the screen's Contrast, Brightness and Color Temperature settings. Phase - Sets predetermined values to match your HDTV. Adjust the HDTV's Bass and Treble settings. Dot Clock - Automatically...parameters. H-Position - PC SOUND (MANUAL) SCREEN Note: These settings do not affect normal TV viewing. PC SETTING SCREEN PC Picture Standard - PC PICTURE (MANUAL) SCREEN Note: These settings do not affect normal TV viewing. Note: Power on the HDTV and any cables, ...
...OR LAPTOP RGB Monitor cable Sanyo recommends using a monitor cable that includes a Ferrite Core. Adjust the screen's Contrast, Brightness and Color Temperature settings. Phase - Sets predetermined values to match your HDTV. Adjust the HDTV's Bass and Treble settings. Dot Clock - Automatically...parameters. H-Position - PC SOUND (MANUAL) SCREEN Note: These settings do not affect normal TV viewing. PC SETTING SCREEN PC Picture Standard - PC PICTURE (MANUAL) SCREEN Note: These settings do not affect normal TV viewing. Note: Power on the HDTV and any cables, ...
Owners Manual
Page 11
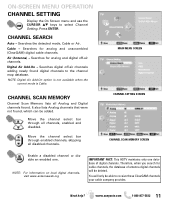
... digital off -air channels. NOTE: Digital Air Add-On option is not available when the current mode is Cable. MAIN MENU SCREEN CHANNEL SETTING SCREEN CHANNEL SCAN MEMORY SCREEN Enable a disabled channel or disable an enabled one database of antenna digital channels will only be deleted. Need help... all disabled channels. It also lists Analog channels that were not found . You will be able to select Channel Setting. ON-SCREEN MENU OPERATION CHANNEL SETTING Display the On Screen menu and use the CURSOR LM keys to receive those ClearQAM channels your cable company provides. ...
... digital off -air channels. NOTE: Digital Air Add-On option is not available when the current mode is Cable. MAIN MENU SCREEN CHANNEL SETTING SCREEN CHANNEL SCAN MEMORY SCREEN Enable a disabled channel or disable an enabled one database of antenna digital channels will only be deleted. Need help... all disabled channels. It also lists Analog channels that were not found . You will be able to select Channel Setting. ON-SCREEN MENU OPERATION CHANNEL SETTING Display the On Screen menu and use the CURSOR LM keys to receive those ClearQAM channels your cable company provides. ...

Owners Manual
Page 12
... ENTER on the screen. Digital Caption's Font, Background and Foreground display may be customized: Navigate the cursor (highlight.) Select / set the current time and on-time with the picture and sound. A blue marker indicates the current selected option. Turning Captioning ON causes... the HDTV to set the Menu Language, VChip rating settings, customize Digital Captions, set Energy Saver level, set parameter. www.sanyoctv.com 1-800-877-5032 Use the Setup menu to open these captions (digital...
... ENTER on the screen. Digital Caption's Font, Background and Foreground display may be customized: Navigate the cursor (highlight.) Select / set the current time and on-time with the picture and sound. A blue marker indicates the current selected option. Turning Captioning ON causes... the HDTV to set the Menu Language, VChip rating settings, customize Digital Captions, set Energy Saver level, set parameter. www.sanyoctv.com 1-800-877-5032 Use the Setup menu to open these captions (digital...
Owners Manual
Page 14
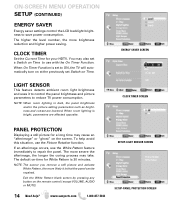
... an "afterimage" or "ghost" on the screen. To help ? You may take. When On Timer Function is set to ON, the TV will automatically turn on at the previously set a Switch on Time. The default on the remote control (except VOLUME, AUDIO or MUTE) 14 Need help avoid ... panel brightness and picture parameters to save power consumption. ON-SCREEN MENU OPERATION SETUP (CONTINUED) ENERGY SAVER Energy saver settings control the LCD backlight brightness to reduce TV power consumption. NOTE: When room lighting is that the panel can be repaired. ENERGY SAVER SCREEN CLOCK TIMER SCREEN ...
... an "afterimage" or "ghost" on the screen. To help ? You may take. When On Timer Function is set to ON, the TV will automatically turn on at the previously set a Switch on Time. The default on the remote control (except VOLUME, AUDIO or MUTE) 14 Need help avoid ... panel brightness and picture parameters to save power consumption. ON-SCREEN MENU OPERATION SETUP (CONTINUED) ENERGY SAVER Energy saver settings control the LCD backlight brightness to reduce TV power consumption. NOTE: When room lighting is that the panel can be repaired. ENERGY SAVER SCREEN CLOCK TIMER SCREEN ...

Owners Manual
Page 15
...or one of the two Manual options for customized personal settings. PARAMETER SELECTION SCREEN VALUE ADJUSTMENT SCREEN EXAMPLES www.sanyoctv.com 1-800-877-5032 15 Set the value of the selected parameter. Advanced Manual offers a Detailed Setting sub-menu with the following options: Expanded DNR, White... Balance, Vertical Sharpness, Edge Enhancer, H-Size and V-Size. Need help? MANUAL PICTURE SETTINGS Choose Manual to parameter selection screen. NOTE: CURSOR LM keys select the next/previous parameter without returning to select Picture. ...
...or one of the two Manual options for customized personal settings. PARAMETER SELECTION SCREEN VALUE ADJUSTMENT SCREEN EXAMPLES www.sanyoctv.com 1-800-877-5032 15 Set the value of the selected parameter. Advanced Manual offers a Detailed Setting sub-menu with the following options: Expanded DNR, White... Balance, Vertical Sharpness, Edge Enhancer, H-Size and V-Size. Need help? MANUAL PICTURE SETTINGS Choose Manual to parameter selection screen. NOTE: CURSOR LM keys select the next/previous parameter without returning to select Picture. ...
Owners Manual
Page 16
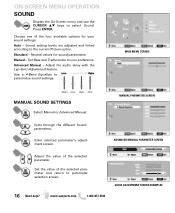
... preference. MAIN MENU SCREEN MANUAL SOUND SETTINGS Select Manual or Advanced Manual. Set the value of the selected parameter. Sound setting levels are adjusted and linked according to personalize sound settings. Manual - Advanced Manual - Enter selected parameter's adjustment screen. Press ENTER. Set Bass and Treble levels to your sound settings: Auto - Adjust the audio delay with...
... preference. MAIN MENU SCREEN MANUAL SOUND SETTINGS Select Manual or Advanced Manual. Set the value of the selected parameter. Sound setting levels are adjusted and linked according to personalize sound settings. Manual - Advanced Manual - Enter selected parameter's adjustment screen. Press ENTER. Set Bass and Treble levels to your sound settings: Auto - Adjust the audio delay with...
Owners Manual
Page 17
... Slideshow functions. Press ENTER on Start Slide-show the full view options menu. NOTE: Picture Settings are separate configurations from the current picture. USB DEVICE HDTV BACK PANEL NOTE: The HDTV switches to start the ...slideshow from the settings in Full View or Slideshow mode to change picture. USING THE PHOTO VIEWER Press ENTER on your...MENU SLIDE SHOW SETUP MENU JPEG VIEWER USB MENU Press MENU when in TV and AV inputs. Adjust Color, Tint, Contrast, Brightness, Sharpness and Dynamic Contrast.
... Slideshow functions. Press ENTER on Start Slide-show the full view options menu. NOTE: Picture Settings are separate configurations from the current picture. USB DEVICE HDTV BACK PANEL NOTE: The HDTV switches to start the ...slideshow from the settings in Full View or Slideshow mode to change picture. USING THE PHOTO VIEWER Press ENTER on your...MENU SLIDE SHOW SETUP MENU JPEG VIEWER USB MENU Press MENU when in TV and AV inputs. Adjust Color, Tint, Contrast, Brightness, Sharpness and Dynamic Contrast.
Owners Manual
Page 18
... without user intervention. HDMI LINKING NOTE: Designed for use of the Xacti must also be turned off by turning off the TV set, or setting the device on stand-by will set the HDTV on your GXDB universal remote to enable the Xacti-Link. For example, a CEC-enabled device hooked up to ...specific features including the automatic power ON process and power OFF process. Use the HDMI-CEC Function to your Xacti camera. Xacti-LINK With a Sanyo Xacti Digital Video/Movie Camera hooked up to enable or disable all HDMICEC functions of devices with each other equipment. NOTE: The HDMI-CEC ...
... without user intervention. HDMI LINKING NOTE: Designed for use of the Xacti must also be turned off by turning off the TV set, or setting the device on stand-by will set the HDTV on your GXDB universal remote to enable the Xacti-Link. For example, a CEC-enabled device hooked up to ...specific features including the automatic power ON process and power OFF process. Use the HDMI-CEC Function to your Xacti camera. Xacti-LINK With a Sanyo Xacti Digital Video/Movie Camera hooked up to enable or disable all HDMICEC functions of devices with each other equipment. NOTE: The HDMI-CEC ...
Owners Manual
Page 19
... occurred. Count the red LED blinks (for other unusual formats. G Do not use the following keys for Learning: DEVICE KEYS, SET, or RECORD (G) G Learning capacity is ready to learn onto. UNIVERSAL REMOTE CONTROL, ADVANCED OPERATION CHECKING THE CODES If you have..., the remote cannot learn . 5. For example, to find out which code is operating your original remote controls handy before programming Learning. Press and hold SET until the LED blinks twice to exit programming and review the "Learning Feature Precautions". 6. Enter 9 9 0. To check for example, three blinks =...
... occurred. Count the red LED blinks (for other unusual formats. G Do not use the following keys for Learning: DEVICE KEYS, SET, or RECORD (G) G Learning capacity is ready to learn onto. UNIVERSAL REMOTE CONTROL, ADVANCED OPERATION CHECKING THE CODES If you have..., the remote cannot learn . 5. For example, to find out which code is operating your original remote controls handy before programming Learning. Press and hold SET until the LED blinks twice to exit programming and review the "Learning Feature Precautions". 6. Enter 9 9 0. To check for example, three blinks =...
Owners Manual
Page 20
...LED blinks twice. Press and hold SET until the LED blinks twice, then release. 2. Then press VOL-. The affected keys are 1 - 0, CHL, CHM, and RECALL. www.sanyoctv.com 1-800-877-5032 You can also delete learned programming by users who watch all broadcast TV through one device's volume controls volume ...in all other modes. Press a mode key twice (i.e., DVD, STB, or AUX) to clear all the learned keys for that you may change the Volume Lock setting to Global Volume Lock so that the ...
...LED blinks twice. Press and hold SET until the LED blinks twice, then release. 2. Then press VOL-. The affected keys are 1 - 0, CHL, CHM, and RECALL. www.sanyoctv.com 1-800-877-5032 You can also delete learned programming by users who watch all broadcast TV through one device's volume controls volume ...in all other modes. Press a mode key twice (i.e., DVD, STB, or AUX) to clear all the learned keys for that you may change the Volume Lock setting to Global Volume Lock so that the ...
Owners Manual
Page 21
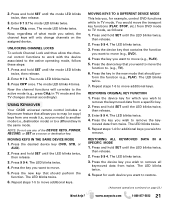
...to move the transport key functions (PLAY, STOP, etc.) from a specific key. 2. Press and hold SET until the LED blinks twice, then release. 2. The LED blinks twice. 5. Press the device key you want to TV mode, as a source or destination key. The LED blinks twice. 4. 2. Enter 9 7 3. ...from one mode (i.e., source mode) to another mode (i.e., destination mode) or to the active mode (e.g., press CHL in TV mode. Press CHM once. Press and hold SET until the LED blinks twice, then release. 3. Press the new key that should per- You would move additional keys. ...
...to move the transport key functions (PLAY, STOP, etc.) from a specific key. 2. Press and hold SET until the LED blinks twice, then release. 2. The LED blinks twice. 5. Press the device key you want to TV mode, as a source or destination key. The LED blinks twice. 4. 2. Enter 9 7 3. ...from one mode (i.e., source mode) to another mode (i.e., destination mode) or to the active mode (e.g., press CHL in TV mode. Press CHM once. Press and hold SET until the LED blinks twice, then release. 3. Press the new key that should per- You would move additional keys. ...
Owners Manual
Page 22
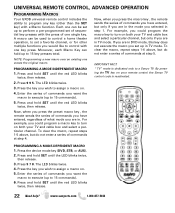
... macro to execute (up to 15 key presses total. By pressing the TV key on both your remote control the Sanyo TV control code is dedicated only to assign a macro on. 4. Each one can be used to control a home theater operation, to set up to 15 commands). 6. For example, you could program a macro key...
... macro to execute (up to 15 key presses total. By pressing the TV key on both your remote control the Sanyo TV control code is dedicated only to assign a macro on. 4. Each one can be used to control a home theater operation, to set up to 15 commands). 6. For example, you could program a macro key...


