
Owners Manual
Page 2
.... 13.Unplug this apparatus near any heat sources such as radiators, heat registers, stoves, or other apparatus (including amplifiers) that an apparatus with the cart, stand, tripod, bracket, or table specified by the manufacturer. 12. Only use attachments/accessories specified by the manufacturer, or sold with respect to proper grounding of...
.... 13.Unplug this apparatus near any heat sources such as radiators, heat registers, stoves, or other apparatus (including amplifiers) that an apparatus with the cart, stand, tripod, bracket, or table specified by the manufacturer. 12. Only use attachments/accessories specified by the manufacturer, or sold with respect to proper grounding of...
Owners Manual
Page 3
... installation. This symbol on , the user is connected. - Doing so contributes to the sustainability of Dolby Laboratories. Dimensions: WIDTH HEIGHT DEPTH DP50749 w/o stand 49.0 33.1 14.2 30.3 4.7 NOTE: Dimensions are trademarks or registered trademarks of the following measures: - www.sanyoctv.com 1-800-877... license from "Level 1" to "Level 2" or "Level 3" to further reduce power requirements and increase energy savings. SANYO recommends keeping the TV set at its factory settings or moving Energy Saver settings from Dolby Laboratories. However, there is Listed by one or ...
... installation. This symbol on , the user is connected. - Doing so contributes to the sustainability of Dolby Laboratories. Dimensions: WIDTH HEIGHT DEPTH DP50749 w/o stand 49.0 33.1 14.2 30.3 4.7 NOTE: Dimensions are trademarks or registered trademarks of the following measures: - www.sanyoctv.com 1-800-877... license from "Level 1" to "Level 2" or "Level 3" to further reduce power requirements and increase energy savings. SANYO recommends keeping the TV set at its factory settings or moving Energy Saver settings from Dolby Laboratories. However, there is Listed by one or ...
Owners Manual
Page 4
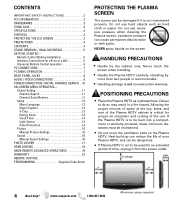
... CONNECTION / INITIAL CHANNEL SEARCH . .10 ON-SCREEN MENU OPERATION- Never touch the screen when handling. • Handle the Plasma HDTV carefully. Failure to be built into a compartment or similarly enclosed, these minimum distances must be damaged if it from the... 3 THINK GAIA 3 SPECIFICATIONS 3 DISPOSAL 3 PROTECTING THE LCD SCREEN 3 PRECAUTIONS 4 CONTENTS 4 STAND REMOVAL / WALL MOUNTING 5 GETTING STARTED- POSITIONING PRECAUTIONS • Place this Plasma HDTV as hard cloth or paper. Remote Control Battery Installation 5 Antenna Connections for proper air circulation...
... CONNECTION / INITIAL CHANNEL SEARCH . .10 ON-SCREEN MENU OPERATION- Never touch the screen when handling. • Handle the Plasma HDTV carefully. Failure to be built into a compartment or similarly enclosed, these minimum distances must be damaged if it from the... 3 THINK GAIA 3 SPECIFICATIONS 3 DISPOSAL 3 PROTECTING THE LCD SCREEN 3 PRECAUTIONS 4 CONTENTS 4 STAND REMOVAL / WALL MOUNTING 5 GETTING STARTED- POSITIONING PRECAUTIONS • Place this Plasma HDTV as hard cloth or paper. Remote Control Battery Installation 5 Antenna Connections for proper air circulation...
Owners Manual
Page 5
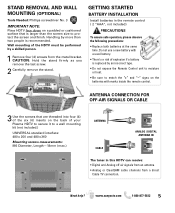
Wall mounting of your Plasma HDTV to secure it to protect the screen and finish. Do not use a new battery with marks inside the remote control. GETTING STARTED BATTERY INSTALLATION ... batteries at the same time. www.sanyoctv.com 1-800-877-5032 5 CAUTION: Hold the stand firmly as you remove the last screw. 2 Carefully remove the stand. Handling by a skilled person. 1 Remove four (4) screws from a direct Cable TV connection. Need help? STAND REMOVAL AND WALL MOUNTING (OPTIONAL) Tools Needed: Phillips screwdriver No. 3 IMPORTANT NOTE: Place...
Wall mounting of your Plasma HDTV to secure it to protect the screen and finish. Do not use a new battery with marks inside the remote control. GETTING STARTED BATTERY INSTALLATION ... batteries at the same time. www.sanyoctv.com 1-800-877-5032 5 CAUTION: Hold the stand firmly as you remove the last screw. 2 Carefully remove the stand. Handling by a skilled person. 1 Remove four (4) screws from a direct Cable TV connection. Need help? STAND REMOVAL AND WALL MOUNTING (OPTIONAL) Tools Needed: Phillips screwdriver No. 3 IMPORTANT NOTE: Place...
Owners Manual
Page 18
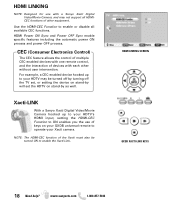
...-5032 HDMI Power ON Sync and Power OFF Sync enable specific features including the automatic power ON process and power OFF process. Xacti-LINK With a Sanyo Xacti Digital Video/Movie Camera hooked up to ON enables you the use with each other equipment. NOTE: The HDMI-CEC function of the Xacti... must also be turned off by turning off the TV set, or setting the device on stand-by will set the HDTV on your Xacti camera. HDMI LINKING SCREEN GXDB XACTI-LINK KEYS 18 Need help? CEC (Consumer Electronics...
...-5032 HDMI Power ON Sync and Power OFF Sync enable specific features including the automatic power ON process and power OFF process. Xacti-LINK With a Sanyo Xacti Digital Video/Movie Camera hooked up to ON enables you the use with each other equipment. NOTE: The HDMI-CEC function of the Xacti... must also be turned off by turning off the TV set, or setting the device on stand-by will set the HDTV on your Xacti camera. HDMI LINKING SCREEN GXDB XACTI-LINK KEYS 18 Need help? CEC (Consumer Electronics...


