Owner's Manual for POA-LN01
Page 1
..., the monitor can be controlled and set up remotely. This product is an optional product to the monitor and connect a network cable. OWNERʼS MANUAL This manual explains the installation of the PJNet Organizer This PJ-Net Organizer is only used for Monitors that have a terminal for the PJ-Net Organizer. PJ...
..., the monitor can be controlled and set up remotely. This product is an optional product to the monitor and connect a network cable. OWNERʼS MANUAL This manual explains the installation of the PJNet Organizer This PJ-Net Organizer is only used for Monitors that have a terminal for the PJ-Net Organizer. PJ...
Owner's Manual for POA-LN01
Page 2
This equipment generates, uses SANYO POA-LN01 Tested To Comply With FCC Standards and can be required to stop operation of Sun Microsystems Inc. ment off and on a circuit different from that interference will not occur in the manual. Do not make any changes or modifications to the equipment unless otherwise specified in...
This equipment generates, uses SANYO POA-LN01 Tested To Comply With FCC Standards and can be required to stop operation of Sun Microsystems Inc. ment off and on a circuit different from that interference will not occur in the manual. Do not make any changes or modifications to the equipment unless otherwise specified in...
Owner's Manual for POA-LN01
Page 3
Use of environment. CAUTION SANYO Electric Co. When you must perform the safety inspections periodically. It may result if the monitor is explained as "this product" or "Network Board" in this manual means "LCD monitor provided with PJ-Net Organizer" unless otherwise noted. For instructions about each piece of environment in which you must...
Use of environment. CAUTION SANYO Electric Co. When you must perform the safety inspections periodically. It may result if the monitor is explained as "this product" or "Network Board" in this manual means "LCD monitor provided with PJ-Net Organizer" unless otherwise noted. For instructions about each piece of environment in which you must...
Owner's Manual for POA-LN01
Page 8
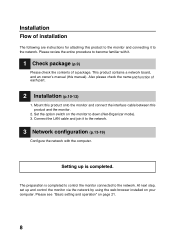
Please review the entire procedure to become familiar with the computer. Mount this product onto the monitor and connect the interface cable between this manual). The preparation is completed. Setting up and control the monitor via the network by using the web browser installed on your computer. ...This product contains a network board, and an ownerʼs manual (this product and the monitor. 2. Also please check the name and function of a package. At next step, set up is completed to control...
Please review the entire procedure to become familiar with the computer. Mount this product onto the monitor and connect the interface cable between this manual). The preparation is completed. Setting up and control the monitor via the network by using the web browser installed on your computer. ...This product contains a network board, and an ownerʼs manual (this product and the monitor. 2. Also please check the name and function of a package. At next step, set up is completed to control...
Owner's Manual for POA-LN01
Page 17
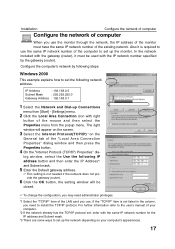
... Connection Properties" dialog window and then press the Properties button. 4 On the "Internet Protocol (TCP/IP) Properties" dia- For further information refer to the user's manual of your computer's appearances. 17 The right window will be used with right button of the mouse and then select the Properties menu from [Start...
... Connection Properties" dialog window and then press the Properties button. 4 On the "Internet Protocol (TCP/IP) Properties" dia- For further information refer to the user's manual of your computer's appearances. 17 The right window will be used with right button of the mouse and then select the Properties menu from [Start...
Owner's Manual for POA-LN01
Page 18
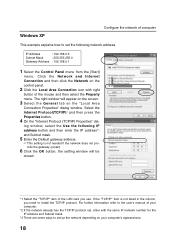
...not provide the gateway (router). 6 Click the OK button, the setting window will appear on the screen. 3 Select the General tab on the control panel. 2 Click the Local Area Connection icon with the same IP network number for the IP address and Subnet mask. *3 There are some ways to ...IP protocol. IP Address : 192.168.0.5 Subnet Mask : 255.255.255.0 Gateway Address : 192.168.0.1 1 Select the Control Panel menu from the [Start] menu. For further information refer to the user's manual of the LAN card you need to set the following IP address button and then enter the IP address...
...not provide the gateway (router). 6 Click the OK button, the setting window will appear on the screen. 3 Select the General tab on the control panel. 2 Click the Local Area Connection icon with the same IP network number for the IP address and Subnet mask. *3 There are some ways to ...IP protocol. IP Address : 192.168.0.5 Subnet Mask : 255.255.255.0 Gateway Address : 192.168.0.1 1 Select the Control Panel menu from the [Start] menu. For further information refer to the user's manual of the LAN card you need to set the following IP address button and then enter the IP address...
Owner's Manual for POA-LN01
Page 19
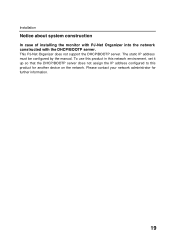
Please contact your network administrator for another device on the network. The static IP address must be configured by the manual. Installation Notice about system construction In case of installing the monitor with PJ-Net Organizer into the network constructed with the DHCP/BOOTP server. This PJ-Net Organizer does not support the DHCP/BOOTP server. To use this product in this network environment, set it up so that the DHCP/BOOTP server does not assign the IP address configured to this product for further information. 19
Please contact your network administrator for another device on the network. The static IP address must be configured by the manual. Installation Notice about system construction In case of installing the monitor with PJ-Net Organizer into the network constructed with the DHCP/BOOTP server. This PJ-Net Organizer does not support the DHCP/BOOTP server. To use this product in this network environment, set it up so that the DHCP/BOOTP server does not assign the IP address configured to this product for further information. 19
Owner's Manual for POA-LN01
Page 34
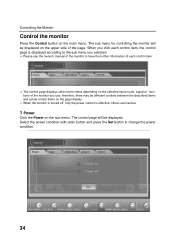
... the upper side of the monitor you use, therefore, there may be displayed. When you click each control item, the control page is displayed according to the sub menu you selected. ✐ Please see the owner's manual of the monitor to change the power condition. 34 others are inactive. 1... radio button and press the Set button to have the further information of each control item. ✐ The control page displays valid control items depending on the page display. ✐ When the monitor is turned off, only the power control is effective; Controlling the Monitor Control the monitor...
... the upper side of the monitor you use, therefore, there may be displayed. When you click each control item, the control page is displayed according to the sub menu you selected. ✐ Please see the owner's manual of the monitor to change the power condition. 34 others are inactive. 1... radio button and press the Set button to have the further information of each control item. ✐ The control page displays valid control items depending on the page display. ✐ When the monitor is turned off, only the power control is effective; Controlling the Monitor Control the monitor...
Owner's Manual for POA-LN01
Page 37
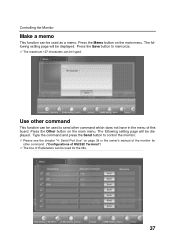
... the main menu. Press the Save button to control the monitor. ✐ Please see the chapter "4: Serial Port Use" on page 39 or the owner's manual of the monitor for other command This function can be used for the title. 37 The following setting page will be...
... the main menu. Press the Save button to control the monitor. ✐ Please see the chapter "4: Serial Port Use" on page 39 or the owner's manual of the monitor for other command This function can be used for the title. 37 The following setting page will be...
Owner's Manual for POA-LN01
Page 49
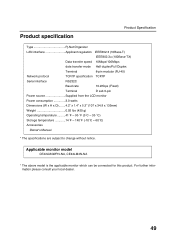
... Supplied from the LCD monitor Power consumption 3.0 watts Dimensions (W x H x D)........4.2" x 1.4" x 5.3" (107 x 34.9 x 135mm) Weight 0.92 lbs (420 g) Operating temperature ..........41˚F ~ 95 ˚F (5˚C ~ 35 ˚C) Storage temperature 14˚F ~ 140˚F (-10˚C ~ 60˚C) Accessories Owner's Manual * The specifications are subject to change without notice. Applicable monitor model CE42LM4WPN-NA, CE42LM4N-NA * The above...
... Supplied from the LCD monitor Power consumption 3.0 watts Dimensions (W x H x D)........4.2" x 1.4" x 5.3" (107 x 34.9 x 135mm) Weight 0.92 lbs (420 g) Operating temperature ..........41˚F ~ 95 ˚F (5˚C ~ 35 ˚C) Storage temperature 14˚F ~ 140˚F (-10˚C ~ 60˚C) Accessories Owner's Manual * The specifications are subject to change without notice. Applicable monitor model CE42LM4WPN-NA, CE42LM4N-NA * The above...
Print Specs
Page 1
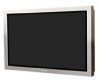
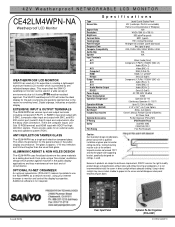
... ceiling mounting. Remote Control w/Batteries; Because its expertise in the public display circumstance. ALUMINUM CABINET & NON HOLES DESIGN The 42LM4WPN uses Anodized aluminum ...000m) 41.3" x 25.7" x 6.4" (w/o Option) 82 lbs. (w/o Option) Owner's Manual; AC Power Cord PJ-Net Organizer (POA-LN01) IP56 Weather Proof UL60950 2003 CAN/CSA-...Panel Optional PJ-Net Organizer (POA-LN01) © 2008 SANYO The SANYO weatherproof LCD will disappear when panel temperature goes down. 42V Weatherproof NETWORKABLE LCD MONITOR CE42LM4WPN-NA Weatherproof LCD Monitor WEATHERPROOF LCD MONITOR SANYO...
... ceiling mounting. Remote Control w/Batteries; Because its expertise in the public display circumstance. ALUMINUM CABINET & NON HOLES DESIGN The 42LM4WPN uses Anodized aluminum ...000m) 41.3" x 25.7" x 6.4" (w/o Option) 82 lbs. (w/o Option) Owner's Manual; AC Power Cord PJ-Net Organizer (POA-LN01) IP56 Weather Proof UL60950 2003 CAN/CSA-...Panel Optional PJ-Net Organizer (POA-LN01) © 2008 SANYO The SANYO weatherproof LCD will disappear when panel temperature goes down. 42V Weatherproof NETWORKABLE LCD MONITOR CE42LM4WPN-NA Weatherproof LCD Monitor WEATHERPROOF LCD MONITOR SANYO...


