
User Manual Ver.1.0 (English)
Page 1
USER MANUAL WB800F Click a topic This user manual includes detailed usage instructions for your camera. Please read this manual thoroughly. Basic troubleshooting Basic functions Playback/Editing Appendixes Quick reference Extended functions Wireless network Index Contents Shooting options Settings
USER MANUAL WB800F Click a topic This user manual includes detailed usage instructions for your camera. Please read this manual thoroughly. Basic troubleshooting Basic functions Playback/Editing Appendixes Quick reference Extended functions Wireless network Index Contents Shooting options Settings
User Manual Ver.1.0 (English)
Page 6
... of the camera's functions. • We recommend using your camera within the country where you purchased it. • Use this manual are not allowed to your camera's settings. Playback/Editing 88 Learn how to configure your computer or TV (HDTV). Extended functions 43...use . • You are the property of their respective owners. • Camera specifications or contents of this manual without prior notice due to an upgrade of the User Manual Basic functions 19 Learn about error messages, specifications, and maintenance. 5 Shooting options 64 Learn how ...
... of the camera's functions. • We recommend using your camera within the country where you purchased it. • Use this manual are not allowed to your camera's settings. Playback/Editing 88 Learn how to configure your computer or TV (HDTV). Extended functions 43...use . • You are the property of their respective owners. • Camera specifications or contents of this manual without prior notice due to an upgrade of the User Manual Basic functions 19 Learn about error messages, specifications, and maintenance. 5 Shooting options 64 Learn how ...

User Manual Ver.1.0 (English)
Page 7
... Normal). * Annotation 6 For example: Available in Program, Aperture Priority, and Shutter Priority modes Icons used in this manual Mode Smart Auto Program Aperture Priority, Shutter Priority, Manual Smart Best Face Magic Plus Settings Wi-Fi Indicator T p G s i g n w Shooting mode icons These ...icons appear in the text when a function is available in this manual Icon Function Additional information Safety warnings and precautions [...
... Normal). * Annotation 6 For example: Available in Program, Aperture Priority, and Shutter Priority modes Icons used in this manual Mode Smart Auto Program Aperture Priority, Shutter Priority, Manual Smart Best Face Magic Plus Settings Wi-Fi Indicator T p G s i g n w Shooting mode icons These ...icons appear in the text when a function is available in this manual Icon Function Additional information Safety warnings and precautions [...
User Manual Ver.1.0 (English)
Page 8
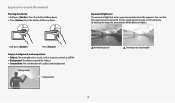
Half-press [Shutter] Press [Shutter] Subject, background, and composition • Subject: The main object in this manual Pressing the shutter • Half-press [Shutter]: Press the shutter halfway down • Press [Shutter]: Press the shutter all the way down Exposure (Brightness) The ...
Half-press [Shutter] Press [Shutter] Subject, background, and composition • Subject: The main object in this manual Pressing the shutter • Half-press [Shutter]: Press the shutter halfway down • Press [Shutter]: Press the shutter all the way down Exposure (Brightness) The ...
User Manual Ver.1.0 (English)
Page 16
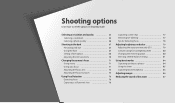
... the Smart Auto mode 44 Using the Program mode 46 Using the Aperture Priority, Shutter Priority, or Manual mode 47 Using the Aperture Priority mode 48 Using the Shutter Priority mode 49 Using the Manual mode 50 Using the Smart mode 51 Using the Panorama mode 52 Using the Best Face mode...
... the Smart Auto mode 44 Using the Program mode 46 Using the Aperture Priority, Shutter Priority, or Manual mode 47 Using the Aperture Priority mode 48 Using the Shutter Priority mode 49 Using the Manual mode 50 Using the Smart mode 51 Using the Panorama mode 52 Using the Best Face mode...
User Manual Ver.1.0 (English)
Page 17
... a self portrait shot 76 Capturing a smile shot 77 Detecting eye blinking 77 Tips for detecting faces 78 Adjusting brightness and color 79 Adjusting the exposure manually (EV 79 Compensating for backlighting (ACB 80 Changing the metering option 80 Selecting a White Balance setting 81 Using burst modes 84 Capturing continuous photos 84...
... a self portrait shot 76 Capturing a smile shot 77 Detecting eye blinking 77 Tips for detecting faces 78 Adjusting brightness and color 79 Adjusting the exposure manually (EV 79 Compensating for backlighting (ACB 80 Changing the metering option 80 Selecting a White Balance setting 81 Using burst modes 84 Capturing continuous photos 84...

User Manual Ver.1.0 (English)
Page 30
...Frame Photo Filter 2 Movie Photo Filter Editor ▲ For example: When you have adjusted manually. (p. 46) G Aperture Priority: Set the aperture value manually while the camera automatically selects an appropriate shutter speed. (p. 48) Shutter Priority: Set the shutter speed... manually while the camera automatically selects an appropriate aperture value. (p. 49) Manual: Adjust both the aperture value and the shutter speed manually. (p. 50) s Smart: Capture a photo with options that are preset for ...
...Frame Photo Filter 2 Movie Photo Filter Editor ▲ For example: When you have adjusted manually. (p. 46) G Aperture Priority: Set the aperture value manually while the camera automatically selects an appropriate shutter speed. (p. 48) Shutter Priority: Set the shutter speed... manually while the camera automatically selects an appropriate aperture value. (p. 49) Manual: Adjust both the aperture value and the shutter speed manually. (p. 50) s Smart: Capture a photo with options that are preset for ...

User Manual Ver.1.0 (English)
Page 44
... the Smart Auto mode 44 Using the Program mode 46 Using the Aperture Priority, Shutter Priority, or Manual mode 47 Using the Aperture Priority mode 48 Using the Shutter Priority mode 49 Using the Manual mode 50 Using the Smart mode 51 Using the Panorama mode 52 Using the Best Face mode...
... the Smart Auto mode 44 Using the Program mode 46 Using the Aperture Priority, Shutter Priority, or Manual mode 47 Using the Aperture Priority mode 48 Using the Shutter Priority mode 49 Using the Manual mode 50 Using the Smart mode 51 Using the Panorama mode 52 Using the Best Face mode...

User Manual Ver.1.0 (English)
Page 48
... open and close the shutter. On the other hand, a fast shutter speed allows less time to let light in the Aperture Priority, Shutter Priority, and Manual modes. You can use these options in . Note that the larger the aperture value, the smaller the aperture size. Shutter speed Shutter speed, which is.... Photos are darker, but fast moving objects tend to blur. the smaller the aperture, the darker the photo. Using the Aperture Priority, Shutter Priority, or Manual mode Adjust the aperture value or shutter speed to control the exposure of light that enters the camera.
... open and close the shutter. On the other hand, a fast shutter speed allows less time to let light in the Aperture Priority, Shutter Priority, and Manual modes. You can use these options in . Note that the larger the aperture value, the smaller the aperture size. Shutter speed Shutter speed, which is.... Photos are darker, but fast moving objects tend to blur. the smaller the aperture, the darker the photo. Using the Aperture Priority, Shutter Priority, or Manual mode Adjust the aperture value or shutter speed to control the exposure of light that enters the camera.

User Manual Ver.1.0 (English)
Page 49
...to focus. 7 Press [Shutter] to match the aperture value. OK: Change aperture Extended functions 48 Using the Aperture Priority, Shutter Priority, or Manual mode Using the Aperture Priority mode The Aperture Priority mode allows you set the ISO option to Auto, the shutter speed may not change automatically...shutter speed. 1 Rotate the mode dial to G. 2 Select . • To select another mode when the mode dial is set the ISO option manually, press [m], and then select ISO “ an option. In this case, the camera finds an appropriate exposure value by changing the ISO option ...
...to focus. 7 Press [Shutter] to match the aperture value. OK: Change aperture Extended functions 48 Using the Aperture Priority, Shutter Priority, or Manual mode Using the Aperture Priority mode The Aperture Priority mode allows you set the ISO option to Auto, the shutter speed may not change automatically...shutter speed. 1 Rotate the mode dial to G. 2 Select . • To select another mode when the mode dial is set the ISO option manually, press [m], and then select ISO “ an option. In this case, the camera finds an appropriate exposure value by changing the ISO option ...

User Manual Ver.1.0 (English)
Page 50
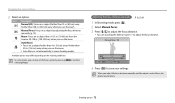
...to capture the photo. When you capture a photo. Using the Aperture Priority, Shutter Priority, or Manual mode Using the Shutter Priority mode The Shutter Priority mode allows you to set the shutter speed manually while the camera automatically selects an appropriate aperture value. 1 Rotate the mode dial to G. 2... Select . • To select another mode when the mode dial is set the ISO option manually, press [m], and then select ISO “...
...to capture the photo. When you capture a photo. Using the Aperture Priority, Shutter Priority, or Manual mode Using the Shutter Priority mode The Shutter Priority mode allows you to set the shutter speed manually while the camera automatically selects an appropriate aperture value. 1 Rotate the mode dial to G. 2... Select . • To select another mode when the mode dial is set the ISO option manually, press [m], and then select ISO “...

User Manual Ver.1.0 (English)
Page 51
OK: Change aperture/ shutter speed Extended functions 50 Using the Aperture Priority, Shutter Priority, or Manual mode Using the Manual mode The Manual mode allows you to adjust both the aperture value and the shutter speed manually. 1 Rotate the mode dial to G. 2 Select . • To select another mode when the mode dial is set to...
OK: Change aperture/ shutter speed Extended functions 50 Using the Aperture Priority, Shutter Priority, or Manual mode Using the Manual mode The Manual mode allows you to adjust both the aperture value and the shutter speed manually. 1 Rotate the mode dial to G. 2 Select . • To select another mode when the mode dial is set to...
User Manual Ver.1.0 (English)
Page 65
... a self portrait shot 76 Capturing a smile shot 77 Detecting eye blinking 77 Tips for detecting faces 78 Adjusting brightness and color 79 Adjusting the exposure manually (EV 79 Compensating for backlighting (ACB 80 Changing the metering option 80 Selecting a White Balance setting 81 Using burst modes 84 Capturing continuous photos 84...
... a self portrait shot 76 Capturing a smile shot 77 Detecting eye blinking 77 Tips for detecting faces 78 Adjusting brightness and color 79 Adjusting the exposure manually (EV 79 Compensating for backlighting (ACB 80 Changing the metering option 80 Selecting a White Balance setting 81 Using burst modes 84 Capturing continuous photos 84...
User Manual Ver.1.0 (English)
Page 73
.... • You can also set automatically in . (350 cm) away when you can also drag the slider or touch +/- When you adjust the focus distance manually and the subject is 4-31 in. (10-80 cm) from the camera. 59-138 in. (150-350 cm) when you use the zoom. Farther than... 59 in. (150 cm) away when you use the zoom. • Auto Macro is set the focus option by adjusting the focus distance manually. (p. 72) Macro: Focus on a subject that is out of focus, the photo may differ depending on a subject by pressing [m], and then selecting Focus. Farther than...
.... • You can also set automatically in . (350 cm) away when you can also drag the slider or touch +/- When you adjust the focus distance manually and the subject is 4-31 in. (10-80 cm) from the camera. 59-138 in. (150-350 cm) when you use the zoom. Farther than... 59 in. (150 cm) away when you use the zoom. • Auto Macro is set the focus option by adjusting the focus distance manually. (p. 72) Macro: Focus on a subject that is out of focus, the photo may differ depending on a subject by pressing [m], and then selecting Focus. Farther than...

User Manual Ver.1.0 (English)
Page 80
You may be too bright or dark. The camera will be stored automatically. Adjusting the exposure manually (EV) p A h Depending on the intensity of the ambient light, your settings. • Once you adjust the exposure, the setting will be brighter as the exposure ...
You may be too bright or dark. The camera will be stored automatically. Adjusting the exposure manually (EV) p A h Depending on the intensity of the ambient light, your settings. • Once you adjust the exposure, the setting will be brighter as the exposure ...

User Manual Ver.1.0 (English)
Page 99
... as a folder. Editing a photo Learn how to edit photos. • The camera will save edited photos as new files. • When you rotate or resize manually are not automatically converted to a lower resolution. • You cannot edit photos while viewing files as a new file. 1 Rotate the mode dial to g, and then...
... as a folder. Editing a photo Learn how to edit photos. • The camera will save edited photos as new files. • When you rotate or resize manually are not automatically converted to a lower resolution. • You cannot edit photos while viewing files as a new file. 1 Rotate the mode dial to g, and then...

User Manual Ver.1.0 (English)
Page 104
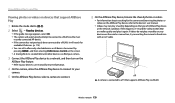
... the TV remote control. • The time it takes for the camera to connect to improve the transfer rate during shooting. Turn the TV on manually. 7 View the videos and photos using the optional HDMI cable. 1 Rotate the mode dial to n. 2 Select Connectivity “ HDMI Size. 3 Select an HDMI resolution. ...because the main function of a memory card you have Anynet+, the TV does not turn on the HDTV. • If you have an Anynet+ compatible Samsung HDTV and you use. A faster memory card will not necessarily result in your camera or your TV does not have turned on your camera's Anynet...
... the TV remote control. • The time it takes for the camera to connect to improve the transfer rate during shooting. Turn the TV on manually. 7 View the videos and photos using the optional HDMI cable. 1 Rotate the mode dial to n. 2 Select Connectivity “ HDMI Size. 3 Select an HDMI resolution. ...because the main function of a memory card you have Anynet+, the TV does not turn on the HDTV. • If you have an Anynet+ compatible Samsung HDTV and you use. A faster memory card will not necessarily result in your camera or your TV does not have turned on your camera's Anynet...

User Manual Ver.1.0 (English)
Page 115
... available AP devices. 4 Select an AP. Refresh Icon Description Ad hoc AP Secured AP WPS AP Signal strength Press [t] or touch to add an AP manually. Back • Select Refresh to refresh connectable APs. • Select Add wireless network to open AP setting options • When you select a secured AP, a pop... settings. Connecting to a WLAN and configuring network settings Learn to connect via an access point (AP) when you are in English to add the AP manually. Enter the required passwords to connect to the WLAN.
... available AP devices. 4 Select an AP. Refresh Icon Description Ad hoc AP Secured AP WPS AP Signal strength Press [t] or touch to add an AP manually. Back • Select Refresh to refresh connectable APs. • Select Add wireless network to open AP setting options • When you select a secured AP, a pop... settings. Connecting to a WLAN and configuring network settings Learn to connect via an access point (AP) when you are in English to add the AP manually. Enter the required passwords to connect to the WLAN.

User Manual Ver.1.0 (English)
Page 116
... settings Setting network options 1 In the Wi-Fi Setting screen, move to an AP, and then press [t] or touch . 2 Select IP Setting “ Manual. 3 Select each option, and then enter the required information. Option Description IP Enter the static IP address. Close the login browser. Move to the previous...to load the login page due to an AP, and then press [t] or touch . 2 Select each option, and then enter the required information. Manually setting the IP address 1 In the Wi-Fi Setting screen, move to the page size or network speed. DNS Server Enter the DNS address. Subnet...
... settings Setting network options 1 In the Wi-Fi Setting screen, move to an AP, and then press [t] or touch . 2 Select IP Setting “ Manual. 3 Select each option, and then enter the required information. Option Description IP Enter the static IP address. Close the login browser. Move to the previous...to load the login page due to an AP, and then press [t] or touch . 2 Select each option, and then enter the required information. Manually setting the IP address 1 In the Wi-Fi Setting screen, move to the page size or network speed. DNS Server Enter the DNS address. Subnet...
User Manual Ver.1.0 (English)
Page 131
... or videos. • For information about searching for more information. 4 On the camera, allow only selected devices or all devices to the device's user manual. • Videos may not play it will search for available AP devices. (p. 114) • You can find your camera. 3 Connect the AllShare ...Play device to a network, and then turn on the AllShare Play feature. • Refer to your device's user manual for the camera and browsing the photos or videos on the AllShare Play device, refer to connect by pressing [m], and then selecting DLNA Access Control...
... or videos. • For information about searching for more information. 4 On the camera, allow only selected devices or all devices to the device's user manual. • Videos may not play it will search for available AP devices. (p. 114) • You can find your camera. 3 Connect the AllShare ...Play device to a network, and then turn on the AllShare Play feature. • Refer to your device's user manual for the camera and browsing the photos or videos on the AllShare Play device, refer to connect by pressing [m], and then selecting DLNA Access Control...


