
Installation Guide Ver.1.0 (English)
Page 1
... 1B 1C Loosen four screws on and start the initial setup Step 4 Remote Control Remote Control Stand Parts and Cables Power Cord x 4 Wall mount adapter IR extender Warning: Screens can be mounted only as recommended by the edges, as shown in the illustration. QUICK START GUIDE Welcome to your new TV. We recommend lifting the TV by the manufacturer. The following instructions cover assembling, connecting, and setting up your new Smart TV...
... 1B 1C Loosen four screws on and start the initial setup Step 4 Remote Control Remote Control Stand Parts and Cables Power Cord x 4 Wall mount adapter IR extender Warning: Screens can be mounted only as recommended by the edges, as shown in the illustration. QUICK START GUIDE Welcome to your new TV. We recommend lifting the TV by the manufacturer. The following instructions cover assembling, connecting, and setting up your new Smart TV...

Installation Guide Ver.1.0 (English)
Page 2
... detailed information, refer to the green AV IN port. I have a wireless network, confirm that the remote has batteries installed. samsung.com or www.samsung.com/spsn for support and warranty service. Best Connection : HDMI We suggest using the Smart Touch Control. Connect the yellow composite video out connector from an AV device to the "Universal Remote Control Setup" section in the TV. Press the power button on the remote to turn on Make sure all other...
... detailed information, refer to the green AV IN port. I have a wireless network, confirm that the remote has batteries installed. samsung.com or www.samsung.com/spsn for support and warranty service. Best Connection : HDMI We suggest using the Smart Touch Control. Connect the yellow composite video out connector from an AV device to the "Universal Remote Control Setup" section in the TV. Press the power button on the remote to turn on Make sure all other...
Quick Guide Ver.1.0 (English)
Page 3
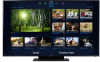
... is Remote Support? 14 Troubleshooting 15 Mounting the TV on the TV 7 Switching Between Video Sources 8 Universal Remote Setup 8 Add the External Device Viewing the e-Manual 9 Viewing the e-Manual 9 Scrolling a Page 9 Using the Top Icons 9 Returning to the Home Page 9 Searching the Index 10 Searching Pages 10 Closing the e-Manual 10 Jumping to a Menu Item 10 Updating the e-Manual Network Configuration 11 Connecting to the Wall Specifications 21 Specifications 22 Dimensions 22 Licenses Guides 23 Warranty Information 25 SAMSUNG BRAND...
... is Remote Support? 14 Troubleshooting 15 Mounting the TV on the TV 7 Switching Between Video Sources 8 Universal Remote Setup 8 Add the External Device Viewing the e-Manual 9 Viewing the e-Manual 9 Scrolling a Page 9 Using the Top Icons 9 Returning to the Home Page 9 Searching the Index 10 Searching Pages 10 Closing the e-Manual 10 Jumping to a Menu Item 10 Updating the e-Manual Network Configuration 11 Connecting to the Wall Specifications 21 Specifications 22 Dimensions 22 Licenses Guides 23 Warranty Information 25 SAMSUNG BRAND...

Quick Guide Ver.1.0 (English)
Page 14
... If your television screen, you may need to correct the issue using Auto Motion Plus (Picture > Picture Options > Auto Motion Plus). Check if Sleep Timer (System > Time > Sleep Timer) has been enabled. Cable Plugs Ports HDMI USB Optical Warning Do not plug cables in the e-Manual. If you find that none of the connections are a number of the energy efficiency features. Be sure to Menu > Broadcasting > Auto Program). ✎✎ For detailed troubleshooting information, watch the troubleshooting videos at 1-800-SAMSUNG (1-800...
... If your television screen, you may need to correct the issue using Auto Motion Plus (Picture > Picture Options > Auto Motion Plus). Check if Sleep Timer (System > Time > Sleep Timer) has been enabled. Cable Plugs Ports HDMI USB Optical Warning Do not plug cables in the e-Manual. If you find that none of the connections are a number of the energy efficiency features. Be sure to Menu > Broadcasting > Auto Program). ✎✎ For detailed troubleshooting information, watch the troubleshooting videos at 1-800-SAMSUNG (1-800...

Quick Guide Ver.1.0 (English)
Page 15
... Cable/Set-Top-Box user manual for the SAMSUNG TV code. ✎✎ This TFT LED panel uses a panel consisting of your connected devices are installed with their poles (+/-) in optimum condition, upgrade to select the correct input source. • Reboot the connected device by the manufacturer. Use the Update Now or Auto Update functions on the TV's menu (Screen Menu > Support > Software Update > Update now or Screen Menu > Support > Software Update > Auto Update). Unless it is HDMI, it , and then reconnecting the device's power cable. • Replace the remote control...
... Cable/Set-Top-Box user manual for the SAMSUNG TV code. ✎✎ This TFT LED panel uses a panel consisting of your connected devices are installed with their poles (+/-) in optimum condition, upgrade to select the correct input source. • Reboot the connected device by the manufacturer. Use the Update Now or Auto Update functions on the TV's menu (Screen Menu > Support > Software Update > Update now or Screen Menu > Support > Software Update > Auto Update). Unless it is HDMI, it , and then reconnecting the device's power cable. • Replace the remote control...

Quick Guide Ver.1.0 (English)
Page 17
... VESA standard screw specifications. •• Do not use screws that do not comply with the VESA standard screw specifications, the length of the screws may cause damage to the inside of the TV set. •• For wall mounts that are too long may differ depending on . Installing a Wall Mount using the Wall mount adapter ✎✎ For more detailed information, refer to the User Manual of accidents. •• Samsung...
... VESA standard screw specifications. •• Do not use screws that do not comply with the VESA standard screw specifications, the length of the screws may cause damage to the inside of the TV set. •• For wall mounts that are too long may differ depending on . Installing a Wall Mount using the Wall mount adapter ✎✎ For more detailed information, refer to the User Manual of accidents. •• Samsung...

Quick Guide Ver.1.0 (English)
Page 25
..., equipment, systems, utilities, services, parts, supplies, accessories, applications, installations, repairs, external wiring or connectors not supplied or authorized by SAMSUNG which occurs in this statement, noncommercial use of the purchaser. brightness related to follow operating instructions, cleaning, maintenance and environmental instructions that are eligible for 37" and smaller LCD/LED TV, transportation to and from a SAMSUNG authorized service center. To obtain warranty service, please contact SAMSUNG at our option...
..., equipment, systems, utilities, services, parts, supplies, accessories, applications, installations, repairs, external wiring or connectors not supplied or authorized by SAMSUNG which occurs in this statement, noncommercial use of the purchaser. brightness related to follow operating instructions, cleaning, maintenance and environmental instructions that are eligible for 37" and smaller LCD/LED TV, transportation to and from a SAMSUNG authorized service center. To obtain warranty service, please contact SAMSUNG at our option...

User Manual Ver.1.0 (English)
Page 4
... Options Sports Mode Subtitles 75 Show Subtitles 75 Subtitle Options 75 Subtitle Display Options TV Settings Basic Picture Settings 76 Changing the Picture Mode 77 Picture Quality 77 Applying the Current Picture Quality Setting to Another Input 78 Picture Size 79 Screen Position 79 Picture Off 79 Reset Image Settings Advanced Settings Picture Options Basic Sound Settings 84 Changing the Sound Mode 85 Adjusting the Sound Settings 85 Auto Volume 85 TV Installation Type 85 Resetting the Sound 3D Audio Speaker Settings 87 Speaker Select 88 Digital Audio Output 88 Samsung Audio Device Connection
... Options Sports Mode Subtitles 75 Show Subtitles 75 Subtitle Options 75 Subtitle Display Options TV Settings Basic Picture Settings 76 Changing the Picture Mode 77 Picture Quality 77 Applying the Current Picture Quality Setting to Another Input 78 Picture Size 79 Screen Position 79 Picture Off 79 Reset Image Settings Advanced Settings Picture Options Basic Sound Settings 84 Changing the Sound Mode 85 Adjusting the Sound Settings 85 Auto Volume 85 TV Installation Type 85 Resetting the Sound 3D Audio Speaker Settings 87 Speaker Select 88 Digital Audio Output 88 Samsung Audio Device Connection

User Manual Ver.1.0 (English)
Page 7
... Sound Test 135 Motion Control Environment Check 135 Signal Information 135 Reset 136 Updating the Software 136 Update now 136 Auto Update 137 Usage Mode 137 Support Info Kensington Security Lock Display Resolution 138 PDP 5500, LED 5500 series and above 138 IBM 138 MAC 139 VESA DMT 140 LED 4300 series models 140 IBM 140 MAC 141 VESA DMT Picture Size and Input Signal Supported 3D Resolutions 143 HDMI 143 3D Format: L/R, T/B 143 3D Format: Frame Packing 144 Component 144 Digital Channel...
... Sound Test 135 Motion Control Environment Check 135 Signal Information 135 Reset 136 Updating the Software 136 Update now 136 Auto Update 137 Usage Mode 137 Support Info Kensington Security Lock Display Resolution 138 PDP 5500, LED 5500 series and above 138 IBM 138 MAC 139 VESA DMT 140 LED 4300 series models 140 IBM 140 MAC 141 VESA DMT Picture Size and Input Signal Supported 3D Resolutions 143 HDMI 143 3D Format: L/R, T/B 143 3D Format: Frame Packing 144 Component 144 Digital Channel...

User Manual Ver.1.0 (English)
Page 10
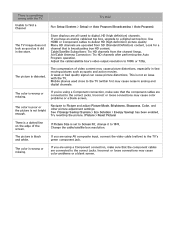
... external device, refer to the antenna input connector. Video Device Connections This TV has a wide range of picture quality. ●● HDMI ●● Component ●● AV Connect the video device to get the next best possible picture quality. The displayed image may vary depending on the model. Antenna Connection Refer to the diagram and connect the antenna cable to the device's operating manual. Make sure that you are using a cable box or satellite receiver...
... external device, refer to the antenna input connector. Video Device Connections This TV has a wide range of picture quality. ●● HDMI ●● Component ●● AV Connect the video device to get the next best possible picture quality. The displayed image may vary depending on the model. Antenna Connection Refer to the diagram and connect the antenna cable to the device's operating manual. Make sure that you are using a cable box or satellite receiver...

User Manual Ver.1.0 (English)
Page 13
... the audio device itself. Connecting the device using its remote control. The displayed image may differ depending on the model. To turn off the TV speakers, open the Speaker Select (Sound > Speaker Settings > Speaker Select) menu, then set External Speaker. Adjust the audio device's volume using an optical cable does not automatically turn off the TV speakers. For better audio quality, it is a good idea to use an AV receiver. ●● Digital Audio (Optical) ●● Audio ●● ARC (Audio Return Channel) The number of...
... the audio device itself. Connecting the device using its remote control. The displayed image may differ depending on the model. To turn off the TV speakers, open the Speaker Select (Sound > Speaker Settings > Speaker Select) menu, then set External Speaker. Adjust the audio device's volume using an optical cable does not automatically turn off the TV speakers. For better audio quality, it is a good idea to use an AV receiver. ●● Digital Audio (Optical) ●● Audio ●● ARC (Audio Return Channel) The number of...

User Manual Ver.1.0 (English)
Page 51
... the Source screen. 222 Select Universal Remote Setup from the top of the screen. Registered External Device Management Universal Remote Setup screen, select a registered external device. ●● Source Setup: Change the TV's input connector that the external device is connected to. ●● Synced Power off: Configure the external device to turn off when the TV is already connected, you wish to set up the universal remote control. Add the External Device 111 Turn on -screen instruction and set up universal remote...
... the Source screen. 222 Select Universal Remote Setup from the top of the screen. Registered External Device Management Universal Remote Setup screen, select a registered external device. ●● Source Setup: Change the TV's input connector that the external device is connected to. ●● Synced Power off: Configure the external device to turn off when the TV is already connected, you wish to set up the universal remote control. Add the External Device 111 Turn on -screen instruction and set up universal remote...
User Manual Ver.1.0 (English)
Page 79
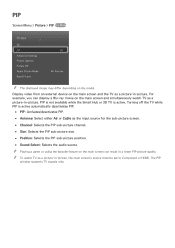
.... "" Playing a game or using the karaoke feature on the main screen and simultaneously watch TV as the input source for the sub-picture screen. ●● Channel: Selects the PIP sub-picture channel. ●● Size: Selects the PIP sub-picture size. ●● Position: Selects the PIP sub-picture position. ●● Sound Select: Selects the audio source. "" To watch TV as a picture-in-picture. PIP Screen Menu > Picture > PIP Try Now Picture 3D PIP Advanced Settings Picture Options Picture Off Apply Picture Mode Reset Picture...
.... "" Playing a game or using the karaoke feature on the main screen and simultaneously watch TV as the input source for the sub-picture screen. ●● Channel: Selects the PIP sub-picture channel. ●● Size: Selects the PIP sub-picture size. ●● Position: Selects the PIP sub-picture position. ●● Sound Select: Selects the audio source. "" To watch TV as a picture-in-picture. PIP Screen Menu > Picture > PIP Try Now Picture 3D PIP Advanced Settings Picture Options Picture Off Apply Picture Mode Reset Picture...

User Manual Ver.1.0 (English)
Page 84
... the reds. When connected to a computer via an HDMI-to Another Input Screen Menu> Picture > Apply Picture Mode Try Now You can be chosen. Decreasing the brightness reduces power consumption. Decreasing the brightness reduces power consumption. Try Now ●● Color Adjusts the overall color saturation. To apply the setting to all external devices connected to red. Adjust the value by dragging left /right arrow button on the remote and change the setting...
... the reds. When connected to a computer via an HDMI-to Another Input Screen Menu> Picture > Apply Picture Mode Try Now You can be chosen. Decreasing the brightness reduces power consumption. Decreasing the brightness reduces power consumption. Try Now ●● Color Adjusts the overall color saturation. To apply the setting to all external devices connected to red. Adjust the value by dragging left /right arrow button on the remote and change the setting...

User Manual Ver.1.0 (English)
Page 97
..., users can set -top box, Satellite receiver, or etc) Manual Manually enter the time. To enable this option, an antenna cable has to be supported depending on the channel and signal. The accuracy of time. Set Clock Mode to +12 hour. "" Time Zone and DST may vary depending on the country. ●● DST: Set the DST (Daylight Savings Time). ●● Time Zone: Choose your time zone. Sleep Timer Screen Menu > System > Time > Sleep Timer Try...
..., users can set -top box, Satellite receiver, or etc) Manual Manually enter the time. To enable this option, an antenna cable has to be supported depending on the channel and signal. The accuracy of time. Set Clock Mode to +12 hour. "" Time Zone and DST may vary depending on the country. ●● DST: Set the DST (Daylight Savings Time). ●● Time Zone: Choose your time zone. Sleep Timer Screen Menu > System > Time > Sleep Timer Try...
User Manual Ver.1.0 (English)
Page 143
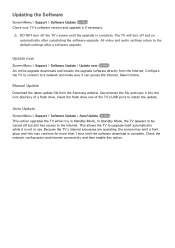
All video and audio settings return to the default settings after completing the software upgrade. Manual Update Download the latest update file from the Internet. Insert the flash drive one of a flash drive. Configure the TV to connect to a network and make sure it into the root directory of the TV's USB ports to be turned off the TV's power until the software download is not in Standby Mode. Decompress the file and copy it...
All video and audio settings return to the default settings after completing the software upgrade. Manual Update Download the latest update file from the Internet. Insert the flash drive one of a flash drive. Configure the TV to connect to a network and make sure it into the root directory of the TV's USB ports to be turned off the TV's power until the software download is not in Standby Mode. Decompress the file and copy it...
User Manual Ver.1.0 (English)
Page 161
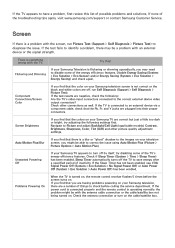
... your Samsung Television is operating normally, the problem might be a problem with the screen, run Self Diagnosis (Support > Self Diagnosis > Picture Test). If the test results are off, run Picture Test (Support > Self Diagnosis > Picture Test) to diagnose the issue. Sleep Timer automatically turns off by itself, try adjusting the following : Are the TV's video input connectors connected to the correct external device video output connectors? If the power cord is connected properly and the remote control...
... your Samsung Television is operating normally, the problem might be a problem with the screen, run Self Diagnosis (Support > Self Diagnosis > Picture Test). If the test results are off, run Picture Test (Support > Self Diagnosis > Picture Test) to diagnose the issue. Sleep Timer automatically turns off by itself, try adjusting the following : Are the TV's video input connectors connected to the correct external device video output connectors? If the power cord is connected properly and the remote control...
User Manual Ver.1.0 (English)
Page 162
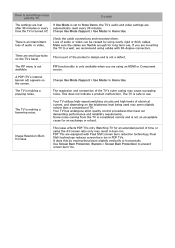
...) channels. Incorrect or loose connections may cause color problems or a blank screen. If you 're using AV composite input, connect the video cable (yellow) to the correct jacks. Use HDMI or Component cables to 1080i or 720p. Adjust the cable/satellite box's video output resolution to deliver HD (high definition) picture quality. If you have an analog cable/set top box, upgrade to a digital set to Screen Fit, change it did in the store. Try resetting the picture. (Picture > Reset Picture) There is set top box. The color...
...) channels. Incorrect or loose connections may cause color problems or a blank screen. If you 're using AV composite input, connect the video cable (yellow) to the correct jacks. Use HDMI or Component cables to 1080i or 720p. Adjust the cable/satellite box's video output resolution to deliver HD (high definition) picture quality. If you have an analog cable/set top box, upgrade to a digital set to Screen Fit, change it did in the store. Try resetting the picture. (Picture > Reset Picture) There is set top box. The color...

User Manual Ver.1.0 (English)
Page 163
Navigate to Sound and set Speaker Select to HDMI cable, a separate audio cable is nothing plugged into it. For antenna or cable connections, check the signal information. Run Self Diagnosis (Support > Self Diagnosis > Sound Test). 3D TV There is another 3D product or electronic device turned on the external device. The 3D Active Glasses may be caused by disconnecting and then reconnecting the device' s power cable. The batteries in...
Navigate to Sound and set Speaker Select to HDMI cable, a separate audio cable is nothing plugged into it. For antenna or cable connections, check the signal information. Run Self Diagnosis (Support > Self Diagnosis > Sound Test). 3D TV There is another 3D product or electronic device turned on the external device. The 3D Active Glasses may be caused by disconnecting and then reconnecting the device' s power cable. The batteries in...
User Manual Ver.1.0 (English)
Page 166
Change Use Mode (Support > Use Mode) to Home Use. Check the cable connections and reconnect them. Make sure the cables are small particles on the TV's bezel. The PIP menu is safe to a wall, we recommend using the 4:3 screen ratio only may result in PDP TVs. A POP (TV's internal banner ad) appears on the brightness level being used may cause a popping noise. The TV is not available...
Change Use Mode (Support > Use Mode) to Home Use. Check the cable connections and reconnect them. Make sure the cables are small particles on the TV's bezel. The PIP menu is safe to a wall, we recommend using the 4:3 screen ratio only may result in PDP TVs. A POP (TV's internal banner ad) appears on the brightness level being used may cause a popping noise. The TV is not available...


