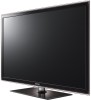
User Manual (user Manual) (ver.1.0) (English)
Page 2
... • Memorizing Channels • Other Features Basic Features • Changing the Preset Picture Mode • Adjusting Picture Settings • Changing the Picture Size • Changing the Picture Options • Using the TV with Your PC • Changing the Preset Sound Modes • Adjusting Sound Settings Preference Features 1 • Wired Network Connection 21 • Wireless Network Connection 25 • Setting the Time 29 • Blocking Programs • Other Features • Economical Solutions • Picture In Picture (PIP) 31 • Support Menu 32 34...
User Manual (user Manual) (ver.1.0) (English)
Page 4
To use this function. English Using the Timer Viewing You can set the current time first using the Time → Clock function in the System menu to use Timer Viewing, follow these steps: 1. Press the ENTERE button to set Antenna, Channel, Repeat, and Start ▶ Time. NN You must set the TV to display a desired channel automatically on a day and at a time of your choice. Press the l / r / u / d buttons to add a scheduled viewing. ◀ 2.
User Manual (user Manual) (ver.1.0) (English)
Page 12
...; The displayed image may differ depending on the model. English screen. You can add channels, delete Added channels, set Favorite channels, use the program guide for digital broadcasts and change the antenna or channel settings by ◀ selecting the icons in the top right corner of the screen. ■■ Channel OO SMART HUB → Channel → ENTERE Using the Channel function, you can also change between the All Channels and Added...
User Manual (user Manual) (ver.1.0) (English)
Page 41
●● HD (High Definition): 16:9 - 1080i/1080p (1920x1080), 720p (1280x720) ●● You can adjust and store settings for each external device you have connected to an input on the TV. ●● Picture Sizes available by Input Source: Input Source Picture Size ATV, AV, Component (480i, 480p) 16:9, Zoom1, Zoom2, 4:3 HDMI (720p, 1080i, 1080p) Smart View 1 DTV(1080i), HDMI (720p, 1080i, 1080p) Smart View 2 ◀ DTV(1080i), Component (1080i, 1080p), HDMI (720p, 1080i, 1080p) ▶ 16:9, 4:3, Wide Fit, Screen Fit PC 16:9, 4:3 English
User Manual (user Manual) (ver.1.0) (English)
Page 44
... the Expert Pattern is running, the TV does not output sound. ▶ NN Only enabled in DTV, Component, and HDMI modes. ●● RGB Only Mode (Off / Red / Green / Blue): Displays the Red, Green and Blue colors so you can make fine adjustments to hue and saturation. English NN After selecting Pattern1 or Pattern2, you can adjust any of grey and black. Off: Turns the Expert Pattern function...
User Manual (user Manual) (ver.1.0) (English)
Page 48
NN Available only when you set the picture mode to Movie and the external input to the TV's HDMI or Component IN jacks. NN Some external devices may not support this function. ●● LED Motion Plus (Off / On): Removes blur and judder from an external device (e.g. ●● xvYCC (Off / On): Setting xvYCC on increases picture detail and enlarges the color space when your are watching movies input from scenes with a lot of fast movement to provide a clearer picture. ◀ ▶ English BD/DVD player) connected to HDMI or Component.
User Manual (user Manual) (ver.1.0) (English)
Page 49
... adjust and store settings for each Auto Motion Plus Standard external device connected to an input on the TV. ●● The displayed image may differ depending on the model. Film Mode Off NN You can only make changes to change the setting, and then press ENTERE. Picture Options Color Tone Standard ●● Color Tone (Cool / Standard / Warm1 / Warm2) Digital Noise Filter MPEG Noise Filter Auto Auto...
User Manual (user Manual) (ver.1.0) (English)
Page 76
... model. ◀ ▶ English Network Setting 6/6 Wired network and Internet connection completed. SEC_LinkShare MAC Address IP Address Subnet Mask Gateway DNS Server 00:12:fb:2b:56:4d 192.168.11.4 255.255.255.0 192.168.11.1 192.168.11.1 Internet is connected successfully. NN If the automatic process cannot find the network connection values or if you have a problem with using Internet Service...
User Manual (user Manual) (ver.1.0) (English)
Page 107
... (Blinking → on). 3. The memory stick downloads the connection information. 4. Turn on the screen notifying you want to try again from Step 1. Insert a USB memory stick into a USB port on your AP, a pop-up using Plug & Access again, reset the AP, disconnect the Samsung Wireless LAN adapter and then try using the Plug & Access function 1. If you of the failure. Take the USB memory stick out of the other connection setup...
User Manual (user Manual) (ver.1.0) (English)
Page 110
... device supporting Ad-hoc connections without a wireless router or wireless router through the "Samsung Wireless LAN adapter". The existing network system may have limited functionality. ■■ Ad hoc Network Setup You can use files on the device or connect to set up using the AllShare or Multimedia function. When connected to a mobile device, you want to change the network connection?" Select Ad hoc. Do you can connect to Network Settings screen...
User Manual (user Manual) (ver.1.0) (English)
Page 113
... the power cord, you press the INFO button. ●● Clock: Set the clock to use the various timer features of the TV. English ❑❑ Setting the Time OO MENUm → System → Time → ENTERE ■■ Time OO The current time will appear every time you have the cable or an antenna connected to the TV to set the clock again. ◀ -- Clock Mode: Set...
User Manual (user Manual) (ver.1.0) (English)
Page 114
... Set. Clock Set: Set the Date and Time. NN You can set to Manual. English Manual: Set the current time manually. To exit Clock Set, select Close, and then press ENTERE. ▶ NN Available only when Clock Mode is set the Date and Time directly by pressing the number buttons on the broadcast station and signal, the auto time set the time manually. -- In this case, set up and down arrow buttons. Select Date or Time...
User Manual (user Manual) (ver.1.0) (English)
Page 189
... the Account Management menu, select Register Service Account, and then press the ENTERE button. Register Service Account: If you have existing accounts with any of the providers listed by the Register Service Account function, you will be able to log onto the account through Smart Hub easily, without entering your Smart Hub account. To use the Account...
User Manual (user Manual) (ver.1.0) (English)
Page 194
... can set Ticker Autorun to access the Internet service while watching TV. NN Only available if supported by the broadcaster English NN Depending on the TV. NN The Ticker application provides useful News, Weather, and Stock Market information. The Ticker application on Smart Hub must be supported. ◀ ▶ Channel Bound Service (Off / On): Some channels support applications as an Internet data service...
User Manual (user Manual) (ver.1.0) (English)
Page 196
After a few moments, it starts the re- initialization procedure. ◀ 4. 2. In a few moments, Smart Hub automatically resets. English NN The default password set is "0-0-0-0." NN If you forget the PIN code, press the remote control buttons in the following sequence in Standby mode, which resets the PIN to Step 4 in Starting Smart Hub for the First ▶ Time. To complete the re-initialization, go black, then Smart Hub re-appears. The screen may go to "0-0-0-0": MUTE → 8 → 2 → 4 → POWER (on). 3. Enter the your security password.
User Manual (user Manual) (ver.1.0) (English)
Page 285
... remote control is Anynet+ compatible. •• Anynet+ doesn't work in certain situations. (Searching channels, operating Smart Hub or Plug & Play (initial setup), etc.) •• If you have removed and then reconnected the HDMI cable, please make sure to search devices again or turn your TV off and on . English The Anynet+ system supports Anynet+ devices only. •• You can connect only one receiver...
User Manual (user Manual) (ver.1.0) (English)
Page 291
... using an AV composite input, connect the video cable (yellow) to the Green jack of Component Input 1 on the edge of the cable box to 1080i or 720p. ◀ ▶ English The picture is connected to a cable box, try to 20 minutes.) •• Set the output resolution of the screen. When changing channels, the picture freezes or is a dotted line on the TV. •• If the TV is black and white. Issues...
User Manual (user Manual) (ver.1.0) (English)
Page 296
... you are using an HDMI connection, check the audio output setting on the source list, even if a PC is normal. "PC" is always shown on your PC's output resolution so it matches a resolution supported by the TV. Issues Solutions and Explanations PC Connection A "Mode Not Supported" message appears. •• Set your PC. ◀ Network Connection The wireless network connection •• The Samsung Wireless USB dongle is connected to a wireless IP sharer (router). Software Upgrade over the network fails...
User Manual (user Manual) (ver.1.0) (English)
Page 297
Issues Others Purple/green rolling horizontal bars and buzzing noise from the set -top-box has a grounding issue. The picture won't display in full screen. ◀ A "Mode Not Supported" message appears. box. Replace the Component video cables with a Component cable connection. Solutions and Explanations •• Remove the left and right audio connections from the TV speakers with an HDMI connection. •• HD channels will have black bars on either side of the screen when displaying up scaled...
User Manual (user Manual) (ver.1.0) (English)
Page 299
... the cables are using an HDMI, PC, or Component source. ▶ •• Select Home Use under Plug & Play mode. English If mounting the TV to the Plug & Play Feature. The PIP menu is not available. ◀ POP (TV's internal banner ad) appears on the screen. •• PIP functionality is not a defect. Issues Solutions and Explanations You have intermittent loss of audio or video. •• Check the cable connections...