User Manual
Page 3
...45 Recording 46 Listening through a Receiver 46 Troubleshooting for instructions on how to open the relevant submenu within the OSD (on the remote control. Contents Getting Started yy List of Features 4 yy Accessories 4 yy Install the Stand 5 yy Viewing the Control Panel 6 yy Viewing the... Remote Control 7 yy Connecting to an Antenna 8 yy Plug & Play (Initial Setup 8 Connections yy Connecting to an AV Device 9 yy Connecting to...
...45 Recording 46 Listening through a Receiver 46 Troubleshooting for instructions on how to open the relevant submenu within the OSD (on the remote control. Contents Getting Started yy List of Features 4 yy Accessories 4 yy Install the Stand 5 yy Viewing the Control Panel 6 yy Viewing the... Remote Control 7 yy Connecting to an Antenna 8 yy Plug & Play (Initial Setup 8 Connections yy Connecting to an AV Device 9 yy Connecting to...
User Manual
Page 4
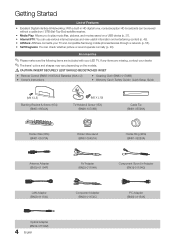
... Media Play: Allows you to play music files, pictures, and movies saved on the models. [[CAUTION: INSERT SECURELY LEST SHOULD BE DETACHED IN SET yy Remote Control (BN68-01055A) & Batteries (AAA x 2) yy Owner's Instructions yy Cleaning Cloth (BN63-01798B) yy Warranty Card / Safety Guide / Quick Setup Guide (M4 X L8) Blanking Bracket... device (p. 37). yy Internet@TV: You can check whether picture or sound operate normally (p. 28). If any items are included with your TV and compatible Samsung mobile phones/devices through a network (p. 55).
... Media Play: Allows you to play music files, pictures, and movies saved on the models. [[CAUTION: INSERT SECURELY LEST SHOULD BE DETACHED IN SET yy Remote Control (BN68-01055A) & Batteries (AAA x 2) yy Owner's Instructions yy Cleaning Cloth (BN63-01798B) yy Warranty Card / Safety Guide / Quick Setup Guide (M4 X L8) Blanking Bracket... device (p. 37). yy Internet@TV: You can check whether picture or sound operate normally (p. 28). If any items are included with your TV and compatible Samsung mobile phones/devices through a network (p. 55).
User Manual
Page 6
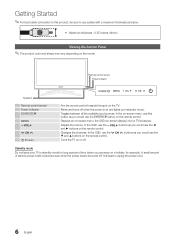
... on a holiday, for long periods of electric power is still consumed even when the power button is best to use the ENTERE button on the remote control. Standby mode Do not leave your TV's features. It is turned off. Displays an on-screen menu, the OSD (on screen display) ... the OSD, use the z buttons as you would use cables with a maximum thickness as you would use the ▼ and ▲ buttons on the remote control. Toggles between all the available input sources. Blinks and turns off . Getting Started ✎✎For best cable connection to this product, be sure...
... on a holiday, for long periods of electric power is still consumed even when the power button is best to use the ENTERE button on the remote control. Standby mode Do not leave your TV's features. It is turned off. Displays an on-screen menu, the OSD (on screen display) ... the OSD, use the z buttons as you would use cables with a maximum thickness as you would use the ▼ and ▲ buttons on the remote control. Toggles between all the available input sources. Blinks and turns off . Getting Started ✎✎For best cable connection to this product, be sure...

User Manual
Page 7
...on the screen (p. 14). P.SIZE: Selects the picture size (p. 18). Installing batteries (Battery size: AAA) ✎✎NOTE xx Use the remote control within 23 feet from the TV. Avoid use when nearby fluorescent lights or neon signs. Displays and selects the available video sources (p. 13).... station. FAV.CH: Displays Favorite Channel Lists on the screen (p. 14). When on, the buttons become illuminated for Samsung recorders that have the Anynet+ feature) Viewing the Remote Control POWER ON/OFF SOURCE PRE-CH MUTE CH LIST CONTENT MENU INTERNET @ TV TOOLS INFO RETURN EXIT A B ...
...on the screen (p. 14). P.SIZE: Selects the picture size (p. 18). Installing batteries (Battery size: AAA) ✎✎NOTE xx Use the remote control within 23 feet from the TV. Avoid use when nearby fluorescent lights or neon signs. Displays and selects the available video sources (p. 13).... station. FAV.CH: Displays Favorite Channel Lists on the screen (p. 14). When on, the buttons become illuminated for Samsung recorders that have the Anynet+ feature) Viewing the Remote Control POWER ON/OFF SOURCE PRE-CH MUTE CH LIST CONTENT MENU INTERNET @ TV TOOLS INFO RETURN EXIT A B ...
User Manual
Page 15
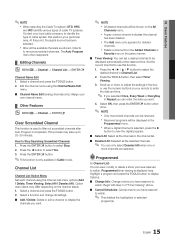
... type of "Timer Viewing" above. ■■ Cancel Schedules: Cancel a show you want . ✎✎ NOTE xx All deleted channels will be shown on your remote to enter the date and time. ✎✎ If you selected Once, Every Week or EveryDay in Repeat you can view, modify or delete a show...
... type of "Timer Viewing" above. ■■ Cancel Schedules: Cancel a show you want . ✎✎ NOTE xx All deleted channels will be shown on your remote to enter the date and time. ✎✎ If you selected Once, Every Week or EveryDay in Repeat you can view, modify or delete a show...
User Manual
Page 21
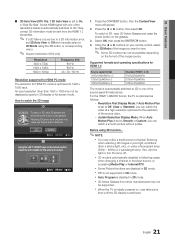
... screen mode. To watch in 3D, wear 3D glasses and press the power button on the glasses. 3. Using the ◄ or ► buttons on your remote control, select the 3D Mode of the image you want to view. ✎✎ Some 3D modes may not be supported. If so, dim the...
... screen mode. To watch in 3D, wear 3D glasses and press the power button on the glasses. 3. Using the ◄ or ► buttons on your remote control, select the 3D Mode of the image you want to view. ✎✎ Some 3D modes may not be supported. If so, dim the...

User Manual
Page 24
... you disconnect the power cord, you have different names. 24 English DST (Daylight Saving Time) (Off / On): Switches the Daylight Saving Time function on the remote control. Auto: Set the current time automatically using more than one photo file in order to set to Activate.) Volume: Set the desired volume level...
... you disconnect the power cord, you have different names. 24 English DST (Daylight Saving Time) (Off / On): Switches the Daylight Saving Time function on the remote control. Auto: Set the current time automatically using more than one photo file in order to set to Activate.) Volume: Set the desired volume level...

User Manual
Page 26
... information from an external device to a restricted channel, the V-Chip will appear: This channel is deactivated. xx Even if you forget the PIN, press the remote-control buttons in digital caption mode depending on the broadcasting station. ■■ Change PIN: The Change PIN screen will not be available in the...
... information from an external device to a restricted channel, the V-Chip will appear: This channel is deactivated. xx Even if you forget the PIN, press the remote-control buttons in digital caption mode depending on the broadcasting station. ■■ Change PIN: The Change PIN screen will not be available in the...
User Manual
Page 28
...9998; If none of the TV. ■■ Picture Test: Use to have a Samsung Mobile phone/device which supports Wireless Remote Control. Adjust your connections. Contact Samsung's Call Center for assistance (1-800-SAMSUNG). No: If the test pattern is noise in the test pattern, select Yes. Please ... test, make sure Speaker Select is set to this is part of the normal operation of these troubleshooting tips apply, contact the Samsung customer service center. 28 English There may be a problem with the TV. Please check your external equipment. You must have a...
...9998; If none of the TV. ■■ Picture Test: Use to have a Samsung Mobile phone/device which supports Wireless Remote Control. Adjust your connections. Contact Samsung's Call Center for assistance (1-800-SAMSUNG). No: If the test pattern is noise in the test pattern, select Yes. Please ... test, make sure Speaker Select is set to this is part of the normal operation of these troubleshooting tips apply, contact the Samsung customer service center. 28 English There may be a problem with the TV. Please check your external equipment. You must have a...

User Manual
Page 31
.... Use the number buttons on your remote. 6. When done, press the RETURN button on your remote to enter numbers and the arrow buttons... supports DHCP. The Network connection values are displayed. Press the ▼ button on your remote. 10. Network Setup Internet Protocol Setup IP Address Subnet Mask Gateway DNS DNS Server : Auto... R Return 7. Wait two minutes, and then press the RETURN button on your remote to go to your LAN as described in the previous section. 2. Network Setup ... TV, press the MENU button on your remote, use the ▲ or ▼ button to the first entry...
.... Use the number buttons on your remote. 6. When done, press the RETURN button on your remote to enter numbers and the arrow buttons... supports DHCP. The Network connection values are displayed. Press the ▼ button on your remote. 10. Network Setup Internet Protocol Setup IP Address Subnet Mask Gateway DNS DNS Server : Auto... R Return 7. Wait two minutes, and then press the RETURN button on your remote to go to your LAN as described in the previous section. 2. Network Setup ... TV, press the MENU button on your remote, use the ▲ or ▼ button to the first entry...
User Manual
Page 34
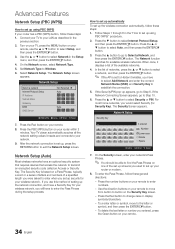
... to select Setup, and then press the ENTERE button. 3. Follow Steps 1 through 6 in the previous section. 2. The Network function searches for your remote to move to select Security or PIN. In the list of the set up screens you have a Security Key for Security Key). Use the direction...press the MENU button on your router or modem. 8. After the network connection is set to Hidden (Invisible), you used to set up your remote to Select a Network, and then press the ENTERE button. The Security Screen appears. If the Network Connecting Screen appears, go to enter numbers....
... to select Setup, and then press the ENTERE button. 3. Follow Steps 1 through 6 in the previous section. 2. The Network function searches for your remote to move to select Security or PIN. In the list of the set up screens you have a Security Key for Security Key). Use the direction...press the MENU button on your router or modem. 8. After the network connection is set to Hidden (Invisible), you used to set up your remote to Select a Network, and then press the ENTERE button. The Security Screen appears. If the Network Connecting Screen appears, go to enter numbers....

User Manual
Page 35
... connection values manually, follow the directions from that appears, click the Support tab. 4. A list of the screen. 2. Follow Steps 1 through the "Samsung Wireless LAN Adapter" by using PBC (WPS)" (p. 34). 2. To test the connection, press the RETURN button to new Ad-hoc device 1. How ... Mask, and Gateway values. 7. Press the ▲ or ▼ button to go to connect. When done, press the Blue button on the remote. ✎✎ The message Ad-hoc is required, input the security key. ✎✎ If network doesn't operate normally, check the Network Name...
... connection values manually, follow the directions from that appears, click the Support tab. 4. A list of the screen. 2. Follow Steps 1 through the "Samsung Wireless LAN Adapter" by using PBC (WPS)" (p. 34). 2. To test the connection, press the RETURN button to new Ad-hoc device 1. How ... Mask, and Gateway values. 7. Press the ▲ or ▼ button to go to connect. When done, press the Blue button on the remote. ✎✎ The message Ad-hoc is required, input the security key. ✎✎ If network doesn't operate normally, check the Network Name...

User Manual
Page 42
.../music/photo files 1. xx To cancel a selection, press the Yellow button again. While a file list is displayed, press the � (Play) / ENTERE button on the remote control to the left of the selected files. Videos /Movie 01.avi Movie 01.avi Movie 03.avi Movie 05.avi Movie 07.avi Movie...
.../music/photo files 1. xx To cancel a selection, press the Yellow button again. While a file list is displayed, press the � (Play) / ENTERE button on the remote control to the left of the selected files. Videos /Movie 01.avi Movie 01.avi Movie 03.avi Movie 05.avi Movie 07.avi Movie...
User Manual
Page 44
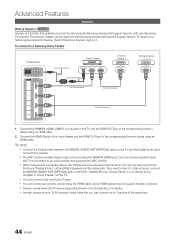
...system can only be used only with your TV and the Digital Audio Input on the DVD / Satellite Box (i.e. Anynet Device 1 or 2) directly to a Samsung Home Theater TV Rear Panel Optical Adapter (Supplied) Home Theater Anynet+ Device 1 Anynet+ Device 2, 3, 4 Optical Cable (Not Supplied) HDMI Cable (Not ...of sound using an HDMI cable. ✎✎NOTE xx Connect the Optical cable between the DIGITAL AUDIO OUT (OPTICAL) jack on your Samsung TV's remote. You will only hear sound from the Home Theater's Front, Left and Right speakers and the subwoofer. t Anynet+ is in total...
...system can only be used only with your TV and the Digital Audio Input on the DVD / Satellite Box (i.e. Anynet Device 1 or 2) directly to a Samsung Home Theater TV Rear Panel Optical Adapter (Supplied) Home Theater Anynet+ Device 1 Anynet+ Device 2, 3, 4 Optical Cable (Not Supplied) HDMI Cable (Not ...of sound using an HDMI cable. ✎✎NOTE xx Connect the Optical cable between the DIGITAL AUDIO OUT (OPTICAL) jack on your Samsung TV's remote. You will only hear sound from the Home Theater's Front, Left and Right speakers and the subwoofer. t Anynet+ is in total...

User Manual
Page 46
... the TV is connected to the TV via HDMI, only 2 channel sound will send out 5.1 channel sound to search devices. 2. xx The TV remote control may not appear in jack of the receiver to the DIGITAL AUDIO OUT (OPTICAL) jack of the TV. ✎✎ When the receiver (i.e... a DTV (air) signal, the TV will be blocked from the TV's Optical jack. Using the ARC function You can only control Anynet+ devices using a Samsung recorder. 1. Advanced Features ¦¦ Recording You can record the source streams by selecting Recording: (device_name). ✎✎ Pressing the � (REC) ...
... the TV is connected to the TV via HDMI, only 2 channel sound will send out 5.1 channel sound to search devices. 2. xx The TV remote control may not appear in jack of the receiver to the DIGITAL AUDIO OUT (OPTICAL) jack of the TV. ✎✎ When the receiver (i.e... a DTV (air) signal, the TV will be blocked from the TV's Optical jack. Using the ARC function You can only control Anynet+ devices using a Samsung recorder. 1. Advanced Features ¦¦ Recording You can record the source streams by selecting Recording: (device_name). ✎✎ Pressing the � (REC) ...
User Manual
Page 47
...the TOOLS button to display the Anynet+ menu and select a menu you are configuring Anynet+ or switching to a view mode. • Use the remote control when the Anynet+ setting or switching to exit Anynet+. The connected device is in the Anynet+ menu. • Press the SOURCE button on the... TV remote control and select a non- Some HDMI cables may not support Anynet+ functions. • If connection is terminated because there has been a power ...
...the TOOLS button to display the Anynet+ menu and select a menu you are configuring Anynet+ or switching to a view mode. • Use the remote control when the Anynet+ setting or switching to exit Anynet+. The connected device is in the Anynet+ menu. • Press the SOURCE button on the... TV remote control and select a non- Some HDMI cables may not support Anynet+ functions. • If connection is terminated because there has been a power ...
User Manual
Page 49
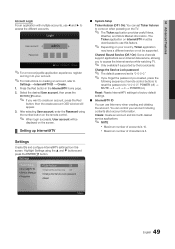
... default settings. ■■ Internet@TV ID You can set is "0-0-0-0." ✎✎ If you forget the password you created, press the following sequence of remote control buttons to reset the password to "0-0-0-0": POWER (off) → MUTE → 8 → 2 → 4 → POWER (on the TV. ...;✎ NOTE xx Maximum number of accounts is 10. xx Maximum number of characters is 8. Highlight Settings using the number button on the remote control. ✎✎ When login succeeds, User account will appear. 3. then the create account OSD window will be supported. Settings Create ...
... default settings. ■■ Internet@TV ID You can set is "0-0-0-0." ✎✎ If you forget the password you created, press the following sequence of remote control buttons to reset the password to "0-0-0-0": POWER (off) → MUTE → 8 → 2 → 4 → POWER (on the TV. ...;✎ NOTE xx Maximum number of accounts is 10. xx Maximum number of characters is 8. Highlight Settings using the number button on the remote control. ✎✎ When login succeeds, User account will appear. 3. then the create account OSD window will be supported. Settings Create ...
User Manual
Page 50
... Delete and lock applications installed to register a service site ID, select Yes. Select Create. Press the 2 button on the remote to input the rest of your Samsung TV with a single login by linking the users' account to test your application site ID and password. Press buttons on the...can use this Screen Keypad in numerical order. 4-4. button on the remote 3 times to change the input mode from numbers to step 5. 10. Press the - xx Password must be displayed on the Samsung Apps. 1. button on the remote while you to change the input mode from lower case to numbers....
... Delete and lock applications installed to register a service site ID, select Yes. Select Create. Press the 2 button on the remote to input the rest of your Samsung TV with a single login by linking the users' account to test your application site ID and password. Press buttons on the...can use this Screen Keypad in numerical order. 4-4. button on the remote 3 times to change the input mode from numbers to step 5. 10. Press the - xx Password must be displayed on the Samsung Apps. 1. button on the remote while you to change the input mode from lower case to numbers....
User Manual
Page 53
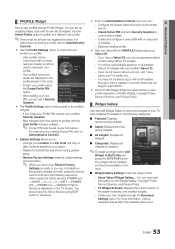
... settings and information. ✎✎ When you cannot run Restore Factory Settings normally or you can not install/run the specific widgets normally, press the remote control buttons in the dock. Widget Gallery...: You can access personalized content using EXIT button in with a unique set to represent your TV. Create your...
... settings and information. ✎✎ When you cannot run Restore Factory Settings normally or you can not install/run the specific widgets normally, press the remote control buttons in the dock. Widget Gallery...: You can access personalized content using EXIT button in with a unique set to represent your TV. Create your...
User Manual
Page 55
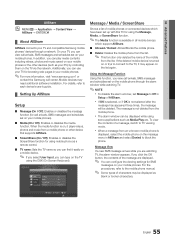
...;¦ Setting Up AllShare Setup ■■ Message (On / Off): Enables or disables the message function (for using some applications such as a remote control. ■■ TV name: Sets the TV name so you can configure the viewing settings for browsing web pages in your mobile phones. ...OO MENUm → Application → Content View → AllShare → ENTERE ¦¦ About AllShare AllShare connects your TV and compatible Samsung mobile phones/ devices through the alarm window while watching TV. ✎✎NOTE xx To disable the alarm window, set Message to Off in ...
...;¦ Setting Up AllShare Setup ■■ Message (On / Off): Enables or disables the message function (for using some applications such as a remote control. ■■ TV name: Sets the TV name so you can configure the viewing settings for browsing web pages in your mobile phones. ...OO MENUm → Application → Content View → AllShare → ENTERE ¦¦ About AllShare AllShare connects your TV and compatible Samsung mobile phones/ devices through the alarm window while watching TV. ✎✎NOTE xx To disable the alarm window, set Message to Off in ...

