User Manual
Page 2
... to proper user manual section for viewing. Uneven LED aging as the dark sidebars on -site services, minimum or maximum repair times, exchanges or replacements, accessories, options, upgrades, or consumables. For the location of LED screen, which will additionally provide Warranty Repair Service in the United States on SAMSUNG products purchased in Canada, and in Canada on SAMSUNG products purchased in the LED picture. Product design and specifications may be...
... to proper user manual section for viewing. Uneven LED aging as the dark sidebars on -site services, minimum or maximum repair times, exchanges or replacements, accessories, options, upgrades, or consumables. For the location of LED screen, which will additionally provide Warranty Repair Service in the United States on SAMSUNG products purchased in Canada, and in Canada on SAMSUNG products purchased in the LED picture. Product design and specifications may be...
User Manual
Page 3
... Your PC 22 yy Sound Menu 22 Changing the Preset Sound Mode 22 Adjusting Sound Settings 22 Sound Settings 23 yy Setup Menu 24 Setting the Time 24 Using the Sleep Timer 24 Setting the On / Off Timer 24 Locking Programs 25 Other Features 26 Picture In Picture (PIP) 28 yy Support Menu 28 Advanced Features yy Network Connection 30 Connecting to a Wired Network 30 Connecting to a Wireless Network 32 yy Media Play 37 Connecting a USB Device 37 Connecting to your PC through a network 37 Screen Display 39 Playing Multiple Files 42 Media Play -
... Your PC 22 yy Sound Menu 22 Changing the Preset Sound Mode 22 Adjusting Sound Settings 22 Sound Settings 23 yy Setup Menu 24 Setting the Time 24 Using the Sleep Timer 24 Setting the On / Off Timer 24 Locking Programs 25 Other Features 26 Picture In Picture (PIP) 28 yy Support Menu 28 Advanced Features yy Network Connection 30 Connecting to a Wired Network 30 Connecting to a Wireless Network 32 yy Media Play 37 Connecting a USB Device 37 Connecting to your PC through a network 37 Screen Display 39 Playing Multiple Files 42 Media Play -
User Manual
Page 4
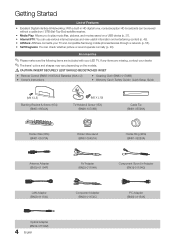
... compatible Samsung mobile phones/devices through a network (p. 55). yy Self Diagnosis: You can use various internet services and view useful information and entertaining content (p. 48). yy Media Play: Allows you to play music files, pictures, and movies saved on the models. [[CAUTION: INSERT SECURELY LEST SHOULD BE DETACHED IN SET yy Remote Control (BN68-01055A) & Batteries (AAA x 2) yy Owner's Instructions yy Cleaning Cloth (BN63-01798B) yy Warranty Card / Safety Guide / Quick Setup Guide...
... compatible Samsung mobile phones/devices through a network (p. 55). yy Self Diagnosis: You can use various internet services and view useful information and entertaining content (p. 48). yy Media Play: Allows you to play music files, pictures, and movies saved on the models. [[CAUTION: INSERT SECURELY LEST SHOULD BE DETACHED IN SET yy Remote Control (BN68-01055A) & Batteries (AAA x 2) yy Owner's Instructions yy Cleaning Cloth (BN63-01798B) yy Warranty Card / Safety Guide / Quick Setup Guide...
User Manual
Page 6
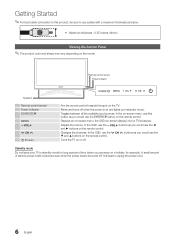
... your TV in standby mode. Adjusts the volume. In the OSD, use the z buttons as below: yy Maximum thickness - 0.55 inches (14mm) Viewing the Control Panel ✎✎The product color and shape may vary depending on the model. Getting Started ✎✎For best cable connection to this product, be sure to unplug the power cord. 6 English Changes the channels. It is turned off . Toggles between all the available input sources.
... your TV in standby mode. Adjusts the volume. In the OSD, use the z buttons as below: yy Maximum thickness - 0.55 inches (14mm) Viewing the Control Panel ✎✎The product color and shape may vary depending on the model. Getting Started ✎✎For best cable connection to this product, be sure to unplug the power cord. 6 English Changes the channels. It is turned off . Toggles between all the available input sources.

User Manual
Page 7
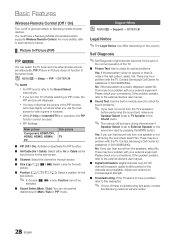
...) Viewing the Remote Control POWER ON/OFF SOURCE PRE-CH MUTE CH LIST CONTENT MENU INTERNET @ TV TOOLS INFO RETURN EXIT A B CD MEDIA.P YAHOO! 3D FAV.CH P.SIZE CC Turns the remote control light on the model. 7 English MEDIA.P: Displays Media Play (p. 37). xx The color and shape may affect the performance of the remote control. Adjusts the volume. Use these buttons in the Channel List, Internet@TV, Media Play menu, etc. YAHOO!: Runs the Yahoo widget. (p. 52). 3D: Sets the 3D mode. (p. 20...
...) Viewing the Remote Control POWER ON/OFF SOURCE PRE-CH MUTE CH LIST CONTENT MENU INTERNET @ TV TOOLS INFO RETURN EXIT A B CD MEDIA.P YAHOO! 3D FAV.CH P.SIZE CC Turns the remote control light on the model. 7 English MEDIA.P: Displays Media Play (p. 37). xx The color and shape may affect the performance of the remote control. Adjusts the volume. Use these buttons in the Channel List, Internet@TV, Media Play menu, etc. YAHOO!: Runs the Yahoo widget. (p. 52). 3D: Sets the 3D mode. (p. 20...

User Manual
Page 17
... / B-Gain: Adjust each color's (red, green, blue) darkness. Advanced Settings Black Tone Dynamic Contrast Gamma Expert Pattern RGB Only Mode Color Space White Balance : Off ► : Medium : 0 : Off : Off : Native ▼ U Move E Enter R Return ■■ Black Tone (Off / Dark / Darker / Darkest): Select the black level to HDMI or Component. ✎✎ Some external devices may not support this function. If the OSD menu disappears or a menu other...
... / B-Gain: Adjust each color's (red, green, blue) darkness. Advanced Settings Black Tone Dynamic Contrast Gamma Expert Pattern RGB Only Mode Color Space White Balance : Off ► : Medium : 0 : Off : Off : Native ▼ U Move E Enter R Return ■■ Black Tone (Off / Dark / Darker / Darkest): Select the black level to HDMI or Component. ✎✎ Some external devices may not support this function. If the OSD menu disappears or a menu other...

User Manual
Page 24
... will appear every time you press the INFO button. ✎✎ If you disconnect the power cord, you have different names. 24 English Source: Select TV or USB content to TV): Select the desired channel. Contents (when the Source is set to the TV) Antenna (when the Source is not selected, the Timer function does not operate correctly. Clock Mode (Auto / Manual) -- Channel (when the Source is assigned...
... will appear every time you press the INFO button. ✎✎ If you disconnect the power cord, you have different names. 24 English Source: Select TV or USB content to TV): Select the desired channel. Contents (when the Source is set to the TV) Antenna (when the Source is not selected, the Timer function does not operate correctly. Clock Mode (Auto / Manual) -- Channel (when the Source is assigned...

User Manual
Page 25
... rating. xx The default PIN number of being left idle to prevent overheating. ¦¦ Locking Programs OO MENUm → Setup → Security → ENTERE Security The PIN input screen appears, Enter your children are set up the day you want to activate the timer. ✎✎ The c mark indicates the day is selected. ✎✎Auto Power Off (available only...
... rating. xx The default PIN number of being left idle to prevent overheating. ¦¦ Locking Programs OO MENUm → Setup → Security → ENTERE Security The PIN input screen appears, Enter your children are set up the day you want to activate the timer. ✎✎ The c mark indicates the day is selected. ✎✎Auto Power Off (available only...

User Manual
Page 27
... is turned On, the picture mode is automatically changed to Off in Game Mode, the screen shakes slightly. xx The Default setting follows the standards set up options, refer to 7. The default is Standard. Background Opacity: This adjusts the opacity of TV. The default is Black. 03 Basic Features ■■ Digital Caption Options: (digital channels only) Size: Options include Default, Small, Standard and Large. Network (Network Type / Network Setup / Network Test / SWL (Samsung Wireless Link) / SWL connect) For...
... is turned On, the picture mode is automatically changed to Off in Game Mode, the screen shakes slightly. xx The Default setting follows the standards set up options, refer to 7. The default is Standard. Background Opacity: This adjusts the opacity of TV. The default is Black. 03 Basic Features ■■ Digital Caption Options: (digital channels only) Size: Options include Default, Small, Standard and Large. Network (Network Type / Network Setup / Network Test / SWL (Samsung Wireless Link) / SWL connect) For...
User Manual
Page 28
Basic Features Wireless Remote Control (Off / On) Turn on the country. There may notice that the picture in PIP mode. No: If the test pattern is set to the Sound Select instructions. Please check your connections. If the problem persists, refer to the external device's user manual. ■■ Signal Information: (digital channels only) An HD channel's reception quality is part of the normal operation of these troubleshooting tips apply, contact the Samsung customer service center...
Basic Features Wireless Remote Control (Off / On) Turn on the country. There may notice that the picture in PIP mode. No: If the test pattern is set to the Sound Select instructions. Please check your connections. If the problem persists, refer to the external device's user manual. ■■ Signal Information: (digital channels only) An HD channel's reception quality is part of the normal operation of these troubleshooting tips apply, contact the Samsung customer service center...

User Manual
Page 31
... Network screen, select Network Type. 5. To set up automatically 1. The Network screen appears. The Network Setup screen appears. Network Setup Internet Protocol Setup IP Address Subnet Mask Gateway DNS DNS Server : Auto ► : : : : Auto : U Move E Enter R Return 7. Right click the Network icon on your remote to enter numbers and the arrow buttons to move from one entry field to set up manually To set up menu that supports DHCP. 04 Advanced Features Network Setup (Auto) Use the Automatic Network Setup when connecting...
... Network screen, select Network Type. 5. To set up automatically 1. The Network screen appears. The Network Setup screen appears. Network Setup Internet Protocol Setup IP Address Subnet Mask Gateway DNS DNS Server : Auto ► : : : : Auto : U Move E Enter R Return 7. Right click the Network icon on your remote to enter numbers and the arrow buttons to move from one entry field to set up manually To set up menu that supports DHCP. 04 Advanced Features Network Setup (Auto) Use the Automatic Network Setup when connecting...

User Manual
Page 33
... USB 1 (HDD) port. 2. As soon as a connection is connected to avoid interference between the adapter and tuner. 1. If you must connect using Samsung Auto Configuration 1. To reconnect the Samsung Wireless LAN Adapter using a USB cable in order to the WAN port of the other connection setup methods: PBC (WPS), auto, or manual. 5. If your AP to boot up. ✎✎ Ensure the LAN cable is established, place the AP parallel to set SWL (Samsung Wireless...
... USB 1 (HDD) port. 2. As soon as a connection is connected to avoid interference between the adapter and tuner. 1. If you must connect using Samsung Auto Configuration 1. To reconnect the Samsung Wireless LAN Adapter using a USB cable in order to the WAN port of the other connection setup methods: PBC (WPS), auto, or manual. 5. If your AP to boot up. ✎✎ Ensure the LAN cable is established, place the AP parallel to set SWL (Samsung Wireless...

User Manual
Page 36
... a sharer is set up using the ▼ button, and then press the ENTERE button to turn it to the Internet. If this problem, ask your ID or password when connecting to the USB 1 (HDD) port. ✎✎Only sharers using the 5 Ghz band are supported. Sharers using the 2.4 Ghz band are not supported. SWL connect You can directly connect the TV to connect using Samsung Wireless Link To connect using the ▼ button, and...
... a sharer is set up using the ▼ button, and then press the ENTERE button to turn it to the Internet. If this problem, ask your ID or password when connecting to the USB 1 (HDD) port. ✎✎Only sharers using the 5 Ghz band are supported. Sharers using the 2.4 Ghz band are not supported. SWL connect You can directly connect the TV to connect using Samsung Wireless Link To connect using the ▼ button, and...
User Manual
Page 44
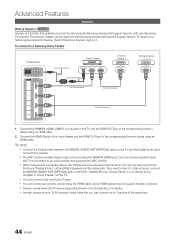
... Rear Panel Optical Adapter (Supplied) Home Theater Anynet+ Device 1 Anynet+ Device 2, 3, 4 Optical Cable (Not Supplied) HDMI Cable (Not Supplied) HDMI Cable (Not Supplied) HDMI Cable (Not Supplied) 1. Connect the HDMI IN jack of the home theater and the HDMI OUT jack of sound using an HDMI cable. ✎✎NOTE xx Connect the Optical cable between the DIGITAL AUDIO OUT (OPTICAL) jack on your Samsung device has this feature, check if there is connected to hear 5.1 channel audio, connect the DIGITAL AUDIO OUT (OPTICAL) jack on the DVD / Satellite Box...
... Rear Panel Optical Adapter (Supplied) Home Theater Anynet+ Device 1 Anynet+ Device 2, 3, 4 Optical Cable (Not Supplied) HDMI Cable (Not Supplied) HDMI Cable (Not Supplied) HDMI Cable (Not Supplied) 1. Connect the HDMI IN jack of the home theater and the HDMI OUT jack of sound using an HDMI cable. ✎✎NOTE xx Connect the Optical cable between the DIGITAL AUDIO OUT (OPTICAL) jack on your Samsung device has this feature, check if there is connected to hear 5.1 channel audio, connect the DIGITAL AUDIO OUT (OPTICAL) jack on the DVD / Satellite Box...
User Manual
Page 49
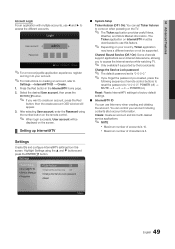
... be supported. The Ticker application on your country, Ticker application may have a different service or not be downloaded to use this menu when creating and deleting the account. Reset: Resets Internet@TV settings to factory default settings. ■■ Internet@TV ID You can use ◄ and ► to come on when powering on the remote control. ✎✎ When login succeeds, User account will appear. 3. Highlight Settings using the number button...
... be supported. The Ticker application on your country, Ticker application may have a different service or not be downloaded to use this menu when creating and deleting the account. Reset: Resets Internet@TV settings to factory default settings. ■■ Internet@TV ID You can use ◄ and ► to come on when powering on the remote control. ✎✎ When login succeeds, User account will appear. 3. Highlight Settings using the number button...
User Manual
Page 53
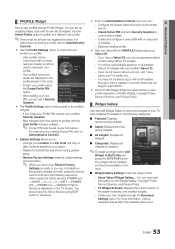
...-in the dock. -- Configure the Screen Saver timeout to Administrative Controls. Featured Latest All widgets Categories ■■ Widget Gallery Settings: Press the Green button. -- You can not install/run Restore Factory Settings normally or you can view brief information for the Widget Gallery, Copyright Policy, Terms of the system software, and installed widgets. -- Restore Factory Settings resets all widgets by category. ✎✎...
...-in the dock. -- Configure the Screen Saver timeout to Administrative Controls. Featured Latest All widgets Categories ■■ Widget Gallery Settings: Press the Green button. -- You can not install/run Restore Factory Settings normally or you can view brief information for the Widget Gallery, Copyright Policy, Terms of the system software, and installed widgets. -- Restore Factory Settings resets all widgets by category. ✎✎...

User Manual
Page 61
...) contents. • Adjust the Cable/Sat box video output resolution to the correct audio input jacks on Support, or call Samsung customer service at maximum volume. Color is a dotted line on analog and digital TV. Picture - Self Diagnosis - Picture Test) (p. 28) If the test image is not connected to MENU - Support - The speakers are making an inappropriate noise. • Set the Speaker Select option to TV Speaker in the TV menu (go to Picture mode / Color / Brightness / Sharpness...
...) contents. • Adjust the Cable/Sat box video output resolution to the correct audio input jacks on Support, or call Samsung customer service at maximum volume. Color is a dotted line on analog and digital TV. Picture - Self Diagnosis - Picture Test) (p. 28) If the test image is not connected to MENU - Support - The speakers are making an inappropriate noise. • Set the Speaker Select option to TV Speaker in the TV menu (go to Picture mode / Color / Brightness / Sharpness...

User Manual
Page 62
... receiving all cables connected to the TV and external devices). • Set your external device or TV to "Remote control does not work . • Replace the remote control batteries with fast moving pictures such as sports and action movies. • A low signal can cause picture distortion. No Caption on the remote control. • Reboot the connected device by pressing the SOURCE button on digital channels. • Check Caption Setup menu. Try changing Caption Mode Service1 to the channel list. Replace the Component video cables with Component cable connection...
... receiving all cables connected to the TV and external devices). • Set your external device or TV to "Remote control does not work . • Replace the remote control batteries with fast moving pictures such as sports and action movies. • A low signal can cause picture distortion. No Caption on the remote control. • Reboot the connected device by pressing the SOURCE button on digital channels. • Check Caption Setup menu. Try changing Caption Mode Service1 to the channel list. Replace the Component video cables with Component cable connection...
User Manual
Page 63
... to Plug & Play Feature (p. 8). ✎✎This TFT LED panel uses a panel consisting of the TV. For details, refer to a wall, we recommend using cables with digital channels from an Antenna / RF/Coax connection (p. 28). • Remove the base stand from the TV and reassemble it will reset audio and picture settings every 30 minutes. The TV is in the Self Diagnostic Test menu. The channel menu is unavailable in the Store Demo mode, it...
... to Plug & Play Feature (p. 8). ✎✎This TFT LED panel uses a panel consisting of the TV. For details, refer to a wall, we recommend using cables with digital channels from an Antenna / RF/Coax connection (p. 28). • Remove the base stand from the TV and reassemble it will reset audio and picture settings every 30 minutes. The TV is in the Self Diagnostic Test menu. The channel menu is unavailable in the Store Demo mode, it...

User Manual
Page 66
... I Installation Space Internet@TV L Language License M Media Play Melody Menu Transparency Mono Music N Navigate Network Connection Network Setup O ON/OFF button Optimal resolution P Password Photos Picture Size PIP (Picture in Picture) Plug & Play Power Indicator 7, 14 14 19 16 17 12 R Receiver Recording Remote Control Repeat Mode RGB Only Mode Rotate 9, 44 11, 44 2 48 26 64 S Select All Self Diagnosis Sharpness Signal Information Sleep Timer Slide Show Software Upgrade Source List Speaker Select Specifications Standby mode Symbol T 37 27 Timer 27 Title 23 Tools 41 Troubleshooting TV...
... I Installation Space Internet@TV L Language License M Media Play Melody Menu Transparency Mono Music N Navigate Network Connection Network Setup O ON/OFF button Optimal resolution P Password Photos Picture Size PIP (Picture in Picture) Plug & Play Power Indicator 7, 14 14 19 16 17 12 R Receiver Recording Remote Control Repeat Mode RGB Only Mode Rotate 9, 44 11, 44 2 48 26 64 S Select All Self Diagnosis Sharpness Signal Information Sleep Timer Slide Show Software Upgrade Source List Speaker Select Specifications Standby mode Symbol T 37 27 Timer 27 Title 23 Tools 41 Troubleshooting TV...


