User Manual (user Manual) (ver.1.0) (English)
Page 2
...inches 4 inches 4 inches 4 inches 2 English The images displayed on warranty terms. Wide screen format LED Displays (16:9, the aspect ratio of a SAMSUNG Authorized Service Center, please call toll-free: - Be careful in the selection and duration of the purchaser. Uneven LED aging as a result of format... the internal temperature of the product. ✎✎ When using a stand or wall-mount, use of the total television viewing per week. Installation with a stand. xx If you contact the TV because some parts can be changed without notice. Displaying stationary graphics and ...
...inches 4 inches 4 inches 4 inches 2 English The images displayed on warranty terms. Wide screen format LED Displays (16:9, the aspect ratio of a SAMSUNG Authorized Service Center, please call toll-free: - Be careful in the selection and duration of the purchaser. Uneven LED aging as a result of format... the internal temperature of the product. ✎✎ When using a stand or wall-mount, use of the total television viewing per week. Installation with a stand. xx If you contact the TV because some parts can be changed without notice. Displaying stationary graphics and ...
User Manual (user Manual) (ver.1.0) (English)
Page 3
...information. Step by pressing the TOOLS button on screen display). 3 English Contents Getting Started yy List of Features 4 yy Accessories 4 yy Install the Stand 5 yy Viewing the Control Panel 7 yy Viewing the Remote Control 8 yy Connecting to an Antenna 9 yy Plug & Play (Initial Setup 9 ... 16 Adjusting Picture Settings 16 Economical Solutions 16 Changing the Picture Options 16 Setting up the TV with Internet@TV 43 Setting up Internet@TV 44 Using the Internet@TV service 46 PROFILE Widget 48 Widget Gallery 48 yy AllShare 50 About AllShare 50 Setting Up ...
...information. Step by pressing the TOOLS button on screen display). 3 English Contents Getting Started yy List of Features 4 yy Accessories 4 yy Install the Stand 5 yy Viewing the Control Panel 7 yy Viewing the Remote Control 8 yy Connecting to an Antenna 9 yy Plug & Play (Initial Setup 9 ... 16 Adjusting Picture Settings 16 Economical Solutions 16 Changing the Picture Options 16 Setting up the TV with Internet@TV 43 Setting up Internet@TV 44 Using the Internet@TV service 46 PROFILE Widget 48 Widget Gallery 48 yy AllShare 50 About AllShare 50 Setting Up ...
User Manual (user Manual) (ver.1.0) (English)
Page 4
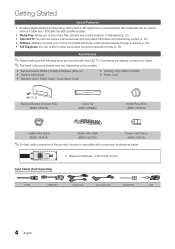
...Sold Separately) HDMI HDMI-DVI Component Composite (AV) Coaxial (RF) VGA 4 English yy Internet@TV: You can check to make sure the following items are missing, contact your TV and compatible Samsung mobile phones/devices through a network (p. 50). yy AllShare: AllShare connects your dealer. ✎✎...Cord (M4 X L8) Blanking Bracket & Screw (1EA) (BN63-06543A) Cable Tie (BN61-05596A) Holder-Ring (4EA) (BN61-05280A) Holder-Wire stand (BN61-05491A) Holder-Wire (3EA) (BN61-05373A) Power Cord Clamp (AA65-30023A) ✎✎For best cable connection to this product, be ...
...Sold Separately) HDMI HDMI-DVI Component Composite (AV) Coaxial (RF) VGA 4 English yy Internet@TV: You can check to make sure the following items are missing, contact your TV and compatible Samsung mobile phones/devices through a network (p. 50). yy AllShare: AllShare connects your dealer. ✎✎...Cord (M4 X L8) Blanking Bracket & Screw (1EA) (BN63-06543A) Cable Tie (BN61-05596A) Holder-Ring (4EA) (BN61-05280A) Holder-Wire stand (BN61-05491A) Holder-Wire (3EA) (BN61-05373A) Power Cord Clamp (AA65-30023A) ✎✎For best cable connection to this product, be ...

User Manual (user Manual) (ver.1.0) (English)
Page 5
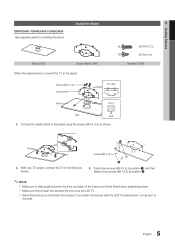
... least two persons lift and move the LED TV. xx Stand the product up and fasten the screws. s s s s s s 2. Install the Stand s s s s s Stand (1EA) Guide Stand (1EA) Follow the steps below to connect the TV to the Stand using five screws (M4 X L12) as shown. Connect the Guide Stand to the stand. (A) 5EA (M4 X L12) (B) 5EA (M4 X L8) Screws (10EA...
... least two persons lift and move the LED TV. xx Stand the product up and fasten the screws. s s s s s s 2. Install the Stand s s s s s Stand (1EA) Guide Stand (1EA) Follow the steps below to connect the TV to the Stand using five screws (M4 X L12) as shown. Connect the Guide Stand to the stand. (A) 5EA (M4 X L12) (B) 5EA (M4 X L8) Screws (10EA...

User Manual (user Manual) (ver.1.0) (English)
Page 6
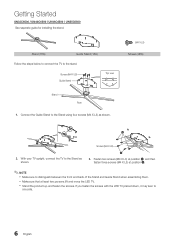
... Follow the steps below to connect the TV to the Stand as shown. (M4 X L8) Screws (9EA) s s s s s s 2. With your TV upright, connect the TV to the stand. Connect the Guide Stand to one side. 6 English Screws (M4 X L8) Guide Stand s s s s s Top view Stand Rear 1. xx Make sure that at ... Make sure to distinguish between the front and back of the Stand and Guide Stand when assembling them. xx Stand the product up and fasten the screws. If you fasten the screws with the LED TV placed down, it may lean to the Stand using four screws (M4 X L8) as shown. 2 s s...
... Follow the steps below to connect the TV to the Stand as shown. (M4 X L8) Screws (9EA) s s s s s s 2. With your TV upright, connect the TV to the stand. Connect the Guide Stand to one side. 6 English Screws (M4 X L8) Guide Stand s s s s s Top view Stand Rear 1. xx Make sure that at ... Make sure to distinguish between the front and back of the Stand and Guide Stand when assembling them. xx Stand the product up and fasten the screws. If you fasten the screws with the LED TV placed down, it may lean to the Stand using four screws (M4 X L8) as shown. 2 s s...

User Manual (user Manual) (ver.1.0) (English)
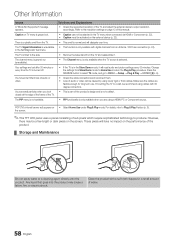
Page 58
... intermittent loss of the product's design and is not a defect. • PIP functionality is turned off. Refer to produce. If mounting the TV to a wall, we recommend using a HDMI, PC or Component source. However, there may cause a failure, fire, or electric shock. Solutions... connection (p. 24). • Remove the base stand from Store Demo mode to Plug & Play Feature (p. 9). You have no impact on TV menu is in the Self Diagnostic Test menu. POP (TV's internal banner ad) appears on the screen. The TV Signal Information is greyed out (unavailable). Other Information...
... intermittent loss of the product's design and is not a defect. • PIP functionality is turned off. Refer to produce. If mounting the TV to a wall, we recommend using a HDMI, PC or Component source. However, there may cause a failure, fire, or electric shock. Solutions... connection (p. 24). • Remove the base stand from Store Demo mode to Plug & Play Feature (p. 9). You have no impact on TV menu is in the Self Diagnostic Test menu. POP (TV's internal banner ad) appears on the screen. The TV Signal Information is greyed out (unavailable). Other Information...
User Manual (user Manual) (ver.1.0) (English, French)
Page 2
... logos, web sites or computer graphics and patterns, should be presented to avoid the appearance of the product. ✎✎ When using a stand or wall-mount, use , as well as Proof of the total television viewing per week. walls) to and from actual product appearance. Displaying...are limited only to manufacturing defects in material or workmanship, and only those encountered in -home or on SAMSUNG products purchased in the LED picture. Failing to view different formats as TV channel logos, panorama or 4:3 image format, stock or news bars at screen bottom etc.) on the ...
... logos, web sites or computer graphics and patterns, should be presented to avoid the appearance of the product. ✎✎ When using a stand or wall-mount, use , as well as Proof of the total television viewing per week. walls) to and from actual product appearance. Displaying...are limited only to manufacturing defects in material or workmanship, and only those encountered in -home or on SAMSUNG products purchased in the LED picture. Failing to view different formats as TV channel logos, panorama or 4:3 image format, stock or news bars at screen bottom etc.) on the ...
User Manual (user Manual) (ver.1.0) (English, French)
Page 3
...Specifications 60 yy Dimensions 61 yy Index 63 ENGLISH Check the Symbol! Contents Getting Started yy List of Features 4 yy Accessories 4 yy Install the Stand 5 yy Viewing the Control Panel 7 yy Viewing the Remote Control 8 yy Connecting to an Antenna 9 yy Plug & Play (Initial Setup 9...the Preset Picture Mode 16 Adjusting Picture Settings 16 Economical Solutions 16 Changing the Picture Options 16 Setting up Internet@TV 44 Using the Internet@TV service 46 PROFILE Widget 48 Widget Gallery 48 yy AllShare 50 About AllShare 50 Setting Up AllShare 50 Other ...
...Specifications 60 yy Dimensions 61 yy Index 63 ENGLISH Check the Symbol! Contents Getting Started yy List of Features 4 yy Accessories 4 yy Install the Stand 5 yy Viewing the Control Panel 7 yy Viewing the Remote Control 8 yy Connecting to an Antenna 9 yy Plug & Play (Initial Setup 9...the Preset Picture Mode 16 Adjusting Picture Settings 16 Economical Solutions 16 Changing the Picture Options 16 Setting up Internet@TV 44 Using the Internet@TV service 46 PROFILE Widget 48 Widget Gallery 48 yy AllShare 50 About AllShare 50 Setting Up AllShare 50 Other ...

User Manual (user Manual) (ver.1.0) (English, French)
Page 4
... (M4 X L8) Blanking Bracket & Screw (1EA) (BN63-06543A) Cable Tie (BN61-05596A) Holder-Ring (4EA) (BN61-05280A) Holder-Wire stand (BN61-05491A) Holder-Wire (3EA) (BN61-05373A) Power Cord Clamp (AA65-30023A) ✎✎For best cable connection to this product, be...USB device (p. 33). Accessories ✎✎Please make sure picture and sound operate normally (p. 24). yy Internet@TV: You can use cables with your TV and compatible Samsung mobile phones/devices through a network (p. 50). Getting Started List of Features yy Excellent Digital Interface & Networking: With...
... (M4 X L8) Blanking Bracket & Screw (1EA) (BN63-06543A) Cable Tie (BN61-05596A) Holder-Ring (4EA) (BN61-05280A) Holder-Wire stand (BN61-05491A) Holder-Wire (3EA) (BN61-05373A) Power Cord Clamp (AA65-30023A) ✎✎For best cable connection to this product, be...USB device (p. 33). Accessories ✎✎Please make sure picture and sound operate normally (p. 24). yy Internet@TV: You can use cables with your TV and compatible Samsung mobile phones/devices through a network (p. 50). Getting Started List of Features yy Excellent Digital Interface & Networking: With...
User Manual (user Manual) (ver.1.0) (English, French)
Page 5
... xx Make sure to distinguish between the front and back of the Stand and Guide Stand when assembling them. Connect the Guide Stand to the Stand as shown. With your TV upright, connect the TV to the Stand using five screws (M4 X L12) as shown. xx Stand the product up and fasten the screws. s s s s s s 2. 01 Getting Started UN40C6400...
... xx Make sure to distinguish between the front and back of the Stand and Guide Stand when assembling them. Connect the Guide Stand to the Stand as shown. With your TV upright, connect the TV to the Stand using five screws (M4 X L12) as shown. xx Stand the product up and fasten the screws. s s s s s s 2. 01 Getting Started UN40C6400...
User Manual (user Manual) (ver.1.0) (English, French)
Page 6
... the front and back of the Stand and Guide Stand when assembling them. xx Stand the product up and fasten the screws. s s s s s Stand (1EA) Guide Stand (1EA) Follow the steps below to connect the TV to the Stand as shown. (M4 X L8) Screws (9EA) s s s s s s 2. With your TV upright, connect the TV to the stand. Getting Started UN32C6500 / UN40C6500 / UN46C6500 / UN55C6500...
... the front and back of the Stand and Guide Stand when assembling them. xx Stand the product up and fasten the screws. s s s s s Stand (1EA) Guide Stand (1EA) Follow the steps below to connect the TV to the Stand as shown. (M4 X L8) Screws (9EA) s s s s s s 2. With your TV upright, connect the TV to the stand. Getting Started UN32C6500 / UN40C6500 / UN46C6500 / UN55C6500...
User Manual (user Manual) (ver.1.0) (English, French)
Page 58
... cables with digital channels from an Antenna / RF/Coax connection (p. 24). • Remove the base stand from the TV and reassemble it. • The Channel menu is only available when the TV source is selected. • If the TV is turned off. There is greyed out. Refer to MENU → Setup → Plug & Play...
... cables with digital channels from an Antenna / RF/Coax connection (p. 24). • Remove the base stand from the TV and reassemble it. • The Channel menu is only available when the TV source is selected. • If the TV is turned off. There is greyed out. Refer to MENU → Setup → Plug & Play...


