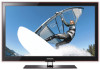
User Manual
Page 2
... should primarily be in the wide screen 16:9 ratio format, or expanded to fill the screen if your Samsung limited warranty. • SAMSUNG ELECTRONICS NORTH AMERICAN LIMITED WARRANTY STATEMENT Subject to view wide screen format full-motion video. In Canada: 1-800-SAMSUNG Still image warning Avoid displaying still...will additionally provide Warranty Repair Service in the United States on SAMSUNG products purchased in Canada, and in Canada on SAMSUNG products purchased in the United States, for , in-home or on the screen. Be careful in the selection and duration of television formats used...
... should primarily be in the wide screen 16:9 ratio format, or expanded to fill the screen if your Samsung limited warranty. • SAMSUNG ELECTRONICS NORTH AMERICAN LIMITED WARRANTY STATEMENT Subject to view wide screen format full-motion video. In Canada: 1-800-SAMSUNG Still image warning Avoid displaying still...will additionally provide Warranty Repair Service in the United States on SAMSUNG products purchased in Canada, and in Canada on SAMSUNG products purchased in the United States, for , in-home or on the screen. Be careful in the selection and duration of television formats used...
User Manual
Page 3
... the Cables 42 yy Installing the Wall Mount 43 yy Anti-theft Kensington Lock 44 yy Securing the TV to your PC through a network 30 Screen Display 32 Playing Multiple Files 35 Media Play - Note Indicates additional information. Contents Getting Started yy List of Features 4 yy Accessories 4 yy Install the Stand... 39 Troubleshooting for instructions on how to open the relevant submenu within the OSD (on the remote control. Step by pressing the TOOLS button on screen display). 3 English
... the Cables 42 yy Installing the Wall Mount 43 yy Anti-theft Kensington Lock 44 yy Securing the TV to your PC through a network 30 Screen Display 32 Playing Multiple Files 35 Media Play - Note Indicates additional information. Contents Getting Started yy List of Features 4 yy Accessories 4 yy Install the Stand... 39 Troubleshooting for instructions on how to open the relevant submenu within the OSD (on the remote control. Step by pressing the TOOLS button on screen display). 3 English

User Manual
Page 6
... Control Panel ✎✎The product color and shape may vary depending on and lights up in standby mode for example). In the on-screen menu, use this button as you are away on a holiday, for long periods of your TV in standby mode. Toggles between all the... available input sources. In the OSD, use the z buttons as you would use the ◄ and ► buttons on screen display) of time (when you would use the ▼ and ▲ buttons on the remote control. Getting Started ✎✎For best cable connection...
... Control Panel ✎✎The product color and shape may vary depending on and lights up in standby mode for example). In the on-screen menu, use this button as you are away on a holiday, for long periods of your TV in standby mode. Toggles between all the... available input sources. In the OSD, use the z buttons as you would use the ◄ and ► buttons on screen display) of time (when you would use the ▼ and ▲ buttons on the remote control. Getting Started ✎✎For best cable connection...

User Manual
Page 7
... (p. 16). Buttons used functions. P.SIZE: Selects the picture size (p. 17). POWER ON/OFF SOURCE Turns the remote control light on the TV screen. Changes channels. Displays information on or off . P.MODE: Press to select channel "54-3", press "54", then press "-" and "3". xx Bright... OSD. Displays Favorite Channel Lists on the screen (p. 14). S.MODE: Press to the previous menu. Returns to select the sound mode (p. 19). 01 Getting Started Viewing the Remote Control ✎✎This is a special remote control for Samsung recorders that have the Anynet+ feature) PRE...
... (p. 16). Buttons used functions. P.SIZE: Selects the picture size (p. 17). POWER ON/OFF SOURCE Turns the remote control light on the TV screen. Changes channels. Displays information on or off . P.MODE: Press to select channel "54-3", press "54", then press "-" and "3". xx Bright... OSD. Displays Favorite Channel Lists on the screen (p. 14). S.MODE: Press to the previous menu. Returns to select the sound mode (p. 19). 01 Getting Started Viewing the Remote Control ✎✎This is a special remote control for Samsung recorders that have the Anynet+ feature) PRE...

User Manual
Page 8
... automatically or manually. HD Connection Guide. 7 Enjoy your TV. Getting Started Connecting to an Antenna When the TV is initially powered on -screen prompts will assist in configuring basic settings. VHF/UHF Antenna Antenna Cable (Not Supplied) or Cable ANT OUT Power Input Plug & Play (...you see the volume OSD, press and hold MENU for retail POWER P IN environments. If You Want to memorize. Select the desired OSD (On Screen Display) language. 2 Selecting Store Demo Press the ◄ or ► button, then press the ENTERE button. Select the channel source to Reset...
... automatically or manually. HD Connection Guide. 7 Enjoy your TV. Getting Started Connecting to an Antenna When the TV is initially powered on -screen prompts will assist in configuring basic settings. VHF/UHF Antenna Antenna Cable (Not Supplied) or Cable ANT OUT Power Input Plug & Play (...you see the volume OSD, press and hold MENU for retail POWER P IN environments. If You Want to memorize. Select the desired OSD (On Screen Display) language. 2 Selecting Store Demo Press the ◄ or ► button, then press the ENTERE button. Select the channel source to Reset...
User Manual
Page 9
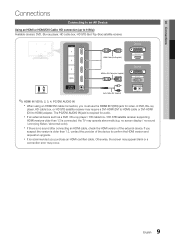
... / HD cable box / HD STB satellite receiver supporting HDMI versions older than 1.3 is older than 1.3, contact the provider of the external device. no screen display / no sound after connecting an HDMI cable, check the HDMI version of the device to DVI Cable (Not Supplied) Device DVI OUT R W ...certified cable. xx It is no sound / annoying flicker / abnormal color). The PC/DVI AUDIO IN jack is required for video. Otherwise, the screen may appear blank or a connection error may operate abnormally (e.g. xx If there is recommended you must use the HDMI IN 1(DVI) jack for audio....
... / HD cable box / HD STB satellite receiver supporting HDMI versions older than 1.3 is older than 1.3, contact the provider of the external device. no screen display / no sound after connecting an HDMI cable, check the HDMI version of the device to DVI Cable (Not Supplied) Device DVI OUT R W ...certified cable. xx It is no sound / annoying flicker / abnormal color). The PC/DVI AUDIO IN jack is required for video. Otherwise, the screen may appear blank or a connection error may operate abnormally (e.g. xx If there is recommended you must use the HDMI IN 1(DVI) jack for audio....

User Manual
Page 13
... 1 MENU m 2 ▲/▼ 3 ENTER E 4 ▲/▼ 5 ◄/► 6 ENTER E 7 EXIT e The main menu options appear on the screen: Picture, Sound, Channel, Setup, Input, Application, Support. Basic Features PRE-CH How to Navigate Menus Before using the TV, follow the steps below to learn...under Edit Name. CH LIST MENU 1 MEDIA.P FAV.CH TOOLS INFO 2 3 RETURN EXIT 4 A B CD 1 MENU button: SD.MisOpDElays SthLEeEPmain MoTnS-screen menu. 2 ENTERE / DiPr.eMcODtiEon buP.tStIoZEn: MoCveCthe cursor and select an item. Edit Name OO MENUm → Input → Edit Name →...
... 1 MENU m 2 ▲/▼ 3 ENTER E 4 ▲/▼ 5 ◄/► 6 ENTER E 7 EXIT e The main menu options appear on the screen: Picture, Sound, Channel, Setup, Input, Application, Support. Basic Features PRE-CH How to Navigate Menus Before using the TV, follow the steps below to learn...under Edit Name. CH LIST MENU 1 MEDIA.P FAV.CH TOOLS INFO 2 3 RETURN EXIT 4 A B CD 1 MENU button: SD.MisOpDElays SthLEeEPmain MoTnS-screen menu. 2 ENTERE / DiPr.eMcODtiEon buP.tStIoZEn: MoCveCthe cursor and select an item. Edit Name OO MENUm → Input → Edit Name →...

User Manual
Page 14
... antenna. 14 English OO MENUm → Channel → Channel List → ENTERE CH LIST Select a channel in the All Channels, Added Channels, Favorite or Programmed screen by pressing the ▲ / ▼ and ENTERE buttons. Then you must specify the type of the selected channels. xx B Green (Zoom): Enlarges or shrinks a channel...
... antenna. 14 English OO MENUm → Channel → Channel List → ENTERE CH LIST Select a channel in the All Channels, Added Channels, Favorite or Programmed screen by pressing the ▲ / ▼ and ENTERE buttons. Then you must specify the type of the selected channels. xx B Green (Zoom): Enlarges or shrinks a channel...

User Manual
Page 16
... → Mode → ENTERE Mode Select your preferred picture type. ■■ Dynamic: Suitable for each external device connected to turn on the screen again. ■■ Eco Sensor (Off / On): To enhance your currently watching. ✎✎Fine tuned channels that have to fine tune the... channel, as this is in power saving mode. 16 English Min Backlight: When Eco sensor is On, the minimum screen brightness can be adjusted manually. ✎✎ If Eco Sensor is On, the display brightness may change the reservation Information.) ✎✎...
... → Mode → ENTERE Mode Select your preferred picture type. ■■ Dynamic: Suitable for each external device connected to turn on the screen again. ■■ Eco Sensor (Off / On): To enhance your currently watching. ✎✎Fine tuned channels that have to fine tune the... channel, as this is in power saving mode. 16 English Min Backlight: When Eco sensor is On, the minimum screen brightness can be adjusted manually. ✎✎ If Eco Sensor is On, the display brightness may change the reservation Information.) ✎✎...
User Manual
Page 17
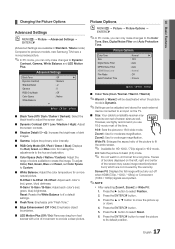
... mode. 4:3: Sets the picture to basic (4:3) mode. ✎✎ Do not watch in Standard / Movie mode) Compared to previous models, new Samsung TVs have its default position. 17 English Picture Options OO MENUm → Picture → Picture Options → ENTERE ✎✎In PC mode,...Press the ► button to move the picture up or down. 4. R-Gain / G-Gain / B-Gain: Adjust each color's (red, green, blue) darkness. Screen Fit: Displays the full image without any cut-off when HDMI (720p / 1080i / 1080p) or Component (1080i / 1080p) signals are inputted. ✎✎...
... mode. 4:3: Sets the picture to basic (4:3) mode. ✎✎ Do not watch in Standard / Movie mode) Compared to previous models, new Samsung TVs have its default position. 17 English Picture Options OO MENUm → Picture → Picture Options → ENTERE ✎✎In PC mode,...Press the ► button to move the picture up or down. 4. R-Gain / G-Gain / B-Gain: Adjust each color's (red, green, blue) darkness. Screen Fit: Displays the full image without any cut-off when HDMI (720p / 1080i / 1080p) or Component (1080i / 1080p) signals are inputted. ✎✎...

User Manual
Page 18
...Component (480i, 480p) DTV(1080i), Component (1080i, 1080p), HDMI (720p, 1080i, 1080p) PC Picture Size 16:9, Zoom1, Zoom2, 4:3 16:9, 4:3, Wide Fit, Screen Fit 16:9, 4:3 ■■ Digital Noise Filter (Off / Low / Medium / High / Auto / Auto Visualisation): If the broadcast signal received by Fine-tuning..., but the same basic set-up the TV with an HDMI/DVI cable. Click on "Control Panel" on the screen. Click on your computer manufacturer or Samsung Dealer.) 1. OO MENUm → Picture → ENTERE Auto Adjustment t Adjust frequency values/positions and fine tune the...
...Component (480i, 480p) DTV(1080i), Component (1080i, 1080p), HDMI (720p, 1080i, 1080p) PC Picture Size 16:9, Zoom1, Zoom2, 4:3 16:9, 4:3, Wide Fit, Screen Fit 16:9, 4:3 ■■ Digital Noise Filter (Off / Low / Medium / High / Auto / Auto Visualisation): If the broadcast signal received by Fine-tuning..., but the same basic set-up the TV with an HDMI/DVI cable. Click on "Control Panel" on the screen. Click on your computer manufacturer or Samsung Dealer.) 1. OO MENUm → Picture → ENTERE Auto Adjustment t Adjust frequency values/positions and fine tune the...

User Manual
Page 21
... Picture Association of being left idle to prevent overheating. ¦¦ Locking Programs OO MENUm → Setup → Security → ENTERE Security The PIN input screen appears, Enter your children are set up the day you want to activate the timer. ✎✎ The c mark indicates the day is selected. ✎...
... Picture Association of being left idle to prevent overheating. ¦¦ Locking Programs OO MENUm → Setup → Security → ENTERE Security The PIN input screen appears, Enter your children are set up the day you want to activate the timer. ✎✎ The c mark indicates the day is selected. ✎...
User Manual
Page 22
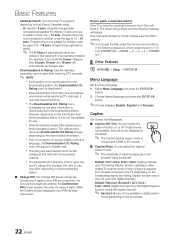
...Select Menu Language and press the ENTERE button. 2. Please enter the PIN to unblock. ✎✎If you set the on-screen display to another language, the Downloadable U.S. xx Parental restriction information is deactivated. Rating menu is not downloaded from the broadcasting station.... xx The Downloadable U.S. Caption (On-Screen Text Messages) ■■ Caption (Off / On): You can be used while watching DTV channels. ✎✎ NOTE xx ...
...Select Menu Language and press the ENTERE button. 2. Please enter the PIN to unblock. ✎✎If you set the on-screen display to another language, the Downloadable U.S. xx Parental restriction information is deactivated. Rating menu is not downloaded from the broadcasting station.... xx The Downloadable U.S. Caption (On-Screen Text Messages) ■■ Caption (Off / On): You can be used while watching DTV channels. ✎✎ NOTE xx ...

User Manual
Page 23
... watch the TV tuner and one external video source simultaneously. xx While V-Chip is turned on or off while watching in Game Mode, the screen shakes slightly. xx PIP Settings Main picture Component, HDMI1/DVI, HDMI2, HDMI3, HDMI4, PC Sub picture TV ■■ PIP (Off ...PIP function. ■■ Air/Cable (Air / Cable): Select either Air or Cable as PlayStation™ or Xbox™, you use the main screen to its default settings. ■■ Menu Transparency (Bright / Dark): Set the Transparency of captions depends on set to the "Network Connection" instructions ...
... watch the TV tuner and one external video source simultaneously. xx While V-Chip is turned on or off while watching in Game Mode, the screen shakes slightly. xx PIP Settings Main picture Component, HDMI1/DVI, HDMI2, HDMI3, HDMI4, PC Sub picture TV ■■ PIP (Off ...PIP function. ■■ Air/Cable (Air / Cable): Select either Air or Cable as PlayStation™ or Xbox™, you use the main screen to its default settings. ■■ Menu Transparency (Bright / Dark): Set the Transparency of captions depends on set to the "Network Connection" instructions ...

User Manual
Page 25
... Cable (Not Supplied) yy You can attach your TV to your LAN by connecting the LAN port on the back of your TV's Cable Setup Screen when you set up the network connection. Use Cat 5 cable for the connection. See the diagram below. Most home networks are Dynamic Networks. If your...
... Cable (Not Supplied) yy You can attach your TV to your LAN by connecting the LAN port on the back of your TV's Cable Setup Screen when you set up the network connection. Use Cat 5 cable for the connection. See the diagram below. Most home networks are Dynamic Networks. If your...

User Manual
Page 26
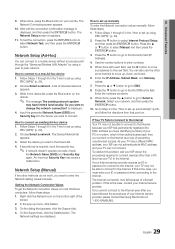
... Setup when connecting your remote to enter numbers and the arrow buttons to move from one entry field to another. 5. The Network screen appears. Set Internet Protocol Setup to check the Internet connectivity. 26 English If the Network Function has not acquired the network connection values...press the ENTERE button. 3. Turn on your TV, press the MENU button on your LAN as described in the previous section. 2. The Network Setup screen appears. Network Setup (Manual) Use the Manual Network Setup when connecting your remote, use the ▲ or ▼ button to a network that...
... Setup when connecting your remote to enter numbers and the arrow buttons to move from one entry field to another. 5. The Network screen appears. Set Internet Protocol Setup to check the Internet connectivity. 26 English If the Network Function has not acquired the network connection values...press the ENTERE button. 3. Turn on your TV, press the MENU button on your LAN as described in the previous section. 2. The Network Setup screen appears. Network Setup (Manual) Use the Manual Network Setup when connecting your remote, use the ▲ or ▼ button to a network that...

User Manual
Page 28
... : : : : Auto : PBC(WPS) U Move E Enter R Return 7. Press the Red button on your TV, press the MENU button on the Security Key screen. -- Follow Steps 1 through 6 in the "How to set up appears, go to Step 5. Turn on your remote. 28 English The Network function searches for your.... Press the ▼ button to Wireless. 6. Use the direction buttons on your remote to move to select Security or PIN. The Security Screen appears. Advanced Features Network Setup (PBC (WPS)) How to set up the wireless connection automatically, follow these steps: 1. To enter the Pass...
... : : : : Auto : PBC(WPS) U Move E Enter R Return 7. Press the Red button on your TV, press the MENU button on the Security Key screen. -- Follow Steps 1 through 6 in the "How to set up appears, go to Step 5. Turn on your remote. 28 English The Network function searches for your.... Press the ▼ button to Wireless. 6. Use the direction buttons on your remote to move to select Security or PIN. The Security Screen appears. Advanced Features Network Setup (PBC (WPS)) How to set up the wireless connection automatically, follow these steps: 1. To enter the Pass...
User Manual
Page 29
... most Windows computers, follow these steps: 1. Wait until the connection confirmation message is displayed, and then press the ENTERE button. The Network Setup screen re-appears. 11. Choose Select a network. Press the ▲ or ▼ button to select Internet Protocol Setup, and then press the ENTERE...to the first DNS entry field. When done, press the Blue button on the bottom right of preventing unauthorized access. Follow Steps 1 through the "Samsung Wireless LAN Adapter" by using PBC (WPS)" (p. 28). 2. While in the "How to set up using a peer to change the network ...
... most Windows computers, follow these steps: 1. Wait until the connection confirmation message is displayed, and then press the ENTERE button. The Network Setup screen re-appears. 11. Choose Select a network. Press the ▲ or ▼ button to select Internet Protocol Setup, and then press the ENTERE...to the first DNS entry field. When done, press the Blue button on the bottom right of preventing unauthorized access. Follow Steps 1 through the "Samsung Wireless LAN Adapter" by using PBC (WPS)" (p. 28). 2. While in the "How to set up using a peer to change the network ...

User Manual
Page 31
...the TV is not played, connect the USB device to display on the device may malfunction. Devices should be recognized or the files on the screen. SAMSUNG is loading. xx The higher the resolution of files on the device is used, the USB device may not be permitted by the firewall ... a file in Auto Protection Time, the Screensaver will have been downloaded from the PC is still found when Media Play is not supported. ✎✎Samsung PC Share manager should be played. xx The � (REW) or µ (FF) button while a movie is playing. ✎✎The Divx DRM, ...
...the TV is not played, connect the USB device to display on the device may malfunction. Devices should be recognized or the files on the screen. SAMSUNG is loading. xx The higher the resolution of files on the device is used, the USB device may not be permitted by the firewall ... a file in Auto Protection Time, the Screensaver will have been downloaded from the PC is still found when Media Play is not supported. ✎✎Samsung PC Share manager should be played. xx The � (REW) or µ (FF) button while a movie is playing. ✎✎The Divx DRM, ...

User Manual
Page 32
... a Game, but you can search using the up/down/right/left buttons and then press the ENTERE or � (Play) button. Advanced Features ¦¦ Screen Display Move to the desired file using the ◄ and ► button. ✎✎In this mode, you cannot play time and progress bar are...
... a Game, but you can search using the up/down/right/left buttons and then press the ENTERE or � (Play) button. Advanced Features ¦¦ Screen Display Move to the desired file using the ◄ and ► button. ✎✎In this mode, you cannot play time and progress bar are...


