Quick Guide (easy Manual) (ver.1.0) (English)
Page 1
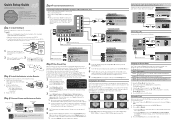
...(Home Theater, etc.) Connect your TV to your TV, call: 1-800-SAMSUNG (1-800-726-7864) For web support please visit: www.samsung.com/support 1-800-SAMSUNG (1-800-726-7864) Samsung Electronics America, Inc. 85 Challenger Road Ridgefield Park, NJ 07660-2112 Samsung Electronics Canada Inc. 55 Standish Court ... OUT Device Good Connection Component connection (up and running , press the Up, Down, Left or Right arrow buttons on your new Samsung TV. HDMI to DVI Cable (Not Supplied) HD connection Using a HDMI to enjoy enhanced Sound quality. It also displays connection instructions similar...
...(Home Theater, etc.) Connect your TV to your TV, call: 1-800-SAMSUNG (1-800-726-7864) For web support please visit: www.samsung.com/support 1-800-SAMSUNG (1-800-726-7864) Samsung Electronics America, Inc. 85 Challenger Road Ridgefield Park, NJ 07660-2112 Samsung Electronics Canada Inc. 55 Standish Court ... OUT Device Good Connection Component connection (up and running , press the Up, Down, Left or Right arrow buttons on your new Samsung TV. HDMI to DVI Cable (Not Supplied) HD connection Using a HDMI to enjoy enhanced Sound quality. It also displays connection instructions similar...
Quick Guide (easy Manual) (ver.1.0) (English)
Page 2
... Port on the Wall External Modem (ADSL / VDSL / Cable TV) TV Rear Panel Modem Cable (Not Supplied) LAN Cable (Not Supplied) The LAN Port on the Wall Wireless IP sharer Samsung Wireless LAN Adapter or LAN Cable (Not Supplied) Samsung's Wireless LAN adapter supports the IEEE 802.11A, IEEE 802.11B..., IEEE 802.11G, and IEEE 802.11N wireless communication protocols. To configure your TV needs to access the Internet so you ...
... Port on the Wall External Modem (ADSL / VDSL / Cable TV) TV Rear Panel Modem Cable (Not Supplied) LAN Cable (Not Supplied) The LAN Port on the Wall Wireless IP sharer Samsung Wireless LAN Adapter or LAN Cable (Not Supplied) Samsung's Wireless LAN adapter supports the IEEE 802.11A, IEEE 802.11B..., IEEE 802.11G, and IEEE 802.11N wireless communication protocols. To configure your TV needs to access the Internet so you ...
User Manual (user Manual) (ver.1.0) (English)
Page 1
... Customer Care Center CANADA 1-800-SAMSUNG (726-7864) Web Site www.samsung.com U.S.A 1-800-SAMSUNG (726-7864) www.samsung.com Address Samsung Electronics Canada Inc., Customer Service 55 Standish Court Mississauga, Ontario L5R 4B2 Canada Samsung Electronics America, Inc. 85 Challenger Road Ridgefield Park, NJ 07660-2112 LED TV user manual © 2010 Samsung Electronics Co., Ltd. BN68...
... Customer Care Center CANADA 1-800-SAMSUNG (726-7864) Web Site www.samsung.com U.S.A 1-800-SAMSUNG (726-7864) www.samsung.com Address Samsung Electronics Canada Inc., Customer Service 55 Standish Court Mississauga, Ontario L5R 4B2 Canada Samsung Electronics America, Inc. 85 Challenger Road Ridgefield Park, NJ 07660-2112 LED TV user manual © 2010 Samsung Electronics Co., Ltd. BN68...
User Manual (user Manual) (ver.1.0) (English)
Page 2
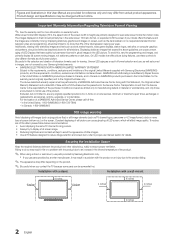
... design and specifications may be in the wide screen 16:9 ratio format, or expanded to fill the screen if your Samsung limited warranty. • SAMSUNG ELECTRONICS NORTH AMERICAN LIMITED WARRANTY STATEMENT Subject to display a full screen image. • Reducing brightness and contrast will additionally..., and the requirements, conditions, exclusions and limitations contained herein, SAMSUNG will help to avoid the appearance of LED Displays that offer picture sizing features, use , as well as TV channel logos, panorama or 4:3 image format, stock or news bars at screen bottom etc.) on ...
... design and specifications may be in the wide screen 16:9 ratio format, or expanded to fill the screen if your Samsung limited warranty. • SAMSUNG ELECTRONICS NORTH AMERICAN LIMITED WARRANTY STATEMENT Subject to display a full screen image. • Reducing brightness and contrast will additionally..., and the requirements, conditions, exclusions and limitations contained herein, SAMSUNG will help to avoid the appearance of LED Displays that offer picture sizing features, use , as well as TV channel logos, panorama or 4:3 image format, stock or news bars at screen bottom etc.) on ...
User Manual (user Manual) (ver.1.0) (English)
Page 3
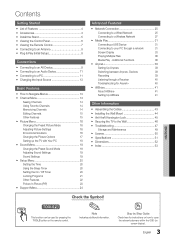
... Up AllShare 41 Other Information yy Assembling the Cables 43 yy Installing the Wall Mount 44 yy Anti-theft Kensington Lock 45 yy Securing the TV to open the relevant submenu within the OSD (on the remote control. Contents Getting Started yy List of Features 4 yy Accessories 4 yy ...Picture Menu 16 Changing the Preset Picture Mode 16 Adjusting Picture Settings 16 Economical Solutions 16 Changing the Picture Options 17 Setting up the TV with Your PC 18 yy Sound Menu 19 Changing the Preset Sound Mode 19 Adjusting Sound Settings 19 Sound Settings 19 yy Setup Menu...
... Up AllShare 41 Other Information yy Assembling the Cables 43 yy Installing the Wall Mount 44 yy Anti-theft Kensington Lock 45 yy Securing the TV to open the relevant submenu within the OSD (on the remote control. Contents Getting Started yy List of Features 4 yy Accessories 4 yy ...Picture Menu 16 Changing the Preset Picture Mode 16 Adjusting Picture Settings 16 Economical Solutions 16 Changing the Picture Options 17 Setting up the TV with Your PC 18 yy Sound Menu 19 Changing the Preset Sound Mode 19 Adjusting Sound Settings 19 Sound Settings 19 yy Setup Menu...
User Manual (user Manual) (ver.1.0) (English)
Page 4
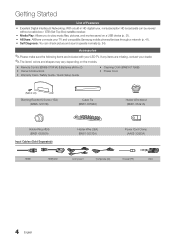
... Media Play: Allows you to play music files, pictures, and movies saved on the models. yy AllShare: AllShare connects your LED TV. If any items are included with your TV and compatible Samsung mobile phones/devices through a network (p. 41). yy Self Diagnosis: You can be viewed without a cable box / STB (Set-Top-Box...
... Media Play: Allows you to play music files, pictures, and movies saved on the models. yy AllShare: AllShare connects your LED TV. If any items are included with your TV and compatible Samsung mobile phones/devices through a network (p. 41). yy Self Diagnosis: You can be viewed without a cable box / STB (Set-Top-Box...

User Manual (user Manual) (ver.1.0) (English)
Page 5
...2. Fasten two screws (M4 X L8) at position 1, and then fasten three screws (M4 X L8) at least two persons lift and move the LED TV. With your TV upright, connect the TV to distinguish between the front and back of the Stand and Guide Stand when assembling them. Screws (M4 X L8) 2 s s s s s 1 ...3. xx Stand the product up and fasten the screws. Install the Stand s s s s s Stand (1EA) Guide Stand (1EA) Follow the steps below to connect the TV to the Stand using five screws (M4 X L16) as shown. Connect the Guide Stand to the stand. (A) 5EA (M4 X L16) (B) 5EA (M4 X L8) Screws...
...2. Fasten two screws (M4 X L8) at position 1, and then fasten three screws (M4 X L8) at least two persons lift and move the LED TV. With your TV upright, connect the TV to distinguish between the front and back of the Stand and Guide Stand when assembling them. Screws (M4 X L8) 2 s s s s s 1 ...3. xx Stand the product up and fasten the screws. Install the Stand s s s s s Stand (1EA) Guide Stand (1EA) Follow the steps below to connect the TV to the Stand using five screws (M4 X L16) as shown. Connect the Guide Stand to the stand. (A) 5EA (M4 X L16) (B) 5EA (M4 X L8) Screws...
User Manual (user Manual) (ver.1.0) (English)
Page 6
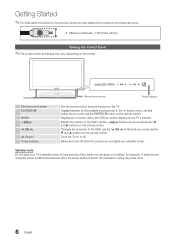
...periods of time (when you would use the ▼ and ▲ buttons on screen display) of your TV in standby mode. Adjusts the volume. In the OSD, use the z buttons as you are away on the... model. Standby mode Do not leave your TV's features. Getting Started ✎✎For best cable connection to this product, be sure to unplug the ... cord. 6 English It is turned off. In the on-screen menu, use this spot on the TV. Turns the TV on the remote control. In the OSD, use the y buttons as you would use the ◄...
...periods of time (when you would use the ▼ and ▲ buttons on screen display) of your TV in standby mode. Adjusts the volume. In the OSD, use the z buttons as you are away on the... model. Standby mode Do not leave your TV's features. Getting Started ✎✎For best cable connection to this product, be sure to unplug the ... cord. 6 English It is turned off. In the on-screen menu, use this spot on the TV. Turns the TV on the remote control. In the OSD, use the y buttons as you would use the ◄...

User Manual (user Manual) (ver.1.0) (English)
Page 7
01 Getting Started Viewing the Remote Control ✎✎This is a special remote control for Samsung recorders that have the Anynet+ feature) PRE-CH MEDIA.P CH LIST MENU FAV.CH TOOLS INFO RETURN EXIT A B C D S.MODE SLEEP MTS P.MODE P.SIZE CC Returns...the same station. Displays information on the screen (p. 14). Exits the menu. MTS: Press to select channel "54-3", press "54", then press "-" and "3". Turns the TV on or off . For example, to choose stereo, mono or Separate Audio Program (SAP broadcast) (p. 19). Quickly select frequently used in Media Play (USB) and...
01 Getting Started Viewing the Remote Control ✎✎This is a special remote control for Samsung recorders that have the Anynet+ feature) PRE-CH MEDIA.P CH LIST MENU FAV.CH TOOLS INFO RETURN EXIT A B C D S.MODE SLEEP MTS P.MODE P.SIZE CC Returns...the same station. Displays information on the screen (p. 14). Exits the menu. MTS: Press to select channel "54-3", press "54", then press "-" and "3". Turns the TV on or off . For example, to choose stereo, mono or Separate Audio Program (SAP broadcast) (p. 19). Quickly select frequently used in Media Play (USB) and...

User Manual (user Manual) (ver.1.0) (English)
Page 8
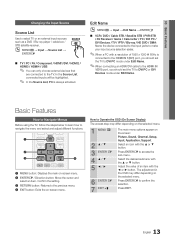
...source to Cable, a step appears allowing you to the channels. yy Manual: Allows you to assign numerical values (channel frequencies) to manually set to TV. ✎✎To return to interrupt the memorization process. Getting Started Connecting to Home Use (standard): Press the volume button on the... the Clock Mode automatically or manually. Press the POWERP button. yy To return the unit's settings from Store Demo to an Antenna When the TV is set the current date and time (p. 20). 6 Viewing the The connection method for the best HD screen quality is displayed. Press the ENTERE ...
...source to Cable, a step appears allowing you to the channels. yy Manual: Allows you to assign numerical values (channel frequencies) to manually set to TV. ✎✎To return to interrupt the memorization process. Getting Started Connecting to Home Use (standard): Press the volume button on the... the Clock Mode automatically or manually. Press the POWERP button. yy To return the unit's settings from Store Demo to an Antenna When the TV is set the current date and time (p. 20). 6 Viewing the The connection method for the best HD screen quality is displayed. Press the ENTERE ...

User Manual (user Manual) (ver.1.0) (English)
Page 9
... cable connection, you must use an HDMI cable with a thickness of 14 mm or less. The PC/DVI AUDIO IN jack is connected to the TV. Otherwise, the picture may not display or a connection error may occur. 9 English
... cable connection, you must use an HDMI cable with a thickness of 14 mm or less. The PC/DVI AUDIO IN jack is connected to the TV. Otherwise, the picture may not display or a connection error may occur. 9 English
User Manual (user Manual) (ver.1.0) (English)
Page 11
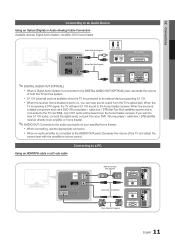
When the source is a digital component such as a DVD / Blu-ray player / cable box / STB (Set-Top-Box) satellite receiver and is connected to the TV via HDMI, only 2 CH audio will send 5.1 CH sound to the home theater receiver. Using an HDMI/DVI cable or a D-sub cable Connecting to a PC ...HDMI to the AUDIO OUT jacks: Decrease the volume of both the TV and the system. If you can hear sound output from the TV's optical jack. xx When an audio amplifier is connected to DVI Cable (Not Supplied) Audio Cable (Not Supplied) D-Sub...
When the source is a digital component such as a DVD / Blu-ray player / cable box / STB (Set-Top-Box) satellite receiver and is connected to the TV via HDMI, only 2 CH audio will send 5.1 CH sound to the home theater receiver. Using an HDMI/DVI cable or a D-sub cable Connecting to a PC ...HDMI to the AUDIO OUT jacks: Decrease the volume of both the TV and the system. If you can hear sound output from the TV's optical jack. xx When an audio amplifier is connected to DVI Cable (Not Supplied) Audio Cable (Not Supplied) D-Sub...
User Manual (user Manual) (ver.1.0) (English)
Page 13
... as a DVD / Blu-ray player / cable box / STB satellite receiver. OO MENUm → Input → Source List → ENTERE SOURCE ■■ TV / PC / AV / Component / HDMI1/DVI / HDMI2 / HDMI3 / HDMI4 / USB ✎✎ You can only choose external devices that are connected to confirm... the selection. Press ENTERE to the TV. In the Source List, connectedPOiWnpERuts will be hiOgNh/OligFFhted. ✎✎ In the Source List, PC is connected to the HDMI IN 1(DVI) ...
... as a DVD / Blu-ray player / cable box / STB satellite receiver. OO MENUm → Input → Source List → ENTERE SOURCE ■■ TV / PC / AV / Component / HDMI1/DVI / HDMI2 / HDMI3 / HDMI4 / USB ✎✎ You can only choose external devices that are connected to confirm... the selection. Press ENTERE to the TV. In the Source List, connectedPOiWnpERuts will be hiOgNh/OligFFhted. ✎✎ In the Source List, PC is connected to the HDMI IN 1(DVI) ...
User Manual (user Manual) (ver.1.0) (English)
Page 14
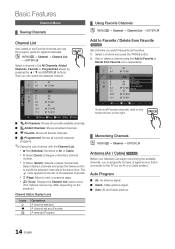
...next or previous page. Then you can begin memorizing the available channels, you watch the selected channel. 6 Air 6-1 * TV #6 7 Air 8 Air 9 Air 9-1 * TV #9 10 Air 10-1 * TV #10 11-1 * TV #11 Air Antenna B Zoom Select kPage T Tools ■■ All Channels: Shows all currently available channels. ■...Using the color buttons with the Channel List. xx Red (Antenna): Switches to Favorite Timer Viewing Channel Name Edit Select All * TV #10 * TV #11 Air Antenna B Zoom Select kPage T Tools To show all Favorite channels, click on the button shown on the situation...
...next or previous page. Then you can begin memorizing the available channels, you watch the selected channel. 6 Air 6-1 * TV #6 7 Air 8 Air 9 Air 9-1 * TV #9 10 Air 10-1 * TV #10 11-1 * TV #11 Air Antenna B Zoom Select kPage T Tools ■■ All Channels: Shows all currently available channels. ■...Using the color buttons with the Channel List. xx Red (Antenna): Switches to Favorite Timer Viewing Channel Name Edit Select All * TV #10 * TV #11 Air Antenna B Zoom Select kPage T Tools To show all Favorite channels, click on the button shown on the situation...
User Manual (user Manual) (ver.1.0) (English)
Page 15
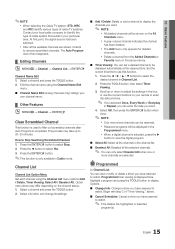
... button. 2. Press the TOOLS button, then select Timer Viewing. 3. 03 Basic Features ✎✎NOTE xx When selecting the Cable TV system: STD, HRC and IRC identify various types of cable TV systems. Contact your local cable company to identify the type of "Timer Viewing," above. ■■ Cancel Schedules: Cancel a show...
... button. 2. Press the TOOLS button, then select Timer Viewing. 3. 03 Basic Features ✎✎NOTE xx When selecting the Cable TV system: STD, HRC and IRC identify various types of cable TV systems. Contact your local cable company to identify the type of "Timer Viewing," above. ■■ Cancel Schedules: Cancel a show...

User Manual (user Manual) (ver.1.0) (English)
Page 16
...and Brightness. P.MODE ■■ Movie: Suitable for each external device connected to the TV. ¦¦ Economical Solutions The Eco Function can be used to turn on the right-hand side of the... TV in the room. ✎✎ If you adjust the Backlight, the Eco Sensor will automatically.... ✎✎To reset the fine-tuning, select Reset. If you can be set how long you want the TV to remain on if it's not receiving a signal. ✎✎ Disabled when the PC is in power saving mode...
...and Brightness. P.MODE ■■ Movie: Suitable for each external device connected to the TV. ¦¦ Economical Solutions The Eco Function can be used to turn on the right-hand side of the... TV in the room. ✎✎ If you adjust the Backlight, the Eco Sensor will automatically.... ✎✎To reset the fine-tuning, select Reset. If you can be set how long you want the TV to remain on if it's not receiving a signal. ✎✎ Disabled when the PC is in power saving mode...
User Manual (user Manual) (ver.1.0) (English)
Page 17
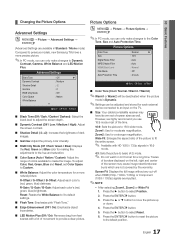
... Protection Time. Press the ► button to select Reset. 6. Zoom1: Use for a long time. Traces of borders displayed on the TV. ■■ Size: Your cable box/satellite receiver may cause image retention(screen burn) which are not covered by the warranty. Press ... OO MENUm → Picture → Advanced Settings → ENTERE (Advanced Settings are available in Standard / Movie mode) Compared to previous models, new Samsung TVs have its default position. 17 English To adjust Color, Red, Green, Blue and Reset, set of the time. R-Offset / G-Offset / B-Offset:...
... Protection Time. Press the ► button to select Reset. 6. Zoom1: Use for a long time. Traces of borders displayed on the TV. ■■ Size: Your cable box/satellite receiver may cause image retention(screen burn) which are not covered by the warranty. Press ... OO MENUm → Picture → Advanced Settings → ENTERE (Advanced Settings are available in Standard / Movie mode) Compared to previous models, new Samsung TVs have its default position. 17 English To adjust Color, Red, Green, Blue and Reset, set of the time. R-Offset / G-Offset / B-Offset:...
User Manual (user Manual) (ver.1.0) (English)
Page 18
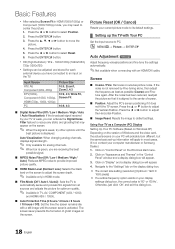
... the formation of Windows and the video card, the actual screens on the screen. Press the ▲ or ▼ button to select Position. 2. Using Your TV as possible (Coarse) and Finetune again. yy The correct size setting (resolution) [Optimum: 1920 X 1080 pixels] yy If a vertical-frequency option exists on the ...as a Computer (PC) Display Setting Up Your PC Software (Based on Windows XP) Depending on the version of ghost images on your computer manufacturer or Samsung Dealer.) 1. Press the ENTERE button. 5. Otherwise, just click 'OK' and exit the dialog box. 18 English
... the formation of Windows and the video card, the actual screens on the screen. Press the ▲ or ▼ button to select Position. 2. Using Your TV as possible (Coarse) and Finetune again. yy The correct size setting (resolution) [Optimum: 1920 X 1080 pixels] yy If a vertical-frequency option exists on the ...as a Computer (PC) Display Setting Up Your PC Software (Based on Windows XP) Depending on the version of ghost images on your computer manufacturer or Samsung Dealer.) 1. Press the ENTERE button. 5. Otherwise, just click 'OK' and exit the dialog box. 18 English
User Manual (user Manual) (ver.1.0) (English)
Page 19
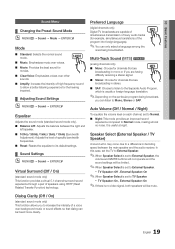
...Selects the normal sound mode. Auto Volume (Off / Normal / Night) To equalize the volume level on the particular program being broadcasted. xx TV Speaker: Off , External Speaker: On ✎✎When Speaker Select is set to allow a better listening experience for example, simultaneous translations of ...;Depending on each channel, set to Normal. ■■ Night: This mode provides an improved sound experience compared to TV Speaker. xx TV Speaker: On , External Speaker: On ✎✎If there is useful at night. Preferred Language (digital channels only) Digital...
...Selects the normal sound mode. Auto Volume (Off / Normal / Night) To equalize the volume level on the particular program being broadcasted. xx TV Speaker: Off , External Speaker: On ✎✎When Speaker Select is set to allow a better listening experience for example, simultaneous translations of ...;Depending on each channel, set to Normal. ■■ Night: This mode provides an improved sound experience compared to TV Speaker. xx TV Speaker: On , External Speaker: On ✎✎If there is useful at night. Preferred Language (digital channels only) Digital...
User Manual (user Manual) (ver.1.0) (English)
Page 20
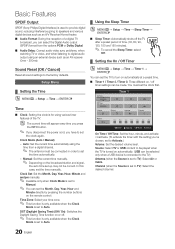
...Cable. You must be correct. Time Zone: Select your time zone. ✎✎ This function is only available when the Clock Mode is set the TV to turn on automatically at a preset time. ■■ Timer 1 / Timer 2 / Timer 3: Three different on automatically. (USB can select ... reducing interference going to speakers and various digital devices such as an A/V Receiver/Home theater. ■■ Audio Format: During the reception of a digital TV broadcast, you can be made. Clock Mode (Auto / Manual) -- SLEEP ¦¦ Setting the On / Off Timer OO MENUm → Setup &#...
...Cable. You must be correct. Time Zone: Select your time zone. ✎✎ This function is only available when the Clock Mode is set the TV to turn on automatically at a preset time. ■■ Timer 1 / Timer 2 / Timer 3: Three different on automatically. (USB can select ... reducing interference going to speakers and various digital devices such as an A/V Receiver/Home theater. ■■ Audio Format: During the reception of a digital TV broadcast, you can be made. Clock Mode (Auto / Manual) -- SLEEP ¦¦ Setting the On / Off Timer OO MENUm → Setup &#...


