User Manual
Page 2
... 5% of a SAMSUNG Authorized Service Center, please call toll-free: - Installation with a stand Installation with the product due to an increase in the internal temperature of the product. ✎✎ When using a stand or wall-mount, use parts provided by another manufacturer, it may differ from the Service Center is the responsibility of Purchase must be limited to no expanded standard format television video and programming, should be...
... 5% of a SAMSUNG Authorized Service Center, please call toll-free: - Installation with a stand Installation with the product due to an increase in the internal temperature of the product. ✎✎ When using a stand or wall-mount, use parts provided by another manufacturer, it may differ from the Service Center is the responsibility of Purchase must be limited to no expanded standard format television video and programming, should be...
User Manual
Page 3
... Using the Sleep Timer 20 Setting the On / Off Timer 20 Locking Programs 20 Other Features 22 Picture In Picture (PIP) 23 yy Support Menu 23 Advanced Features yy Media Play 25 Connecting a USB Device 25 Screen Display 26 Playing Multiple Files 29 Media Play - Contents Getting Started yy List of Features 4 yy Accessories 4 yy Install the Stand (UN19C4000, UN22C4000 / UN22C4010 5 yy Install the Stand (UN26C4000 5 yy Viewing the Control Panel 6 yy Viewing the Remote Control 7 yy Connecting to an Antenna 8 yy Plug & Play (Initial Setup 8 Connections yy Connecting...
... Using the Sleep Timer 20 Setting the On / Off Timer 20 Locking Programs 20 Other Features 22 Picture In Picture (PIP) 23 yy Support Menu 23 Advanced Features yy Media Play 25 Connecting a USB Device 25 Screen Display 26 Playing Multiple Files 29 Media Play - Contents Getting Started yy List of Features 4 yy Accessories 4 yy Install the Stand (UN19C4000, UN22C4000 / UN22C4010 5 yy Install the Stand (UN26C4000 5 yy Viewing the Control Panel 6 yy Viewing the Remote Control 7 yy Connecting to an Antenna 8 yy Plug & Play (Initial Setup 8 Connections yy Connecting...

User Manual
Page 7
... the picture mode (p. 15). Brings up the OSD. Buttons used functions. Displays the channel list on the TV screen. CC: Controls the caption decoder (p. 22). Adjusts the volume. Changes channels. xx Bright light may vary depending on the menu. 01 Getting Started Viewing the Remote Control ✎✎This is a special remote control for Samsung recorders that have the Anynet+ feature) PRE-CH MEDIA.P CHLIST MENU FAV.CH TOOLS INFO RETURN EXIT A B CD S.MODE SLEEP MTS P.MODE P.SIZE...
... the picture mode (p. 15). Brings up the OSD. Buttons used functions. Displays the channel list on the TV screen. CC: Controls the caption decoder (p. 22). Adjusts the volume. Changes channels. xx Bright light may vary depending on the menu. 01 Getting Started Viewing the Remote Control ✎✎This is a special remote control for Samsung recorders that have the Anynet+ feature) PRE-CH MEDIA.P CHLIST MENU FAV.CH TOOLS INFO RETURN EXIT A B CD S.MODE SLEEP MTS P.MODE P.SIZE...

User Manual
Page 8
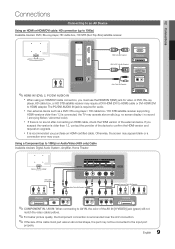
... numerical values (channel frequencies) to the channels. Store Demo Mode is initially powered on, basic settings proceed automatically. ✎✎Connecting the power cord and antenna. ✎✎If the size of on the TV. Select the desired OSD (On Screen Display) language. 2 Selecting Store Demo Press the ◄ or ► button, then press the ENTERE button. VHF/UHF Antenna Antenna Cable (Not Supplied) or Cable ANT OUT Power Input Plug & Play (Initial Setup) When the...
... numerical values (channel frequencies) to the channels. Store Demo Mode is initially powered on, basic settings proceed automatically. ✎✎Connecting the power cord and antenna. ✎✎If the size of on the TV. Select the desired OSD (On Screen Display) language. 2 Selecting Store Demo Press the ◄ or ► button, then press the ENTERE button. VHF/UHF Antenna Antenna Cable (Not Supplied) or Cable ANT OUT Power Input Plug & Play (Initial Setup) When the...
User Manual
Page 9
The PC/DVI AUDIO IN jack is no sound / annoying flicker / abnormal color). xx If there is required for video. no screen display / no sound after connecting an HDMI cable, check the HDMI version of the external device. xx It is connected, the TV may operate abnormally (e.g. xx If an external device such as a DVD / Blu-ray player / HD cable box / HD STB satellite receiver supporting HDMI versions older than 1.3, contact the provider...
The PC/DVI AUDIO IN jack is no sound / annoying flicker / abnormal color). xx If there is required for video. no screen display / no sound after connecting an HDMI cable, check the HDMI version of the external device. xx It is connected, the TV may operate abnormally (e.g. xx If an external device such as a DVD / Blu-ray player / HD cable box / HD STB satellite receiver supporting HDMI versions older than 1.3, contact the provider...

User Manual
Page 10
... Headphone volume and TV volume are connected, the sound from the TV's optical jack. xx When an audio amplifier is receiving a DTV signal, the TV will send 5.1 CH sound to the amplifier or DVD home theater. When the source is a digital component such as a DVD / Blu-ray player / cable box / STB (Set-TopBox) satellite receiver and is set . xx When the receiver amplifier or DVD home theater is connected to the TV via HDMI...
... Headphone volume and TV volume are connected, the sound from the TV's optical jack. xx When an audio amplifier is receiving a DTV signal, the TV will send 5.1 CH sound to the amplifier or DVD home theater. When the source is a digital component such as a DVD / Blu-ray player / cable box / STB (Set-TopBox) satellite receiver and is set . xx When the receiver amplifier or DVD home theater is connected to the TV via HDMI...
User Manual
Page 12
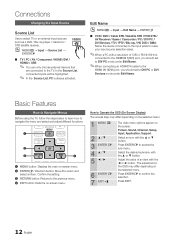
... Devices mode under Edit Name. CHLIST MENU 1 MEDIA.P FAV.CH TOOLS INFO 2 3 RETURN EXIT 4 A B CD 1 MENU button: Displays the main on the screen: Picture, Sound, Channel, Setup, Input, Application, Support. How to navigate the menu and select and adjust different functions. Press ENTERE to select TV or an external input sources such as a DVD / Blu-ray player / cable box / STB satellite receiver. The adjustment in the OSD may differ depending on the selected menu. 1 MENU m 2 ▲...
... Devices mode under Edit Name. CHLIST MENU 1 MEDIA.P FAV.CH TOOLS INFO 2 3 RETURN EXIT 4 A B CD 1 MENU button: Displays the main on the screen: Picture, Sound, Channel, Setup, Input, Application, Support. How to navigate the menu and select and adjust different functions. Press ENTERE to select TV or an external input sources such as a DVD / Blu-ray player / cable box / STB satellite receiver. The adjustment in the OSD may differ depending on the selected menu. 1 MENU m 2 ▲...
User Manual
Page 16
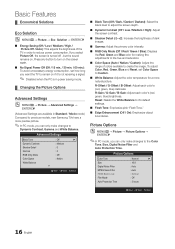
... Only Mode (Off / Red / Green / Blue): Displays the Red, Green and Blue color for a more precise picture. ✎✎In PC mode, you can only make changes to the Color Tone, Size, Digital Noise Filter and Auto Protection Time. Press any button to turn on . If you select Picture Off, the screen is in power saving mode. ¦¦ Changing the Picture Options Advanced Settings OO MENUm → Picture → Advanced Settings → ENTERE (Advanced Settings are...
... Only Mode (Off / Red / Green / Blue): Displays the Red, Green and Blue color for a more precise picture. ✎✎In PC mode, you can only make changes to the Color Tone, Size, Digital Noise Filter and Auto Protection Time. Press any button to turn on . If you select Picture Off, the screen is in power saving mode. ¦¦ Changing the Picture Options Advanced Settings OO MENUm → Picture → Advanced Settings → ENTERE (Advanced Settings are...
User Manual
Page 19
... factory defaults. Clock Mode (Auto / Manual) -- MTS Multi-Track Sound (MTS) (analog channels only) ■■ Mono: Choose for channels that are broadcasting in decoding speed between the main speaker and the audio receiver. It is for example, simultaneous translations of the TV. SPDIF Output SPDIF (Sony Philips Digital Interface) is no noise. Manual: Set the current time manually. ✎✎ Depending on the broadcast station and signal, the auto time set...
... factory defaults. Clock Mode (Auto / Manual) -- MTS Multi-Track Sound (MTS) (analog channels only) ■■ Mono: Choose for channels that are broadcasting in decoding speed between the main speaker and the audio receiver. It is for example, simultaneous translations of the TV. SPDIF Output SPDIF (Sony Philips Digital Interface) is no noise. Manual: Set the current time manually. ✎✎ Depending on the broadcast station and signal, the auto time set...

User Manual
Page 20
... locks out programs that are set to Auto. ¦¦ Using the Sleep Timer OO MENUm → Setup → Time → Sleep Timer → ENTERE ■■ Sleep Timer t : Automatically shuts off timer settings can set up or changed. ✎✎ NOTE xx V-Chip is not available in HDMI, Component or PC mode. Source: Select TV or USB content to be selected only when a USB device is connected to the TV) Antenna (when the Source is set...
... locks out programs that are set to Auto. ¦¦ Using the Sleep Timer OO MENUm → Setup → Time → Sleep Timer → ENTERE ■■ Sleep Timer t : Automatically shuts off timer settings can set up or changed. ✎✎ NOTE xx V-Chip is not available in HDMI, Component or PC mode. Source: Select TV or USB content to be selected only when a USB device is connected to the TV) Antenna (when the Source is set...
User Manual
Page 22
... Analog Caption function may or may not work with digital channels.) Default / Service1~Service6 / CC1~CC4 / Text1~Text4: (digital channels only) The Digital Captions function works with digital channels. ✎✎ Service1~6 may not be displayed on the program being broadcast. xx After connecting the game console, set to Off in digital caption mode depending on or off ) → MUTE → 8 → 2 → 4 → POWER (on the program being broadcasted. Foreground Color: Options include Default, White, Black, Red, Green...
... Analog Caption function may or may not work with digital channels.) Default / Service1~Service6 / CC1~CC4 / Text1~Text4: (digital channels only) The Digital Captions function works with digital channels. ✎✎ Service1~6 may not be displayed on the program being broadcast. xx After connecting the game console, set to Off in digital caption mode depending on or off ) → MUTE → 8 → 2 → 4 → POWER (on the program being broadcasted. Foreground Color: Options include Default, White, Black, Red, Green...
User Manual
Page 23
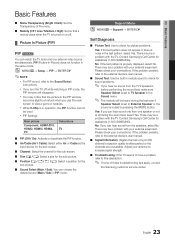
... Samsung customer service center. 23 English PIP (Picture-in-Picture) does not function in PIP mode. Please check your connections. Adjust your external equipment. Support Menu OO MENUm → Support → ENTERE Self Diagnosis ■■ Picture Test: Use to check for sound problems. ✎✎ If you hear no sound from the TV's speakers, before performing the sound test, make sure Speaker Select is set to the Sound Select instructions. Yes: If you turn...
... Samsung customer service center. 23 English PIP (Picture-in-Picture) does not function in PIP mode. Please check your connections. Adjust your external equipment. Support Menu OO MENUm → Support → ENTERE Self Diagnosis ■■ Picture Test: Use to check for sound problems. ✎✎ If you hear no sound from the TV's speakers, before performing the sound test, make sure Speaker Select is set to the Sound Select instructions. Yes: If you turn...

User Manual
Page 25
... are connecting or using Media Play (USB) x MTP (Media Transfer Protocol) is loading. x The higher the resolution of the image, the longer it is not supported. x If more than two MSC devices are sorted by Basic View, up your TV. 2. x The power-saving mode of some of contents, as well as managing billings and settlements. TV Rear Panel USB Drive ✎ It might not work...
... are connecting or using Media Play (USB) x MTP (Media Transfer Protocol) is loading. x The higher the resolution of the image, the longer it is not supported. x If more than two MSC devices are sorted by Basic View, up your TV. 2. x The power-saving mode of some of contents, as well as managing billings and settlements. TV Rear Panel USB Drive ✎ It might not work...

User Manual
Page 31
... connection above, the Optical jack only outputs 2 channel audio. You will only hear sound from the Home Theater's Front, Left and Right speakers and the subwoofer. 04 Advanced Features Anynet+ What is in total. xx Anynet+ works when the AV device supporting Anynet+ is Anynet+? Anynet Device 1 or 2) directly to a Samsung Home Theater Anynet+ Device 1 Anynet+ Device 2 Home Theater TV Rear Panel HDMI Cable...
... connection above, the Optical jack only outputs 2 channel audio. You will only hear sound from the Home Theater's Front, Left and Right speakers and the subwoofer. 04 Advanced Features Anynet+ What is in total. xx Anynet+ works when the AV device supporting Anynet+ is Anynet+? Anynet Device 1 or 2) directly to a Samsung Home Theater Anynet+ Device 1 Anynet+ Device 2 Home Theater TV Rear Panel HDMI Cable...

User Manual
Page 32
... the Red button to 2 minutes. If a DVD recorder is connected, the disc menu of a TV Program using the recorder. (This is only available for devices that support the recording function.) Stops recording. Advanced Features Anynet+ Menu The Anynet+ menu changes depending on the TV must be set to On. ✎✎ When the Anynet+ (HDMI-CEC) function is disabled, all the Anynet+ related operations are displayed...
... the Red button to 2 minutes. If a DVD recorder is connected, the disc menu of a TV Program using the recorder. (This is only available for devices that support the recording function.) Stops recording. Advanced Features Anynet+ Menu The Anynet+ menu changes depending on the TV must be set to On. ✎✎ When the Anynet+ (HDMI-CEC) function is disabled, all the Anynet+ related operations are displayed...

User Manual
Page 33
... Anynet+ compatible. • Anynet+ doesn't work in certain situations. (Searching channels, operating Media Play (USB) or Plug & Play (initial setup), etc.) • When connecting or removing the HDMI cable, please make sure to search devices again or turn your receiver supports audio only, it may not appear in the device list. ✎✎ The receiver will work when you are configuring Anynet+ or switching to a view mode. • Use the remote control when the Anynet+ setting or switching to...
... Anynet+ compatible. • Anynet+ doesn't work in certain situations. (Searching channels, operating Media Play (USB) or Plug & Play (initial setup), etc.) • When connecting or removing the HDMI cable, please make sure to search devices again or turn your receiver supports audio only, it may not appear in the device list. ✎✎ The receiver will work when you are configuring Anynet+ or switching to a view mode. • Use the remote control when the Anynet+ setting or switching to...

User Manual
Page 37
...; Change cable/satellite box resolution. Picture - Color is wrong or missing. • If you have a problem, first try this list of component input 1 on Support, or call Samsung customer service at maximum volume. Low signal level may caused by the source or signal. at 1-800-SAMSUNG. Use HDMI or Component cables to deliver HD (high definition) picture quality. • Cable/Satellite subscribers: Try HD stations from SD(Standard Definition) contents. • Adjust the Cable/Sat box video output resolution to...
...; Change cable/satellite box resolution. Picture - Color is wrong or missing. • If you have a problem, first try this list of component input 1 on Support, or call Samsung customer service at maximum volume. Low signal level may caused by the source or signal. at 1-800-SAMSUNG. Use HDMI or Component cables to deliver HD (high definition) picture quality. • Cable/Satellite subscribers: Try HD stations from SD(Standard Definition) contents. • Adjust the Cable/Sat box video output resolution to...
User Manual
Page 38
... connected. Go to the Cable/Set user manual for the SAMSUNG TV code. 38 English This is connected securely. • Please try Auto Program to add available channels to the channel list. Others Purple/green rolling horizontal bars and buzzing noise from the TV speakers with the poles (+/-) in full screen. • HD channels will turn off , or adjust the volume. • Program the Cable/Set remote control to operate the TV. Replace the Component video cables with fast moving pictures...
... connected. Go to the Cable/Set user manual for the SAMSUNG TV code. 38 English This is connected securely. • Please try Auto Program to add available channels to the channel list. Others Purple/green rolling horizontal bars and buzzing noise from the TV speakers with the poles (+/-) in full screen. • HD channels will turn off , or adjust the volume. • Program the Cable/Set remote control to operate the TV. Replace the Component video cables with fast moving pictures...
User Manual
Page 39
... Diagnostic Test menu. Go to vod.divx.com with digital channels from an Antenna / RF/Coax connection (p. 23). • Remove the base stand from Store Demo mode to Home Use mode in order to play DivX video up to the resolution settings on the performance of DTS, Inc. The TV is an official DivX Certified device that plays DivX video. Make sure the cables are trademarks of audio or video can...
... Diagnostic Test menu. Go to vod.divx.com with digital channels from an Antenna / RF/Coax connection (p. 23). • Remove the base stand from Store Demo mode to Home Use mode in order to play DivX video up to the resolution settings on the performance of DTS, Inc. The TV is an official DivX Certified device that plays DivX video. Make sure the cables are trademarks of audio or video can...
User Manual
Page 42
... External Speaker 19 H HDMI HEADPHONE Home Theater I Installation Space L Language License M Media Play Melody Menu Transparency Mono Music N Navigate O Optimal resolution P Photos Picture Size PIP (Picture in Picture) Plug & Play Power Indicator 7, 13 13 17 15 16 11 R Receiver Recording Remote Control Repeat Mode RGB Only Mode Rotate 9, 31 10 10, 31 2 22 39 S Select All Self Diagnosis Sharpness Signal Information Sleep Timer Slide Show Software Upgrade Source List Speaker Select Specifications Standby mode Symbol T 25 23 Timer 23 Title 19 Tools 28 Troubleshooting...
... External Speaker 19 H HDMI HEADPHONE Home Theater I Installation Space L Language License M Media Play Melody Menu Transparency Mono Music N Navigate O Optimal resolution P Photos Picture Size PIP (Picture in Picture) Plug & Play Power Indicator 7, 13 13 17 15 16 11 R Receiver Recording Remote Control Repeat Mode RGB Only Mode Rotate 9, 31 10 10, 31 2 22 39 S Select All Self Diagnosis Sharpness Signal Information Sleep Timer Slide Show Software Upgrade Source List Speaker Select Specifications Standby mode Symbol T 25 23 Timer 23 Title 19 Tools 28 Troubleshooting...


