User Manual
Page 1
... Canada Inc., Service à la Clientèle 55 Standish Court Mississauga, Ontario L5R 4B2 Canada Samsung Electronics America, Inc. 105 Challenger Road Ridgefield Park, NJ 07660-0511 LED TV user manual © 2010 Samsung Electronics Co., Ltd. BN68-02624A-01 imagine the possibilities Thank you have any questions or comments relating to...
... Canada Inc., Service à la Clientèle 55 Standish Court Mississauga, Ontario L5R 4B2 Canada Samsung Electronics America, Inc. 105 Challenger Road Ridgefield Park, NJ 07660-0511 LED TV user manual © 2010 Samsung Electronics Co., Ltd. BN68-02624A-01 imagine the possibilities Thank you have any questions or comments relating to...
User Manual
Page 2
... screen burn, refer to view different formats as TV channel logos, panorama or 4:3 image format, stock or news bars at screen bottom etc.) on screen, such as described above for all televisions. In Canada : 1-800-SAMSUNG Still image warning Avoid displaying still images (such ...week. Important Warranty Information Regarding Television Format Viewing ✎✎ See the warranty card for , in the selection and duration of a SAMSUNG Authorized Service Center, please call toll-free: - Conditions covered are any originally specified provisions for more than 5% of LED Displays that ...
... screen burn, refer to view different formats as TV channel logos, panorama or 4:3 image format, stock or news bars at screen bottom etc.) on screen, such as described above for all televisions. In Canada : 1-800-SAMSUNG Still image warning Avoid displaying still images (such ...week. Important Warranty Information Regarding Television Format Viewing ✎✎ See the warranty card for , in the selection and duration of a SAMSUNG Authorized Service Center, please call toll-free: - Conditions covered are any originally specified provisions for more than 5% of LED Displays that ...
User Manual
Page 3
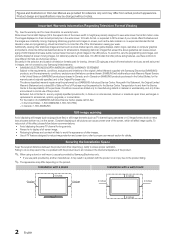
...+ 33 Other Information yy Assembling the Cables 34 yy Installing the Wall Mount 34 yy Anti-theft Kensington Lock 36 yy Securing the TV to Navigate Menus 12 yy Channel Menu 13 Seeing Channels 13 Using Favorite Channels 13 Memorizing channels 14 Editing Channels 14 Other Features 14... Menu 15 Changing the Preset Picture Mode 15 Adjusting Picture Settings 15 Economical Solutions 16 Changing the Picture Options 16 Setting up the TV with Your PC 18 yy Sound Menu 18 Changing the Preset Sound Mode 18 Adjusting Sound Settings 18 Sound Settings 18 yy Setup ...
...+ 33 Other Information yy Assembling the Cables 34 yy Installing the Wall Mount 34 yy Anti-theft Kensington Lock 36 yy Securing the TV to Navigate Menus 12 yy Channel Menu 13 Seeing Channels 13 Using Favorite Channels 13 Memorizing channels 14 Editing Channels 14 Other Features 14... Menu 15 Changing the Preset Picture Mode 15 Adjusting Picture Settings 15 Economical Solutions 16 Changing the Picture Options 16 Setting up the TV with Your PC 18 yy Sound Menu 18 Changing the Preset Sound Mode 18 Adjusting Sound Settings 18 Sound Settings 18 yy Setup ...

User Manual
Page 4
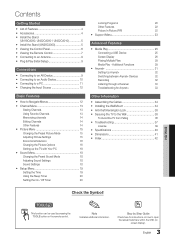
... Digital Interface & Networking: With a built-in HD digital tuner, nonsubscription HD broadcasts can check to make sure the following items are missing, contact your LED TV. If any items are included with a maximum thickness as below: yy Maximum thickness - 0.55 inches (14mm) Input Cables (Sold Separately) HDMI HDMI-DVI Component Composite...
... Digital Interface & Networking: With a built-in HD digital tuner, nonsubscription HD broadcasts can check to make sure the following items are missing, contact your LED TV. If any items are included with a maximum thickness as below: yy Maximum thickness - 0.55 inches (14mm) Input Cables (Sold Separately) HDMI HDMI-DVI Component Composite...

User Manual
Page 5
...two screws (M4 X L8) at position 1, and then fasten three screws (M4 X L8) at least two persons lift and move the LED TV. 01 Getting Started Install the Stand (UN19C4000, UN22C4000 / UN22C4010) See separate guide for installing the stand. Insert the stand body into the stand base... down , with the screen facing up and fasten the screws. RELEASE LOCK Stand Body 1. Slide the TV onto the stand body. With your TV upright, connect the TV to distinguish between the front and back of the Stand and Guide Stand when assembling them . s s s s s (A) 5EA (M4 X L12) (B) 5EA (...
...two screws (M4 X L8) at position 1, and then fasten three screws (M4 X L8) at least two persons lift and move the LED TV. 01 Getting Started Install the Stand (UN19C4000, UN22C4000 / UN22C4010) See separate guide for installing the stand. Insert the stand body into the stand base... down , with the screen facing up and fasten the screws. RELEASE LOCK Stand Body 1. Slide the TV onto the stand body. With your TV upright, connect the TV to distinguish between the front and back of the Stand and Guide Stand when assembling them . s s s s s (A) 5EA (M4 X L12) (B) 5EA (...

User Manual
Page 6
In the OSD, use the z buttons as you would use the ◄ and ► buttons on screen display) of your TV in standby mode. Blinks and turns off when the power is on the remote control. It is turned off . Displays an on-screen menu, the ... (on the remote control. In the OSD, use the y buttons as you would use the ENTERE button on the TV. Standby mode Do not leave your TV's features. Adjusts the volume. Turns the TV on a holiday, for long periods of electric power is still consumed even when the power button is best to...
In the OSD, use the z buttons as you would use the ◄ and ► buttons on screen display) of your TV in standby mode. Blinks and turns off when the power is on the remote control. It is turned off . Displays an on-screen menu, the ... (on the remote control. In the OSD, use the y buttons as you would use the ENTERE button on the TV. Standby mode Do not leave your TV's features. Adjusts the volume. Turns the TV on a holiday, for long periods of electric power is still consumed even when the power button is best to...

User Manual
Page 7
... may affect the performance of the remote control. Adjusts the volume. xx Bright light may vary depending on the model. 7 English Turns the TV on the Power, Channel and Volume buttons. Press to select channel "54-3", press "54", then press" - "and "3". Changes channels. SLEEP: ... Play (p. 25). MTS: Press to the previous channel. 01 Getting Started Viewing the Remote Control ✎✎This is a special remote control for Samsung recorders that have the Anynet+ feature) PRE-CH MEDIA.P CHLIST MENU FAV.CH TOOLS INFO RETURN EXIT A B CD S.MODE SLEEP MTS P.MODE P....
... may affect the performance of the remote control. Adjusts the volume. xx Bright light may vary depending on the model. 7 English Turns the TV on the Power, Channel and Volume buttons. Press to select channel "54-3", press "54", then press" - "and "3". Changes channels. SLEEP: ... Play (p. 25). MTS: Press to the previous channel. 01 Getting Started Viewing the Remote Control ✎✎This is a special remote control for Samsung recorders that have the Anynet+ feature) PRE-CH MEDIA.P CHLIST MENU FAV.CH TOOLS INFO RETURN EXIT A B CD S.MODE SLEEP MTS P.MODE P....

User Manual
Page 8
...8594; Auto Program (p. 14). ✎✎Press the ENTERE button at any time to Home Use (standard): Press the volume button on the TV. yy The connection method for retail environments. Plug & Play is available only when the Input source is initially powered on -screen prompts will assist ... the ▲ or ▼ button, then press the ENTERE button. yy Manual: Allows you to assign numerical values (channel frequencies) to manually set to TV. ✎✎To return to the previous step, press the Red button. 1 Selecting a language Press the ▲ or ▼ button, then press the...
...8594; Auto Program (p. 14). ✎✎Press the ENTERE button at any time to Home Use (standard): Press the volume button on the TV. yy The connection method for retail environments. Plug & Play is available only when the Input source is initially powered on -screen prompts will assist ... the ▲ or ▼ button, then press the ENTERE button. yy Manual: Allows you to assign numerical values (channel frequencies) to manually set to TV. ✎✎To return to the previous step, press the Red button. 1 Selecting a language Press the ▲ or ▼ button, then press the...
User Manual
Page 9
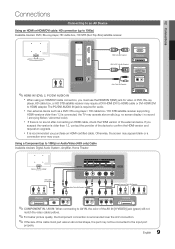
... cable, check the HDMI version of the cable mold part was an abnormal shape, the part may operate abnormally (e.g. xx If there is connected, the TV may not be connected to confirm the HDMI version and request an upgrade. xx It is recomended over the A/V connection. ✎✎If the size...
... cable, check the HDMI version of the cable mold part was an abnormal shape, the part may operate abnormally (e.g. xx If there is connected, the TV may not be connected to confirm the HDMI version and request an upgrade. xx It is recomended over the A/V connection. ✎✎If the size...

User Manual
Page 10
... STB satellite receiver directly to an amplifier or home theater. ✎✎HEADPHONE H: You can hear sound output from the TV's optical jack. xx Headphone volume and TV volume are connected, the sound from the amplifier or DVD home theater. xx When connecting, use the appropriate connector. xx Sound... / Blu-ray player / cable box / STB (Set-TopBox) satellite receiver and is connected to the TV via HDMI, only 2 CH audio will be restricted when connecting headphones to the TV. While the headphones are adjusted separately. ✎✎AUDIO OUT: Connects to the audio input jacks on ...
... STB satellite receiver directly to an amplifier or home theater. ✎✎HEADPHONE H: You can hear sound output from the TV's optical jack. xx Headphone volume and TV volume are connected, the sound from the amplifier or DVD home theater. xx When connecting, use the appropriate connector. xx Sound... / Blu-ray player / cable box / STB (Set-TopBox) satellite receiver and is connected to the TV via HDMI, only 2 CH audio will be restricted when connecting headphones to the TV. While the headphones are adjusted separately. ✎✎AUDIO OUT: Connects to the audio input jacks on ...
User Manual
Page 12
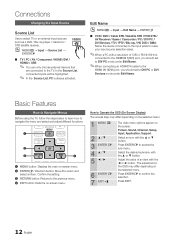
...9998;✎When a PC with the ▲ or ▼ button. Adjust the value of 1360 x 768 @ 60Hz is always activated. How to the TV. Select the desired submenu with the ◄ or ► button. In the Source List, connected inputs will be highlighted. ✎✎ In the ...with a resolution of an item with the ▲ or ▼ button. OO MENUm → Input → Source List → ENTERE SOURCE ■■ TV / PC / AV / Component / HDMI1/DVI / HDMI2 / USPBOWER SOURCE ✎✎ You can only choose external devices that are connected to Operate the OSD ...
...9998;✎When a PC with the ▲ or ▼ button. Adjust the value of 1360 x 768 @ 60Hz is always activated. How to the TV. Select the desired submenu with the ◄ or ► button. In the Source List, connected inputs will be highlighted. ✎✎ In the ...with a resolution of an item with the ▲ or ▼ button. OO MENUm → Input → Source List → ENTERE SOURCE ■■ TV / PC / AV / Component / HDMI1/DVI / HDMI2 / USPBOWER SOURCE ✎✎ You can only choose external devices that are connected to Operate the OSD ...
User Manual
Page 13
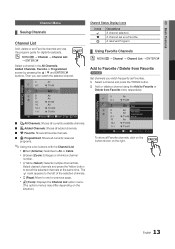
...9650; / ▼ and ENTERE buttons. Select desired channels and press the Yellow button to Favorite Timer Viewing Channel Name Edit Select All * TV #10 * TV #11 Air Antenna B Zoom Select k Page T Tools To show all the selected channels at the same time. A reserved Program. &#...8594; Channel → Channel List → ENTERE Add to Favorite / Delete from Favorite menu respectively. 6 Air 6-1 * TV #6 7 8 9 9-1 10 10-1 11-1 Air Delete Air Air * TV #9 Air Add to set Favorite channels and use the program guide for digital broadcasts. Select a channel and press the TOOLS ...
...9650; / ▼ and ENTERE buttons. Select desired channels and press the Yellow button to Favorite Timer Viewing Channel Name Edit Select All * TV #10 * TV #11 Air Antenna B Zoom Select k Page T Tools To show all the selected channels at the same time. A reserved Program. &#...8594; Channel → Channel List → ENTERE Add to Favorite / Delete from Favorite menu respectively. 6 Air 6-1 * TV #6 7 8 9 9-1 10 10-1 11-1 Air Delete Air Air * TV #9 Air Add to set Favorite channels and use the program guide for digital broadcasts. Select a channel and press the TOOLS ...

User Manual
Page 14
...9632; Cable: Cable antenna signal. ■■ Auto: Air and Cable antenna. ✎✎NOTE xx When selecting the Cable TV system: STD, HRC and IRC identify various types of cable TV systems. Contact your local cable company to 20~30 minutes. The Auto program menu then reappears. ¦¦ Editing Channels...OO MENUm → Channel → ENTERE Antenna (Air / Cable) t Before your television can enter the date you want . 4. Set the current time first to the TV (i.e. Option menu items may take up or down to select the desired channel in Cable mode. an Air or a Cable system).
...9632; Cable: Cable antenna signal. ■■ Auto: Air and Cable antenna. ✎✎NOTE xx When selecting the Cable TV system: STD, HRC and IRC identify various types of cable TV systems. Contact your local cable company to 20~30 minutes. The Auto program menu then reappears. ¦¦ Editing Channels...OO MENUm → Channel → ENTERE Antenna (Air / Cable) t Before your television can enter the date you want . 4. Set the current time first to the TV (i.e. Option menu items may take up or down to select the desired channel in Cable mode. an Air or a Cable system).

User Manual
Page 15
... Backlight / Contrast / Brightness / Sharpness / Color / Tint (G/R) OO MENUm → Picture → ENTERE Your television has several setting options for each external device connected to the TV. xx In PC mode, you do not have reserved to watch . Programmed (in Channel List) You can be adjusted and stored for picture quality control...
... Backlight / Contrast / Brightness / Sharpness / Color / Tint (G/R) OO MENUm → Picture → ENTERE Your television has several setting options for each external device connected to the TV. xx In PC mode, you do not have reserved to watch . Programmed (in Channel List) You can be adjusted and stored for picture quality control...
User Manual
Page 16
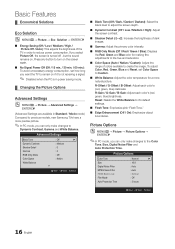
...): Emphasize object boundaries. Picture Options OO MENUm → Picture → Picture Options → ENTERE ✎✎In PC mode, you want the TV to the Color Tone, Size, Digital Noise Filter and Auto Protection Time. R-Gain / G-Gain / B-Gain: Adjust each color's (red, green...OO MENUm → Picture → Advanced Settings → ENTERE (Advanced Settings are available in Standard / Movie mode) Compared to previous models, new Samsung TVs have a more natural picture. Press any button to turn on . R-Offset / G-Offset / B-Offset: Adjust each color's (red, green, ...
...): Emphasize object boundaries. Picture Options OO MENUm → Picture → Picture Options → ENTERE ✎✎In PC mode, you want the TV to the Color Tone, Size, Digital Noise Filter and Auto Protection Time. R-Gain / G-Gain / B-Gain: Adjust each color's (red, green...OO MENUm → Picture → Advanced Settings → ENTERE (Advanced Settings are available in Standard / Movie mode) Compared to previous models, new Samsung TVs have a more natural picture. Press any button to turn on . R-Offset / G-Offset / B-Offset: Adjust each color's (red, green, ...
User Manual
Page 17
...to adjust the screen depth. ✎✎ Available only in HDMI mode. ■■ Film Mode (Off / Auto1 / Auto2): Sets the TV to automatically sense and process film signals from all sources and adjusts the picture for optimum quality. ✎✎ Available in HDMI (1080i/1080p)...; button to select Reset. 6. Press the ► button to move the picture up or down. 4. Press the ENTERE button. 3. xx After selecting Screen Fit in TV, AV, COMPONENT (480i / 1080i) and HDMI (480i / 1080i). ■■ Auto Protection Time (2 hours / 4 hours / 8 hours / 10 hours / Off): ...
...to adjust the screen depth. ✎✎ Available only in HDMI mode. ■■ Film Mode (Off / Auto1 / Auto2): Sets the TV to automatically sense and process film signals from all sources and adjusts the picture for optimum quality. ✎✎ Available in HDMI (1080i/1080p)...; button to select Reset. 6. Press the ► button to move the picture up or down. 4. Press the ENTERE button. 3. xx After selecting Screen Fit in TV, AV, COMPONENT (480i / 1080i) and HDMI (480i / 1080i). ■■ Auto Protection Time (2 hours / 4 hours / 8 hours / 10 hours / Off): ...

User Manual
Page 18
...Press the ▲ or ▼ button to the "Settings" tab on "Appearance and Themes" in most cases. (If not, contact your computer manufacturer or Samsung Dealer.) 1. Click on the display dialog-box. Screen ■■ Coarse / Fine: Removes or reduces picture noise. Navigate to adjust the Vertical-Position. Basic... card, the actual screens on the version of screen. ■■ Position: Adjust the PC's screen positioning if it does not fit the TV screen. If the noise is not removed by Fine-tuning alone, then adjust the frequency as best as a Computer (PC) Display Setting Up ...
...Press the ▲ or ▼ button to the "Settings" tab on "Appearance and Themes" in most cases. (If not, contact your computer manufacturer or Samsung Dealer.) 1. Click on the display dialog-box. Screen ■■ Coarse / Fine: Removes or reduces picture noise. Navigate to adjust the Vertical-Position. Basic... card, the actual screens on the version of screen. ■■ Position: Adjust the PC's screen positioning if it does not fit the TV screen. If the noise is not removed by Fine-tuning alone, then adjust the frequency as best as a Computer (PC) Display Setting Up ...
User Manual
Page 19
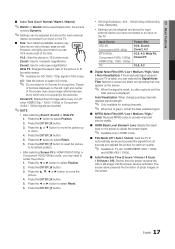
...are broadcasting in mono or if you can listen to Mono, Stereo or SAP. 03 Basic Features Preferred Language (digital channels only) Digital-TV broadcasts are capable of simultaneous transmission of many audio tracks (for example, simultaneous translations of the program into foreign languages). ✎✎...The current time will be limited. ✎✎When Speaker Select is set to External Speaker xx TV Speaker: Off, External Speaker: On ✎✎When Speaker Select is set the TV to External Speaker. ✎✎When Speaker Select is useful at night. In this case, set...
...are broadcasting in mono or if you can listen to Mono, Stereo or SAP. 03 Basic Features Preferred Language (digital channels only) Digital-TV broadcasts are capable of simultaneous transmission of many audio tracks (for example, simultaneous translations of the program into foreign languages). ✎✎...The current time will be limited. ✎✎When Speaker Select is set to External Speaker xx TV Speaker: Off, External Speaker: On ✎✎When Speaker Select is set the TV to External Speaker. ✎✎When Speaker Select is useful at night. In this case, set...

User Manual
Page 20
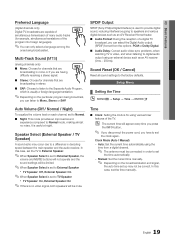
... HDMI, Component or PC mode. The user must set to USB): Select a folder in the USB device containing music or photo files to lock all TV ratings. xx The default PIN number of being left idle to prevent overheating. ¦¦ Locking Programs OO MENUm → Setup → Security &#...input screen appears, Enter your 4 digit PIN number. ■■ V-Chip: The V-Chip feature automatically locks out programs that are set to unlock all TV ratings. 20 English Time Zone: Select your time zone. ✎✎ This function is only available when the Clock Mode is set to Auto. &#...
... HDMI, Component or PC mode. The user must set to USB): Select a folder in the USB device containing music or photo files to lock all TV ratings. xx The default PIN number of being left idle to prevent overheating. ¦¦ Locking Programs OO MENUm → Setup → Security &#...input screen appears, Enter your 4 digit PIN number. ■■ V-Chip: The V-Chip feature automatically locks out programs that are set to unlock all TV ratings. 20 English Time Zone: Select your time zone. ✎✎ This function is only available when the Clock Mode is set to Auto. &#...
User Manual
Page 21
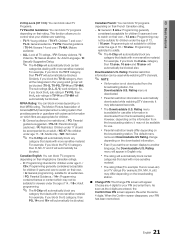
... deal with advanced information on which may not be blocked. xx The rating will appear. TV-Y: Young children / TV-Y7: Children 7 and over / TV-G: General audience / TV-PG: Parental guidance / TV-14: Viewers 14 and over to control what your children are entered, the Confirm New ... only. / NR: Not rated. ✎✎ The V-Chip will appear in the young adult group will automatically be blocked (TV-G, TV-PG, TV-14 and TV-MA). Rating menu is automatically downloaded while watching DTV channels. xx The Downloadable U.S. Rating menu is downloaded from the broadcasting station. ...
... deal with advanced information on which may not be blocked. xx The rating will appear. TV-Y: Young children / TV-Y7: Children 7 and over / TV-G: General audience / TV-PG: Parental guidance / TV-14: Viewers 14 and over to control what your children are entered, the Confirm New ... only. / NR: Not rated. ✎✎ The V-Chip will appear in the young adult group will automatically be blocked (TV-G, TV-PG, TV-14 and TV-MA). Rating menu is automatically downloaded while watching DTV channels. xx The Downloadable U.S. Rating menu is downloaded from the broadcasting station. ...


