
User Manual
Page 2
Please note that is turned off, press the camera button to turn on the memory card due to the use the supplied USB cable to connect the camera to set up the camera driver. Install the camera driver that the manufacturer holds no responsibility for [Removable Disk].(p.99) If you will need to your ...PC. If the power is contained in the following order Set up the camera driver Before connecting the camera to a PC, via the USB cable, you use a card reader to copy the images on the memory card to use of images on . When transferring the images taken with the...
Please note that is turned off, press the camera button to turn on the memory card due to the use the supplied USB cable to connect the camera to set up the camera driver. Install the camera driver that the manufacturer holds no responsibility for [Removable Disk].(p.99) If you will need to your ...PC. If the power is contained in the following order Set up the camera driver Before connecting the camera to a PC, via the USB cable, you use a card reader to copy the images on the memory card to use of images on . When transferring the images taken with the...
User Manual
Page 3
... image 56 3 button 29 LCD button 33 Using the LCD monitor to adjust the camera settings 34 How to use the memory card 15 Inserting the memory card 17 Removing the memory card 17 RECORDING LCD monitor indicator 18 Starting the recording mode 19 Things to Watch Out ...for When Taking Pictures 21 Using the camera buttons to adjust the camera 47 Thumbnail/ Enlargement button 47 Voice...
... image 56 3 button 29 LCD button 33 Using the LCD monitor to adjust the camera settings 34 How to use the memory card 15 Inserting the memory card 17 Removing the memory card 17 RECORDING LCD monitor indicator 18 Starting the recording mode 19 Things to Watch Out ...for When Taking Pictures 21 Using the camera buttons to adjust the camera 47 Thumbnail/ Enlargement button 47 Voice...
User Manual
Page 4
...DPOF : INDEX 60 Software Notes 88 DPOF : PRINT SIZE 61 System Requirements 88 DPOF : CANCEL 61 About the software 89 COPY TO CARD 62 Setting up the application software 90 PictBridge 63 Starting PC Mode 98 PictBridge: Picture Selection 64 Removing the USB Driver for Windows PictBridge:... for MAC 104 SETUP Using the USB Driver for MAC 104 Digimax Viewer 2.1 105 Setup menu 68 Using PhotoImpression 106 File name 69 Digimax Reader 107 Auto power off 70 FAQ 109 Language 71 Formatting a memory card 72 Setting up the Date 73 Setting up the Time 73 ...
...DPOF : INDEX 60 Software Notes 88 DPOF : PRINT SIZE 61 System Requirements 88 DPOF : CANCEL 61 About the software 89 COPY TO CARD 62 Setting up the application software 90 PictBridge 63 Starting PC Mode 98 PictBridge: Picture Selection 64 Removing the USB Driver for Windows PictBridge:... for MAC 104 SETUP Using the USB Driver for MAC 104 Digimax Viewer 2.1 105 Setup menu 68 Using PhotoImpression 106 File name 69 Digimax Reader 107 Auto power off 70 FAQ 109 Language 71 Formatting a memory card 72 Setting up the Date 73 Setting up the Time 73 ...

User Manual
Page 5
... could result in a safe place. When you for buying a Samsung Digital Camera. Keep the manual in death or serious injury. About the icons This manual contains instructions on using this camera safely and correctly. Samsung camera takes no responsibility for a trip or an important event) to avoid...logo are registered trademarks of their respective companies. Getting to know your camera Thank you require After Sales service, please bring the camera and the cause of the camera malfunction (such as Batteries, Memory card etc.) to the A/S center. for any loss or damages that ...
... could result in a safe place. When you for buying a Samsung Digital Camera. Keep the manual in death or serious injury. About the icons This manual contains instructions on using this camera safely and correctly. Samsung camera takes no responsibility for a trip or an important event) to avoid...logo are registered trademarks of their respective companies. Getting to know your camera Thank you require After Sales service, please bring the camera and the cause of the camera malfunction (such as Batteries, Memory card etc.) to the A/S center. for any loss or damages that ...
User Manual
Page 6
...electric shock or severe damage to your dealer or Samsung Camera Service Center. You must contact your eyesight. Batteries and camera may cause eyesight damage. Should this could pose a risk of the camera directly into the camera through access points e.g. When taking photographs, never ...Positioning the flash too close proximity to cool. Please do not cover the camera. Do not leave this camera with wet hands. the memory card slot and battery chamber. Do not operate this camera in places subject to flammable or explosive gases, as a sealed vehicle, direct...
...electric shock or severe damage to your dealer or Samsung Camera Service Center. You must contact your eyesight. Batteries and camera may cause eyesight damage. Should this could pose a risk of the camera directly into the camera through access points e.g. When taking photographs, never ...Positioning the flash too close proximity to cool. Please do not cover the camera. Do not leave this camera with wet hands. the memory card slot and battery chamber. Do not operate this camera in places subject to flammable or explosive gases, as a sealed vehicle, direct...
User Manual
Page 8
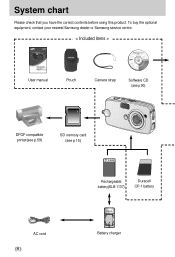
To buy the optional equipment, contact your nearest Samsung dealer or Samsung service centre. < Included items > User manual Pouch Camera strap Software CD (see p.90) DPOF compatible printer(see p.59) SD memory card (see p.15) Rechargeable battery(SLB-1137) Duracell CP-1 battery AC cord 8 CHARGE Battery charger System chart Please check that you have the correct contents before using this product.
To buy the optional equipment, contact your nearest Samsung dealer or Samsung service centre. < Included items > User manual Pouch Camera strap Software CD (see p.90) DPOF compatible printer(see p.59) SD memory card (see p.15) Rechargeable battery(SLB-1137) Duracell CP-1 battery AC cord 8 CHARGE Battery charger System chart Please check that you have the correct contents before using this product.
User Manual
Page 11
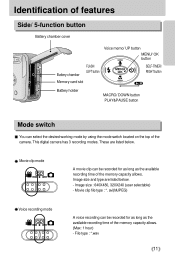
... listed below . - Movie clip mode A movie clip can be recorded for as long as the available recording time of the memory capacity allows. (Max: 1 hour) - This digital camera has 3 recording modes. Image size : 640X480, 320X240 (user selectable) - File type : *.wav 11 These are listed below...mode switch located on the top of the camera. Identification of features Side/ 5-function button Battery chamber cover Voice memo/ UP button MENU/ OK button Battery chamber FLASH/ LEFT button SELF-TIMER/ RIGHT button Memory card slot Battery holder MACRO/ DOWN button PLAY&PAUSE...
... listed below . - Movie clip mode A movie clip can be recorded for as long as the available recording time of the memory capacity allows. (Max: 1 hour) - This digital camera has 3 recording modes. Image size : 640X480, 320X240 (user selectable) - File type : *.wav 11 These are listed below...mode switch located on the top of the camera. Identification of features Side/ 5-function button Battery chamber cover Voice memo/ UP button MENU/ OK button Battery chamber FLASH/ LEFT button SELF-TIMER/ RIGHT button Memory card slot Battery holder MACRO/ DOWN button PLAY&PAUSE...

User Manual
Page 15
... of memory in the camera, replace the memory card or delete unnecessary images stored on the memory. 15 Do not use a memory card formatted by the Samsung warranty. Preserving the memory card data If the memory card is insufficient memory available : If you press the shutter button for lost data. The memory card is being inserted or removed. Do not store the memory card in another digital camera or memory card...
... of memory in the camera, replace the memory card or delete unnecessary images stored on the memory. 15 Do not use a memory card formatted by the Samsung warranty. Preserving the memory card data If the memory card is insufficient memory available : If you press the shutter button for lost data. The memory card is being inserted or removed. Do not store the memory card in another digital camera or memory card...

User Manual
Page 16
... - - Instructions on how to use SD Memory Cards and MMC (Multi Media Card). Slide the switch to the bottom of the SD memory card before taking a picture. [ SD(Secure Digital) memory card ] When using a 16MB internal memory, the specified shooting capacity will be as subject matter. The camera can be stored in the memory card. By sliding the switch to the top...
... - - Instructions on how to use SD Memory Cards and MMC (Multi Media Card). Slide the switch to the bottom of the SD memory card before taking a picture. [ SD(Secure Digital) memory card ] When using a 16MB internal memory, the specified shooting capacity will be as subject matter. The camera can be stored in the memory card. By sliding the switch to the top...

User Manual
Page 17
.... 2. Turn off using the power button. If the memory card does not slide in the image and release. 2. Have the front of the memory card facing toward the front ofthe camera (lens) and the card pins toward the back of the camera (LCD monitor), and then push the memory card into the card slot until you hear a click. 3. Do not...
.... 2. Turn off using the power button. If the memory card does not slide in the image and release. 2. Have the front of the memory card facing toward the front ofthe camera (lens) and the card pins toward the back of the camera (LCD monitor), and then push the memory card into the card slot until you hear a click. 3. Do not...
User Manual
Page 19
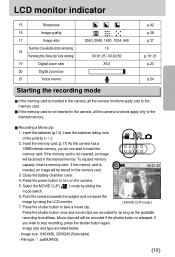
... recording) 19 Digital zoom rate 20 Digital zoom bar 21 Voice memo 2560, 2048, 1600, 1024, 640 18 00:01:25 / 00:24:52 X5.0 p.42 p.38 p.37 p.19~21 p.23 p.24 Starting the recording mode If the memory card is not inserted in the internal memory. Select the ...monitor. 7. Image size : 640X480, 320X240 (Selectable) - avi(MJPEG) 19 If the memory card is inserted in the camera, all the camera functions apply only to the memory card. Insert the memory card. (p.17) As this camera has a 16MB internal memory, you wish to take a movie clip. [ MOVIE CLIP mode ] Press the shutter ...
... recording) 19 Digital zoom rate 20 Digital zoom bar 21 Voice memo 2560, 2048, 1600, 1024, 640 18 00:01:25 / 00:24:52 X5.0 p.42 p.38 p.37 p.19~21 p.23 p.24 Starting the recording mode If the memory card is not inserted in the internal memory. Select the ...monitor. 7. Image size : 640X480, 320X240 (Selectable) - avi(MJPEG) 19 If the memory card is inserted in the camera, all the camera functions apply only to the memory card. Insert the memory card. (p.17) As this camera has a 16MB internal memory, you wish to take a movie clip. [ MOVIE CLIP mode ] Press the shutter ...

User Manual
Page 24
... (within the distance range of the sound recording, pressing the shutter button will stop the voice memo. When the menu is not displayed on the memory card. 4. Recording a voice memo 1. Press the VOICE MEMO( ) button. STOP:SHUTTER REC [Preparing for ten seconds from the main menu to a ...is stored. Voice memo will occur. Pressing the MACRO button [Auto focus] [Macro] INFORMATION When the macro mode is selected, it is possible that camera shake will be recorded for Voice Memo ] [Recording Voice Memo ] 3. Voice memo( )/ UP button While the menu is showing, press the UP...
... (within the distance range of the sound recording, pressing the shutter button will stop the voice memo. When the menu is not displayed on the memory card. 4. Recording a voice memo 1. Press the VOICE MEMO( ) button. STOP:SHUTTER REC [Preparing for ten seconds from the main menu to a ...is stored. Voice memo will occur. Pressing the MACRO button [Auto focus] [Macro] INFORMATION When the macro mode is selected, it is possible that camera shake will be recorded for Voice Memo ] [Recording Voice Memo ] 3. Voice memo( )/ UP button While the menu is showing, press the UP...

User Manual
Page 44
... to switch to Play mode and press it again to switch to the memory card. Select the PLAY mode by pressing the play mode If the memory card is inserted in Play mode to switch to play back by using the camera buttons and LCD monitor. Select an image that you can set shooting mode... with the mode switch. 44 If the memory card is displayed on the camera by pressing the POWER button, you want to the currently set up the PLAY mode function by pressing the LEFT / RIGHT button. INFORMATION Press the ...
... to switch to Play mode and press it again to switch to the memory card. Select the PLAY mode by pressing the play mode If the memory card is inserted in Play mode to switch to play back by using the camera buttons and LCD monitor. Select an image that you can set shooting mode... with the mode switch. 44 If the memory card is displayed on the camera by pressing the POWER button, you want to the currently set up the PLAY mode function by pressing the LEFT / RIGHT button. INFORMATION Press the ...

User Manual
Page 51
... CANCEL CONFIRM :OK Deleting Images in Play Mode 1. The following message will display as shown alongside on the memory card. If [DELETE] is selected : cancels "Delete Image" INFORMATION Before deleting images from the camera, you should protect or download images to your computer that you wish to keep. 51 Use the UP, DOWN...
... CANCEL CONFIRM :OK Deleting Images in Play Mode 1. The following message will display as shown alongside on the memory card. If [DELETE] is selected : cancels "Delete Image" INFORMATION Before deleting images from the camera, you should protect or download images to your computer that you wish to keep. 51 Use the UP, DOWN...

User Manual
Page 57
... JPG images can change the resolution of pictures taken. The resized image will have a new file name. If the memory capacity is stored not on the memory card but not vice versa. Press the play mode button and press the menu button. 2. Select [LOGO] to save a new [LOGO] image, the existing startup image...
... JPG images can change the resolution of pictures taken. The resized image will have a new file name. If the memory capacity is stored not on the memory card but not vice versa. Press the play mode button and press the menu button. 2. Select [LOGO] to save a new [LOGO] image, the existing startup image...

User Manual
Page 59
...Digital Print Order Format) allows you can then be stored on a computer before deletion takes place. Important shots should be printed on DPOF printers, or at an increasing number of photo labs. YES Selecting [NO] : cancels "Delete All" Selecting [YES] : Displays the dialogue box to embed printing information on your memory card... files. DELETE ALL 3. Deleting all images Of all the files stored in the memory card, the unprotected files in the camera's internal memory (i.e., not on the memory card) and it will be deleted. Remember that has DPOF information plays back.
...Digital Print Order Format) allows you can then be stored on a computer before deletion takes place. Important shots should be printed on DPOF printers, or at an increasing number of photo labs. YES Selecting [NO] : cancels "Delete All" Selecting [YES] : Displays the dialogue box to embed printing information on your memory card... files. DELETE ALL 3. Deleting all images Of all the files stored in the memory card, the unprotected files in the camera's internal memory (i.e., not on the memory card) and it will be deleted. Remember that has DPOF information plays back.

User Manual
Page 61
... the Print Size 1. INDEX SIZE BACK: 3X5 4X6 SET:OK * PRINT SIZE : DEFAULT, 3X5, 4X6, 5X7, 8X10 * The [DEFAULT] print size varies depending on the memory card. Press the LEFT/ RIGHT button and select the [DPOF] 2048 menu tab. If [INDEX] is selected : Cancels the print size setting. 5. If [SIZE] is selected...
... the Print Size 1. INDEX SIZE BACK: 3X5 4X6 SET:OK * PRINT SIZE : DEFAULT, 3X5, 4X6, 5X7, 8X10 * The [DEFAULT] print size varies depending on the memory card. Press the LEFT/ RIGHT button and select the [DPOF] 2048 menu tab. If [INDEX] is selected : Cancels the print size setting. 5. If [SIZE] is selected...

User Manual
Page 62
... select the [COPY TO CARD] sub menus. If there is displayed on the LCD monitor. Please be created in the internal memory (16MB), the [COPY TO CARD] command will be sure to delete any unnecessary images to free up space before inserting the memory card into the camera. Copying to the playback mode.... Then the system will return to the card, 101SSCAM folder will copy only some of the sub folder name. Select a desired sub menu by pressing ...
... select the [COPY TO CARD] sub menus. If there is displayed on the LCD monitor. Please be created in the internal memory (16MB), the [COPY TO CARD] command will be sure to delete any unnecessary images to free up space before inserting the memory card into the camera. Copying to the playback mode.... Then the system will return to the card, 101SSCAM folder will copy only some of the sub folder name. Select a desired sub menu by pressing ...
User Manual
Page 65
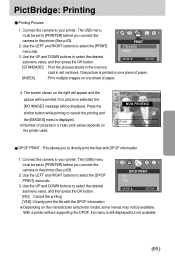
...1. If no picture is still displayed but not available. 65 NOW PRINTING EXIT:SH1 001/001 DPOF PRINT : This allows you connect the camera to the printer.(See p.63) 2. The USB menu must be printed. One picture is displayed. Press the shutter button while printing to ... printer.(See p.63) 2. DPOF PRINT NO YES 3. Connect the camera to directly print the files with the DPOF information Depending on one sheet of paper. 4. MOVE: SET:OK [STANDARD] : Print the pictures stored in the memory card in a index print varies depends on the right will appear and...
...1. If no picture is still displayed but not available. 65 NOW PRINTING EXIT:SH1 001/001 DPOF PRINT : This allows you connect the camera to the printer.(See p.63) 2. The USB menu must be printed. One picture is displayed. Press the shutter button while printing to ... printer.(See p.63) 2. DPOF PRINT NO YES 3. Connect the camera to directly print the files with the DPOF information Depending on one sheet of paper. 4. MOVE: SET:OK [STANDARD] : Print the pictures stored in the memory card in a index print varies depends on the right will appear and...

User Manual
Page 69
...RESET 3MIN ENGLISH MOVE : CHANGE : button and press the OK button. [RESET] : After using numbers that follow the previous sequence, even when a new memory card is used, or after formatting, or after formatting, deleting all pictures 5. Select a desired sub menu by pressing the UP/ DOWN button and press the ... MENU button. 2. Press the menu button twice and the menu will be set from 0001 even after deleting all or inserting a new memory card. [SERIES] : New files are subject to select the file naming format. Press the LEFT/ RIGHT button and select the [SETUP] menu tab. 3.
...RESET 3MIN ENGLISH MOVE : CHANGE : button and press the OK button. [RESET] : After using numbers that follow the previous sequence, even when a new memory card is used, or after formatting, or after formatting, deleting all pictures 5. Select a desired sub menu by pressing the UP/ DOWN button and press the ... MENU button. 2. Press the menu button twice and the menu will be set from 0001 even after deleting all or inserting a new memory card. [SERIES] : New files are subject to select the file naming format. Press the LEFT/ RIGHT button and select the [SETUP] menu tab. 3.


