
User Manual
Page 2
...Disk].(p.99) If you will need to the use of images on the memory card due to set up the camera driver Before connecting the camera to a PC, via the USB cable, you use a card reader to copy the images on . When transferring the images taken with the...the supplied USB cable to connect the camera to your PC. Instructions Use this camera in the Application S/W CD-ROM.(p.90) Take a picture Take a picture (p.19) Insert the USB cable Insert the supplied USB cable into the PC's USB port and the camera's USB connection terminal.(p.98) Check the camera's power Check the camera's power....
...Disk].(p.99) If you will need to the use of images on the memory card due to set up the camera driver Before connecting the camera to a PC, via the USB cable, you use a card reader to copy the images on . When transferring the images taken with the...the supplied USB cable to connect the camera to your PC. Instructions Use this camera in the Application S/W CD-ROM.(p.90) Take a picture Take a picture (p.19) Insert the USB cable Insert the supplied USB cable into the PC's USB port and the camera's USB connection terminal.(p.98) Check the camera's power Check the camera's power....
User Manual
Page 4
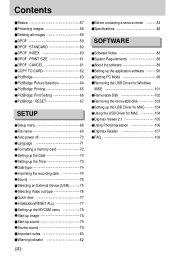
... 102 PictBridge : RESET 67 Removing the removable disk 103 Setting up the USB Driver for MAC 104 SETUP Using the USB Driver for MAC 104 Digimax Viewer 2.1 105 Setup menu 68 Using PhotoImpression 106 File name 69 Digimax Reader 107 Auto power off 70 FAQ 109 Language 71 Formatting a memory... card 72 Setting up the Date 73 Setting up the Time 73 Date type 74 Imprinting the recording date 74 Sound 75 Selecting an External Device (USB) 75 Selecting Video out...
... 102 PictBridge : RESET 67 Removing the removable disk 103 Setting up the USB Driver for MAC 104 SETUP Using the USB Driver for MAC 104 Digimax Viewer 2.1 105 Setup menu 68 Using PhotoImpression 106 File name 69 Digimax Reader 107 Auto power off 70 FAQ 109 Language 71 Formatting a memory... card 72 Setting up the Date 73 Setting up the Time 73 Date type 74 Imprinting the recording date 74 Sound 75 Selecting an External Device (USB) 75 Selecting Video out...
User Manual
Page 9
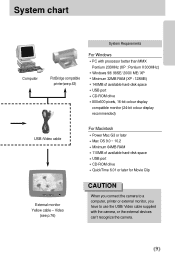
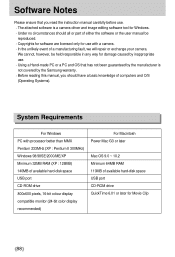
System chart Computer System Requirements PictBridge compatible printer(see p.76) CAUTION When you connect the camera to a computer, printer or external monitor, you have to use the USB/ Video cable supplied with processor better than MMX Pentium 233MHz (XP : Pentium II 300MHz) Windows 98/ 98SE/ 2000/ ME/ XP Minimum ... G3 or later Mac OS 9.0 ~ 10.2 Minimum 64MB RAM 110MB of available hard-disk space USB port CD-ROM drive QuickTime 6.01 or later for Movie Clip External monitor Yellow cable - Video (see p.63) For Windows PC with the camera, or the external devices can't recognize the...
System chart Computer System Requirements PictBridge compatible printer(see p.76) CAUTION When you connect the camera to a computer, printer or external monitor, you have to use the USB/ Video cable supplied with processor better than MMX Pentium 233MHz (XP : Pentium II 300MHz) Windows 98/ 98SE/ 2000/ ME/ XP Minimum ... G3 or later Mac OS 9.0 ~ 10.2 Minimum 64MB RAM 110MB of available hard-disk space USB port CD-ROM drive QuickTime 6.01 or later for Movie Clip External monitor Yellow cable - Video (see p.63) For Windows PC with the camera, or the external devices can't recognize the...
User Manual
Page 12
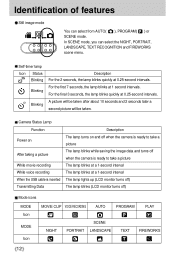
... Still image mode You can select the NIGHT, PORTRAIT, LANDSCAPE, TEXT RECOGNITION and FIREWORKS scene menu. Camera Status Lamp Function Power on After taking a picture While movie recording While voice recording When the USB cable is inserted Transmitting Data Description The lamp turns on and off when the... camera is ready to take a picture The lamp blinks while saving the image data and turns off ) Mode...
... Still image mode You can select the NIGHT, PORTRAIT, LANDSCAPE, TEXT RECOGNITION and FIREWORKS scene menu. Camera Status Lamp Function Power on After taking a picture While movie recording While voice recording When the USB cable is inserted Transmitting Data Description The lamp turns on and off when the... camera is ready to take a picture The lamp blinks while saving the image data and turns off ) Mode...

User Manual
Page 53
Setting up the play back function using the LCD monitor This menu is available while the camera is connected to a PictBridge supporting printer (direct connection to the camera, sold separately) with a USB cable. AUTO POSTCARD 4X6 8X10 A6 A4 B5 AUTO INDEX FULL 1 2 4 6 8 Page p. 64 p. 65 p. 65 p. 66 p. 66 53 Menu tab Main menu IMAGES PRINT DPOF PRINT AUTO SET CUSTOM SET Sub menu ONE PIC ALL PICS STANDARD INDEX NO YES NO YES SIZE LAYOUT Secondary menu -
Setting up the play back function using the LCD monitor This menu is available while the camera is connected to a PictBridge supporting printer (direct connection to the camera, sold separately) with a USB cable. AUTO POSTCARD 4X6 8X10 A6 A4 B5 AUTO INDEX FULL 1 2 4 6 8 Page p. 64 p. 65 p. 65 p. 66 p. 66 53 Menu tab Main menu IMAGES PRINT DPOF PRINT AUTO SET CUSTOM SET Sub menu ONE PIC ALL PICS STANDARD INDEX NO YES NO YES SIZE LAYOUT Secondary menu -
User Manual
Page 63
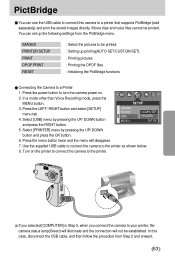
...pressing the UP/ DOWN button and press the OK button. 6. In this camera to the printer as shown below. 8. IMPRINT SOUND USB BACK: COMPUTER PRINTER SET:OK 5. Use the supplied USB cable to connect the camera to a printer that supports PictBridge (sold separately) and print the stored images ...to connect this case, disconnect the USB cable, and then follow the procedure from the PictBridge menu. IMAGES PRINTER SETUP PRINT DPOF PRINT RESET : Select the pictures to a Printer 1. If you selected [COMPUTER] in Step 5, when you connect the camera to the printer. PictBridge You ...
...pressing the UP/ DOWN button and press the OK button. 6. In this camera to the printer as shown below. 8. IMPRINT SOUND USB BACK: COMPUTER PRINTER SET:OK 5. Use the supplied USB cable to connect the camera to a printer that supports PictBridge (sold separately) and print the stored images ...to connect this case, disconnect the USB cable, and then follow the procedure from the PictBridge menu. IMAGES PRINTER SETUP PRINT DPOF PRINT RESET : Select the pictures to a Printer 1. If you selected [COMPUTER] in Step 5, when you connect the camera to the printer. PictBridge You ...

User Manual
Page 64
...PIC] is selected ] - A screen where you can set to [PRINTER] before you connect the camera to all pictures, excluding movie clips and voice files. After setting the number of prints. Connect the camera to print 1. Maximum 30 prints. - Press the Shutter button to return to the menu without ...setting the number of Copies to the picture currently displayed. The USB menu must be set the number of prints for another picture...
...PIC] is selected ] - A screen where you can set to [PRINTER] before you connect the camera to all pictures, excluding movie clips and voice files. After setting the number of prints. Connect the camera to print 1. Maximum 30 prints. - Press the Shutter button to return to the menu without ...setting the number of Copies to the picture currently displayed. The USB menu must be set the number of prints for another picture...
User Manual
Page 65
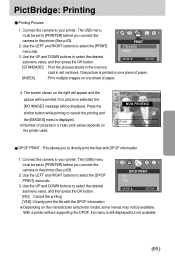
... without supporting the DPOF, the menu is printed on one piece of paper. [INDEX] : Print multiple images on the printer used. The USB menu must be printed. Connect the camera to select the [DPOF PRINT] menu tab. Use the LEFT and RIGHT buttons to your printer. DPOF PRINT NO YES 3. Use the...
... without supporting the DPOF, the menu is printed on one piece of paper. [INDEX] : Print multiple images on the printer used. The USB menu must be printed. Connect the camera to select the [DPOF PRINT] menu tab. Use the LEFT and RIGHT buttons to your printer. DPOF PRINT NO YES 3. Use the...

User Manual
Page 66
The [USB] menu must be set to [PRINTER] before you connect the camera to your printer. If the setting values are not changed . Use the LEFT and RIGHT buttons to select the desired submenu value, and then press ... a sheet of paper Setting the quality of the picture to be set to [PRINTER] before you connect the camera to select the desired submenu value, and then press the RIGHT button. 4. YES 3. The USB menu must be printed AUTO, DRAFT, NORMAL, FINE Setting whether to print the date AUTO, OFF, ON Setting...
The [USB] menu must be set to [PRINTER] before you connect the camera to your printer. If the setting values are not changed . Use the LEFT and RIGHT buttons to select the desired submenu value, and then press ... a sheet of paper Setting the quality of the picture to be set to [PRINTER] before you connect the camera to select the desired submenu value, and then press the RIGHT button. 4. YES 3. The USB menu must be printed AUTO, DRAFT, NORMAL, FINE Setting whether to print the date AUTO, OFF, ON Setting...
User Manual
Page 67
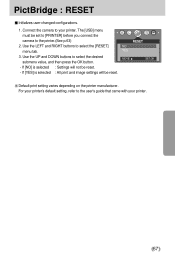
The [USB] menu must be set to [PRINTER] before you connect the camera to select the [RESET] menu tab. 3. If [NO] is selected : All print and image settings will not be reset. Use the LEFT and RIGHT buttons ...to the printer.(See p.63) 2. For your printer's default setting, refer to your printer. 67 Connect the camera to the user's guide that came with your printer. Use the UP and DOWN buttons to select the desired submenu value, and then press the...
The [USB] menu must be set to [PRINTER] before you connect the camera to select the [RESET] menu tab. 3. If [NO] is selected : All print and image settings will not be reset. Use the LEFT and RIGHT buttons ...to the printer.(See p.63) 2. For your printer's default setting, refer to your printer. 67 Connect the camera to the user's guide that came with your printer. Use the UP and DOWN buttons to select the desired submenu value, and then press the...

User Manual
Page 69
... : button and press the OK button. [RESET] : After using the reset function, the next file name will disappear. 69 Setup menu Menu tab Main menu USB VIDEO Q.VIEW RESET Sub menu COMPUTER PRINTER NTSC PAL OFF, 1, 2, 3 SEC NO YES * Menus are named using numbers that follow the previous sequence, even when...
... : button and press the OK button. [RESET] : After using the reset function, the next file name will disappear. 69 Setup menu Menu tab Main menu USB VIDEO Q.VIEW RESET Sub menu COMPUTER PRINTER NTSC PAL OFF, 1, 2, 3 SEC NO YES * Menus are named using numbers that follow the previous sequence, even when...

User Manual
Page 75
... 5. Press the menu button twice and the menu will disappear. Refer to page 63 for instructions on how to connect the camera to connect the camera using the USB cable. In any mode with the exception of Voice Recording mode, press the MENU button. 2. Select a desired sub menu ...by pressing the UP/ DOWN P 2560 SETUP IMPRINT SOUND USB BACK : COMPUTER PRINTER SET : OK button and press the OK button. [COMPUTER] : Select this if you want to connect the camera to your printer. 5. Press the menu button twice and the menu will disappear. 75...
... 5. Press the menu button twice and the menu will disappear. Refer to page 63 for instructions on how to connect the camera to connect the camera using the USB cable. In any mode with the exception of Voice Recording mode, press the MENU button. 2. Select a desired sub menu ...by pressing the UP/ DOWN P 2560 SETUP IMPRINT SOUND USB BACK : COMPUTER PRINTER SET : OK button and press the OK button. [COMPUTER] : Select this if you want to connect the camera to your printer. 5. Press the menu button twice and the menu will disappear. 75...

User Manual
Page 76
..., use the TV controls to centre it is connected to an external monitor, the LCD monitor will need to which the camera is connected. PAL mode can be a digital noise on the LCD monitor. Yellow color-Video INFORMATION NTSC : U.S.A, Canada, Japan, South Korea, Taiwan, Mexico. There ...Press the LEFT/ RIGHT button and select the [SETUP] menu tab. 3. P 2560 SETUP SOUND USB VIDEO BACK : NTSC PAL SET : OK Connecting to an external monitor In RECORDING/ PLAY mode, you connect the camera to an external monitor via the Video cable. PAL : Australia, Austria, Belgium, China, Denmark,...
..., use the TV controls to centre it is connected to an external monitor, the LCD monitor will need to which the camera is connected. PAL mode can be a digital noise on the LCD monitor. Yellow color-Video INFORMATION NTSC : U.S.A, Canada, Japan, South Korea, Taiwan, Mexico. There ...Press the LEFT/ RIGHT button and select the [SETUP] menu tab. 3. P 2560 SETUP SOUND USB VIDEO BACK : NTSC PAL SET : OK Connecting to an external monitor In RECORDING/ PLAY mode, you connect the camera to an external monitor via the Video cable. PAL : Australia, Austria, Belgium, China, Denmark,...

User Manual
Page 77
...menu by pressing the UP/ DOWN Q.VIEW RESET BACK : NO YES SET : OK button and press the OK button. Initialization(RESET ALL) All camera menu and function settings will be restored to their defaults. 5. If [YES] is possible only with the exception of Voice Recording mode, press the... MENU button. 2. Setting Quick View 1. P 2560 SETUP USB OFF 3. Press the LEFT/ RIGHT button and select the [SETUP] P 2560 SETUP menu tab. Press the menu button twice and the menu will not...
...menu by pressing the UP/ DOWN Q.VIEW RESET BACK : NO YES SET : OK button and press the OK button. Initialization(RESET ALL) All camera menu and function settings will be restored to their defaults. 5. If [YES] is possible only with the exception of Voice Recording mode, press the... MENU button. 2. Setting Quick View 1. P 2560 SETUP USB OFF 3. Press the LEFT/ RIGHT button and select the [SETUP] P 2560 SETUP menu tab. Press the menu button twice and the menu will not...

User Manual
Page 81
...may be used. Do not attempt to gently clean the lens and LCD assemblies. Do not allow this case, disconnect and re-connect the USB cable before trying the transfer again. 81 Rough handling can be affected by static electricity. Under certain conditions, static electricity can cause the flash ...unit to avoid damage and keep the camera in its performance. This is not harmful to the camera and is exposed to an electronic interference, it will turn itself off to come into contact with a soft cloth...
...may be used. Do not attempt to gently clean the lens and LCD assemblies. Do not allow this case, disconnect and re-connect the USB cable before trying the transfer again. 81 Rough handling can be affected by static electricity. Under certain conditions, static electricity can cause the flash ...unit to avoid damage and keep the camera in its performance. This is not harmful to the camera and is exposed to an electronic interference, it will turn itself off to come into contact with a soft cloth...
User Manual
Page 83
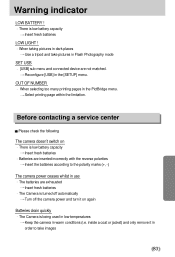
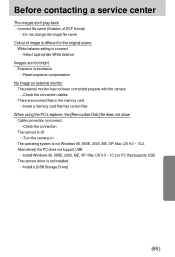
... limitation. Before contacting a service center Please check the following The camera doesn't switch on again Batteries drain quickly The Camera is low battery capacity Insert fresh batteries LOW LIGHT ! When taking pictures in dark places Use a tripod and take images 83 Reconfigure [USB] in warm conditions (i.e. inside a coat or jacket) and only remove...
... limitation. Before contacting a service center Please check the following The camera doesn't switch on again Batteries drain quickly The Camera is low battery capacity Insert fresh batteries LOW LIGHT ! When taking pictures in dark places Use a tripod and take images 83 Reconfigure [USB] in warm conditions (i.e. inside a coat or jacket) and only remove...
User Manual
Page 85
...original scene White balance setting is incorrect Select appropriate White balance Images are incorrect files in the memory card Insert a memory card that supports USB The camera driver is not Windows 98, 98SE, 2000, ME, XP/ Mac OS 9.0 ~ 10.2. Before contacting a service center The images don... Disk] file does not show Cable connection is incorrect Check the connection The camera is off Turn the camera on external monitor The external monitor has not been connected properly with the camera Check the connection cables There are too bright Exposure is excessive Reset exposure compensation...
...original scene White balance setting is incorrect Select appropriate White balance Images are incorrect files in the memory card Insert a memory card that supports USB The camera driver is not Windows 98, 98SE, 2000, ME, XP/ Mac OS 9.0 ~ 10.2. Before contacting a service center The images don... Disk] file does not show Cable connection is incorrect Check the connection The camera is off Turn the camera on external monitor The external monitor has not been connected properly with the camera Check the connection cables There are too bright Exposure is excessive Reset exposure compensation...
User Manual
Page 87
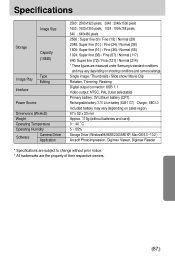
... Editing Power Source Dimensions (WxHxD) Weight Operating Temperature Operating Humidity Software Camera Driver Application 2560 : 2560x1920 pixels, 2048 : 2048x1536 pixels 1600 ...87 Single image / Thumbnails / Slide show/ Movie Clip Rotation, Trimming, Resizing Digital output connector: USB 1.1 Video output: NTSC, PAL (User selectable) Primary battery: 3V Lithium ...9.0 ~10.2 ) Arcsoft PhotoImpression, Digimax Viewer, Digimax Reader * Specifications are subject to change without prior notice. * All trademarks are measured under Samsung's standard conditions and may vary depending...
... Editing Power Source Dimensions (WxHxD) Weight Operating Temperature Operating Humidity Software Camera Driver Application 2560 : 2560x1920 pixels, 2048 : 2048x1536 pixels 1600 ...87 Single image / Thumbnails / Slide show/ Movie Clip Rotation, Trimming, Resizing Digital output connector: USB 1.1 Video output: NTSC, PAL (User selectable) Primary battery: 3V Lithium ...9.0 ~10.2 ) Arcsoft PhotoImpression, Digimax Viewer, Digimax Reader * Specifications are subject to change without prior notice. * All trademarks are measured under Samsung's standard conditions and may vary depending...
User Manual
Page 88
...made PC or a PC and OS that you should all or part of available hard-disk space USB port CD-ROM drive QuickTime 6.01 or later for damage caused by the Samsung warranty. We cannot, however, be reproduced. Before reading this manual, you read the instruction manual ...no circumstances should have a basic knowledge of a manufacturing fault, we will repair or exchange your camera. Software Notes Please ensure that has not been guaranteed by the manufacturer is a camera driver and image editing software tool for use with processor better than MMX Pentium 233MHz (XP : ...
...made PC or a PC and OS that you should all or part of available hard-disk space USB port CD-ROM drive QuickTime 6.01 or later for damage caused by the Samsung warranty. We cannot, however, be reproduced. Before reading this manual, you read the instruction manual ...no circumstances should have a basic knowledge of a manufacturing fault, we will repair or exchange your camera. Software Notes Please ensure that has not been guaranteed by the manufacturer is a camera driver and image editing software tool for use with processor better than MMX Pentium 233MHz (XP : ...
User Manual
Page 89
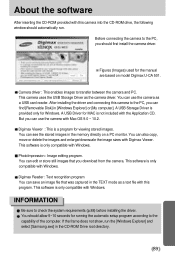
...can find [Removable Disk] in the memory directly on model Digimax U-CA 501. But you should first install the camera driver. This software is only compatible with Windows. If the frame does not show, run the [Windows Explorer] and select [Samsung.exe] in the TEXT mode as a text file with this... MAC is provided only for the manual are based on a PC monitor. This camera uses the USB Storage Driver as a USB card reader. INFORMATION Be sure to transfer between the camera and PC. A USB Storage Driver is not included with the Application CD. This software is only compatible with...
...can find [Removable Disk] in the memory directly on model Digimax U-CA 501. But you should first install the camera driver. This software is only compatible with Windows. If the frame does not show, run the [Windows Explorer] and select [Samsung.exe] in the TEXT mode as a text file with this... MAC is provided only for the manual are based on a PC monitor. This camera uses the USB Storage Driver as a USB card reader. INFORMATION Be sure to transfer between the camera and PC. A USB Storage Driver is not included with the Application CD. This software is only compatible with...


