

Open Source Guide (ENGLISH)
Page 1
....) These requirements apply to the modified work based on the Program) on a medium customarily used to control compilation and installation of the executable. And you must be distributed under the scope of this License. 3. Also, for such interactive use in the most software are designed to take away your freedom to share and change free software--to accept this License. 7. We...
....) These requirements apply to the modified work based on the Program) on a medium customarily used to control compilation and installation of the executable. And you must be distributed under the scope of this License. 3. Also, for such interactive use in the most software are designed to take away your freedom to share and change free software--to accept this License. 7. We...

Open Source Guide (ENGLISH)
Page 2
... a new library, and you want it free software that everyone can do so by permitting redistribution... we recommend making it to be of warranty; 16. IN NO EVENT UNLESS REQUIRED...OPERATE WITH ANY OTHER SOFTWARE), EVEN IF SUCH HOLDER OR OTHER PARTY HAS BEEN ADVISED OF THE POSSIBILITY OF SUCH DAMAGES. and each source... file to where the full notice is found. It is safest to attach them to the start of each file should have at least the "copyright" line and a pointer to most effectively convey the exclusion of the greatest possible use to the library. You can redistribute and change...
... a new library, and you want it free software that everyone can do so by permitting redistribution... we recommend making it to be of warranty; 16. IN NO EVENT UNLESS REQUIRED...OPERATE WITH ANY OTHER SOFTWARE), EVEN IF SUCH HOLDER OR OTHER PARTY HAS BEEN ADVISED OF THE POSSIBILITY OF SUCH DAMAGES. and each source... file to where the full notice is found. It is safest to attach them to the start of each file should have at least the "copyright" line and a pointer to most effectively convey the exclusion of the greatest possible use to the library. You can redistribute and change...
User Manual (user Manual) (ver.1.0) (English)
Page 2
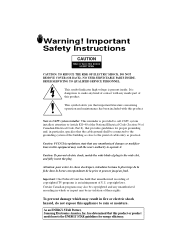
... the wide slot, and fully insert the plug. Note to CATV system installer: This reminder is present inside part of this appliance to make any unauthorized recording in whole or in fire or electric shock hazard, do not expose this product. NO USER SERVICEABLE PARTS INSIDE. Warning! Important Safety Instructions CAUTION RISK OF ELECTRIC SHOCK DO NOT...
... the wide slot, and fully insert the plug. Note to CATV system installer: This reminder is present inside part of this appliance to make any unauthorized recording in whole or in fire or electric shock hazard, do not expose this product. NO USER SERVICEABLE PARTS INSIDE. Warning! Important Safety Instructions CAUTION RISK OF ELECTRIC SHOCK DO NOT...
User Manual (user Manual) (ver.1.0) (English)
Page 4
... been damaged - This television receiver provides display of television closed captioning in accordance with such lines can result in fire or electric shock. • Do not insert anything through the openings in wire to qualified service personnel under the following the operating instructions - Power supply cords should not be sure the service technician uses replacement parts specified by following conditions: - An outside antenna system should be extremely...
... been damaged - This television receiver provides display of television closed captioning in accordance with such lines can result in fire or electric shock. • Do not insert anything through the openings in wire to qualified service personnel under the following the operating instructions - Power supply cords should not be sure the service technician uses replacement parts specified by following conditions: - An outside antenna system should be extremely...
User Manual (user Manual) (ver.1.0) (English)
Page 5
... a DVD Player (480i/480p 2.7 Connecting a Digital TV Set-Top Box (480p/1080i 2.8 Connecting to Y,Pb,Pr 2.8 Connecting to DVI (Digital Visual Interface 2.9 Connecting a Camcorder 2.10 Installing Batteries in the Remote Control 2.11 Chapter 3: Operation 3.1 Turning the TV On and Off 3.1 Plug & Play Feature 3.1 Viewing the Menus and On-Screen Displays 3.3 Viewing the Menus 3.3 Viewing the Display 3.3 Selecting a Menu Language 3.4 Memorizing the Channels 3.5 Selecting the Video Signal-source 3.5 Storing Channels in Memory (Automatic Method 3.6 Adding and Erasing Channels (Manual...
... a DVD Player (480i/480p 2.7 Connecting a Digital TV Set-Top Box (480p/1080i 2.8 Connecting to Y,Pb,Pr 2.8 Connecting to DVI (Digital Visual Interface 2.9 Connecting a Camcorder 2.10 Installing Batteries in the Remote Control 2.11 Chapter 3: Operation 3.1 Turning the TV On and Off 3.1 Plug & Play Feature 3.1 Viewing the Menus and On-Screen Displays 3.3 Viewing the Menus 3.3 Viewing the Display 3.3 Selecting a Menu Language 3.4 Memorizing the Channels 3.5 Selecting the Video Signal-source 3.5 Storing Channels in Memory (Automatic Method 3.6 Adding and Erasing Channels (Manual...
User Manual (user Manual) (ver.1.0) (English)
Page 6
... (or DVD) . 4.1 Setting Up Your Remote Control to Operate Your Cable Box . . . . 4.3 Fine Tuning Channels 4.4 LNA (Low Noise Amplifier 4.5 Tilt 4.6 DNIeTM (Digital Natural Image engine 4.7 Digital Noise Reduction 4.8 Changing the Screen Size 4.9 Changing the Color Tone 4.10 Using the R.Surf Feature 4.11 Freezing the Picture 4.11 Setting the On/Off Timer 4.12 Setting the Sleep Timer 4.13 Choosing a Multi-Channel Sound (MTS) Soundtrack 4.14 Extra sound settings (Turbo Sound, Surround, Auto Volume, Melody, BBE or Woofer 4.15 Viewing Closed Captions 4.17 Viewing Picture-in-Picture...
... (or DVD) . 4.1 Setting Up Your Remote Control to Operate Your Cable Box . . . . 4.3 Fine Tuning Channels 4.4 LNA (Low Noise Amplifier 4.5 Tilt 4.6 DNIeTM (Digital Natural Image engine 4.7 Digital Noise Reduction 4.8 Changing the Screen Size 4.9 Changing the Color Tone 4.10 Using the R.Surf Feature 4.11 Freezing the Picture 4.11 Setting the On/Off Timer 4.12 Setting the Sleep Timer 4.13 Choosing a Multi-Channel Sound (MTS) Soundtrack 4.14 Extra sound settings (Turbo Sound, Surround, Auto Volume, Melody, BBE or Woofer 4.15 Viewing Closed Captions 4.17 Viewing Picture-in-Picture...
User Manual (user Manual) (ver.1.0) (English)
Page 7
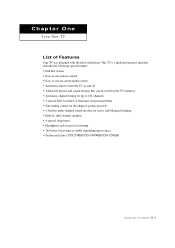
... features: • Full Flat Screen • Easy-to-use remote control • Easy-to-use on-screen menu system • Automatic timer to turn the TV on and off • Adjustable picture and sound settings that can be stored in the TV's memory • Automatic channel tuning for up to 181 channels • A special filter to reduce or eliminate reception problems • Fine tuning control for the sharpest...
... features: • Full Flat Screen • Easy-to-use remote control • Easy-to-use on-screen menu system • Automatic timer to turn the TV on and off • Adjustable picture and sound settings that can be stored in the TV's memory • Automatic channel tuning for up to 181 channels • A special filter to reduce or eliminate reception problems • Fine tuning control for the sharpest...

User Manual (user Manual) (ver.1.0) (English)
Page 9
... on-screen menu. ˆ STANDBY indicator Lights up when you turn the TV on the TV. Ø POWER Press to turn the power off . YOUR NEW TV Œ TV/VIDEO Press to change between viewing TV programs and signals from an S-VHS VCR or DVD player. ¨ HEADPHONE jack Connect a set of your TV's features. ˇ VOL - , + Press to change channels. Also used only occasionally, such as a camcorder or video game. (For...
... on-screen menu. ˆ STANDBY indicator Lights up when you turn the TV on the TV. Ø POWER Press to turn the power off . YOUR NEW TV Œ TV/VIDEO Press to change between viewing TV programs and signals from an S-VHS VCR or DVD player. ¨ HEADPHONE jack Connect a set of your TV's features. ˇ VOL - , + Press to change channels. Also used only occasionally, such as a camcorder or video game. (For...
User Manual (user Manual) (ver.1.0) (English)
Page 10
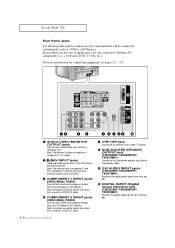
... cable). ' DVI AUDIO INPUT jacks (TXN3298HF/TXN3098WHF/ TXN2798HF) Receives the digital audio signals from a set top box. ˝ DIGITAL INPUT (Digital Visual Interface) jack (TXN3298HF/TXN3098WHF/ TXN2798HF) Receives the digital video signals from VCRs, DVD players and similar devices. Note: Only black and white signals are exclusive relation with each other. ˇ COMPONENT 1 INPUT jacks (480i/480p/1080i) Connect to the audio and component output jacks of a DVD player or Set-Top Box. Because there are output from a monitor in Component 1 or 2 modes. ´,¨,ˆAV INPUT...
... cable). ' DVI AUDIO INPUT jacks (TXN3298HF/TXN3098WHF/ TXN2798HF) Receives the digital audio signals from a set top box. ˝ DIGITAL INPUT (Digital Visual Interface) jack (TXN3298HF/TXN3098WHF/ TXN2798HF) Receives the digital video signals from VCRs, DVD players and similar devices. Note: Only black and white signals are exclusive relation with each other. ˇ COMPONENT 1 INPUT jacks (480i/480p/1080i) Connect to the audio and component output jacks of a DVD player or Set-Top Box. Because there are output from a monitor in Component 1 or 2 modes. ´,¨,ˆAV INPUT...

User Manual (user Manual) (ver.1.0) (English)
Page 11
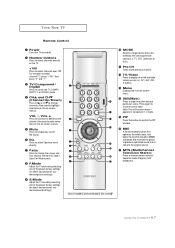
... to be controlled by the Samsung remote control (i.e., TV, VCR, Cable box, or DVD). SET Use this button when you are Normal, Zoom1, Zoom2 or Wide screen. ˆ RESET If your VCR and cable box. Press again to add or erase channels in Component1, 2 mode. 1.5 CHAPTER ONE: YOUR NEW TV When using the remote control again. Ø MTS (Multichannel Television Stereo) Press to choose stereo, mono or Separate Audio Program (SAP...
... to be controlled by the Samsung remote control (i.e., TV, VCR, Cable box, or DVD). SET Use this button when you are Normal, Zoom1, Zoom2 or Wide screen. ˆ RESET If your VCR and cable box. Press again to add or erase channels in Component1, 2 mode. 1.5 CHAPTER ONE: YOUR NEW TV When using the remote control again. Ø MTS (Multichannel Television Stereo) Press to choose stereo, mono or Separate Audio Program (SAP...
User Manual (user Manual) (ver.1.0) (English)
Page 13
... picture settings). ' S.Mode Adjust the TV sound by the Samsung remote control (i.e., TV, VCR, Cable box, or DVD). Ô Pre-CH Tunes to the previous channel. TV/Video Press to select channels directly on -screen menus). Press to select Equalizer menu directly. ∏ P.size Press to resume normal video. For example, to select channel 121, press "+100," then press "2" and "1." ˇ TV/Component/ Digital Press to switch the TV, COMPONENT1, 2, or DIGITAL mode...
... picture settings). ' S.Mode Adjust the TV sound by the Samsung remote control (i.e., TV, VCR, Cable box, or DVD). Ô Pre-CH Tunes to the previous channel. TV/Video Press to select channels directly on -screen menus). Press to select Equalizer menu directly. ∏ P.size Press to resume normal video. For example, to select channel 121, press "+100," then press "2" and "1." ˇ TV/Component/ Digital Press to switch the TV, COMPONENT1, 2, or DIGITAL mode...
User Manual (user Manual) (ver.1.0) (English)
Page 14
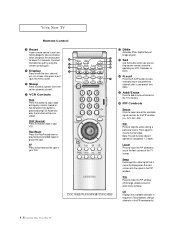
... pause the tape. Locate Press to move the PIP window to resume normal video. CH Displays the available channels in sequence (These buttons change channels in Component 1, 2 mode. Also press to exit (quit) the menu system. ¿ Sleep Press to select a preset time interval for automatic shutoff. ¸ VCR Controls Stop Press this button when you are setting up your remote control to operate your VCR, Cable box, or DVD). ± R.surf...
... pause the tape. Locate Press to move the PIP window to resume normal video. CH Displays the available channels in sequence (These buttons change channels in Component 1, 2 mode. Also press to exit (quit) the menu system. ¿ Sleep Press to select a preset time interval for automatic shutoff. ¸ VCR Controls Stop Press this button when you are setting up your remote control to operate your VCR, Cable box, or DVD). ± R.surf...
User Manual (user Manual) (ver.1.0) (English)
Page 17
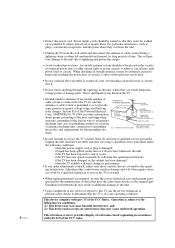
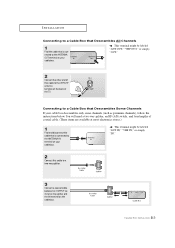
... coaxial cable. (These items are available at most electronics stores.) 1 Find and disconnect the cable that is connected to the ANTENNA IN terminal on your cable box. INSTALLATION Connecting to a Cable Box that Descrambles All Channels 1 Find the cable that is connected to the ANTENNA OUT terminal on your cable box. Connecting to a Cable Box that Descrambles Some Channels If your cable box descrambles only some channels (such as premium channels), follow the instructions below...
... coaxial cable. (These items are available at most electronics stores.) 1 Find and disconnect the cable that is connected to the ANTENNA IN terminal on your cable box. INSTALLATION Connecting to a Cable Box that Descrambles All Channels 1 Find the cable that is connected to the ANTENNA OUT terminal on your cable box. Connecting to a Cable Box that Descrambles Some Channels If your cable box descrambles only some channels (such as premium channels), follow the instructions below...

User Manual (user Manual) (ver.1.0) (English)
Page 18
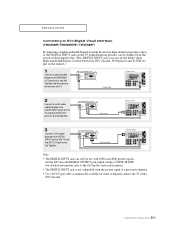
... view scrambled channels. (When you set the A/B switch to "B," you 've made this connection, set the A/B switch to the cable box's output channel, which is usually channel 3 or 4.) 2.4 CHAPTER TWO: INSTALLATION INSTALLATION 4 Connect a coaxial cable between the ANTENNA OUT terminal on the cable box and the B-IN terminal on the A/B switch. 5 Connect another cable between the other OUT terminal on the splitter and the A-IN terminal on the RF (A/B) switch. 6 Connect the last coaxial cable...
... view scrambled channels. (When you set the A/B switch to "B," you 've made this connection, set the A/B switch to the cable box's output channel, which is usually channel 3 or 4.) 2.4 CHAPTER TWO: INSTALLATION INSTALLATION 4 Connect a coaxial cable between the ANTENNA OUT terminal on the cable box and the B-IN terminal on the A/B switch. 5 Connect another cable between the other OUT terminal on the splitter and the A-IN terminal on the RF (A/B) switch. 6 Connect the last coaxial cable...

User Manual (user Manual) (ver.1.0) (English)
Page 19
... TV. Skip step 1 if you have already connected your VCR tape. 2.5 CHAPTER TWO: INSTALLATION Follow the instructions in "Viewing a VCR or Camcorder Tape" to view your TV to an antenna or a cable TV system (according to the left and right audio input jacks of the TV. If you must connect two cables. 5 Connect a video cable between the VIDEO OUT jack on the VCR and the...
... TV. Skip step 1 if you have already connected your VCR tape. 2.5 CHAPTER TWO: INSTALLATION Follow the instructions in "Viewing a VCR or Camcorder Tape" to view your TV to an antenna or a cable TV system (according to the left and right audio input jacks of the TV. If you must connect two cables. 5 Connect a video cable between the VIDEO OUT jack on the VCR and the...
User Manual (user Manual) (ver.1.0) (English)
Page 23
... compatible with the picture signal of audio cables between the AUDIO INPUT jacks on the TV and the AUDIO OUT jacks on the Set Top Box. 3 Connect a DVI cable between the DIGITAL INPUT jack on the TV and the DVI OUT jack on the screen in order to digitally connect the TV with a DTV decoder. 2.9 CHAPTER TWO: INSTALLATION Set the DTV decoder DIGITAL OUTPUT jack output setting to 1080I OR 480P. INSTALLATION Connecting to DVI (Digital...
... compatible with the picture signal of audio cables between the AUDIO INPUT jacks on the TV and the AUDIO OUT jacks on the Set Top Box. 3 Connect a DVI cable between the DIGITAL INPUT jack on the TV and the DVI OUT jack on the screen in order to digitally connect the TV with a DTV decoder. 2.9 CHAPTER TWO: INSTALLATION Set the DTV decoder DIGITAL OUTPUT jack output setting to 1080I OR 480P. INSTALLATION Connecting to DVI (Digital...
User Manual (user Manual) (ver.1.0) (English)
Page 26
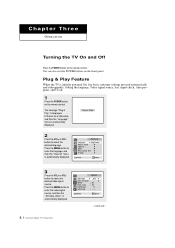
... and then the "Language" menu is automatically displayed. 2 Press the VOL+ or VOLbutton to enter the video signal source, and then the "Ant Input check" is initially powered On, five basic customer settings proceed automatically and subsequently: Setting the language, Video signal source, Ant. C h a pOtPEeRArTIOTN h r e e OPERATION Turning the TV On and Off Press the POWER button on the front panel. input check, Auto program, and Clock. 1 Press the POWER button on the remote control.
... and then the "Language" menu is automatically displayed. 2 Press the VOL+ or VOLbutton to enter the video signal source, and then the "Ant Input check" is initially powered On, five basic customer settings proceed automatically and subsequently: Setting the language, Video signal source, Ant. C h a pOtPEeRArTIOTN h r e e OPERATION Turning the TV On and Off Press the POWER button on the front panel. input check, Auto program, and Clock. 1 Press the POWER button on the remote control.
User Manual (user Manual) (ver.1.0) (English)
Page 28
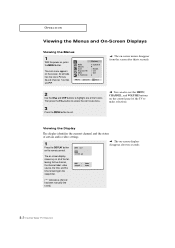
... On-Screen Displays Viewing the Menus 1 With the power on the sleep timer. ("*" indicates a channel has been manually fine tuned.) 3.3 CHAPTER THREE: TV OPERATION Then press the VOL+ button to access the icon's sub-menu. 3 Press the MENU button to make selections. w You can also use the MENU, CHANNEL, and VOLUME buttons on the remote control. Viewing the Display The display identifies the current channel and the status of certain audio-video settings. 1 Press the DISPLAY button on the control panel of...
... On-Screen Displays Viewing the Menus 1 With the power on the sleep timer. ("*" indicates a channel has been manually fine tuned.) 3.3 CHAPTER THREE: TV OPERATION Then press the VOL+ button to access the icon's sub-menu. 3 Press the MENU button to make selections. w You can also use the MENU, CHANNEL, and VOLUME buttons on the remote control. Viewing the Display The display identifies the current channel and the status of certain audio-video settings. 1 Press the DISPLAY button on the control panel of...
User Manual (user Manual) (ver.1.0) (English)
Page 43
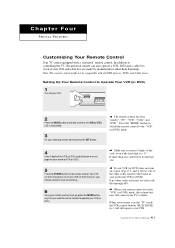
... switch the remote control to controlling the TV, the universal remote can also operate a VCR, DVD and a cable box (even if your remote control is set correctly. 6 Once your VCR and cable box are made by manufacturers other codes are listed, try one . When your remote is now set up, press the MODE button any time you enter 3 digits of the VCR (or DVD) code listed on , your remote control is in the "VCR" (or DVD) mode, the volume buttons still control your Samsung remote control...
... switch the remote control to controlling the TV, the universal remote can also operate a VCR, DVD and a cable box (even if your remote control is set correctly. 6 Once your VCR and cable box are made by manufacturers other codes are listed, try one . When your remote is now set up, press the MODE button any time you enter 3 digits of the VCR (or DVD) code listed on , your remote control is in the "VCR" (or DVD) mode, the volume buttons still control your Samsung remote control...
User Manual (user Manual) (ver.1.0) (English)
Page 45
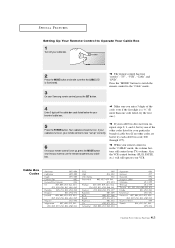
... control buttons (PLAY, PAUSE, etc.) will still operate your TV's volume. w The remote control has four "modes": "TV", "VCR", "Cable" and "DVD". SPECIAL FEATURES Setting Up Your Remote Control to the "Cable" mode. 4 Enter 3 digits of the cable box code listed below for your particular brand of cable box (If no other codes are listed, try one .) 5 Press the POWER button. If your cable box turns on, your remote control is now "set up" correctly. 6 Once your remote control is set up, press the MODE button any time...
... control buttons (PLAY, PAUSE, etc.) will still operate your TV's volume. w The remote control has four "modes": "TV", "VCR", "Cable" and "DVD". SPECIAL FEATURES Setting Up Your Remote Control to the "Cable" mode. 4 Enter 3 digits of the cable box code listed below for your particular brand of cable box (If no other codes are listed, try one .) 5 Press the POWER button. If your cable box turns on, your remote control is now "set up" correctly. 6 Once your remote control is set up, press the MODE button any time...


